Creating a Custom Certificate Template
HYPR Passwordless: Installation
This document describes how to create a custom Active Directory certificate template on a Windows server and then configure the HYPR Passwordless client application to use the certificate when a user registers or authenticates on a Windows or macOS workstation. There are three main steps in this process:
- Create a Certificate Template on the Server
- Issue the Certificate Template on the Server
- Configure HYPR to Use the Certificate on the Workstation
Before you begin, verify that:
- Active Directory Certificate Services are deployed within the domain
- Your account on the Windows server has privileges to modify the Certificate Authority settings
- The HYPR Passwordless client application is already installed on the workstation
OS-specific Templates
The custom certificate template requirements vary slightly between Windows and Mac, so if you have both types of workstations in your environment you'll need to create two templates. The instructions below indicate where there are differences.
Create a Certificate Template on the Server
- Login to the Windows server that performs the Certificate Authority role, either directly or via a remote desktop client.
- Open the Microsoft Management Console (MMC).
- In the console, select File>Add/Remove Snap-in...

- Use the Add > button to add Certificate Templates to the list of selected snap-ins then click OK to save the change.

- (FOR WINDOWS) Open the Certificate Templates snap-in, right-click on the User template, and select Duplicate Template.

(FOR MAC) Open the Certificate Templates snap-in, right-click on the Smartcard User template, and select Duplicate Template.

- In the Properties of New Template window, go to the General tab and change the following settings:
| Parameter | Value |
|---|---|
| Template display name | Any name that will let you identify this as a HYPR template |
| Template name | By default, MMC will use the Template display name without any spaces. In order to match the preconfigured template name used by the HYPR Passwordless client installer, we strongly suggest you use the following:hyprwin (for Windows)hyprmac (for macOS).If you prefer to use a different template name, be sure to make a note of the value since you’ll need to manually change the HYPR Passwordless client configuration settings on each workstation. |
| Publish certificate in Active Directory | You can leave this either checked or unchecked |

Non-exportable Key Creation
If you are creating a template for non-exportable security keys, stop here and continue below.
- (WINDOWS ONLY) Go to the Request Handling tab and change the following settings:
| Parameter | Value |
|---|---|
| Purpose | Signature and encryption |
| Allow private key to be exported | Checked |
| Prompt the user during enrollment | Selected |

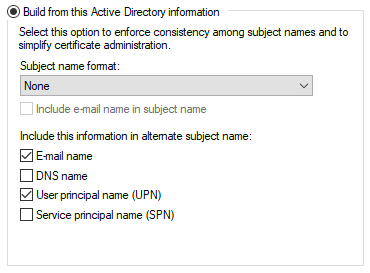
- (WINDOWS ONLY) Go to the Subject Name tab and change the following settings:
| Parameter | Value |
|---|---|
| Build from this Active Directory information | Checked |
| Subject name format | None |
| User principal name (UPN) | Checked |

Additional Information
When configuring Single Registration: Workstation-to-Web, the Email name must also be checked for the feature to function properly.
- (WINDOWS ONLY) Go to the Extensions tab and edit Application Policies so that the only listed policies are Client Authentication and Smart Card Logon. (Remove any default policies as necessary.)

- (WINDOWS ONLY) Go to the Cryptography tab and verify the Minimum key size. HYPR supports a minimum of 1024-bit encryption but recommends you use 2048-bit RSA private keys.

- Select OK to close the Properties of New Template window and create the template.
Creating a Certificate Template for Non-exportable Private Keys
Start by completing Create a Certificate Template on the Server Steps 1-6; then return here to complete the process.
- (WINDOWS ONLY) Go to the Request Handling tab and change the following settings:
| Parameter | Value |
|---|---|
| Purpose | Signature and smartcard logon |
| Allow private key to be exported | Unchecked |
| Prompt the user during enrollment | Selected |
- Go to the Subject Name tab and change the following settings:
| Parameter | Value |
|---|---|
| Build from this Active Directory information | Checked |
| Subject name format | None |
| User principal name (UPN) | Checked |
- (WINDOWS ONLY) Go to the Extensions tab and edit Application Policies so that the only listed policies are Client Authentication and Smart Card Logon. (Remove any default policies as necessary.)
- (WINDOWS ONLY) On the Cryptography tab:
- Minimum key size: HYPR supports a minimum of 1024-bit encryption but recommends you use 2048-bit RSA private keys
- Provider Category: Select Key Storage Provider
- Choose which cryptographic providers can be used for requests: Select Requests must use one of the following providers
- Providers: Check Microsoft Smart Card Key Storage Provider
- Select OK to close the Properties of New Template window and create the template.
Issue the Certificate Template on the Server
- On the Windows server, open the Certification Authority console.
- In the left navigation pane, right-click on the machine name and select Properties.

- Go to the Policy Module tab, click the Properties... button, and make sure the "Follow the settings in the certificate template, if applicable. Otherwise, automatically issue the certificate" option is checked for Request Handling.

- Back in the left navigation pane, right-click on Certificate Templates and select New > Certificate Template to Issue.

- In the Enable Certificate Templates list, locate the HYPR certificate template you created above. Highlight the template name and click OK to publish it.

Configure HYPR to Use the Certificate on the Workstation
To configure HYPR to use the new certificate, you must modify the installation settings on each workstation where the HYPR Passwordless client application is installed.
Windows Workstations
On a Windows machine, you need to modify HYPR’s Certificate Template registry settings.
Active Directory Note
If you named the template
hyprwinas suggested above and your client installerhypr.jsonfile was preconfigured by HYPR to use Active Directory, you shouldn’t have to make any changes to the registry settings.
Use Regedit to set the registry value:
- Open Regedit on the workstation where the HYPR Passwordless client is installed.
Important: Before making any changes, back up the registry for safety.
- Locate the following registry key:
HKEY_LOCAL_MACHINE\SOFTWARE\HYPR Workforce Access
- Edit the Certificate Template value and change the data field to the name of the HYPR certificate template you created. Make sure you use the template name (for example, “hyprwin” without spaces), not the template display name (“HYPR Windows”).

- Close Regedit and restart the computer.
- Open the HYPR Passwordless client and register a new device to confirm the registration is using the new certificate template.
Non-exportable Private Keys
When this feature is enabled, HYPR Passwordless client will use the
certTemplatevalue when requesting a certificate for a mobile enrollment, and thesecurityKeyCertTemplatewhen requesting a certificate for a security key. If a value is not specified (or is empty), the same template will be used for mobile devices and security keys.Installations using this parameter will generate a Certificate Template (Security Keys) registry value in the key,
HKLM:\SOFTWARE\HYPR Workforce Access. Likewise, if this value remains empty, HYPR will default to using the mobile certificate (ex: hyprwin) template.
macOS Workstations
On a macOS machine, you need to specify the certificate template name in the HyprOneService.plist file.
Active Directory Note
If you named the template
hyprmacas suggested above and your client installerhypr.jsonfile was preconfigured by HYPR to use Active Directory, you shouldn’t have to make any changes toHyprOneService.plist.
- Open
/Library/HYPR/HyprOneService.plistfor editing. The file is protected from edits by non-admin users, so you’ll need to usesudo.- Editing with vi:
sudo vi /Library/HYPR/HyprOneService.plist - Editing with nano:
sudo nano /Library/HYPR/HyprOneService.plist
- Editing with vi:
- Set the
CertificateTemplatekey value to the name of your certificate template. Make sure you use the template name (for example, “hyprmac”), not the template display name (“HYPR macOS”).
\<?xml version="1.0" encoding="UTF-8"?\>
\<!DOCTYPE plist PUBLIC "-//Apple//DTD PLIST 1.0//EN" "http://www.apple.com/DTDs/PropertyList-1.0.dtd"\>
\<plist version="1.0"\>
\<dict\>
  \<key\>ApiToken\</key\>
  \<string\>\</string\>
  \<key\>ApiTokenId\</key\>
  \<string\>\</string\>
  \<key\>ApiVersion\</key\>
  \<integer\>4\</integer\>
  \<key\>ApplicationId\</key\>
  \<string\>windowslogin\</string\>
  \<key\>CertificateAuthEnabled\</key\>
  \<true/\>
  \<key\>CertificateTemplate\</key\>
  \<string\>hyprmac\</string\>
  \<key\>Devices\</key\>
  ...
- Make sure the
CertificateAuthEnabledkey value is set totrue. (Normally this value will already be set correctly unless you’re modifying an existing non-domain-joined installation to use Active Directory.) - Save the changes and restart the computer.
- Open the HYPR Passwordless dlient and register a new device to confirm the registration is using the new certificate template.
Updated 5 months ago