Enable Push Notification for iOS
HYPR SDK for iOS: Web Authentication
Follow these integration steps to facilitate out-of-band (OOB) Authentication with Firebase push notifications for your iOS project.
Do This First
This process assumes that you have an existing Firebase project and that you have connected it to Control Center via Configuring Push Notifications via FireBase.
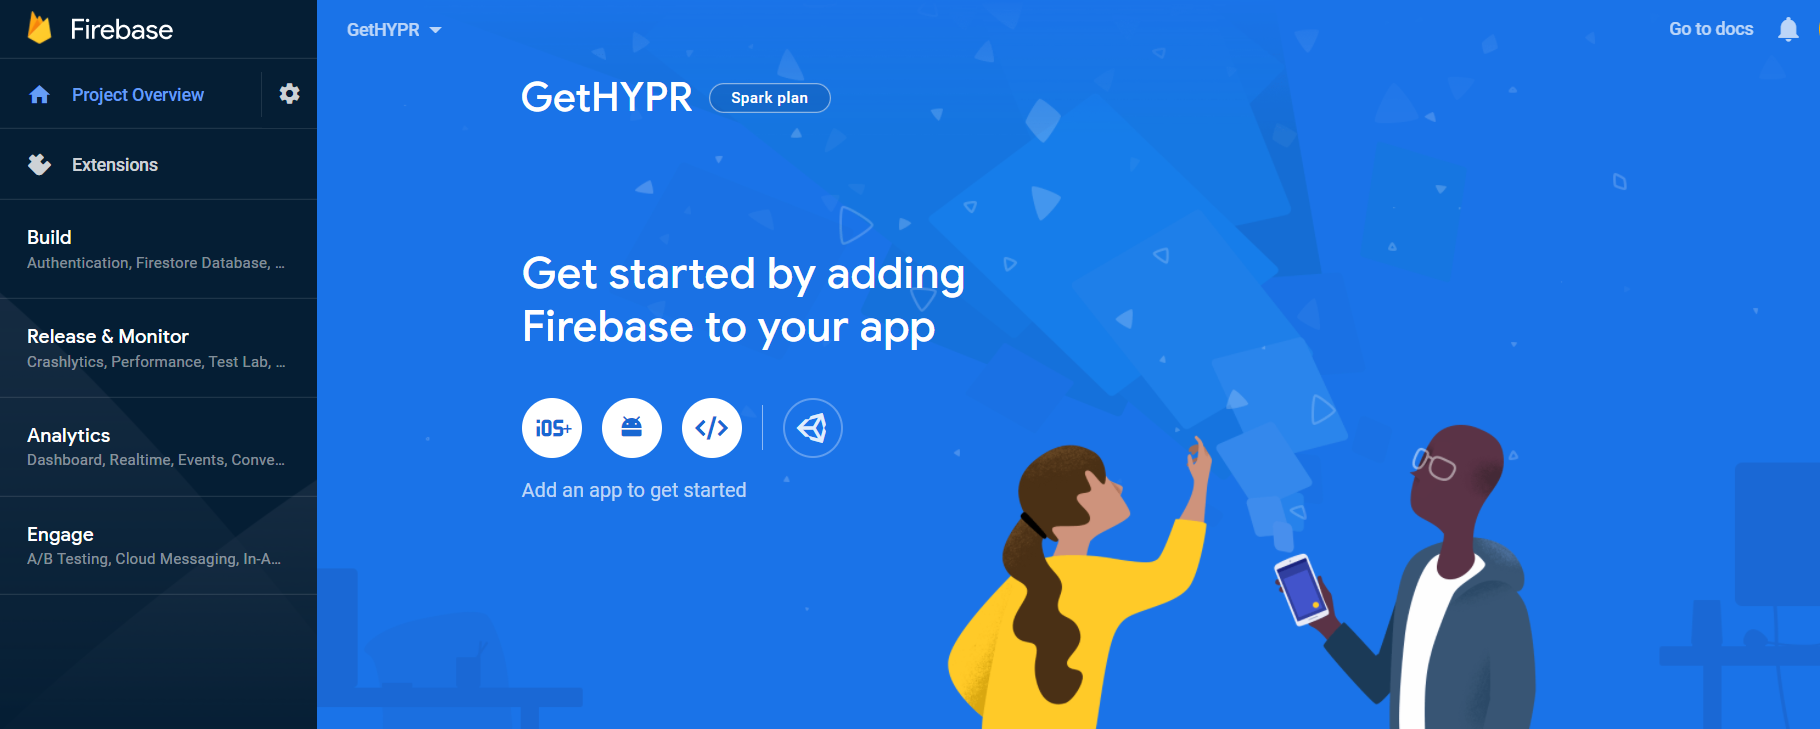
- Click Project Overview on the left; then select the iOS+ icon.
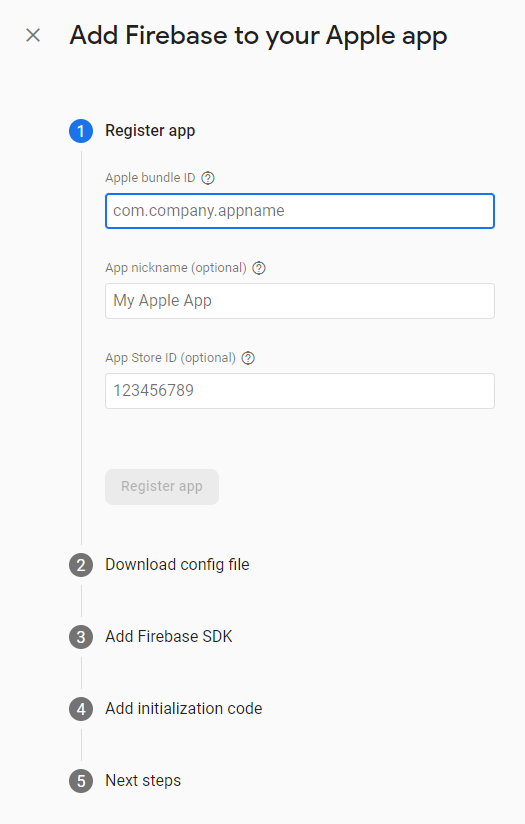
- Fill in the iOS package name and App nickname; add a SHA sum if desired. When finished, click Register App.
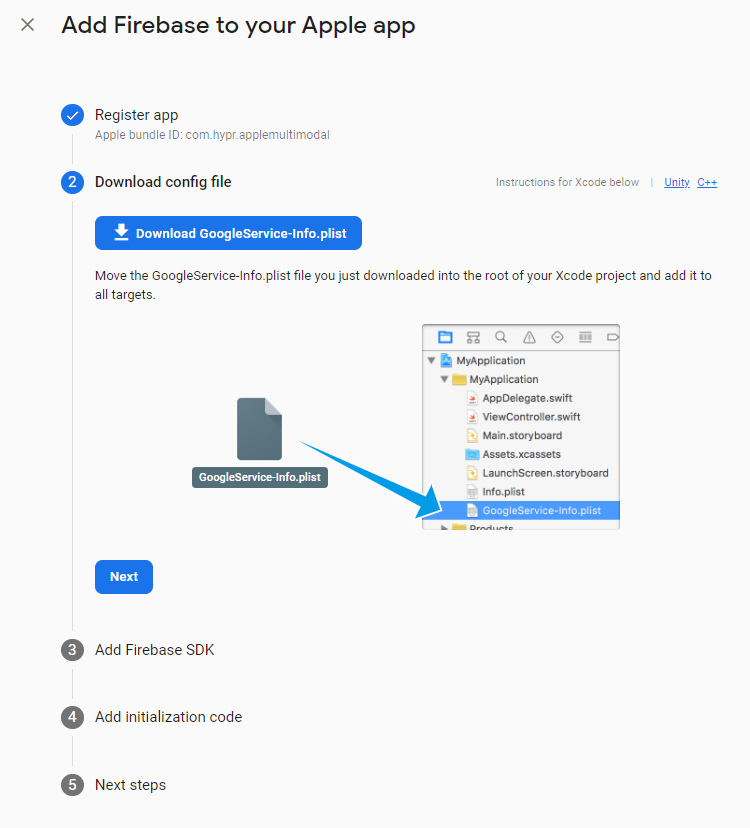
- Download
google.services.jsonto theapp/directory and click Next.
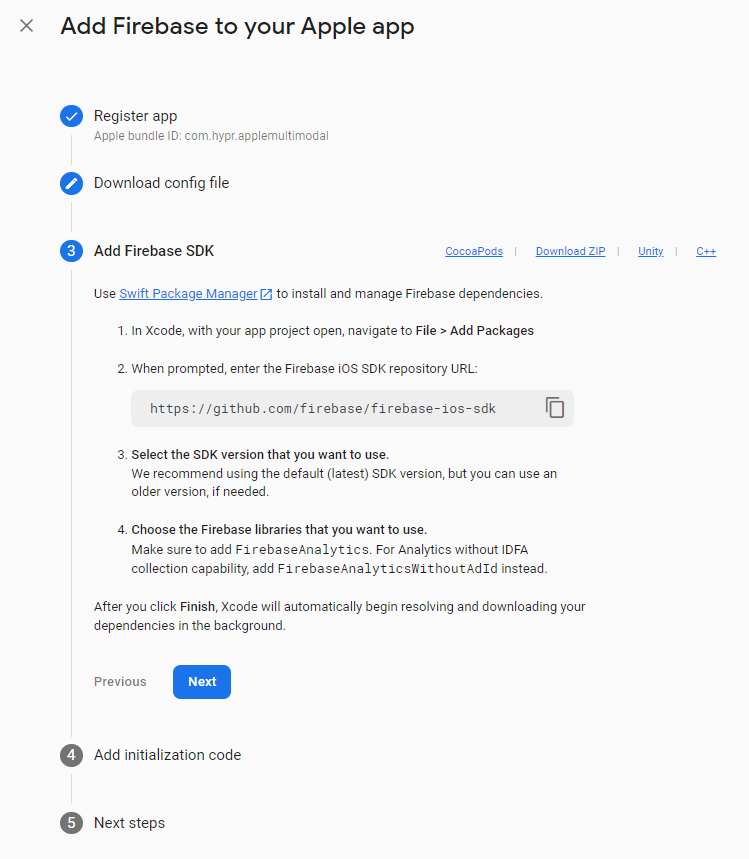
- Follow the instructions to add Firebase SDK to your app, then click Next. HYPR includes this entry by default in the reference app.
- Select the type of code you are using, and add the initialization code. Click Next.
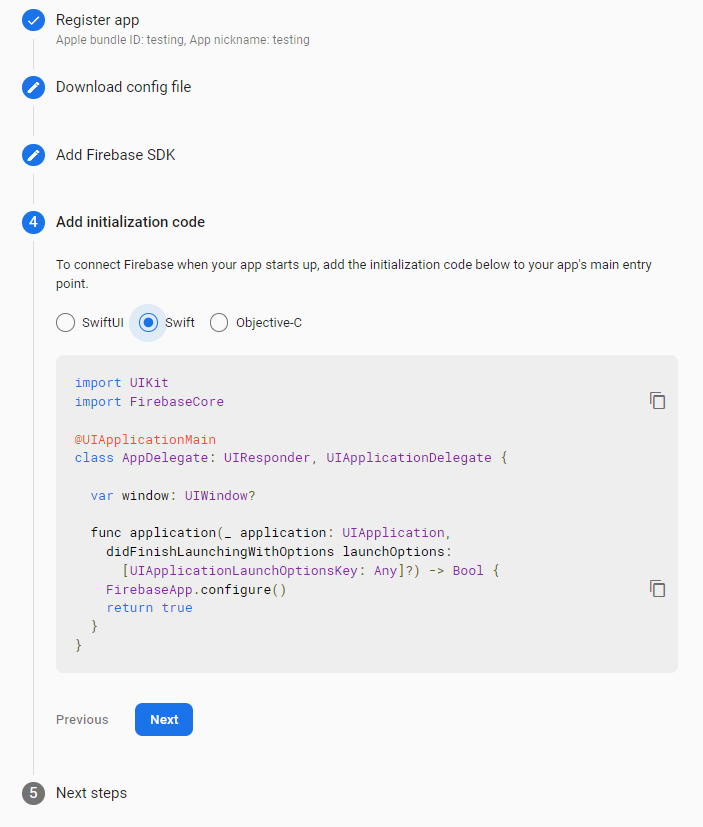
- If you are satisfied with your project configuration, click Continue to console.
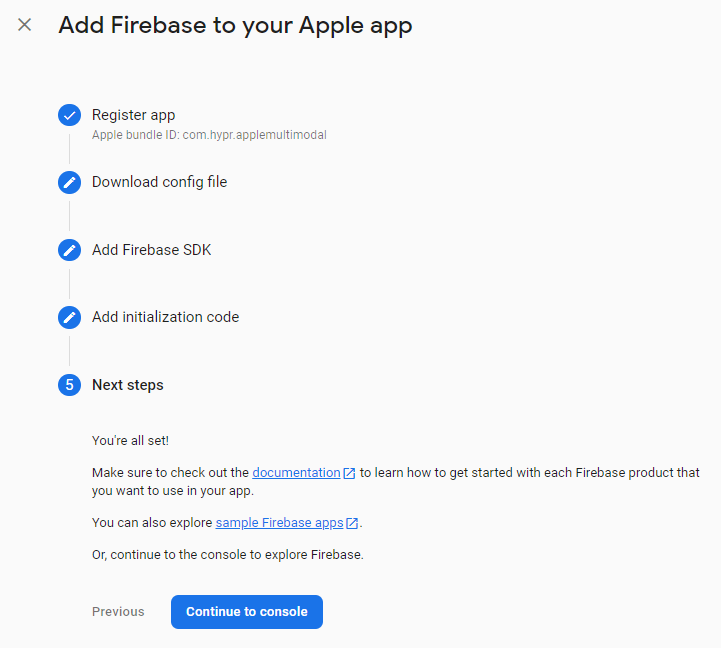
Add Firebase SDK to Your iOS App
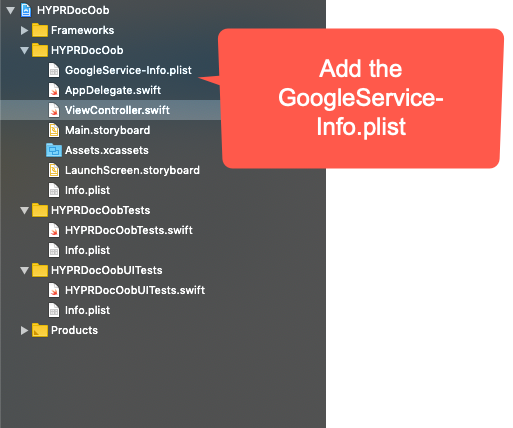
- Create a group to contain the frameworks.
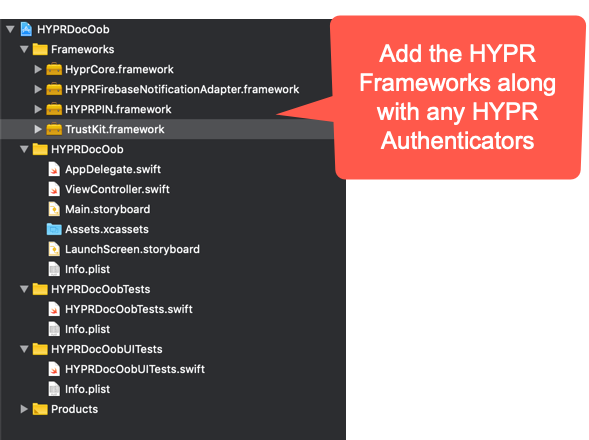
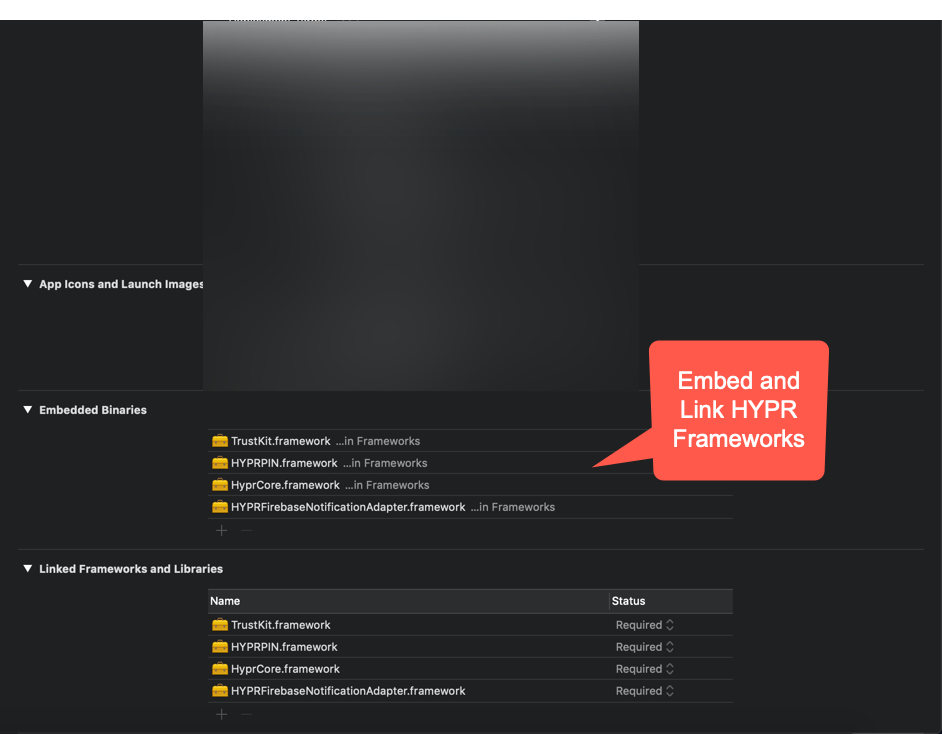
- Embed and link the HYPR Frameworks.
- Add
GoogleService-Info.plist.
Pairing the Web Account with the Mobile Device
To pair your mobile device with the web account, you must generate the PIN/QR Code, then call the HYPRUserAgent registerRemoteDevice method to pair via PIN or QR Code.
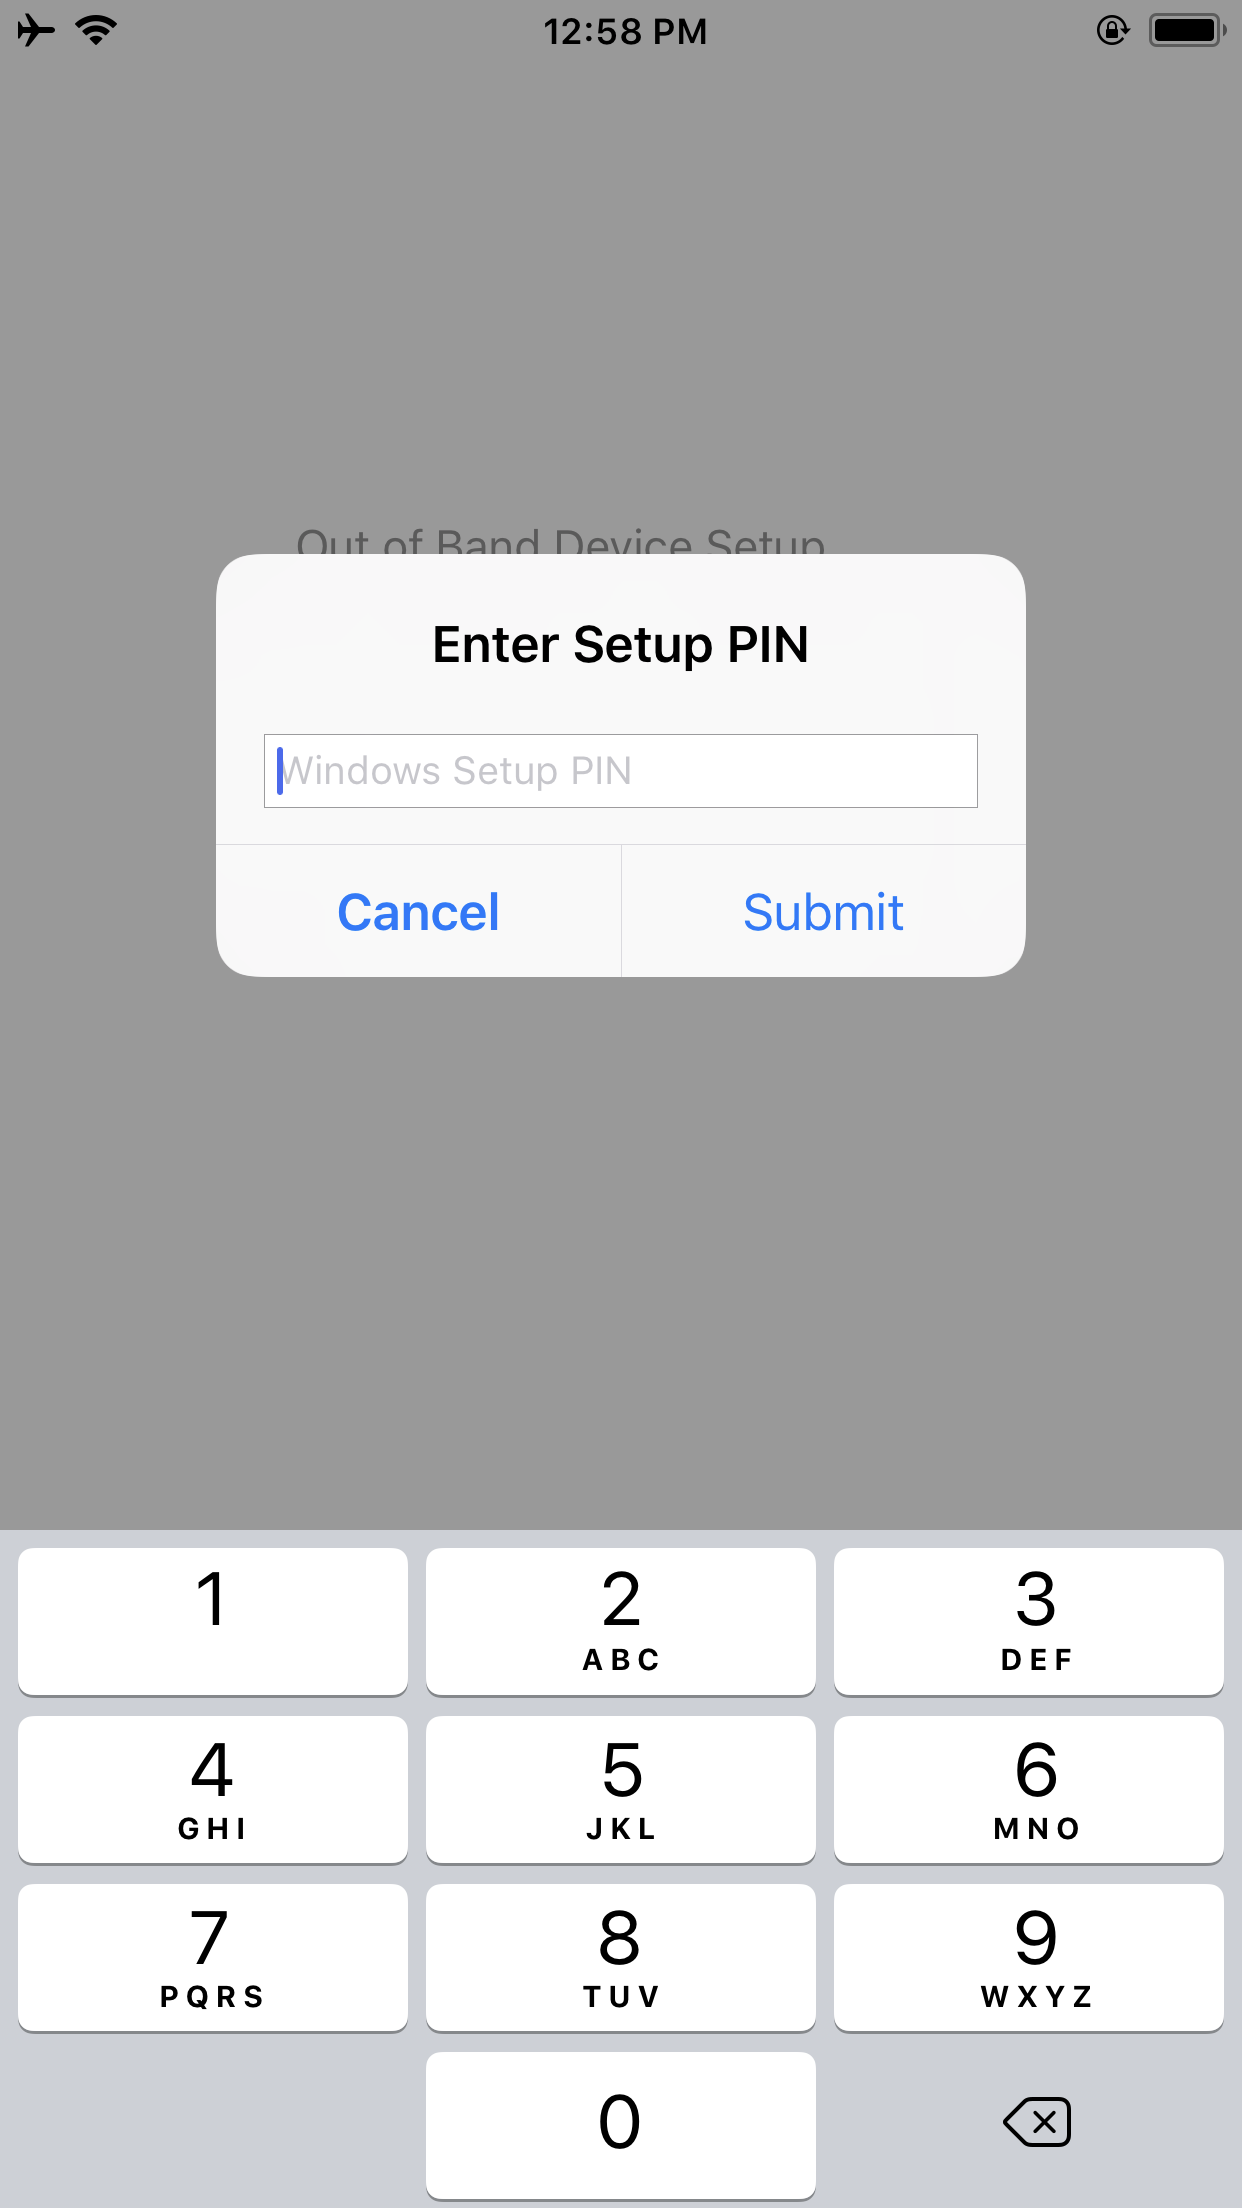
Out-of-band device setup has an option of presenting an Alert View Controller that accepts a PIN or a QR Code Scan view. To display an Alert View Controller for PIN input, use one of two public methods provided as shown below. Either method will prompt an Alert View Controller for PIN input.
Default Policy
The default policy for remote device registration is
defaultRegAction. This means that the authenticators specified indefaultRegActionwill be the authenticators used during remote device registration. To learn more about policies, check out Policy Matching.
PIN Entry Setup Example
class ViewController: UIViewController {
  func outOfBandDeviceSetup() {
    HYPRUserAgent.setParentViewController(self)
    // Here you need to pass in .alert for pinInputType
    HYPRUserAgent.sharedInstance().registerRemoteDevice(forUser: nil, pinInputType: .alert, actionId: "<your policy name goes here>") { error in
      if let error = error {
        // Handle Error
        print(error)
      }
      else {
        // Out of Band Device Setup is successful
        print("Out of Band Device Setup Successful!")
      }
    }
  }
}
Alert PIN Input View
QR Code Scan View
To display a QR Code Scan view, please use the method provided below.
class ViewController: UIViewController {
  func outOfBandDeviceSetup() {
    HYPRUserAgent.setParentViewController(self)
    // Setting UI elements for QR Scan view
    let qrCodeConfig = HYPRViewConfiguration.qrCodeViewConfiguration()
    qrCodeConfig.titleText = "SCAN QR CODE"
    qrCodeConfig.titleFont = UIFont(name: "You Font", size: 16.0)
    qrCodeConfig.titleColor = UIColor.white
    qrCodeConfig.logoImage = UIImage(named: "you logo")
    // Here you need to pass in .qrCodeScan for pinInputType
    HYPRUserAgent.sharedInstance().registerRemoteDevice(forUser: nil, pinInputType: .qrCodeScan, actionId: "<your policy name goes here>") { error in
      if let error = error {
        // Handle Error
        print(error)
      }
      else {
        // Out of Band Device Setup is successful
        print("Out of Band Device Setup Successful!")
      }
    }
  }
}
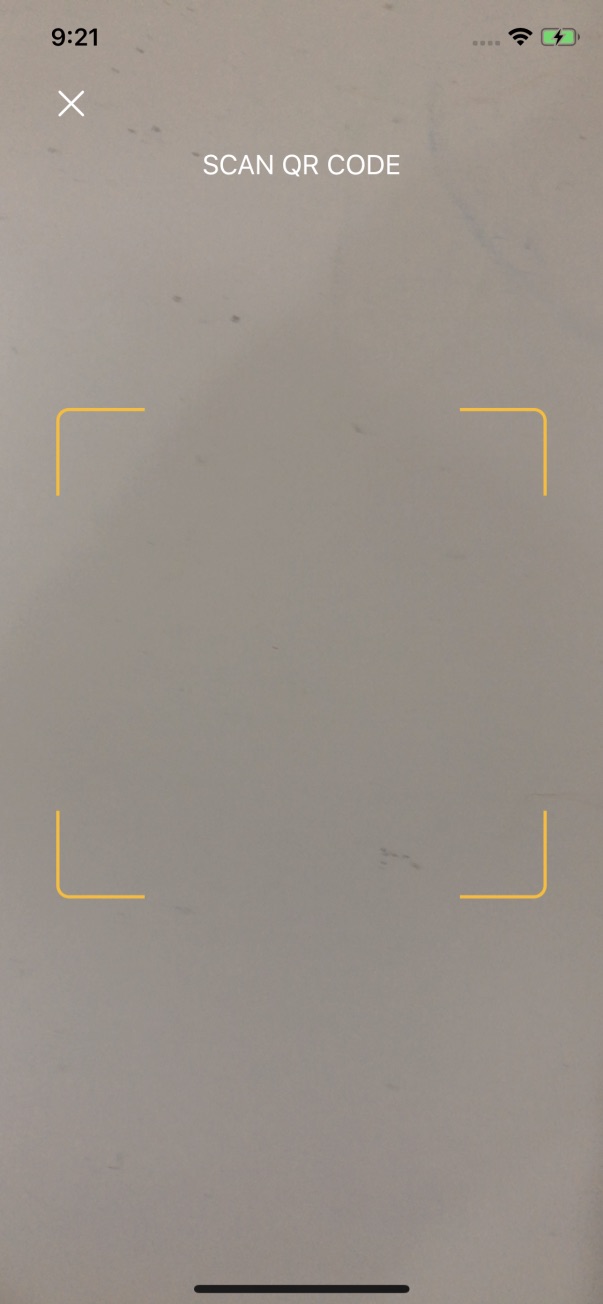
Modifiable options include the following:
| Option | Resulting Change |
|---|---|
titleText | Title text at the top of the view. |
titleFont | Font at the top of the view. |
titleColor | Text color at the top of the view. |
logoImage | The logo displayed at the top. |
Processing the Push Notification
Here are steps to enable push notifications along with your chosen authenticator(s). For the purposes of demonstration we will only enable the PIN authenticator, but the method applies for any you might use.
We need to enable push Notifications and authenticators during App startup, so we placed it within AppDelegate.swift.
Within func application(_ application: UIApplication, didReceiveRemoteNotification userInfo: [AnyHashable : Any], fetchCompletionHandler completionHandler: @escaping (UIBackgroundFetchResult) -> Void), if the callback in HYPRFirebaseAdapter.handlePushPayloadUserInfo returns an error, OOB authentication was unsuccessful and your app will need to inform the user.
The HYPRFirebaseAdapter.handlePushPayloadUserInfo method returns a userInfo dictionary in the completion block. The following keys will return the corresponding values:
HYPR_OOB_ACTION_TITLE_KEY | The out-of-band Authentication screen title text of type NSString. |
HYPR_OOB_ACTION_MESSAGE_KEY | The out-of-band Authentication screen message text of type NSString. |
HYPR_OOB_ACTION_TYPE | A HYPROOBActionType enum. |
HYPR_OOB_ACTION_REMOTE_DEVICE_KEY | The HYPRUserAgentRemoteDevice asking for authentication. |
import HyprCore
import HyprCore
import HYPRPIN
import HYPRFirebaseNotificationAdapter

@UIApplicationMain
class AppDelegate: UIResponder, UIApplicationDelegate {
  func application(_ application: UIApplication, didFinishLaunchingWithOptions launchOptions: [UIApplicationLaunchOptionsKey: Any]?) -> Bool {
    // Enable any authenticator you like.
    // We are just enabling PIN for the purposes of demonstration
    HYPRUAFClient.registerAuthenticatorModule(HYPRPINAsm.self)

    // Set SSLPinningEnabled to true if you are using SSL Pinning
    HYPRUserAgent.setSSLPinningEnabled(false)
    HYPRUserAgent.setNotificationProviderAdapter(HYPRFirebaseAdapter.shared())
    HYPRFirebaseAdapter.shared().userPushNotifications(enabled: true)
    if HYPRUserAgent.sharedInstance().activeProfile() == nil {
      let config = HYPRUserAgentProfileConfiguration(
        rpAppId: "Relying Party App ID i.e: HYPRDefaultApplication",
        rpServerUrl: "Relying Party URL i.e.: https://9999-pov.hypr.com",
        deviceType: "WEB",
        rpSSLPinCredentials: nil,
        additionalData: nil)

        let profile = HYPRUserAgentProfile(displayName: "Place a profile name name here: i.e. MyProfile",
          configuration: config,
          persona: nil,
          userAccounts: nil)

        HYPRUserAgent.sharedInstance().registerProfile(profile!)
      }
    return true
  }

  func application(_ application: UIApplication, didReceiveRemoteNotification userInfo: [AnyHashable : Any], fetchCompletionHandler completionHandler: @escaping (UIBackgroundFetchResult) -> Void) {
    if let rootController = self.window?.rootViewController {
      HYPRUserAgent.setParentViewController(rootController)
    }
    let didHandle = HYPRFirebaseAdapter.handlePushPayloadUserInfo(userInfo) { (responseUserInfo, error) in
      //the responseUserInfo includes one or more key-value pairs. Keys are:
      //extern NSString * const HYPR_OOB_ACTION_TITLE_KEY;
      //extern NSString * const HYPR_OOB_ACTION_MESSAGE_KEY;
      //extern NSString * const HYPR_OOB_ACTION_TYPE;
      //details can be found in HYPRPushNotificationAdapter.h
      // if there is no error, then success
      // if there is an error, with code != cancelled, then fail
      if error == nil {
        print("push notification successfully processed!")
      } else if let hyprError = error as NSError?, hyprError.code != HYPRError.cancelled.rawValue {
        print("\(#function): \(hyprError.description)")
      }
    }

    if didHandle {
      completionHandler(.newData)
    } else {
      completionHandler(.noData)
    }
  }
}
To perform OOB authentication upon receiving the push, add the following line of code in your Initial View Controller's viewWillAppear method:
class ViewController: UIViewController {

    override func viewWillAppear(_ animated: Bool) {
        super.viewWillAppear(animated)
        HYPRUserAgent.setParentViewController(self)
    }
}
Set Parent View to Controller
Your application will not process the OOB push notification unless your initial view controller has the
HYPRUserAgent.setParentViewController(self)method in itsviewWillAppearmethod.
UI Customization
OOB Device Setup has an option of presenting an Alert View Controller that accepts a PIN or a QR Code Scan view.
To display an Alert View Controller for PIN input, use one of two public methods provided as shown below. Either one of those two methods will prompt an Alert View Controller for PIN input.
class ViewController: UIViewController {
  func outOfBandDeviceSetup() {
    HYPRUserAgent.setParentViewController(self)
    // Here you need to pass in a nil for pin to prompt an alert for PIN input
    HYPRUserAgent.sharedInstance().registerRemoteDevice(forUser: nil, pin: nil, actionId: "<your policy name goes here>") { error in
      if let error = error {
        // Handle Error
        print(error)
      }
      else {
        // Out of Band Device Setup is successful
        print("Out of Band Device Setup Successful!")
      }
    }
  }
}
class ViewController: UIViewController {
  func outOfBandDeviceSetup() {
    HYPRUserAgent.setParentViewController(self)
    // Here you need to pass in .alert for pinInputType
    HYPRUserAgent.sharedInstance().registerRemoteDevice(forUser: nil, pinInputType: .alert, actionId: "<your policy name goes here>") { error in
      if let error = error {
        // Handle Error
        print(error)
      }
      else {
        // Out of Band Device Setup is successful
        print("Out of Band Device Setup Successful!")
      }
    }
  }
}
Alert PIN Input View
If you are creating your own out-of-band Device Setup screen, you'll need to create a view controller that accepts the 6-digit PIN. Once you have that PIN, you must provide it to the HYPRUserAgent registerRemoteDevice method as shown here:
class ViewController: UIViewController {
  func outOfBandDeviceSetup() {
    HYPRUserAgent.setParentViewController(self)
    // Here you pass in your PIN
    HYPRUserAgent.sharedInstance().registerRemoteDevice(forUser: nil, pin: "<Your PIN here>", actionId: "<your policy name goes here>") { error in
      if let error = error {
        // Handle Error
        print(error)
      }
      else {
        // Out of Band Device Setup is successful
        print("Out of Band Device Setup Successful!")
      }
    }
  }
}
QR Code Scan View
To display a QR Code Scan view, use the method provided below.
class ViewController: UIViewController {
  func outOfBandDeviceSetup() {
    HYPRUserAgent.setParentViewController(self)
    // Setting UI elements for QR Scan view
    let qrCodeConfig = HYPRViewConfiguration.qrCodeViewConfiguration()
    qrCodeConfig.titleText = "SCAN QR CODE"
    qrCodeConfig.titleFont = UIFont(name: "your font", size: 16.0)
    qrCodeConfig.titleColor = UIColor.white
    qrCodeConfig.logoImage = UIImage(named: "your logo")
    // Here you need to pass in .qrCodeScan for pinInputType
    HYPRUserAgent.sharedInstance().registerRemoteDevice(forUser: nil, pinInputType: .qrCodeScan, actionId: "<your policy name goes here>") { error in
      if let error = error {
        // Handle Error
        print(error)
      }
      else {
        // Out of Band Device Setup is successful
        print("Out of Band Device Setup Successful!")
      }
    }
  }
}
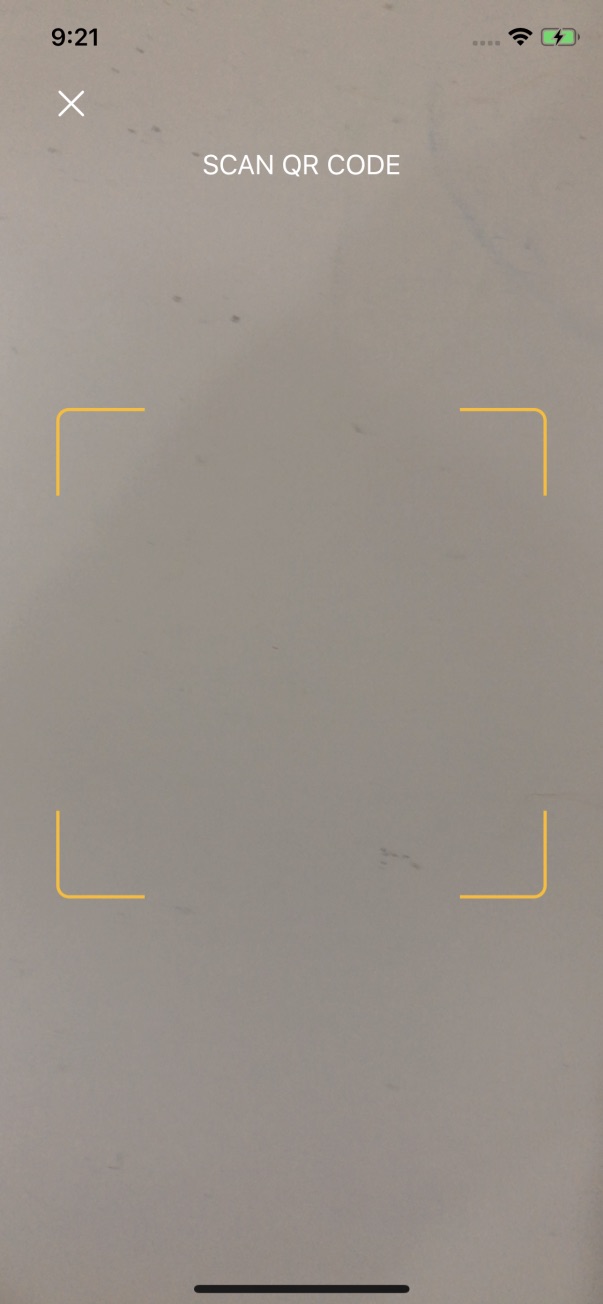
Modifiable options include the following:
| Option | Resulting Change |
|---|---|
titleText | Title text at the top of the view. |
titleFont | Font at the top of the view. |
titleColor | Text color at the top of the view. |
logoImage | The logo displayed at the top. |
iOS Apple Push Notification Service (APNS)
To receive push notifications when your app is backgrounded, you must add the certificate to your Firebase iOS Project. Please refer to these documents for more information:
After OOB Device Setup is implemented, you can now perform OOB Authentication. For more information, please refer to the following documentation:
- Javascript Web SDK Out-of-band Authentication with iOS
- Java Web SDK Out-of-band Authentication with iOS
Limiting the Number of Relying Party Profiles
To limit the number of Relying Parties the user can have, call the following method:
HYPRUserAgent.sharedInstance().setLimit(<your limit goes here>, forProfilesOf: .web)
Register with JSON Content
The QR code content used for web account pairing will be in .JSON format. If you prefer not to scan a QR code to register, there is an option to directly register with the JSON content that the QR code represents.
Example
HYPRUserAgent.sharedInstance().registerRemoteDevice(withJsonContent: contentJson) { error in
if let error = error {
    // Process Error
  } else {
    self.presentInfoAlert(title: "Success!", message: "Registered Successfully!")
  }
}
iOS Apple Push Notification Service (APNS)
To receive push notifications when your App is backgrounded, you must add the certificate to your Firebase iOS Project. Please refer to these documents for more information:
Check Server for Push Payload
In the event that the push notification does not arrive on the device, we still would like to authenticate.
HYPR SDK for iOS provides functionality to check the HYPR server for any push notifications for authentication, and if so, to start the authentication. You can do so with the code provided here:
if let webAccounts = HYPRUserAgent.sharedInstance().activeUserAccount()?.remoteDevices,
	let webAccount = webAccounts.first {
  HYPRUserAgent.sharedInstance().pendingOOBAuthenticationPayload(for: webAccount) { pushPayload, error in
		if let error = error {
			// Error
 		}
		else {
			// Process the Push Payload
		 	CustomFirebaseAdapter.handlePushPayloadUserInfo(pushPayload, completion: { (userInfo, error) in
				window.rootViewController = tempRootViewController
					if let error = error {
						print("Encountered an error during OOB Authentication: \(error.localizedDescription)")
					}
			})
			if didHandle {
				completionHandler(.newData)
			} else {
				completionHandler(.noData)
			}
	}
}
After OOB Device Setup is implemented, you can now perform OOB Authentication. For more information, please refer to the following documentation:
Updated 3 months ago
