Entra/Azure AD: HYPR Login Experience
HYPR Control Center Standard: Integrations
Integrating HYPR with Entra/Azure Active Directory (AD) lets you access your organization’s Entra/Azure-based applications (such as Office 365) using HYPR passwordless authentication instead of the standard username + password login.
Getting the HYPR Entra/Azure integration up and running requires the following basic steps:
- Understand how the Entra/Azure login process changes for end users after you integrate with HYPR. See What Will Happen in Entra/Azure?.
- Configure the Entra/Azure side of the integration. See Setting Up Entra/Azure.
- Configure the HYPR side of the integration. See Connecting Entra/Azure to HYPR.
The following HYPR Integration common tasks are explained on the Integrations main page.
- Choose the methods you want people to be able to use for passwordless authentication; see Allowing the Use of FIDO2 Authenticators
- Enabling the Integration
- Enrolling Users
- Monitor integration-specific user activity with the Audit Trail
What Will Happen in Entra/Azure?
Login Flow
Once you activate the HYPR Entra/Azure integration, users will experience a different Entra/Azure login flow depending on whether they’re enrolled or non-enrolled.
Enrolled Users
Users who have been successfully enrolled via the HYPR Control Center will no longer need to provide a password to login to Entra/Azure. After providing their username on the Entra/Azure sign in screen, they’ll be redirected to the HYPR passwordless authorization flow. Essentially, HYPR intercepts the default Entra/Azure login process and replaces the password step with passwordless access.

Non-enrolled Users
Users who have not been enrolled via the HYPR Control Center will be prompted to enter their Entra/Azure password after they click Sign In on the HYPR login screen.
Behind the Scenes
Once you create the integration, HYPR will handle as much of the back-end configuration in Entra/Azure as possible.
Non-enrolled Group Membership
Users who haven’t registered a device with HYPR before you activate the HYPR Entra/Azure integration will automatically be added to a “Users Not Yet Enrolled” Entra/Azure AD group created by HYPR during the setup process. They’ll automatically be removed from the non-enrolled group as soon as they register a device.
What You'll Need
- Since you’re setting up the HYPR Entra/Azure integration through the HYPR Control Center, you should have already registered for an account, paired your mobile device with HYPR, and used your new passwordless login to access the Control Center; if this isn’t the case, please contact us at [email protected] and we’ll help you out
- Make sure you have the Entra/Azure tenant available and an account that exists on the
\*.onmicrosoft.comdomain with Global Admin Access - Make sure you have the Entra/Azure licenses (P1) assigned to the test accounts
Setting Up Entra/Azure
Registering an Application
- From the Entra/Azure home screen, select Azure Active Directory > App registrations > New registration.

- Enter the application name HYPRAuthApp and select Accounts in this organizational directory only.

- Click Register when done.
- On the Overview page, make a note of the following values which you’ll need later when configuring the integration in the HYPR Control Center:
Application (client) ID
Directory (tenant) ID

Granting Required API Permissions
- From the Entra/Azure Active Directory screen, select App registrations and choose the
HYPRAuthApp.

- Select API permissions.
- By default, the application will already have Microsoft Graph’s User.Read. This isn’t required, so remove it by clicking the ... icon and choosing Remove permission. Click Yes, remove to confirm when prompted.

- Click Add a permission.

- Select Microsoft Graph.

- Select Delegated permissions.

NOTE
In some situations, Entra/Azure won’t display the option to choose Delegated or Application permissions and will automatically default to Delegated.
- Select Directory.AccessAsUser.All and click Add Permissions.

- Click Grant admin consent to apply the permissions and click Yes to confirm when prompted.

Setting Application-level Scope
- From the Entra/Azure Active Directory screen, select App registrations and choose the HYPRAuthApp.
- Select Expose an API, then click Set next to Application ID URI.

- Accept the default Application ID URI setting by clicking Save.

- Click Add a scope.

- Enter the following values:
Scope name: User.Read
Who can consent: Admins and users
Admin consent display name: HYPRAuthApp User.Read Access
Admin consent description: HYPRAuthApp User.Read Access
State: Enabled

- Click Add Scope to save the changes.
Creating a Client Secret
You’ll need to provide a client secret when you set up the integration in the HYPR Control Center. Generate the client secret in Entra/Azure as follows:
- From the Entra/Azure Active Directory screen, select App registrations and choose the HYPRAuthApp.
- Select Certificates & secrets, then click New client secret.

- Enter a Description and an Expires date of 24 months.

- Make a note of the client secret value now so you can use it later when connecting Entra/Azure to HYPR.
One Time Only
If you return to this screen later, Entra/Azure will mask the value and you won’t be able to copy it.

Creating a Service Account
You’ll need to provide a service user account name and password when you set up the integration in the HYPR Control Center.
onmicrosoft.com
The service account here must be created on
onmicrosoft.com, not on the custom federated domain. This service account must be excluded from any policy that would require it to use MFA.
Create the account in Entra/Azure as follows:
- From the Entra/Azure Active Directory screen, select Users.

- Click New user.

- Select Create user and enter the following values:
User name: hyprserviceaccount
Name: HYPR Service Account
Password: Let me create the password
Enter a temporary password and make a note of it so you can change it below.

- Click Create to save the user account.
- On the Profile screen for the new account, select Assigned roles.

- Select Add Assignments.

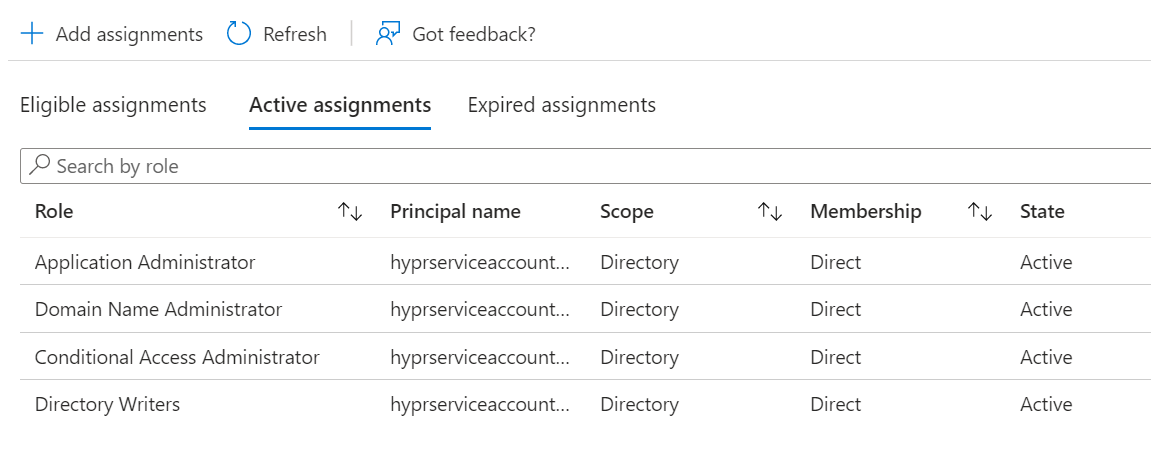
- Search for and add the following Directory roles:
Application administrator
Configures the HYPRAuthApp application to accept authentication via ROPC when the domain is federated. Needed when adding or deleting the HYPR Entra/Azure integration via the Control Center.
Directory writers
Allows the necessary group creation/update and also handles getting the user data for sync and the immutableID for authentication. Needed throughout the entire lifecycle of the HYPR Entra/Azure integration.
Domain Name Administrators
Allows HYPR to automatically enable/disable the federation with Azure. This is needed throughout the entire lifecycle of the HYPR Entra/Azure integration.
Conditional Access administrator
If you are planning to use a Conditional Access Policy Template, you must also add the Conditional Access administrator.
This role permits creation/updating for the HYPR Conditional Access Policy. It is needed when adding, enabling, disabling, or deleting the HYPR Entra/Azure integration via the Control Center.
Entra/Azure AD Domain Name Administrator Role
Make sure the Domain Name Administrator role is added to the HYPR Service Account in Entra/Azure, or you will receive an error stating, "Insufficient privileges to complete the operation," when attempting to enable or disable the Integration.

- Click Add when done.
Patience
Entra/Azure can be very slow to replicate these changes. You may need to refresh the page several times, or possibly add some of the settings more than once.
- Confirm that all the roles were successfully assigned.
- Open an incognito browser window and login to portal.azure.com as the new service account user so you can set the permanent password.

One Condition
If the account gets prompted for MFA during this login, it means you have a Conditional Access Policy in place which will need to be updated to exclude the hyprserviceaccount user.
- Enter an appropriate new password and make a note of it for later.
Creating a Custom Domain
If the domain you intend to secure with HYPR isn’t already set up and verified by Entra/Azure, you’ll need to add one. Note that it can take a couple of days for the DNS changes to propagate.
Managed, Not Federated
If you already have a verified domain, make sure it isn’t already set to Federated in Entra/Azure AD. If it is, you must change it to Managed before you activate the integration (“Go-Live”) with HYPR.
- From the Entra/Azure Active Directory screen, select Custom domain names then click Add custom domain.

- Enter your domain in the Custom domain name field and click Add domain.
You’ll need create a new TXT or MX record with your domain name registrar. Entra/Azure provides the necessary information and allows you to verify the domain once it’s been created.

Connecting Entra/Azure to HYPR
Once Entra/Azure is set up, you can add the integration to HYPR.
- Go to the Integrations screen in the HYPR Control Center and click Add New Integration to show a list of available integration types.

- Select the Azure AD integration.

- HYPR will present you with a choice; select HYPR Login Experience.
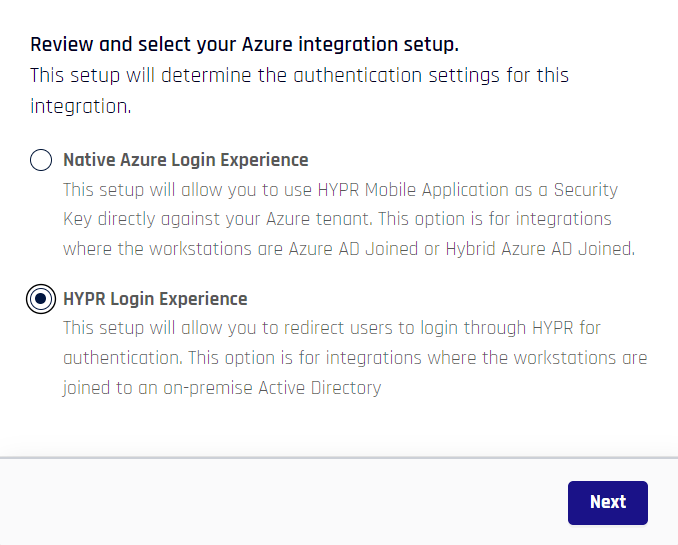
Native Entra/Azure Login Experience
Choosing Native Entra/Azure Login Experience is used when configuring HYPR Enterprise Passkeys.
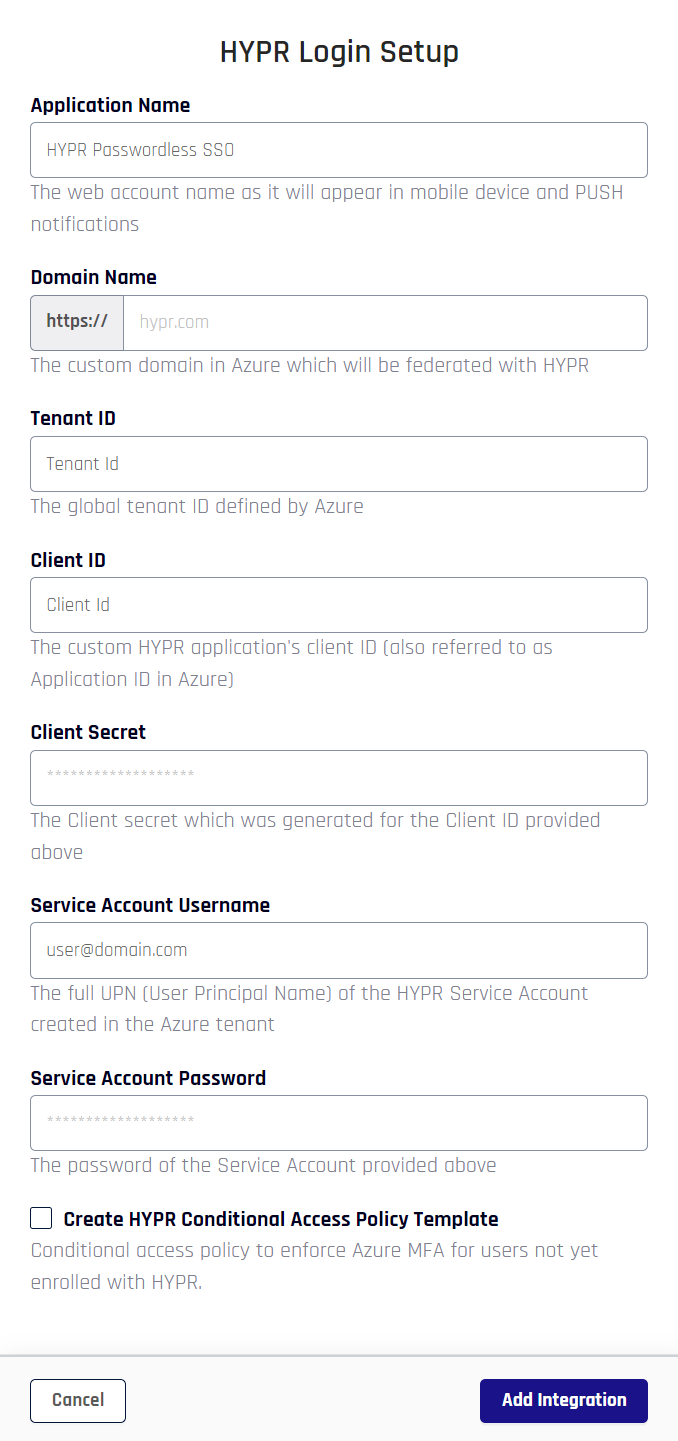
- To integrate HYPR and Entra/Azure , you just need to provide some information on the HYPR Login Setup screen.
| Field | Value |
|---|---|
| Application Name | The name you provide here will be used in three places: - For the web account name that users will see in the HYPR Mobile App - For the HYPR Device Manager page where users register their devices - For internal identification of this integration within the HYPR platform You can use any name you like, but it’s best to go with something that indicates the purpose of the application. For example: HYPRPasswordlessAzureSSOYou can use numbers, spaces, hyphens, and underscores in the name but note that spaces will be stripped from the name used to internally identify the integration within the HYPR platform. The namespace is limited to 23 characters. Once set, the only way to change the Application Name is to delete and re-add the integration. |
| Domain Name | The custom domain in Entra/Azure you want to integrate with HYPR. For example:secure.highlandsbank.comNote that this domain must not already be federated (see Creating a Custom Domain). Once set, the only way to change Domain Name is to delete and re-add the integration. |
| Tenant ID | The Directory (tenant) ID from Entra/Azure. If you didn’t make a note of this earlier, you can retrieve it from the Overview page for the application in Entra/Azure (see Registering an Application). Once set, the only way to change the Tenant ID is to delete and re-add the integration. |
| Client ID | The Application (client) ID from Azure. If you didn’t make a note of this earlier, you can retrieve it from the Overview page for the application in Entra/Azure (see Registering an Application). Once set, the only way to change the Client ID is to delete and re-add the integration. |
| Client Secret | The client secret value for the Azure application If you didn’t make a note of this earlier, you’ll need to go back and generate a new one in Entra/Azure (see Creating a Client Secret). |
| Service Account Username | The User Principal Name (UPN) for the service account you created in Entra/Azure (see Creating a Service Account). For example:[email protected] |
| Service Account Password | The permanent password you set for the service account (see Creating a Service Account). |
| Create HYPR Conditional Access Policy Template | Enables the Conditional Access policy template in Entra/Azure AD. This policy determines whether or not you will be able to enroll in HYPR. If left unchecked, all affected Entra/Azure users will be redirected to HYPR for passwordless enrollment. NOTE: If this option is enabled, the Conditional Access Administrator role must also be defined. See Creating a Service Account in this article. |
- Click Add Integration to begin.
- If the setup succeeds, you’ll see the Integration Added! confirmation dialog.

- You can optionally now register to use HYPR Entra/Azure logins yourself by clicking Enroll Myself. You’ll be taken to the HYPR Device Manager where you can register your mobile device.

Self-enrollment
The Enroll Myself option is only available if your Entra/Azure username is the same as your HYPR Control Center username. If they are not the same, you can add yourself to the Integration as a regular user later (see Enrolling Users).
Once you’ve registered a device, you’ll see your username in the list of enrolled users.
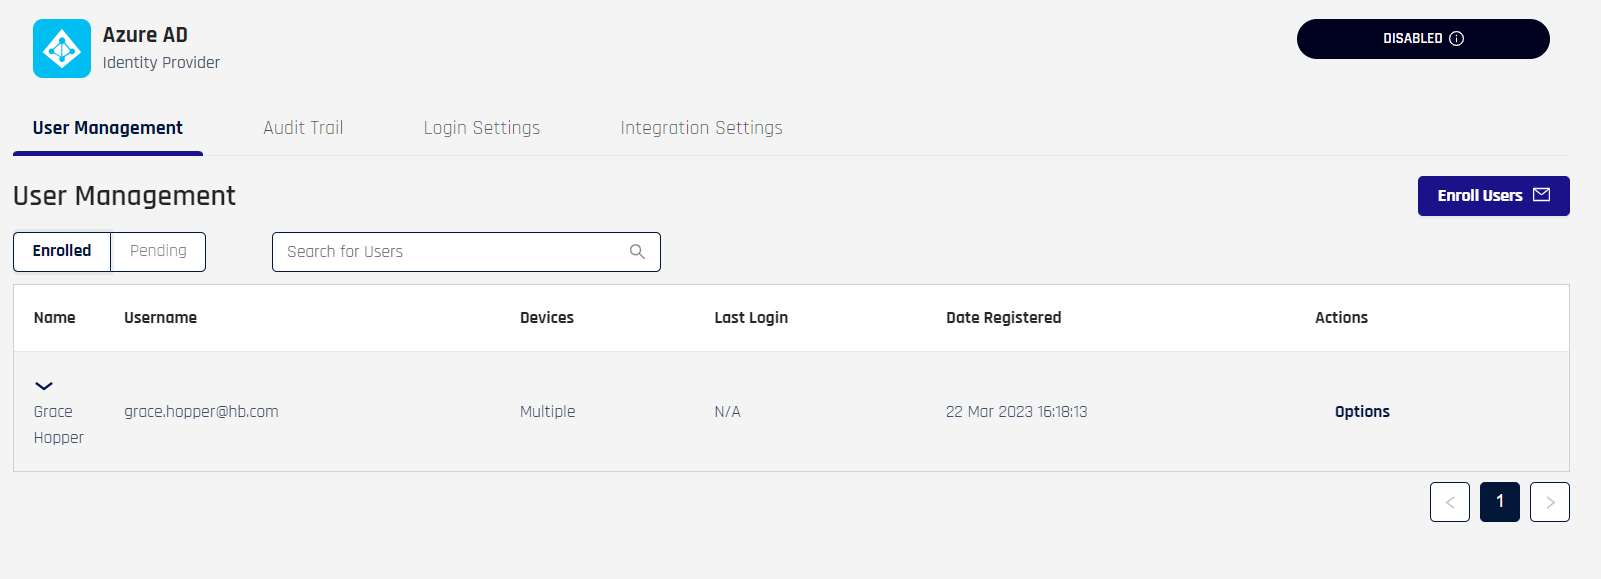
Enable, Enroll, and Audit
Continue with the HYPR Integrations common UI experience in the Integrations main page to complete Enabling your integration, enrolling users, and monitoring activity with the integration's Audit Trail.
Frequently Asked Questions
Q: Why are some users missing from the Enroll Users screen when I do Sync with Entra/Azure AD?
A: Once the HYPR Entra/Azure integration is live, new users added in Entra/Azure AD will need to be manually added to the “HYPR Group (Users Not Yet Enrolled)” group via the Entra/Azure admin portal in order for them to show up as enrollable in the HYPR Control Center. Each user must also have a First Name, Last Name, and Email address defined in Entra/Azure.
Updated 4 months ago