Integrating with Okta
HYPR Control Center Standard: Integrations
Integrating HYPR with Okta lets you access your organization’s Okta SSO-protected applications using HYPR passwordless authentication instead of the standard username + password login.
Getting the HYPR Okta integration up and running requires the following basic steps:
- Understand how the Okta login process changes for end users after you integrate with HYPR. See What Will Happen in Okta?.
- Configure the Okta side of the integration. See Setting Up Okta.
- Configure the HYPR side of the integration. See Connecting Okta to HYPR.
The following HYPR Integration common tasks are explained on the Integrations main page.
- Choose the methods you want people to be able to use for passwordless authentication; see Allowing the Use of FIDO2 Authenticators
- Enabling the Integration
- Enrolling Users
- Monitor integration-specific user activity with the Audit Trail
What Will Happen in Okta?
Login Flow
Once you activate the HYPR Okta integration, both enrolled and non-enrolled users will experience a new Okta login flow.
Enrolled Users
Users who have been enrolled via the HYPR Control Center will no longer need to provide a password to login to Okta. When they access an application through their Okta home page, they’ll provide their Okta username as usual, and then they’ll be redirected to the HYPR passwordless authorization flow. Essentially, HYPR intercepts the default Okta login process and replaces the password step with passwordless access.

Non-enrolled Users
Users who have not been enrolled via the HYPR Control Center will see the same initial login screen as enrolled users. However, after providing their username they’ll be asked to enter their usual Okta password.

Okta Admin Console
When you add the HYPR Okta integration, HYPR will automatically create a Device Manager application in the Okta Admin Console based on the name you provide during setup.

Because HYPR handles the setup for this application, you don’t need to make any manual configuration changes. Each user you enroll via the HYPR Control Center will be automatically assigned to the application, and there are no routine maintenance tasks necessary on the Okta side.
Okta User Home Page
Enrolled users will see the new Device Manager application listed on their Okta home page.

Clicking on the application opens the HYPR Device Manager, where the user can add or remove the devices used for authentication.
What You'll Need
HYPR Control Center Account
Since you’re setting up the HYPR Okta integration through the HYPR Control Center, you should have already registered for an account, paired your mobile device with HYPR, and used your new passwordless login to access the Control Center. If this isn’t the case, please contact us at [email protected] and we’ll help you out.
Okta Admin Console Account
Although most of the HYPR Okta integration process is automated, you’ll need an Okta admin account so you can generate an API key.
Naming Convention
Although not required, it’s easier to set up the integration if you use the same email address for both your HYPR Control Center username and your Okta username.
Setting Up Okta
Making Sure OIDC Is Enabled in Okta
Before starting the HYPR Okta integration, you need to confirm that Open ID Connect (OIDC) is enabled in your Okta account. To check if OIDC is enabled:
- Sign in to your Okta Admin Console.
- In the left navigation, select Identity Providers from the Security menu.
- Go to the Identity Providers tab, click Add Identity Provider, and confirm that the Select an Identity Provider list includes "OpenID Connect IdP” as shown here:

If “OpenID Connect IdP” doesn’t appear in the list, contact your Okta account representative and ask to have the “GENERIC_OIDC_IDP” feature enabled.
Generating an Okta API Token
As part of the connection process, you’ll need to provide an Okta API token that grants HYPR the necessary access to your Okta account. You can generate this token as follows:
- Sign in to your Okta Admin Console.
- In the left navigation pane, select API from the Security menu.
- Go to the Tokens tab and click Create Token.
- Name your token (any name is fine) and click Create Token.
- Copy the token. Note that you won’t be able to view it again later.
Connecting Okta to HYPR
- Go to the Integrations screen in the HYPR Control Center and click Add New Integration to show a list of available integration types.

- Select the Okta Identity Provider integration.

- To integrate HYPR and Okta, you just need to provide some basic information on the Integrations screen.

| Field | Value |
|---|---|
| Okta Portal Application Name | The name you provide here will be used in four places: - For an application that HYPR auto-creates in the Okta Admin Console - For the web account name that users will see in the HYPR Mobile App - For the HYPR Device Manager page where users register their devices - For internal identification of this integration within the HYPR platform You can use any name you like, but it’s best to go with something that indicates the purpose of the application. For example: HYPRPasswordlessOktaSSONote that any spaces or special characters will be automatically removed from the name you supply. The namespace is limited to 23 characters. |
| Okta Tenant URL | The base URL you use to access Okta. For example, if your Okta Admin Console is at https://myorg.okta.com/admin/dashboard then enter the following:myorg.okta.com |
| Okta API Token | An Okta-generated token that grants HYPR the necessary access to your Okta account. See Setting Up Okta. |
- Click Add Integration to begin. If the action is successful, you’ll see the Integration Added confirmation dialog.

- You can optionally now register to use HYPR Okta passwordless SSO yourself by clicking Enroll Myself. You’ll be taken to the HYPR Device Manager, where you can register with your chosen device.

Same Name
The Enroll Myself option is only available if your Okta username is the same as your HYPR Control Center username. If not, you can add yourself as a regular user later (see Enrolling Users on the main Integrations page).
Once you’ve registered a device, you’ll see your username in the list of enrolled users.

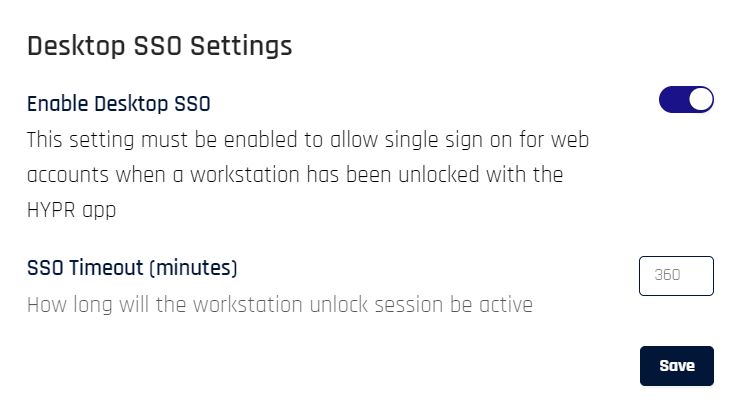
Desktop SSO in HYPR Integration with Okta
To enable a seamless desktop login experience with Okta applications, HYPR includes a Desktop SSO HYPRspeed toggle under the Login Settings tab of the Okta Integration page. Toggle it to On, confirm the SSO Timeout (minutes) (default is 360 or 6 hours), and Save when you've finished.
Enable, Enroll, and Audit
Continue with the HYPR Integrations common UI experience in the Integrations main page to complete Enabling your integration, enrolling users, and monitoring activity with the integration's Audit Trail.
Updated 4 months ago