Single Registration
HYPR Workforce Access Client
Beta Feature
This functionality is subject to change as the feature develops and we make improvements.
Single Registration will only function with newly registered accounts.
HYPR can be configured to only require pairing in one component of the HYPR system, instead of pairing separately with the Device Manager or the Workforce Access Client. When paired in one, users will be automatically prompted to complete the pairing on the other, and thereafter that pair will appear universally in all HYPR authentication rosters for that RP Application user.
What the User Sees
Following is the process a user experiences when they receive an invitation email:
- Open the invitation email on your device.
- Click the link to open the HYPR Mobile App and initiate pairing. Click Get Started to begin.
- Complete the device'sFIDO authentication when prompted. When completed, HYPR Mobile App displays the pairing on your device.
- HYPR Mobile App obtains a certificate from the Certificate Enrollment Service, and alerts you when the workstation is ready. Click Continue. HYPR Mobile App displays the pairing on your device again.
- On the workstation, click Scan QR to Login. A QR code displays.
- On the HYPR Mobile App, click the pairing label to open the account screen.
- Click the matching QR icon beneath Tap to Unlock or press and Hold for Options.
- Grant access to the Camera, if necessary, and scan the QR on the workstation screen.
- You are passwordlessly logged into the workstation. HYPR Mobile App returns to the pairing roster.
Certificate Services Options
Single Registration can be deployed in one of two ways:
- Certificate Enrollment Service: HYPR Certificate Enrollment Service is designed to manage authentication certificates for end users enrolling with the HYPR Workforce Access Client (WFA) and the HYPR Device Manager; when users add a new device to the Device Manager for a workstation authentication, Control Center (CC) will make REST API calls to the Enrollment Service to enroll the certificate on the user's behalf - and then transport this certificate to the user's mobile device; if the user follows the prompt, they will be prompted to renew the key's PIN
- HYPR Certificate Authority (CA) (coming soon): HYPR CA is designed for organizations that don't want to manage a PKI infrastructure, and instead will allow HYPR to manage a Certificate Authority purpose-built for their passwordless authentication
Certificate Enrollment Service
How It Works
- The HYPR Enrollment Service is a service running on a Windows computer (Windows 10 or Windows Server 2008/2012/2016/2019) hosted on-premises at the customer with network connectivity to Active Directory Certificate Services (AD CS)
- The service runs under the SYSTEM account
- The computer on which the service is running will have an Enrollment Agent (Computer) certificate enrolled and stored in the Local Machine certificate store
- A certificate template named HYPR Enrollment User will be defined for enrolling user certificates; that service will utilize the template to enroll user certificates on behalf of a specified user; the policy for this template will be set to require one signature from an Enrollment Agent
- The service will continually poll CC for certificate requests by invoking the
api/certificate/requestsendpoint with a secure API token; the service will attempt to enroll a user certificate on behalf of the specified user for each request - The enrollment service uses the
CertENROLL(a Microsoft-provided.dllthat ships with every MS OS) ActiveX component to enroll user certificates - When a
userIDis presented to the HYPR Enrollment Service, it will attempt to find the user in Active Directory; it will first try the lookup by User Principle Name (UPN), then via themailattribute (email address)
One of Us
The server where the Certificate Enrollment Service is installed must be joined to the domain and have persistent and reliable network connectivity with a domain controller and the Active Directory Certificate Services (AD CS) server.
Private Space
Do not install the Certificate Enrollment Service on the Domain Controller or the AD CS server.
Install the Certificate Enrollment Service on a separate server in the same security tier/level.
What You'll Need
Windows and Active Directory
- Install the Certificate Enrollment Service on a Windows server
- Configure the Active Directory Certificate Services (AD CS) role
Control Center Settings
- If you have not yet created the RP Application you will use, go ahead and create it in Control Center Advanced Mode
- In that Application's Login Settings, Push Notifications must be enabled
- Generate an API access token (and store it securely) for both that Application and for the Control Center Admin Application before proceeding
HYPR Feature Flags
Changing Feature Flags requires an access token for each affected Application.
The following feature flags must be enabled:
WINDOWS_WEB_ENROLLMENTmust be enabled at the Control Center and Application levels- These feature flags must be enabled only at the Application level:
ASYNC_REGISTRATION- Must be enabled beforeRP_APP_WORKSTATION_ENABLEDRP_APP_WORKSTATION_ENABLEDVIRTUAL_DESKTOP_INFRASTRUCTUREENDPOINT_API_SECURITY_TOKEN_DEVICE- Enabled by defaultENDPOINT_API_SECURITY_TOKEN_WORKSTATION- Enabled by default
- The following feature flag must be disabled for Single Registration to function:
FIDO2_MOBILE_AUTHENTICATOR- Used with HYPR Enterprise Passkeys
To enable the feature flag at the Application level:
curl --location --request POST 'https://<YOUR CONTROL CENTER URL>/rp/api/versioned/features/toggle/<FEATURE FLAG NAME>/<YOUR RP APP NAME>' \--header 'Connection: keep-alive' \
--header 'Cache-Control: max-age=0' \
--header 'Content-Type: application/json' \
--header 'Accept: */*' \
--header 'Sec-Fetch-Site: same-origin' \
--header 'Sec-Fetch-Mode: cors' \
--header 'Accept-Encoding: gzip, deflate, br' \
--header 'Accept-Language: en-US,en;q=0.9' \
--header 'Authorization: Bearer <YOUR ACCESS TOKEN> \
--data-raw ''
To enable the feature flag at the Control Center level:
curl --location --request POST 'https://<YOUR CONTROL CENTER URL>/rp/api/versioned/features/toggle/<FEATURE FLAG NAME>' \--header 'Connection: keep-alive' \
--header 'Cache-Control: max-age=0' \
--header 'Content-Type: application/json' \
--header 'Accept: */*' \
--header 'Sec-Fetch-Site: same-origin' \
--header 'Sec-Fetch-Mode: cors' \
--header 'Accept-Encoding: gzip, deflate, br' \
--header 'Accept-Language: en-US,en;q=0.9' \
--header 'Authorization: Bearer <YOUR ACCESS TOKEN>\
--data-raw ''
Installation
The Enrollment Service is distributed as an MSI installer package. The file name is HyprEnrollmentService_x64.msi. The installer has no user interface – it is intended to be installed by an IT professional on a server, where a GUI may not be available. Installation parameters must be passed on the msiexec command line
Private Space
Do not install the Enrollment Service on the Domain Controller or the AD CS server, but on a separate server in the same security tier/level.
Administrator
Local Administrator or Domain Administrator privileges are required to install the HYPR Certificate Enrollment Service.
Installation Parameters
Verify the values in the download package's hypr.json file are correct for your environment.
The parameters are detailed here:
| Parameter | Description | Type |
|---|---|---|
HYPRAPITOKEN | API Token that Enrollment Service will use to access the HYPR server. Must be generated for the Control Center Admin application. Note that this is an API Access Token, and not an Installation Token. | Required |
HYPRHASH | SSL/TLS public key pinning hash. This value can be obtained from the hypr.json file included when you download HYPR Passwordless (Workforce Access Client). | Required |
HYPRRP | URL of the HYPR server (e.g. https://bank.hypr.com/rp). | Required |
HYPRLOGLEVEL | Log level to the Enrollment Service (5 = Debug, 6 = Trace, other values should be avoided). Default is 5 if not specified. | Optional |
HYPRPROXYSERVER | Proxy server address and port (e.g., proxy.foobar.com:8080 or 12.34.56.78:8888). | Optional |
HYPRTEMPLATE | Template that the Enrollment Service will use to request user certificates. Defaults to HYPREnrollmentUser if not specified. | Optional |
HYPRPROXYBYPASS | Subnets and/or hosts that should bypass the proxy. | Optional |
Many of these properties are also used in Workforce Access Client installation. See Workforce Access Client Installation Parameters for more details.
Install the Certificate Enrollment Service
Run the following batch file from a command prompt to install the service:
@echo off
setlocal

if "%1%"=="" goto USAGE
if not exist "%1%" goto USAGE

set RP="https\://<YOUR CONTROL CENTER URL>/rp"
set APITOKEN="<YOUR CONTROL CENTER ADMIN RP APP ACCESS TOKEN>"
set HASH="\<SSL/TLS PUBLIC KEY PINNING HASH>"
set TEMPLATE="<CERTIFICATE TEMPLATE NAME>"

msiexec /i %1 /qn /norestart /L\*V install.log HYPRRP=%RP% HYPRHASH=%HASH% HYPRTEMPLATE=%TEMPLATE% HYPRAPITOKEN=%APITOKEN% HYPRLOGLEVEL="5"

exit /b 0

:USAGE
echo Usage: install "<path-to-msi>"
exit /b 1
Configure AD CS
Just One Example
Screenshots below were taken using Active Directory 2008. Your AD may have a different user interface if you're on a newer version.
To enroll certificates on behalf of another user, an Enrollment Agent certificate must be present on the Windows server where the HYPR Certificate Enrollment Service is running. In addition, a user template must be defined to allow user certificates to be issued.
The following instructions occur in the Microsoft Management Console Certificate Templates snap-in.
Domain Administrator
DA privileges are required to create, configure, and deploy certificate templates.
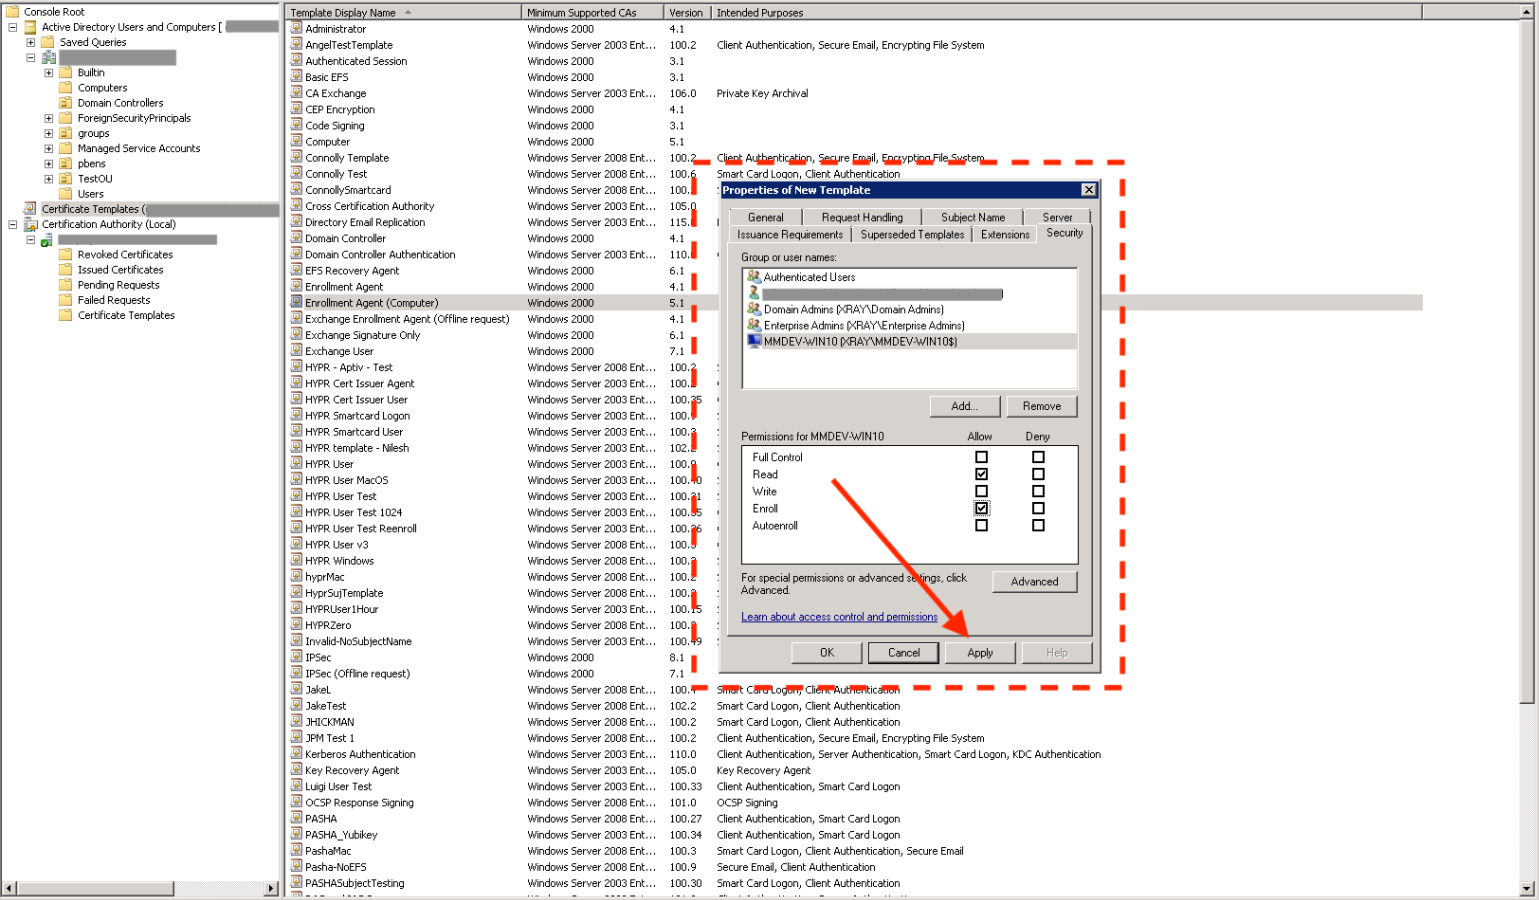
Create the HYPR Enrollment Agent Template
- Right-click the Enrollment Agent (Computer) template and choose the All Tasks → Duplicate Template menu option.
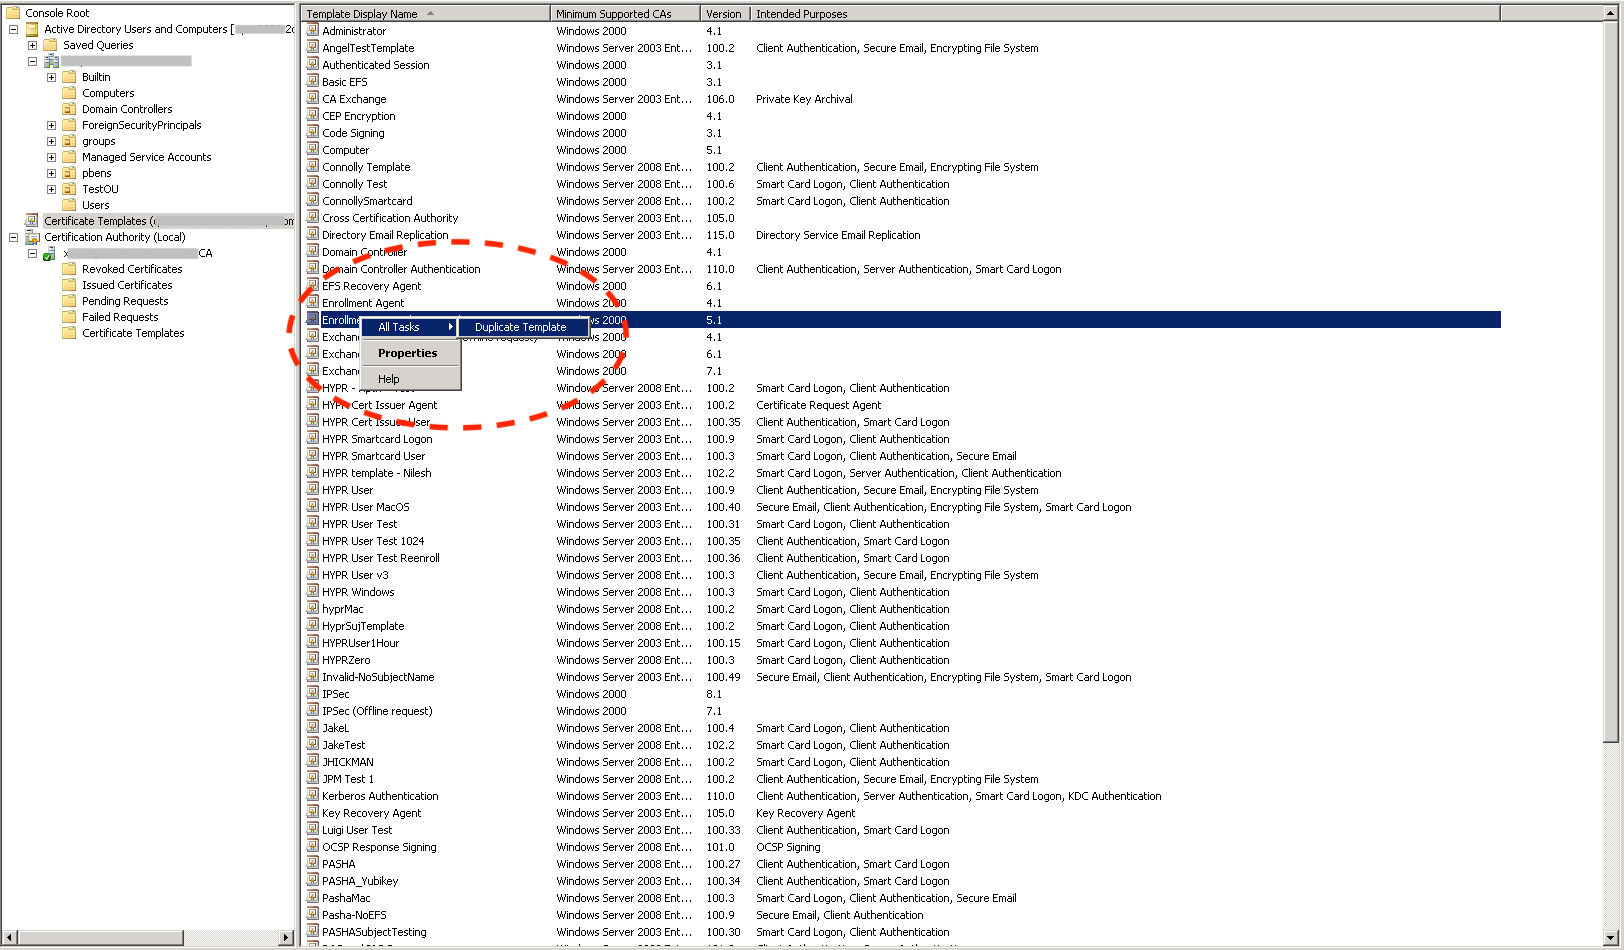
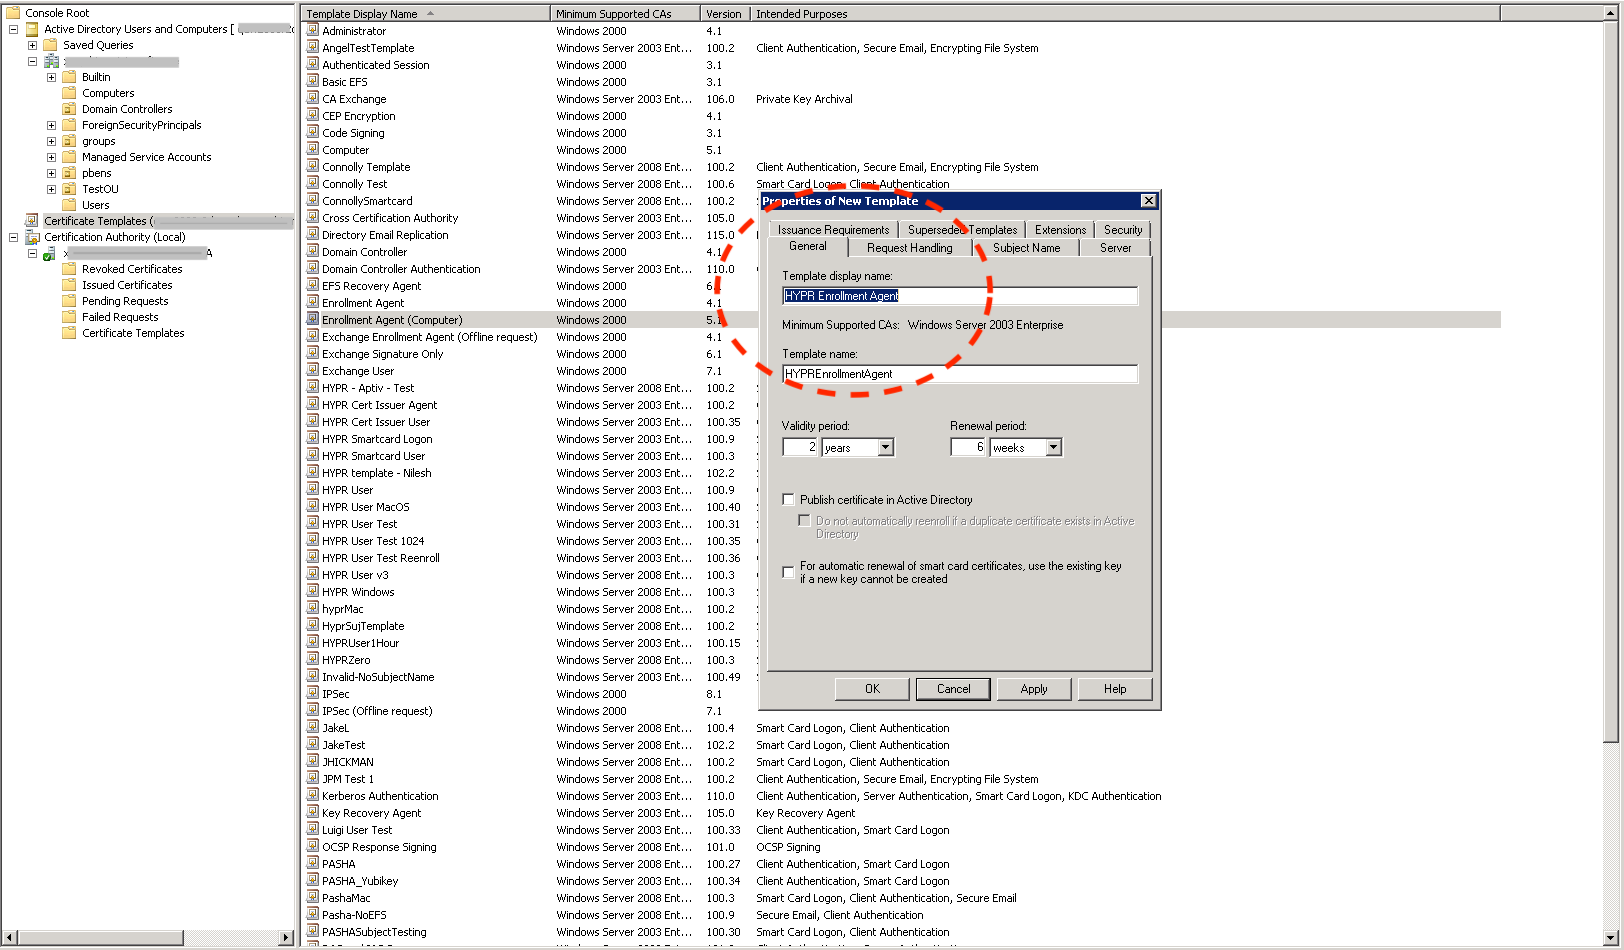
- Name the new template HYPR Enrollment Agent.
- Select the Security tab to display the current access control list for the template.
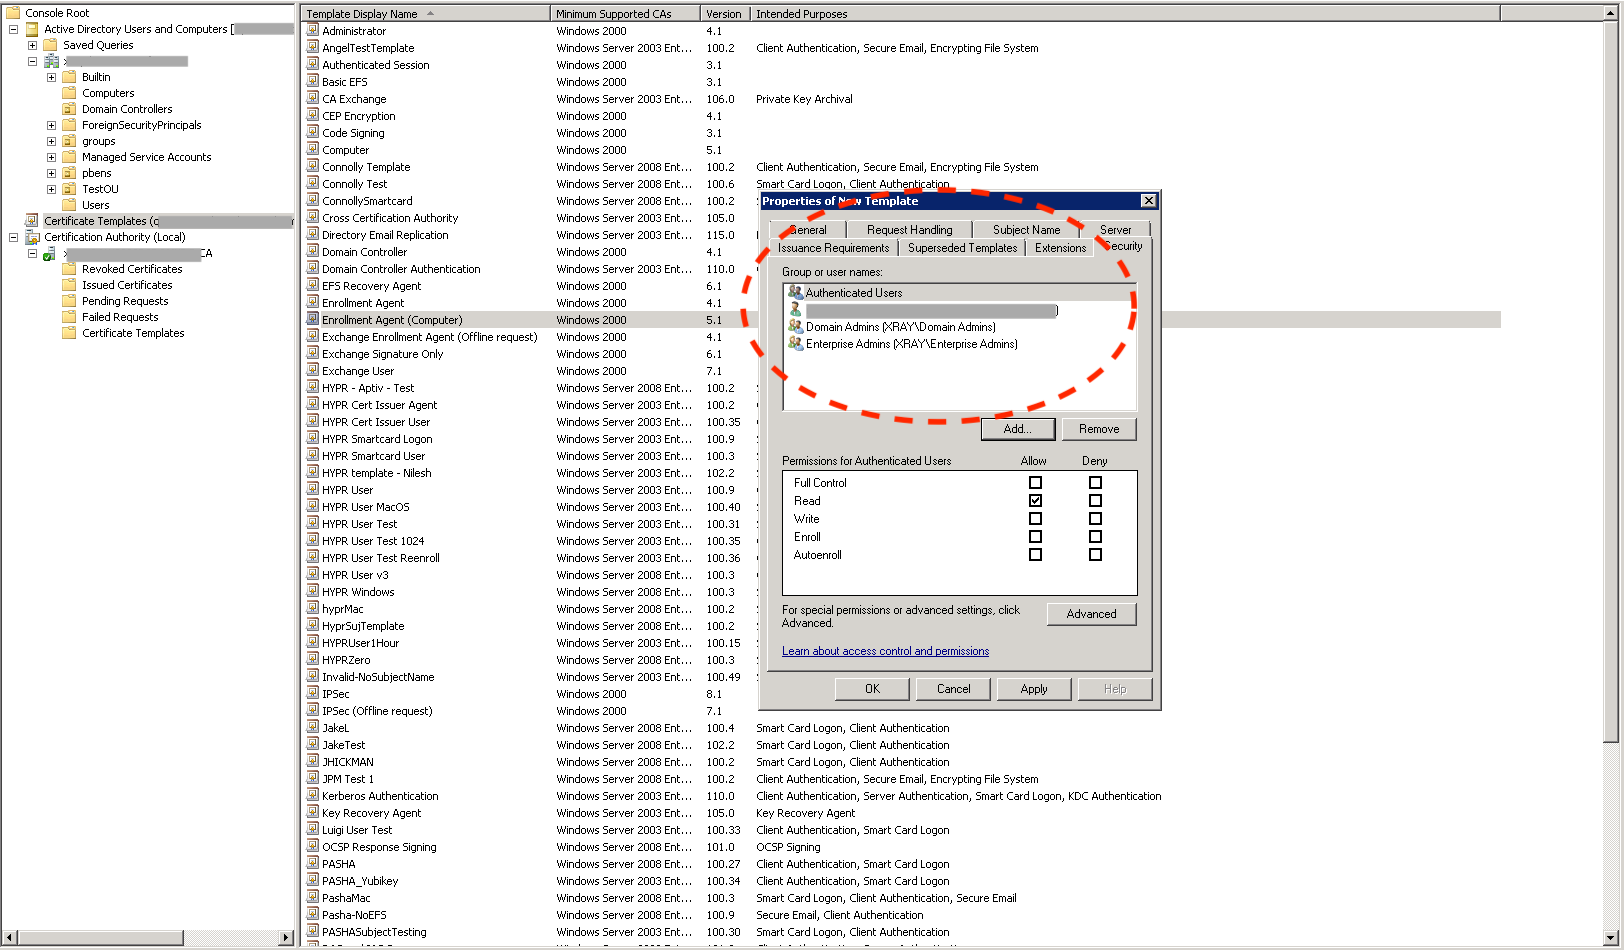
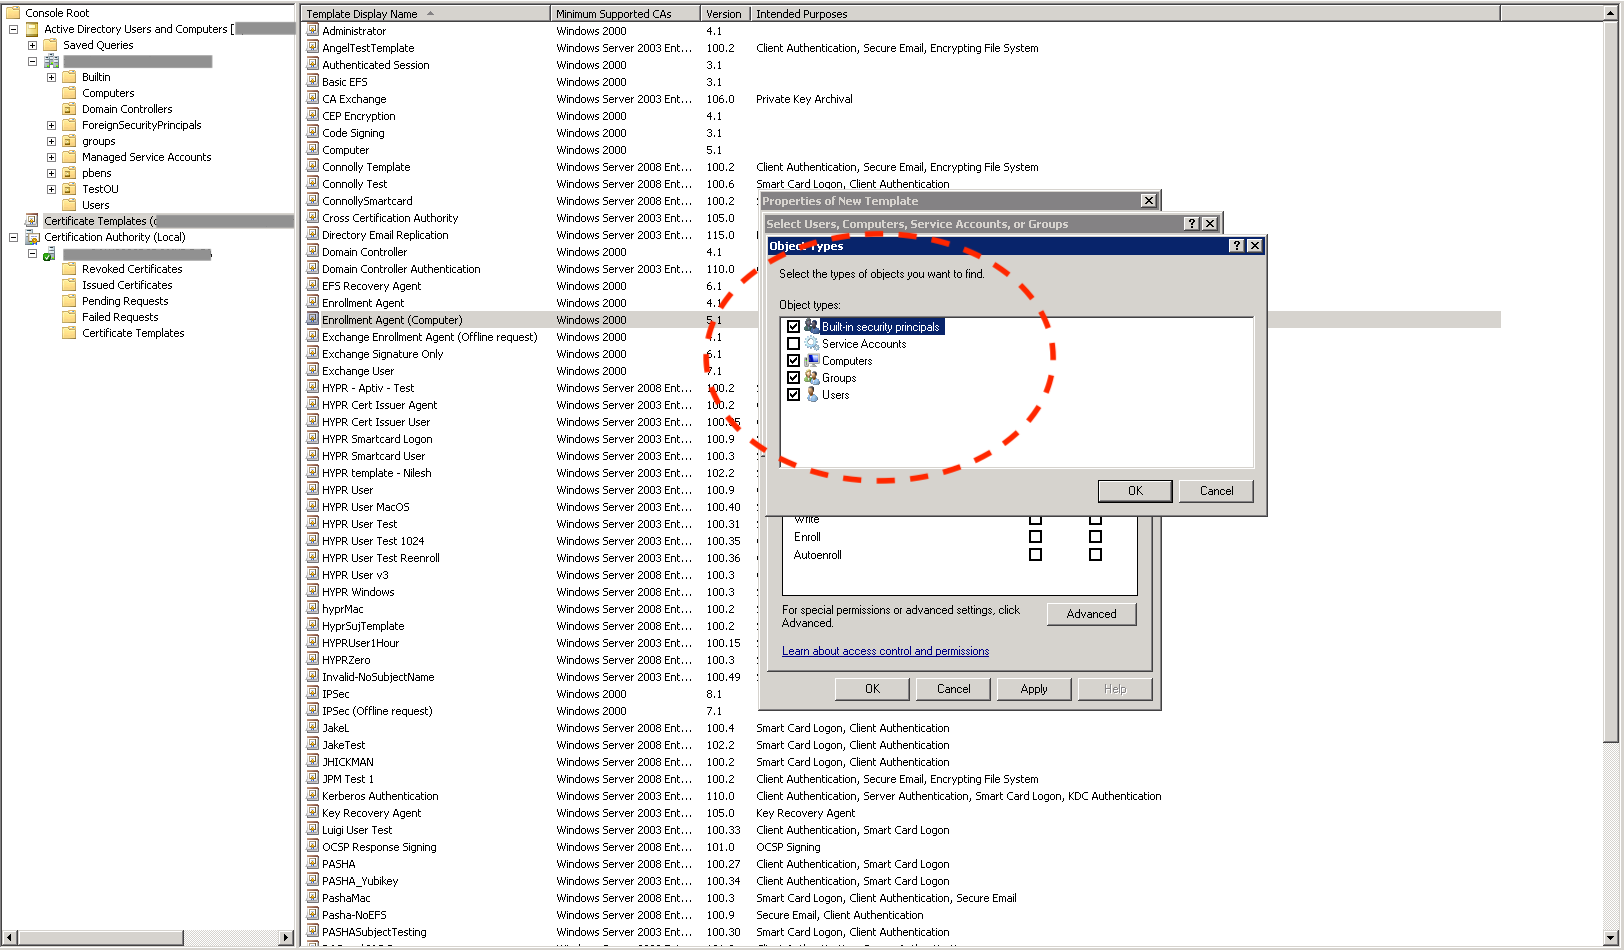
- To tighten the access controls on the template, click Add… and add an entry for the computer where the HYPR Enrollment Service will be running.

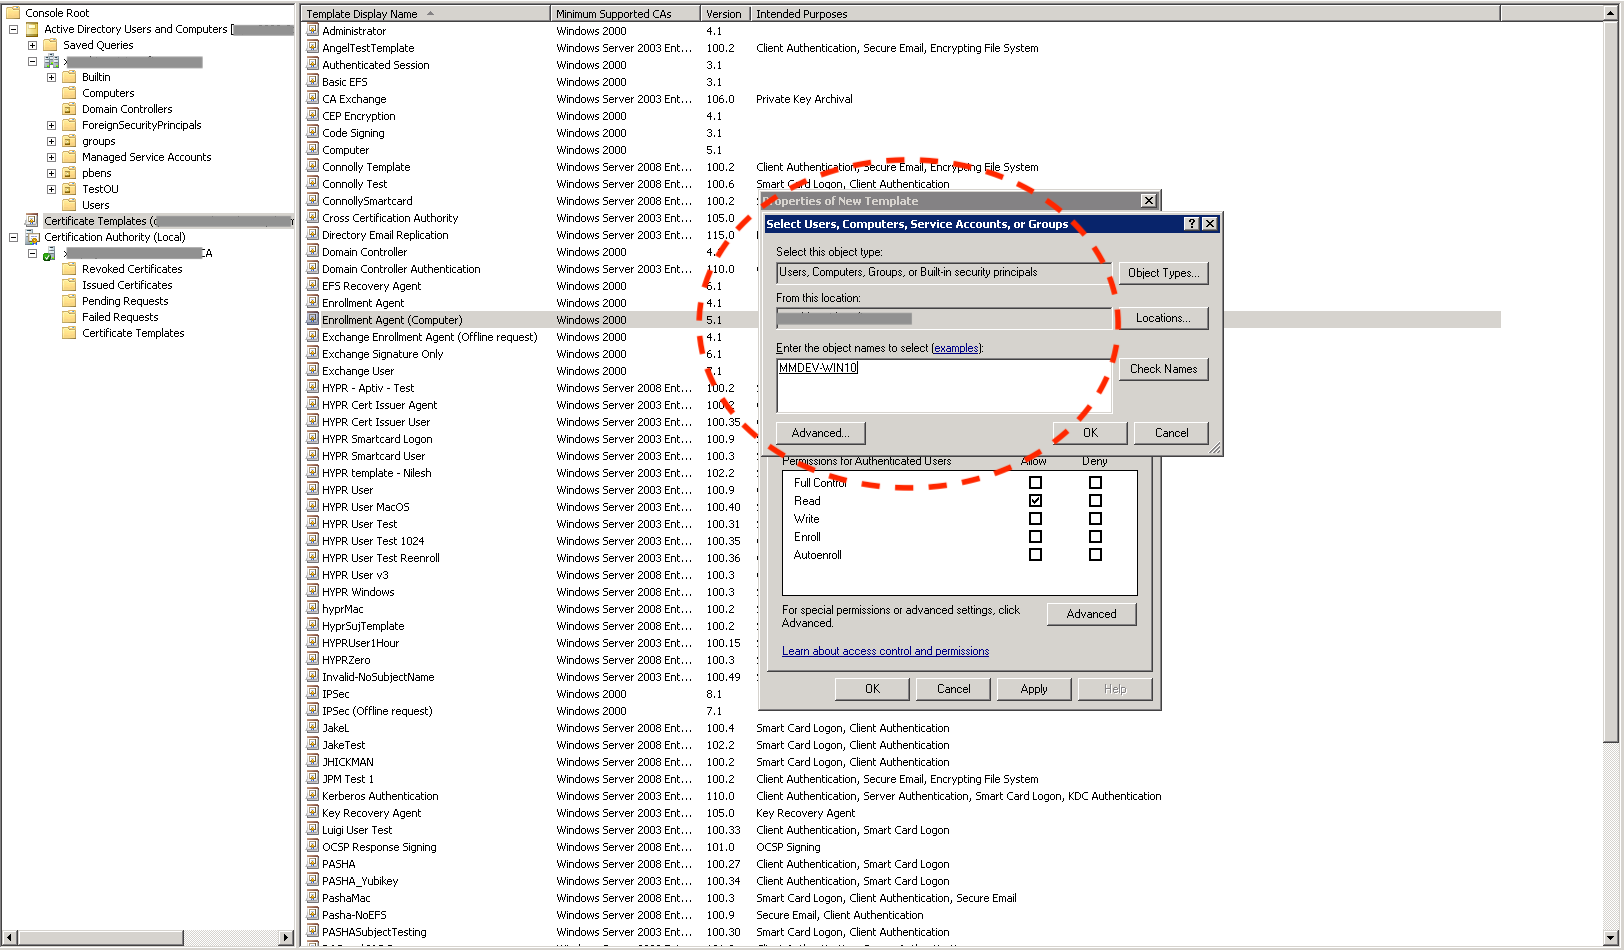
- Check the Allow column's box next to Enroll, then click Apply to save the template.
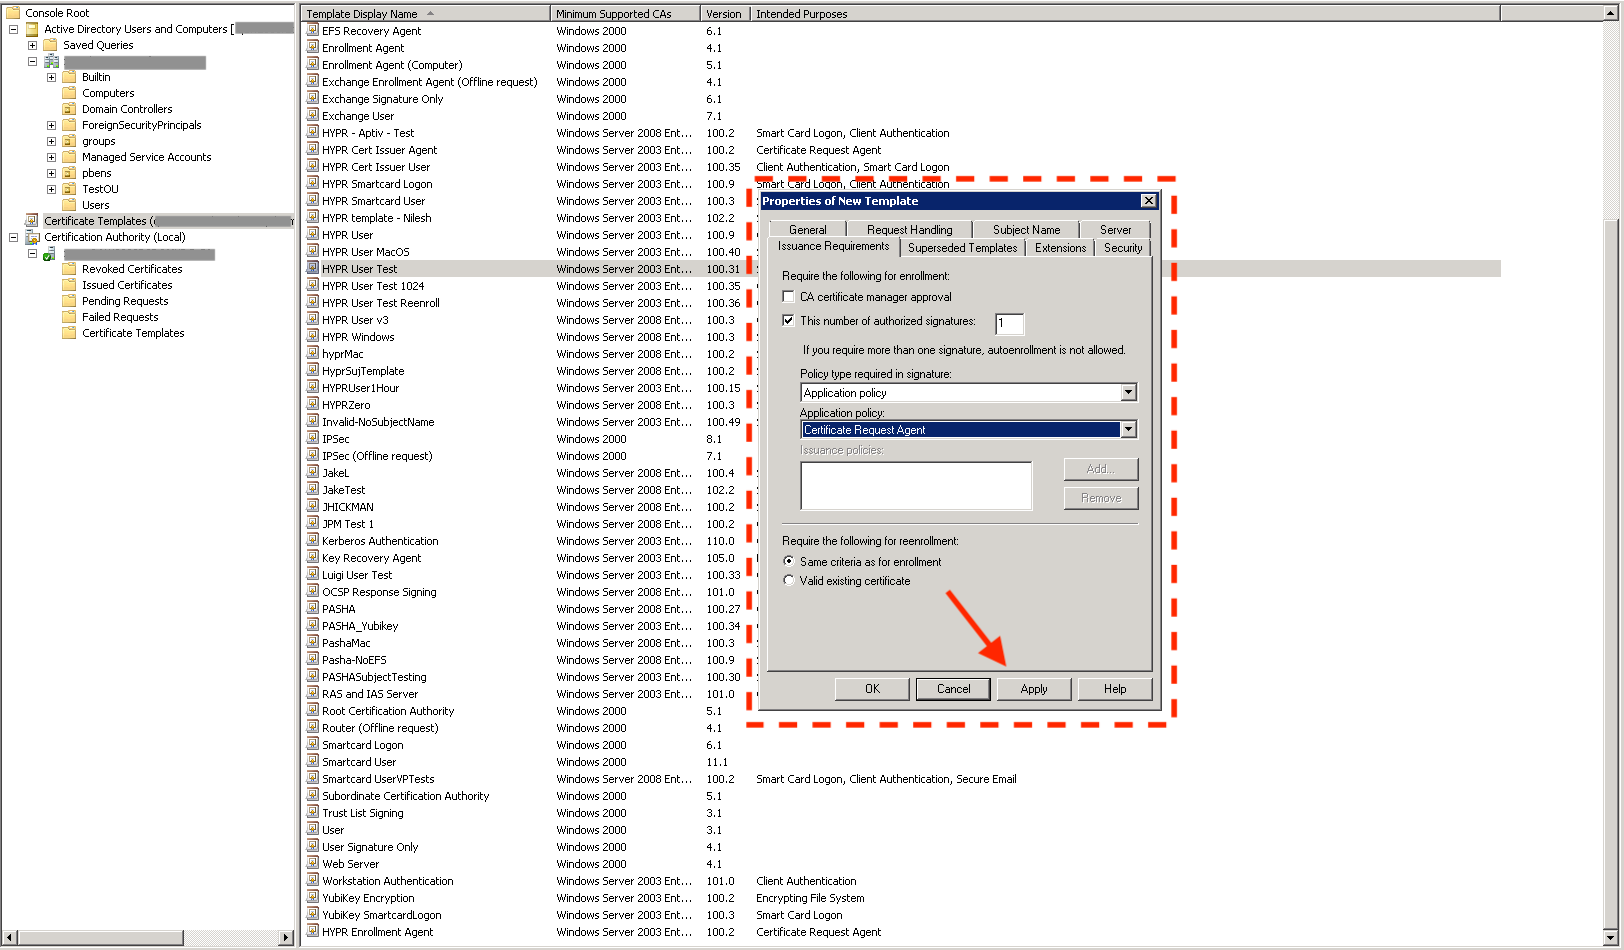
Create the HYPR Enrollment User Template
- Duplicate an existing template (see Creating a Custom Certificate Template) and name it HYPR Enrollment User. This is the template that will be used to issue user certificates.
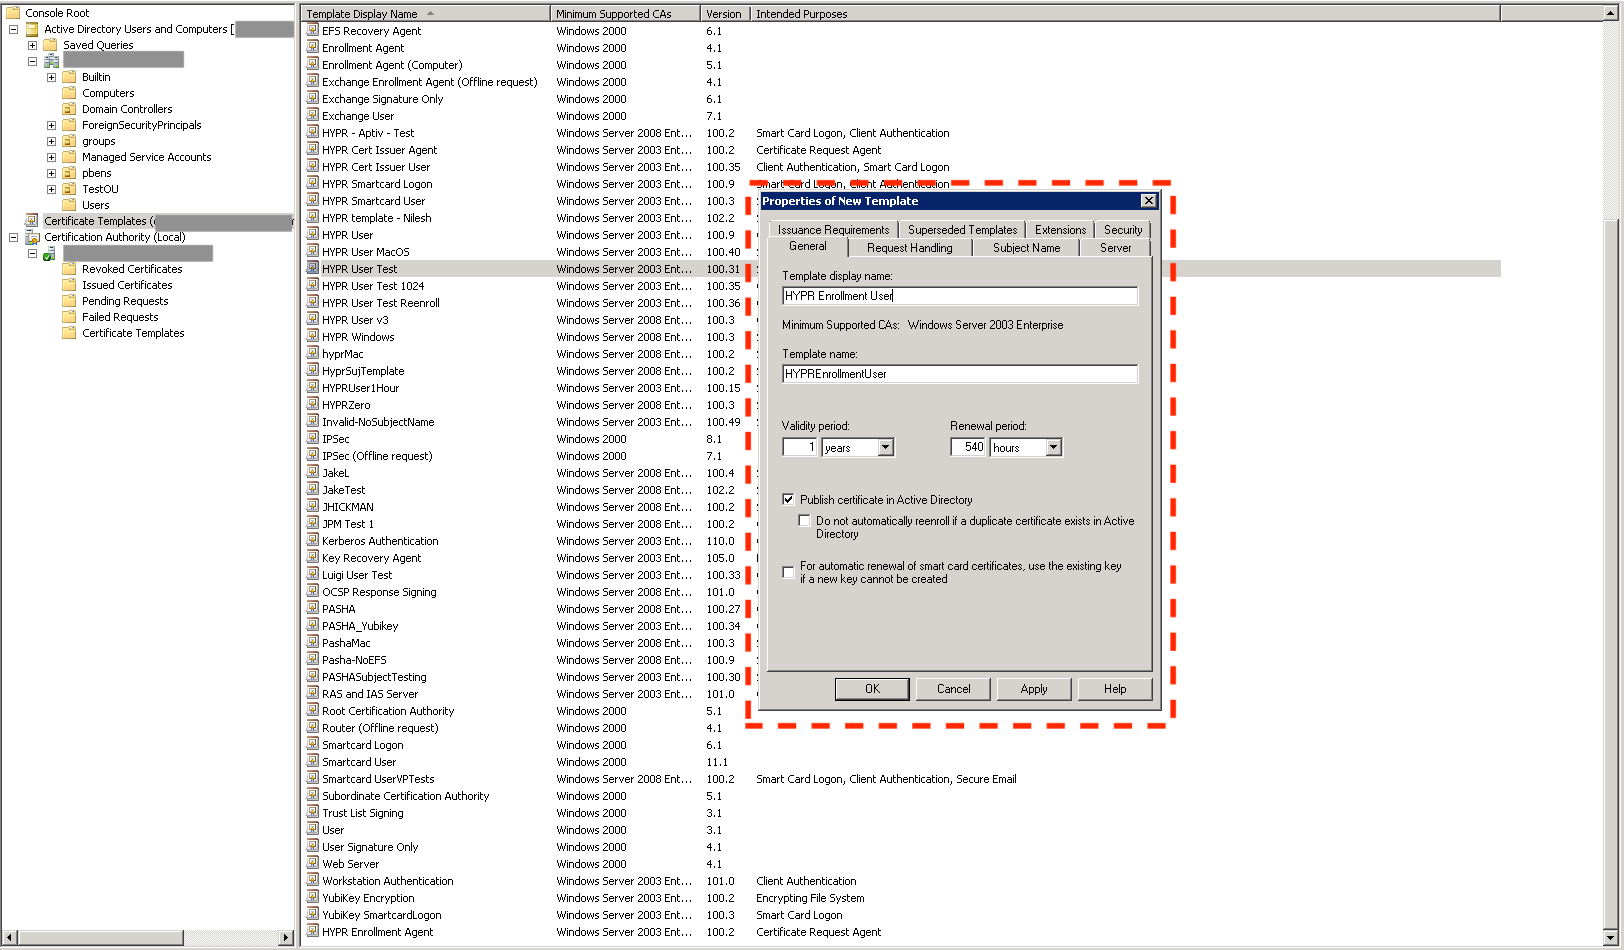
- Select the Issuance Requirements tab.
- Check This number of authorized signatures and give it a value of 1.
- Set the Application Policy to Certificate Request Agent.
- Click Apply to save the template.
Grant System Account Permissions
- Right-click the server name and choose Properties.
- On the Server Properties dialog, select the Security tab.
- Select the server's computer account. Under the Allow column, check the box for Issue and Manage Certificates, then click OK.
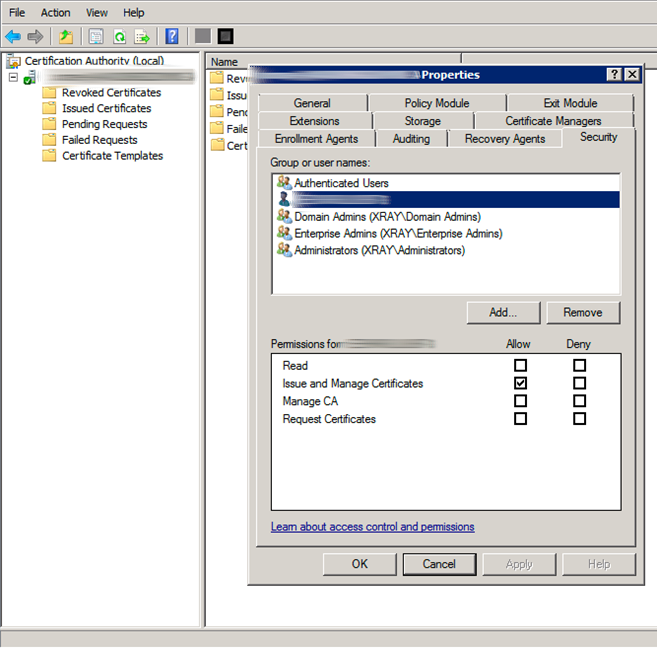
- On the Server Properties dialog, select the Certificate Managers tab. In the Certificate Managers pane, select the computer account you added in the previous step.
- In the Certificate Templates pane, click Add... and choose the HYPR Enrollment User template. Click OK.

Enable the Templates
- Right-click and select the New → Certificate Template to Issue menu option.
- Select the HYPR Enrollment Agent and HYPR Enrollment User templates from the list.
- Click OK to publish the certificate templates for use.

Deploy the HYPR Enrollment Agent Template
- On the Windows server where the HYPR Enrollment Service is running, deploy the Enrollment Agent certificate to the Local Machine certificate store. Run
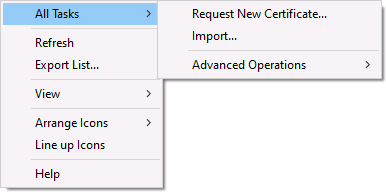
certlm.msc. - Right-click Personal and choose Certificates.
- Right-click Certificates and choose All Tasks → Request New Certificate.
- Continue to click Next until the following dialog is displayed.
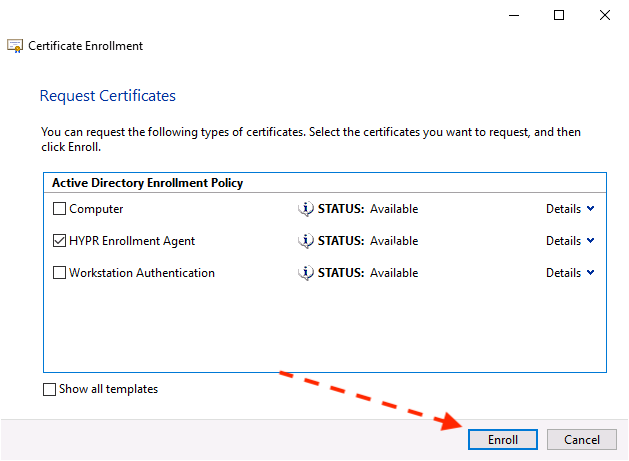
- Choose the HYPR Enrollment Template and click Enroll to deploy the Enrollment Agent certificate to the Windows server.
Configuring Active Directory (AD) Users
Before a user can start the web registration flow, their AD user account must be configured as follows:.
- In the management console, click Start.
- Navigate to Active Directory Users and Computers.
- In the top menu, click View -> Advanced Features.
- Select the user that you will invite to register.
- Under the General tab, enter the user's email address into the E-mail field.
- Click the Attribute Editor.
- Scroll down, click the mail attribute, and enter the user’s email address.
Updated 10 months ago