HYPR Windows Passwordless Login using Smartcard Playbook
Introduction
What is a smartcard authentication?
Public-key and certificate-based authentication are two common alternatives to password-based authentication. Instead of using a password, your identity is verified through the use of public and private keys. A certificate is a digital document that identifies an individual, server, company, or other entity and links that identity to a public key. Similar to a driver's license or passport, a certificate serves as widely accepted proof of identity. Public-key cryptography relies on certificates to prevent impersonation.
In smart card authentication, your credentials—public and private keys, along with a certificate—are stored on a smart card. These credentials can only be used once the card is inserted into a reader and the correct PIN is entered. Since this method requires both a physical device (the smart card) and knowledge of the PIN, it qualifies as two-factor authentication.
HYPR provides a certificate-based authentication for Windows and MAC workstations.
Products: HYPR Authenticate app and Workforce Access Client
Features: Passwordless MFA workstation login, Remote Lock, RDP, roaming user
Benefits
- Reduces the attack surface
- Makes login faster and simpler
- Helps avoid business risk
- Increases user productivity
- Lowers help desk support costs
- Reduces employee onboarding times
Expected Outcome
To successfully install, configure and use HYPR WFA client on workstations for passwordless authentication, remote lock, Remote Desktop Login and as a Roaming User
Preparing for the solution deployment
Preparing for the Solution Deployment | HYPR Identity Assurance
Platform Before deploying the HYPR Passwordless solution, ensure that the environment, identity infrastructure, and endpoint configurations are fully prepared. Completing the steps below helps avoid installation failures, authentication issues, and support escalations during rollout.
(Windows) HYPRReady Diagnostics Tool | HYPR Identity Assurance
Platform Before deployment, download and run the HYPRReady Tool on representative Windows endpoints to validate readiness.
Ensure the following checks pass:
-
Supported Windows OS version and patch level
-
Network connectivity to the HYPR tenant (HTTPS and WebSocket endpoints)
-
Proper proxy configuration and TLS inspection compatibility
-
Availability of required Windows services and cryptographic providers
-
Device join state (Azure AD Joined, Hybrid Joined, or Domain Joined)
Use the diagnostics output to remediate any failures prior to client installation.
Getting Started | HYPR Identity Assurance Platform
Confirm that the HYPR tenant and core platform components are ready:
-
HYPR Control Center access is available for administrators
-
Required administrator roles are assigned
-
HYPR tenant URL (rpUrl) and Application ID (appId) are identified
-
Installation tokens or enrollment methods are defined
-
Mobile application availability is confirmed for end users (iOS / Android)
At this stage, define whether the deployment will follow:
-
Quick Install (non–domain joined endpoints)
-
Advanced Install (Active Directory–integrated endpoints)
Passwordless Client Config | HYPR Identity Assurance Platform
Prepare the Passwordless Client configuration before deployment:
-
Create and validate the hypr.json configuration file
-
Define required parameters such as:
-
Relying Party URL
-
Application ID
-
Installation or registration behavior
-
-
Confirm authentication policies (PIN requirements, biometric enforcement)
-
Validate offline authentication and recovery options
This configuration should be finalized and tested prior to mass deployment.
Desktop Client | HYPR Identity Assurance Platform
Prepare endpoints and deployment tooling for the HYPR Desktop Client:
-
Confirm endpoints meet minimum hardware and OS requirements
-
Ensure users or deployment accounts have sufficient permissions
-
Validate that endpoint protection and firewall rules allow HYPR services
-
Decide on deployment method:
-
Intune / MDM
-
SCCM / Configuration Manager
-
Manual or scripted installation
-
For enterprise deployments, pre-package the client with configuration files and test silent installation behavior.
Workstation Settings | HYPR Identity Assurance Platform
Configure Workstation Settings in the HYPR Control Center to match enterprise security requirements:
-
Authentication behavior (lock, unlock, login)
-
PIN complexity and retry limits
-
Biometric enforcement policies
-
Device trust and recovery options
Ensure workstation policies are published and validated before user onboarding begins.
Requirements Analysis | HYPR Authenticate Passwordless Client
This section outlines the certificate infrastructure and Active Directory requirements necessary to support HYPR Passwordless authentication using Microsoft Certificate Services (AD CS). These requirements apply to Advanced Installations and environments leveraging certificate-based authentication.
Microsoft Certificate Services (AD CS) | HYPR Identity Assurance
Platform A functioning Microsoft Active Directory Certificate Services (AD CS) deployment is required to issue authentication certificates for HYPR Passwordless users.
Ensure the following prerequisites are met:
-
An Enterprise Certification Authority (CA) is deployed and operational
-
The CA is integrated with Active Directory
-
The CA supports user authentication certificates
-
Certificate auto-enrollment is enabled for target users or devices
-
CRL and OCSP endpoints are reachable by domain controllers and endpoints
The CA must be trusted by all domain-joined systems participating in passwordless authentication.
HYPR Certificate Template | HYPR Identity Assurance Platform
A dedicated HYPR certificate template must be created and published in AD CS to support passwordless authentication.
Template requirements:
-
Based on a Smart Card Logon or User Authentication template
-
Includes the Client Authentication and Smart Card Logon EKUs
-
Uses a compatible cryptographic provider (KSP recommended)
-
Supports strong key sizes and modern algorithms (e.g., RSA 2048 or ECC)
Configuration considerations:
-
Allow enrollment permissions for target user groups
-
Enable auto-enrollment where applicable
-
Ensure the Subject Name is correctly populated from Active Directory
-
Validate template compatibility with HYPR client workflows
This template is used by HYPR to issue certificates that represent the user’s passwordless credential.
Domain Controller Certificate Supporting Smart Card Authentication |
HYPR Identity Assurance Platform All domain controllers participating in passwordless authentication must have a valid domain controller certificate that supports smart card authentication.
Certificate requirements:
-
Issued to each domain controller from the enterprise CA
-
Contains the Smart Card Logon EKU
-
Includes Server Authentication where required
-
Is trusted by domain members and endpoints
-
Has a valid and reachable CRL distribution point
Validation steps:
-
Confirm certificates are present in the Local Computer certificate store on each DC
-
Verify smart card logon functionality using built-in Windows tools
-
Ensure domain controllers can validate user authentication certificates issued by the HYPR template
Without a smart card–capable DC certificate, certificate-based logon attempts will fail even if user certificates are issued correctly.
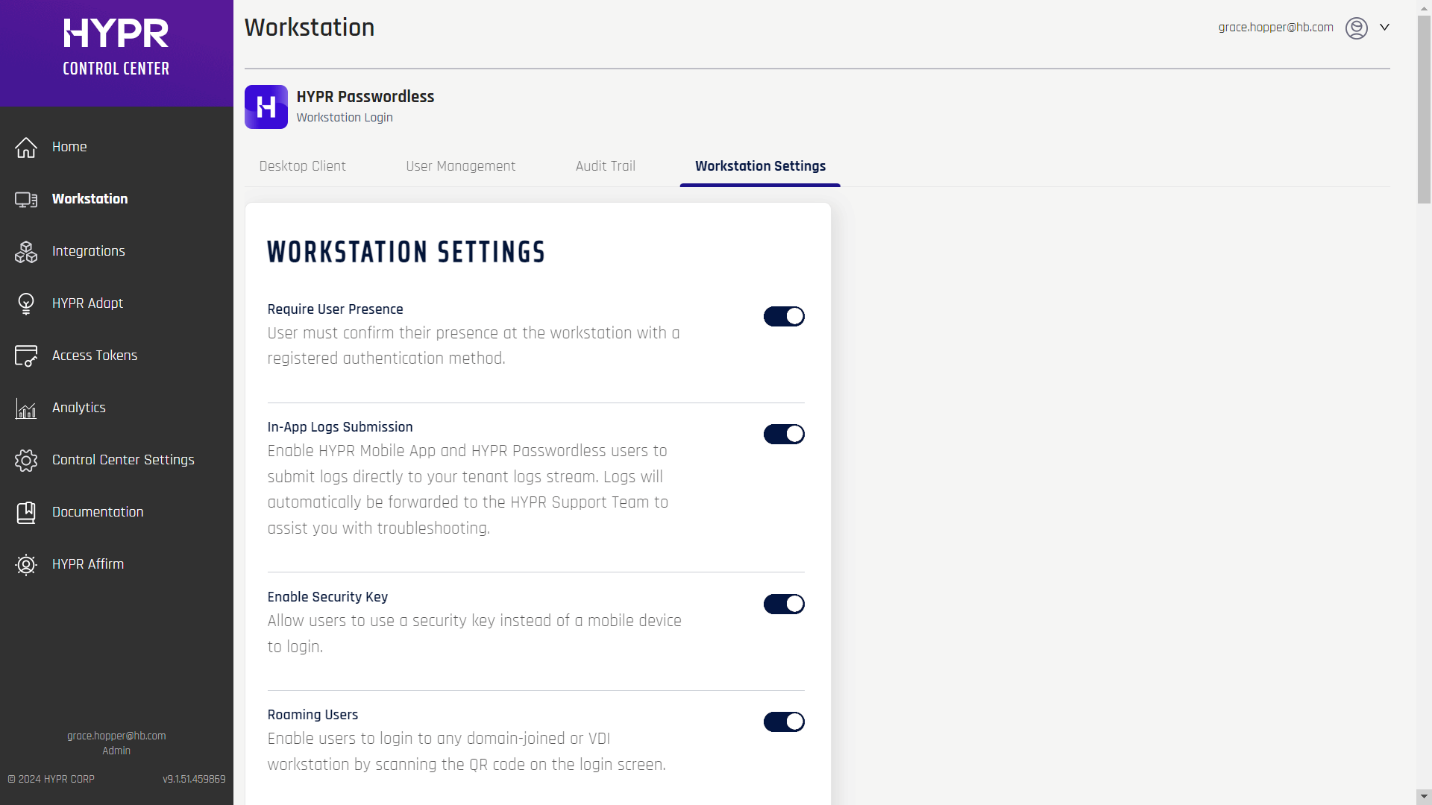
Configuring Control Center for HYPR Passwordless Client
Access Control Center using admin credentials and select standard mode.
Navigate to Workstation settings tab and select Workstation Settings
Use the Workstation Settings screen to enable and configure optional HYPR workstation login features. These changes by default affect the HYPR Default Workstation Application and will be used as the default settings for any newly created RP Applications. To manually change Workstation Settings for individual RP Applications, you must be in Control Center Advanced Mode > Select an Application > Application Configuration > Workstation Settings. The UI is identical to what is described in this article.
Workstation Settings can be administered using the following RP Application > Workstation API calls:
- Retrieve workstation settings: GET /cc/api/appconfig/workstation
- Update workstation settings: PUT /cc/api/appconfig/workstation
Require User Presence for Registration
Windows Only
This setting doesn't apply when the Single Registration Web-to-Workstation flow is enabled since the registration happens on the Web
If enabled, the Require User Presence feature will prompt users to complete their workstation account authentication (PIN, Security Key, smart card, etc.) as an extra security step when registering a mobile device. While this is enabled, the default one-minute timeout to allow for scanning the QR code is extended to three minutes.

In-App Logs Submission
Enables logs to be sent directly to the tenant logs from inside the Application. The same information is also sent directly to HYPR Customer Support when users do so. In the Support dialogs, the Company Display Name from General Settings will only be shown for the App if this feature is ON.
Mac users have some unique options surrounding this feature. See also User Experience: Contact Support for how this setting affects the user experience on HYPR Passwordless for Mac.

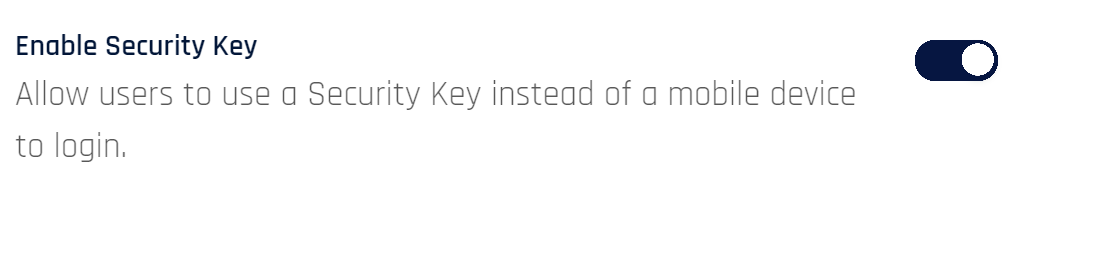
Enable Security Key
If enabled, the Enable Security Key feature allows users to register a security key or smart-card via the HYPR Passwordless client and use it for workstation authentication as an alternative to their mobile device.
Related Topics:
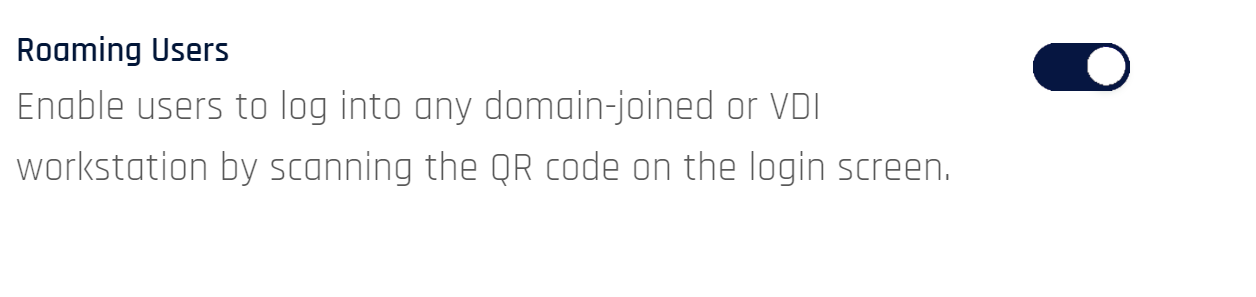
Roaming Users
Windows Only
If enabled, the Roaming Users feature allows users to pair their mobile device once then access any domain-joined desktop by scanning a QR code displayed on the login screen. For a description of the user experience, see Logging In As a Roaming User.
Users Must Pair Again to Use This Feature!
After the Roaming Users feature is activated in the Control Center, users will need to re-register their mobile devices with the HYPR Passwordless application.
HYPR supports Single Registration: Web-to-workstation operations for roaming users. Additional Virtual Desktop Infrastructure (VDI) configuration must be performed; the following limitations apply:
-
If a user has multiple accounts registered, the user cannot select which account to use when authenticating
-
Offline and Recovery PINs are not generated on the workstations for roaming users
Enable Offline Mode
Offline Mode allows users to perform a PIN-based login when they don't have an internet connection for either their mobile device or the workstation itself. For a description of the user experience, see Unlocking While Offline.

In addition to enabling/disabling Offline Mode, you can set the following parameters:
| Parameter | Description |
|---|---|
| PIN Length | The number of alphanumeric characters users will need to enter on the workstation login screen when their mobile device or the workstation is offline (6-13). |
| Number of Offline PINs | The number of times a user can access their machine while offline (10-25). Users are warned they're running low on PINs when they have 20% remaining and the PIN count is reset upon successful completion of a normal online login. |
| PIN Display Timeout | Number of seconds the PIN will be displayed on the user's smartphone (30-300). |
| Offline PIN Prompt | Number of seconds before the offline PIN is displayed when the user is online. |
| Offline Access Days | The number of consecutive days a user can login while offline (7-90). Users are warned they're running low on days when they have 20% remaining and the offline access day count is reset upon successful completion of a normal online login. |
Recovery Mode
Recovery Mode allows users to perform a PIN-based login when they don't have access to their mobile device. For more information, see Unlocking with a Recovery PIN for the user experience this enables.
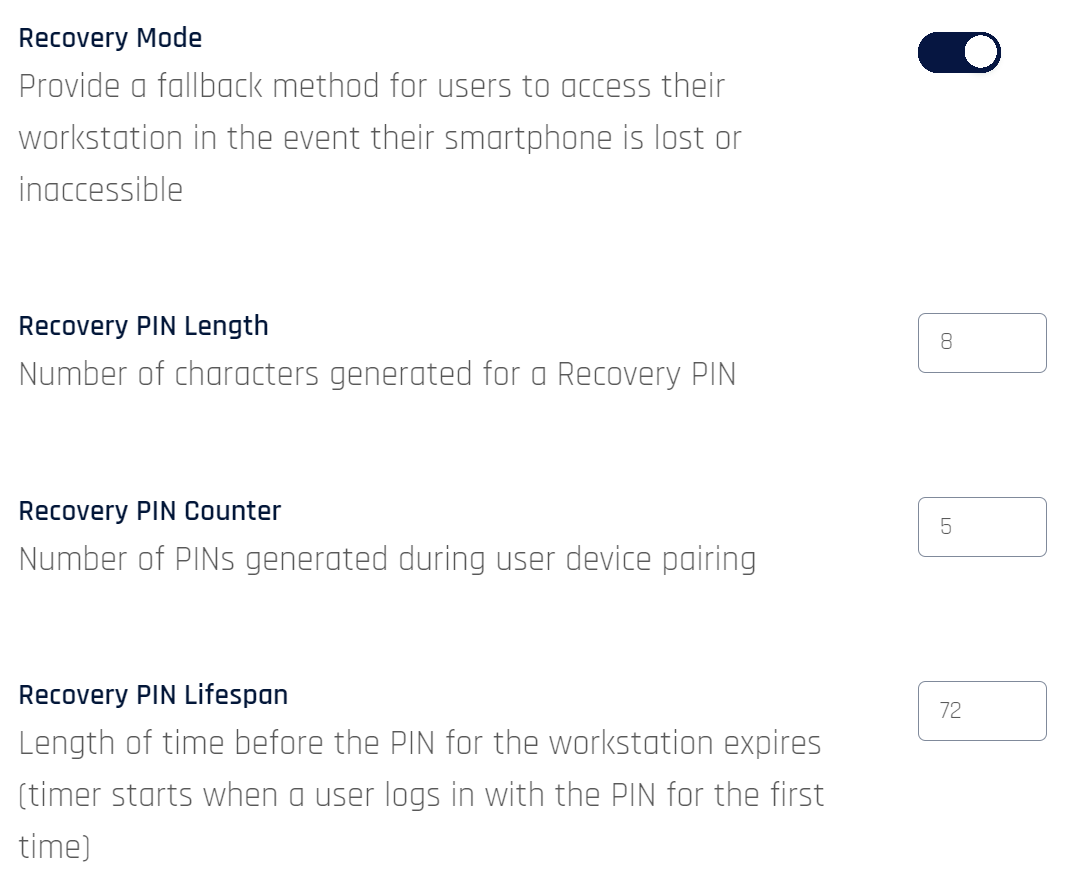
In addition to enabling/disabling Recovery Mode, you can set the following parameters:
| Parameter | Description |
|---|---|
| Recovery PIN Length | The number of alphanumeric characters users will need to enter on the workstation login screen when they request a Recovery PIN (6-13). Default: 8 |
| Recovery PIN Counter | The number of Recovery PINs generated during the pairing process (1-10). Default: 5 |
| Recovery PIN Lifespan | Number of hours for which the Recovery PIN is valid (24-72). The timer starts when the user first logs into the workstation using the PIN. Default: 72 |
Security Key Recovery Mode
Windows Only
Enables a recovery PIN for security key or smart-card users who do not have access to their device and need to login. See Pairing with a Security Key for security key or smart-card PIN management.
Non-exportable Private Keys
If non-exportable private keys are enabled for the HYPR Passwordless client, Security Key Recovery Mode will be disabled automatically.

In addition to enabling/disabling Security Key Recovery Mode, you can set the following parameters:
| Parameter | Description |
|---|---|
| Recovery PIN Length | The number of alphanumeric characters users will need to enter on the workstation login screen when they request a Recovery PIN (6-13). Default: 8 |
| Recovery PIN Counter | The number of Recovery PINs generated during the pairing process (1-10). Default: 5 |
| Recovery PIN Lifespan | Number of hours for which the Recovery PIN is valid (24-72). The timer starts when the user first logs into the workstation using the PIN. Default: 72 |
Use the Desktop Client screen in the Workstation section to select and download the HYPR Passwordless client installers for Windows and Mac.
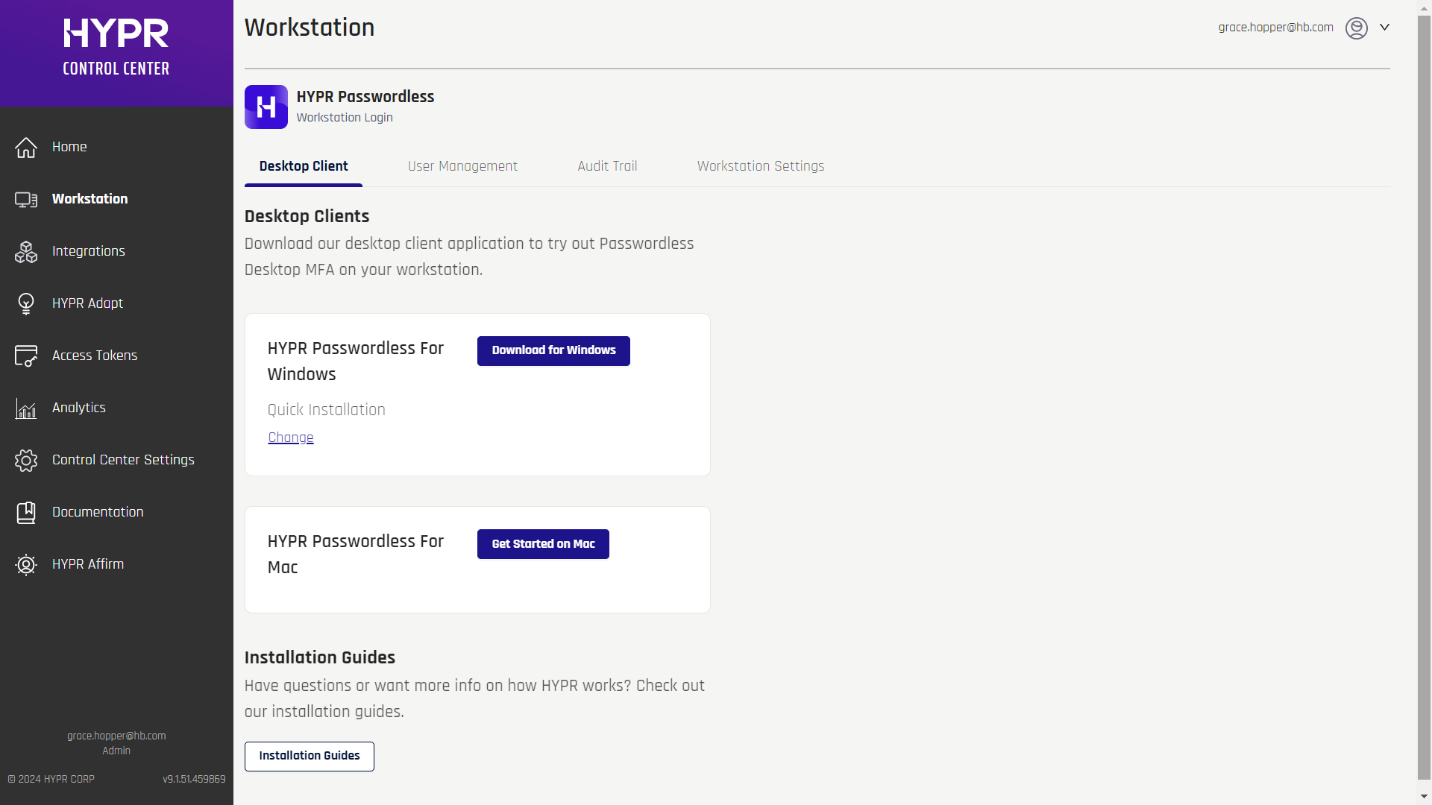
Downloading the HYPR Passwordless Client Installer
One-Time Only
For both the Windows and macOS installers, the button to download the Passwordless client will at first be labeled Get Started on [Windows or Mac]. Once you have chosen which type of installation will download, the button for that installer changes to Download for [Windows or Mac].
-
Click the Download for... button for the platform you're using (Windows or Mac).
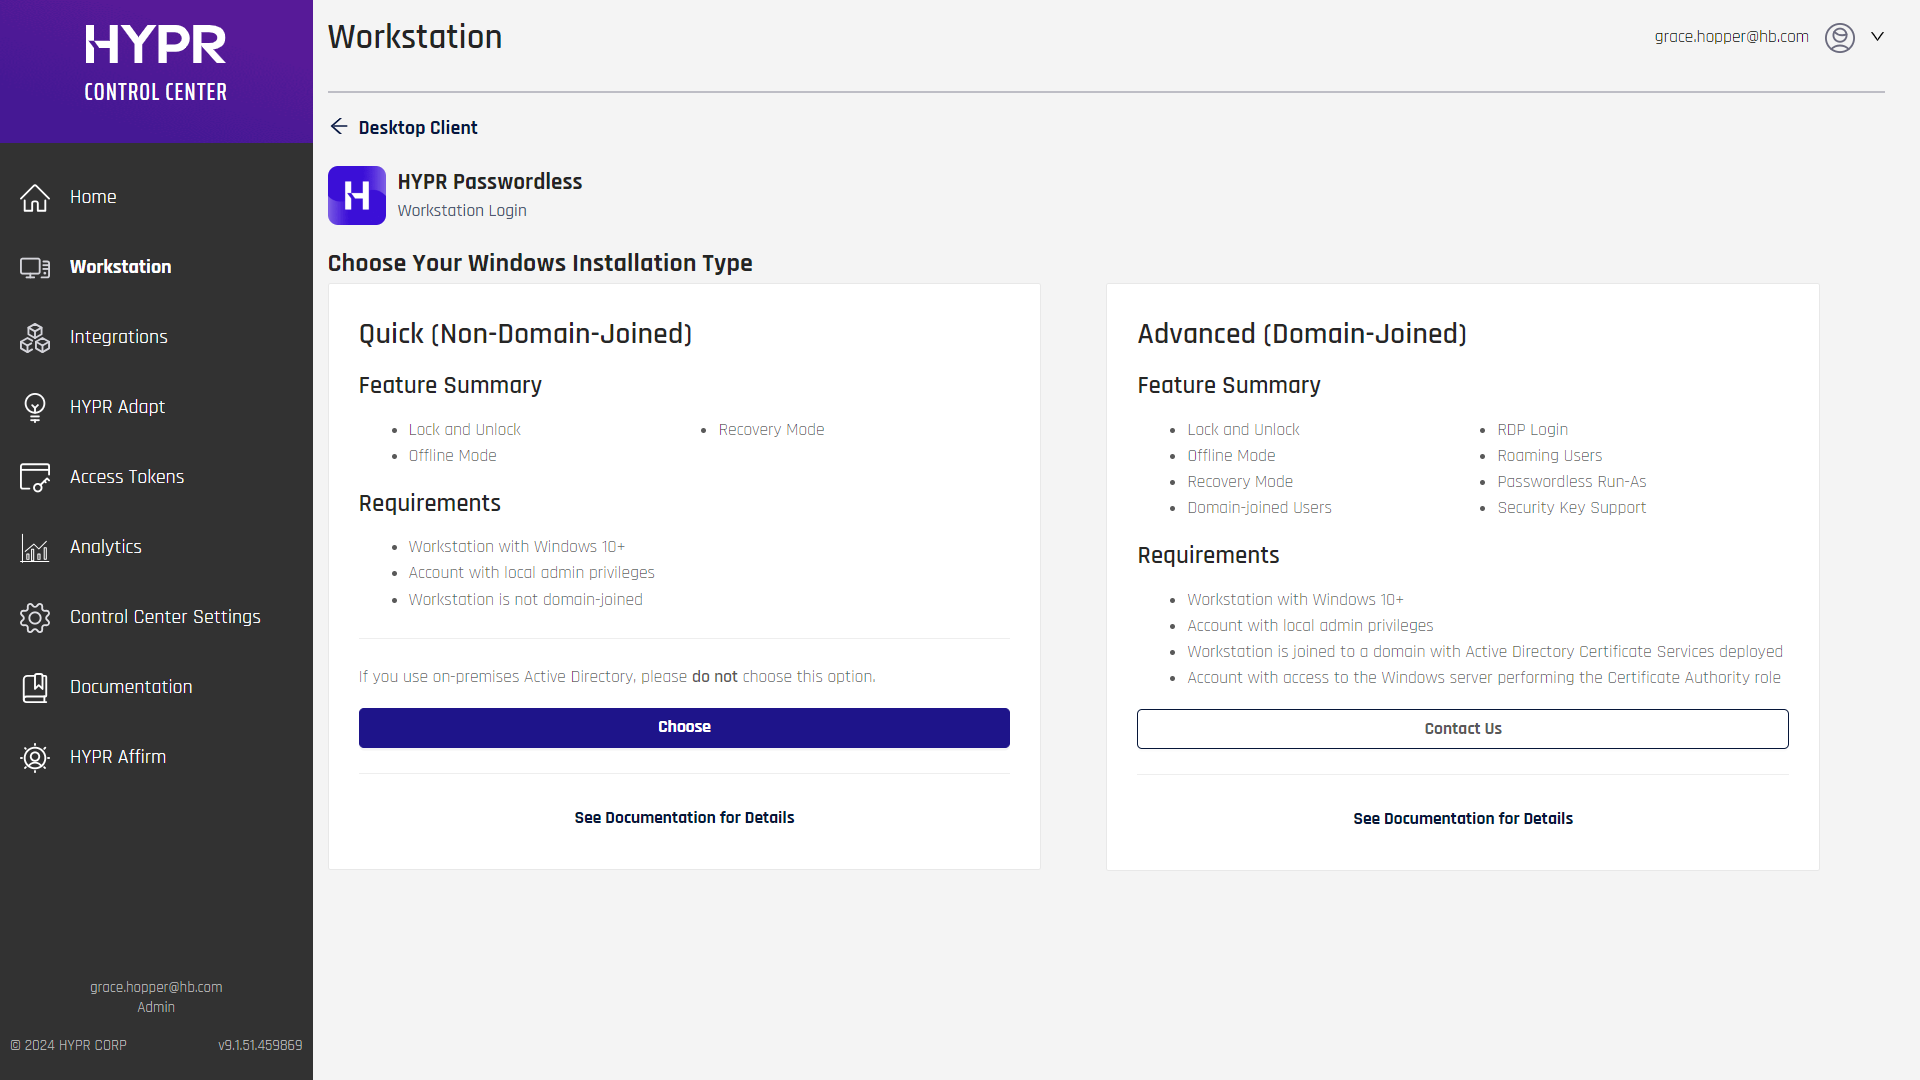
-
Choose your installation type: Quick (Non-Domain-Joined) or Advanced (Domain-Joined).
-
To continue with a Quick installation, click Choose in the left pane and continue with the next step
-
If you want a more configurable client, click Contact Us on the Advanced pane, and await further instructions
-
- Confirm the requirements to start the download.
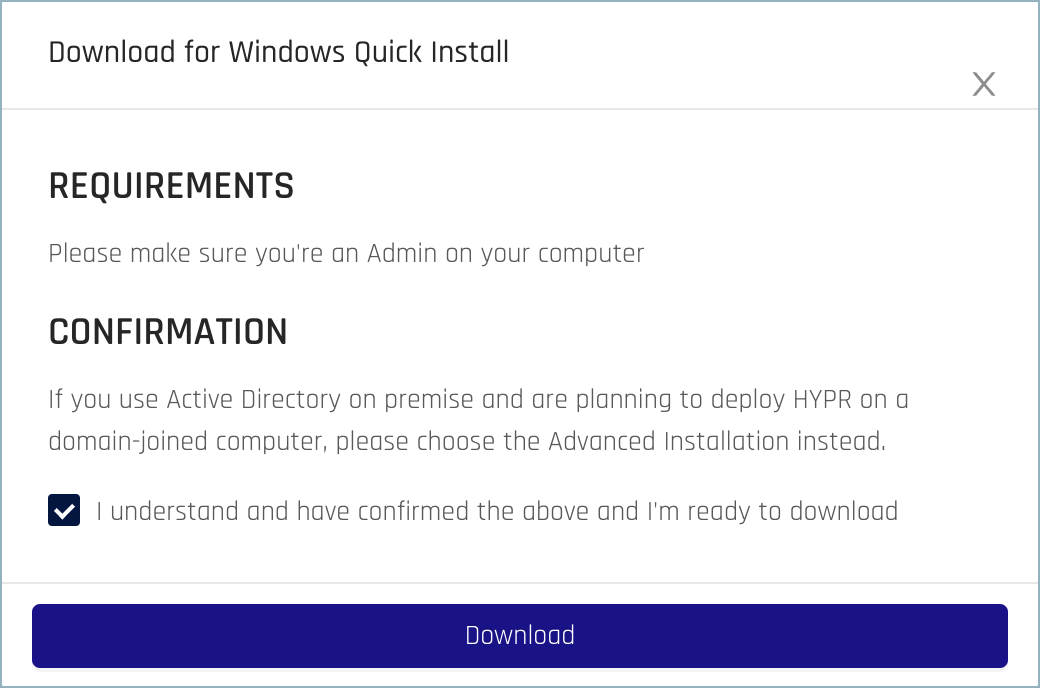
- Once the installer file has finished downloading, follow the on-screen steps to start the install process
Installing Passwordless client with the UI
Passwordless for Windows
To install the HYPR Passwordless client application on Windows, run HYPR installer as follows:
- Open the downloaded HYPR Installer-WINDOWS.zip package and extract the WorkforceAccess_x64.msi file and hypr.json configuration file to the same folder.
Full Extraction
Make sure you extract the files rather than simply opening the .zip and running WorkforceAccess_x64.msi directly. The installer will start but won't be able to read the hypr.json configuration file.
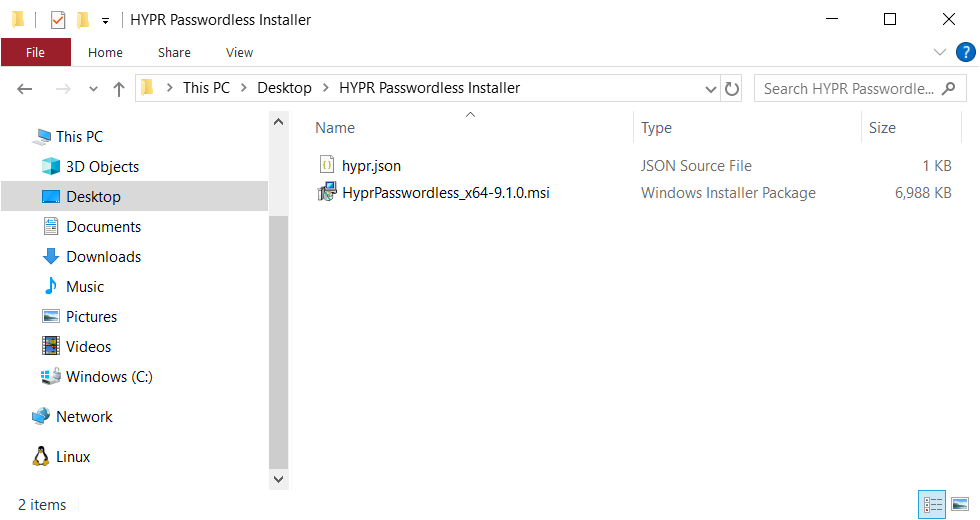
- Double-click the HyprPasswordless_x64-<version>.msi file to start the installation.

- Click Next to display the EULA.

-
If the End User Agreement Terms are acceptable, select the checkbox and click Next.
-
If you're performing a Quick Install, you don't need to provide any more parameters. You can skip this step.
If you're performing an Advanced Install, you'll see the Environment Setting dialog.
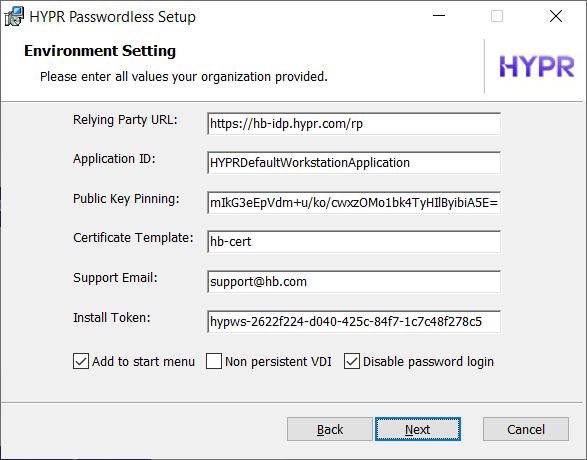
| Field | Value |
|---|---|
| Relying Party URL | The URL for the HYPR server. Corresponds to the 'rpUrl' manual installation parameter. |
| Application ID | The unique identifier for the HYPR RP Application. Corresponds to the 'rpAppId' manual installation parameter. |
| Public Key Pinning | The PIN hash used for SSL Pinning on the workstation. Corresponds to the 'pinningHash' manual installation parameter. |
| Certificate Template | The name of the Active Directory certificate template. Corresponds to the 'certTemplate' manual installation parameter. |
| Support Email | The email for users to contact corporate support. Corresponds to the 'supportEmail' manual installation parameter. |
| Install Token | The HYPR workstation installation token. Corresponds to the 'installToken' manual installation parameter. |
| Add to Start Menu | Add a HYPR Passwordless shortcut to the Windows Start Menu. |
| Non-persistent VDI | If your site uses stateless Virtual Desktop Infrastructure, toggle this setting On. |
| Disable Password Login | Toggle On to hide the password login/unlock option on Windows. Corresponds to the registry entry \HKEY_LOCAL_MACHINE\SOFTWARE\HYPR Workforce Access\Config\Disable Password Login. |
Value Add
Normally the values on the Environment Setting screen are pre-populated from the hypr.json configuration file (see Installing Manually) and shouldn't be changed. For an Advanced Install, HYPR Support may also provide you with additional values to use here.
- Click Next to continue.
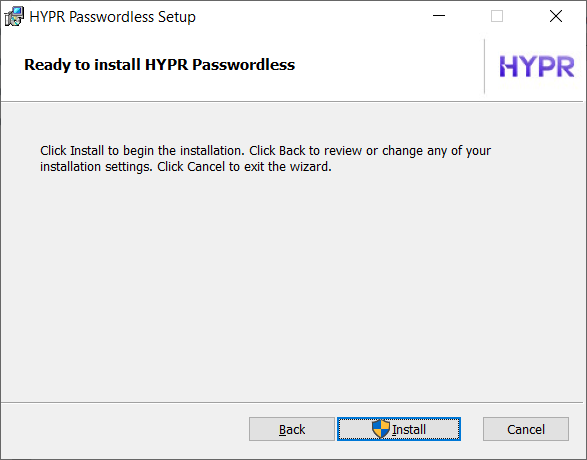
- Click Install to begin the installation.

-
When the installation is done, click Finish.
-
Click Yes to restart now or No if you plan to manually restart later.

Give It the Boot
HYPR Passwordless may not function fully if opened before a restart.
If you're deploying across your organization using a desktop management tool or using some other mechanism that requires a silent install, the HYPR Passwordless client for Windows can be also installed from the command line. For more information, please see
Install via msiexec (silent) | HYPR Identity Assurance Platform
Install via msiexec (silent) | HYPR Identity Assurance Platform
You can deploy the HYPR Passwordless client on Windows without displaying the installation UI by using the msiexec command. This is ideal for automated deployments or tools like Intune/SCCM.
Windows Silent Install Steps
Option 1: Using hypr.json
-
Place the hypr.json configuration file in the same folder as the HYPR .msi installer.
-
Run the silent installation:
-
msiexec.exe /qn /i WorkforceAccess_x64.msi
This installs the client using the parameters defined in hypr.json.
Option 2: Passing Parameters Inline
-
Run msiexec with required installation parameters directly on the command line. For example:
-
msiexec.exe /qn /i WorkforceAccess_x64.msi HYPRAPPID="HYPRDefaultWorkstationApplication"
-
HYPRRP="https://yourtenant.hypr.com/rp"
-
HYPRHASH="…pinning hash…"
-
HYPRINSTALLTOKEN="…install token…"
-
HYPRSUPPORT="support@example.com"
-
Each parameter maps to a configuration property that the HYPR client needs to install correctly.
📝 Notes
-
Run this from an elevated command prompt (administrator).
-
The silent switch /qn suppresses all UI.
-
Parameters passed on the command line override any values in hypr.json.
Creating a Custom Certificate Template
This document describes how to create a custom Active Directory certificate template on a Windows server and then configure the HYPR Passwordless client application to use the certificate when a user registers or authenticates on a Windows or macOS workstation. There are three main steps in this process:
-
Create a Certificate Template on the Server
-
Issue the Certificate Template on the Server
-
Configure HYPR to Use the Certificate on the Workstation
Before you begin
Verify the following:
-
Active Directory Certificate Services are deployed within the domain
-
Your account on the Windows server has privileges to modify the Certificate Authority settings
-
The HYPR Passwordless client application is already installed on the workstation
OS-specific Templates
The custom certificate template requirements vary slightly between Windows and Mac, so if you have both types of workstations in your environment you'll need to create two templates. The instructions below indicate where there are differences.
API Calls
Workstation certificate operations appear under RP Applications > Workstation > Certificates in the HYPR Passwordless API.
For domain certificates, see these Control Center > Certificates calls.
Create a Certificate Template on the Server
-
Log in to the Windows server that performs the Certificate Authority role, either directly or via a remote desktop client.
-
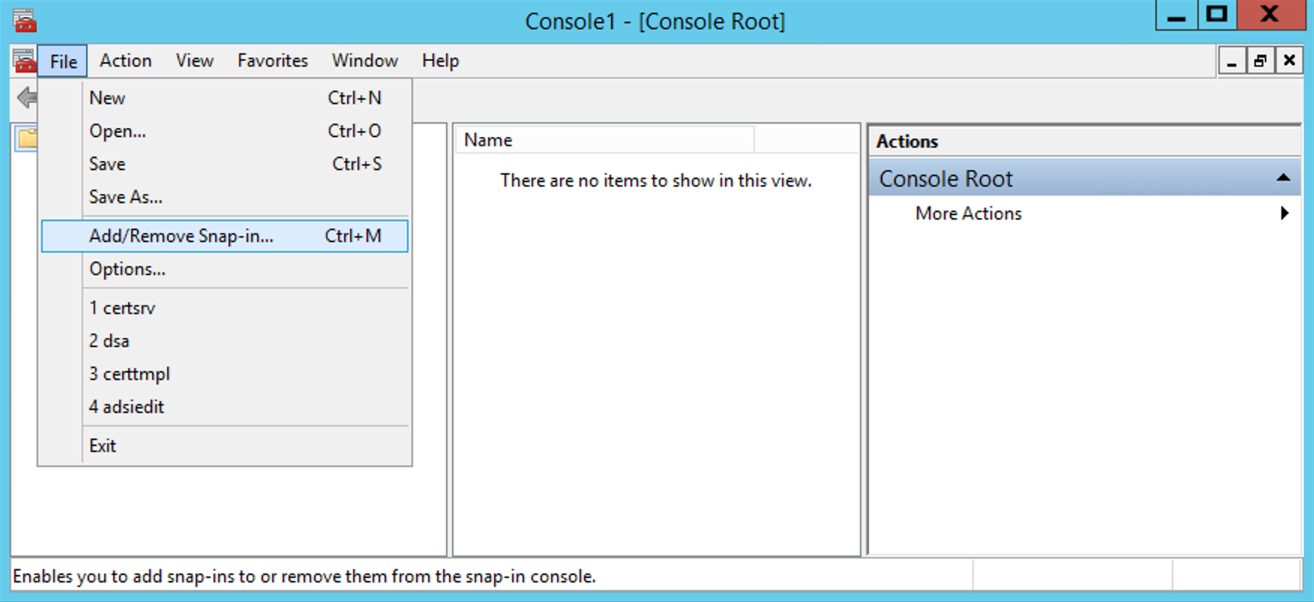
Open the Microsoft Management Console (MMC).
-
In the console, select File>Add/Remove Snap-in...
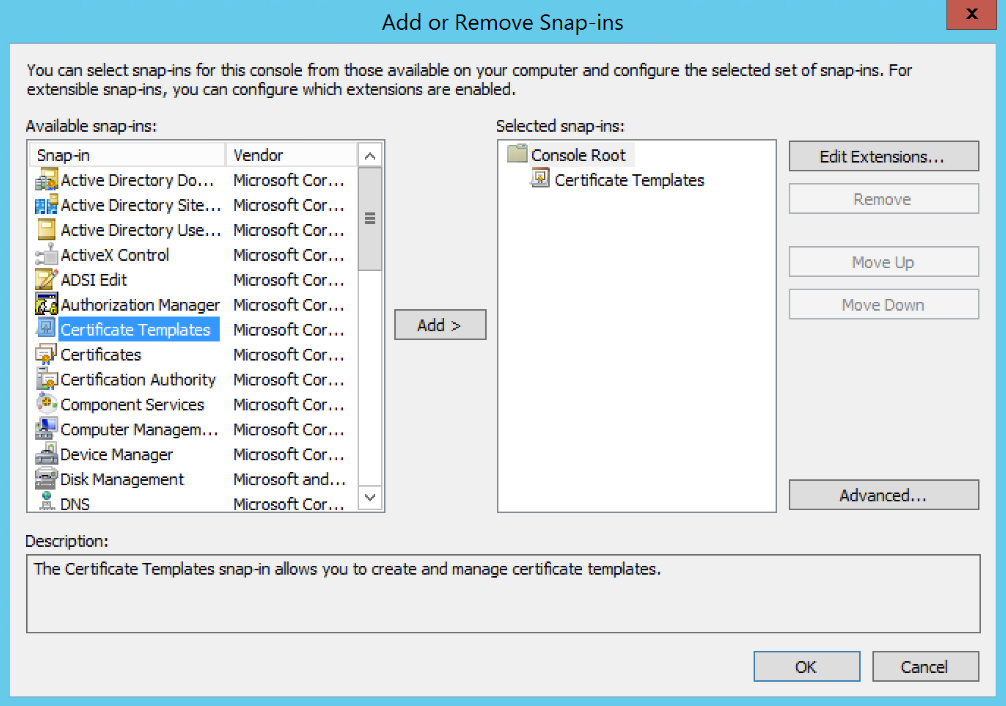
- Use the Add > button to add Certificate Templates to the list of selected snap-ins then click OK to save the change.
- (FOR WINDOWS) Open the Certificate Templates snap-in, right-click on the User template, and select Duplicate Template.
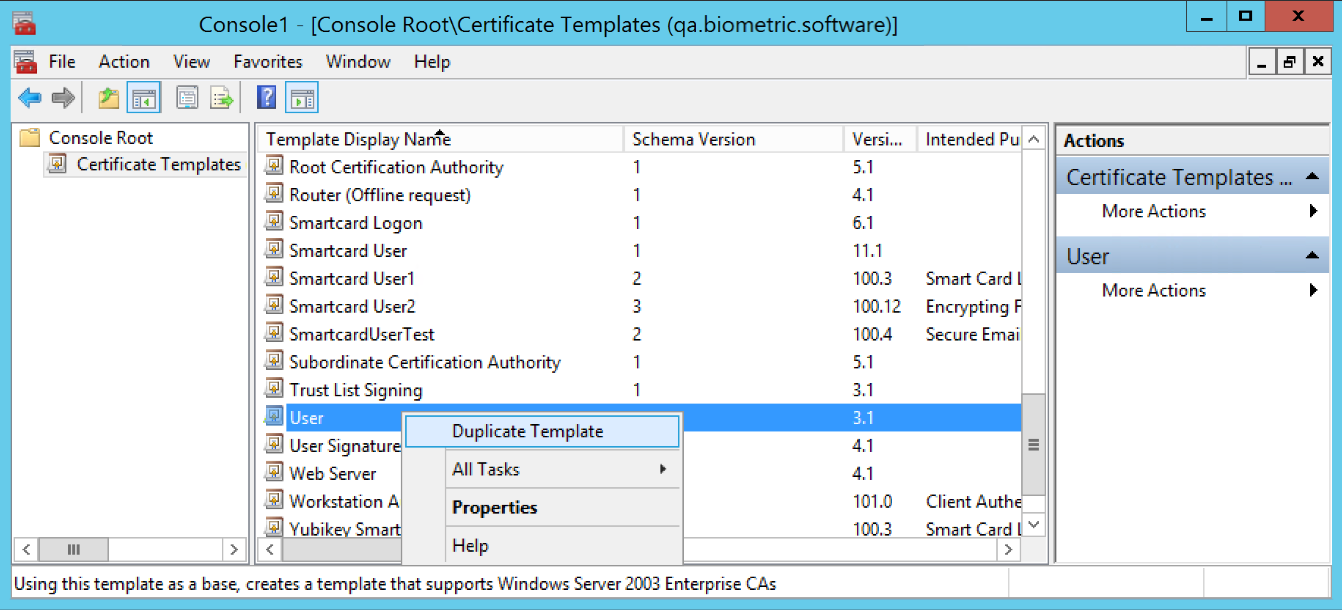
(FOR MAC) Open the Certificate Templates snap-in, right-click on the Smartcard User template, and select Duplicate Template.

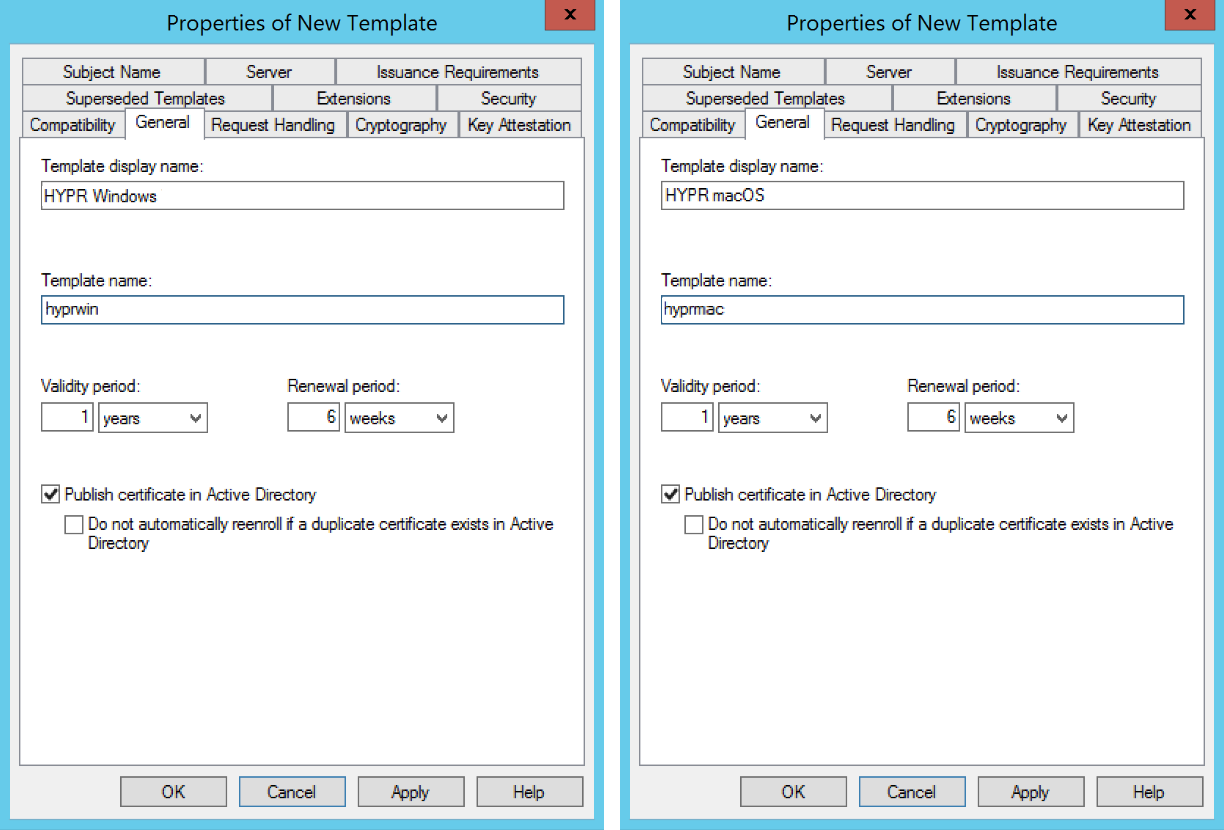
- In the Properties of New Template window, go to the General tab and change the following settings:
| Parameter | Value |
|---|---|
| Template display name | Any name that will let you identify this as a HYPR template |
| Template name | By default, MMC will use the Template display name without any spaces. In order to match the preconfigured template name used by the HYPR Passwordless client installer, we strongly suggest you use the following: hyprwin (for Windows) hyprmac (for macOS). If you prefer to use a different template name, be sure to make a note of the value since you'll need to manually change the HYPR Passwordless client configuration settings on each workstation. |
| Publish certificate in Active Directory | You can leave this either checked or unchecked |
-
-
Non-exportable Private Key Creation
-
If you are creating a template for non-exportable private keys, stop here and continue below.
-
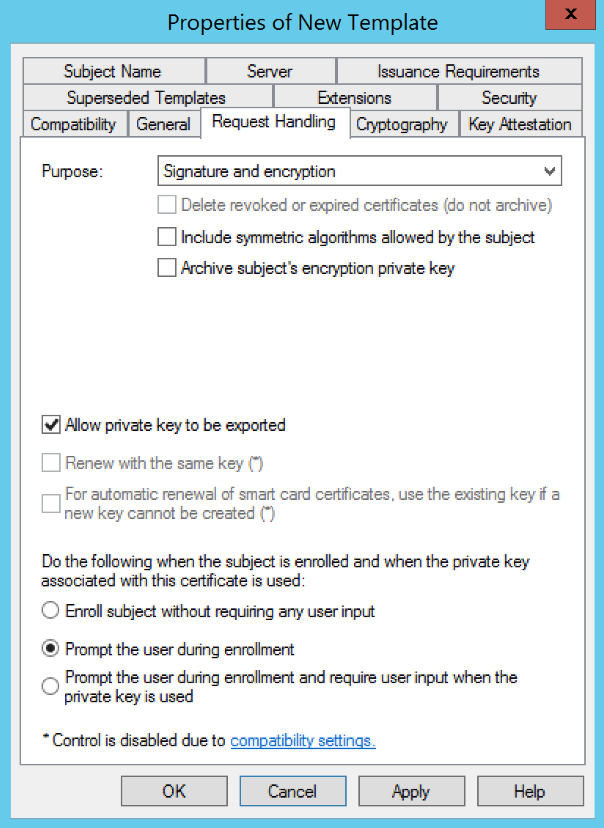
(WINDOWS ONLY) Go to the Request Handling tab and change the following settings:
| Parameter | Value |
|---|---|
| Purpose | Signature and encryption |
| Allow private key to be exported | Checked |
| Prompt the user during enrollment | Selected |
-
-
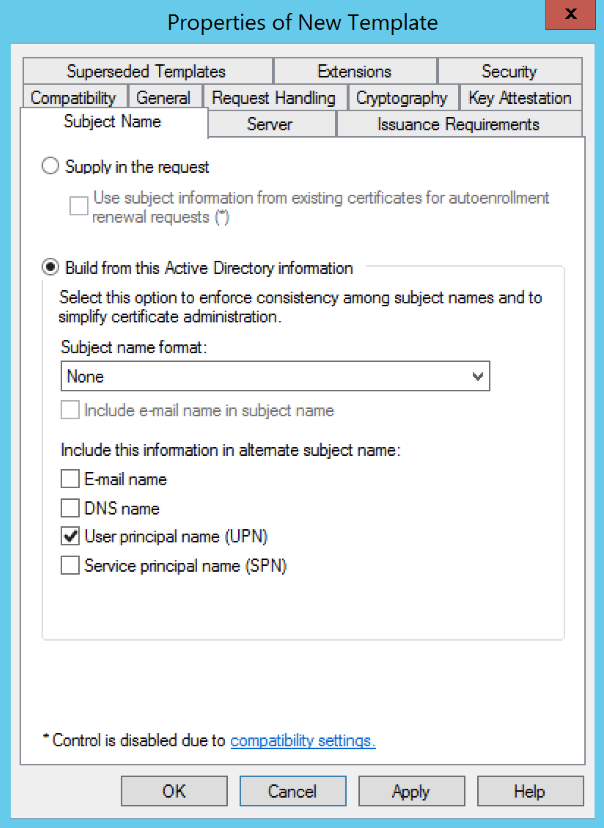
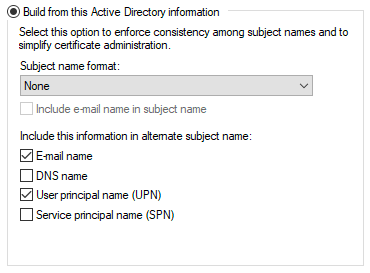
(WINDOWS ONLY) Go to the Subject Name tab and change the following settings:
| Parameter | Value |
|---|---|
| Build from this Active Directory information | Checked |
| Subject name format | None |
| User principal name (UPN) | Checked |
-
-
Important Security Patch Notice for Windows Server 2019 and 2022
-
In January 2025, security patches were released for Windows Server 2019 and 2022. Unfortunately, one of these patches introduced an incompatible fix that caused issues with certificates containing empty 'Subject Name'.
-
If you're running Domain Controllers on this patch version and cannot upgrade to a later security patch (February 2025 or later), Microsoft offers a Known Issue Rollback as a workaround. To apply this fix, please contact HYPR support for guidance.
-
Additional Information
-
When configuring Single Registration: Workstation-to-Web, the Email name must also be checked for the feature to function properly.
-
-
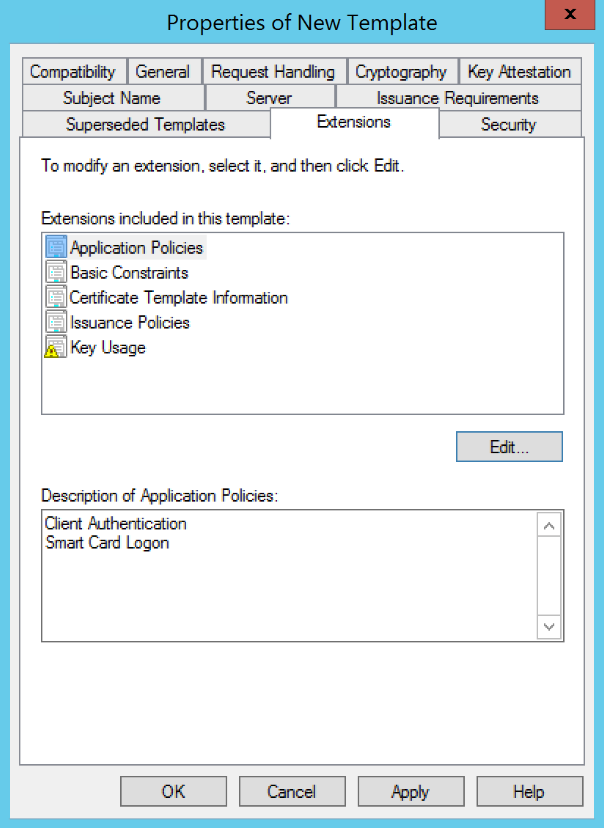
(WINDOWS ONLY) Go to the Extensions tab and edit Application Policies so that the only listed policies are Client Authentication and Smart Card Logon. (Remove any default policies as necessary.)
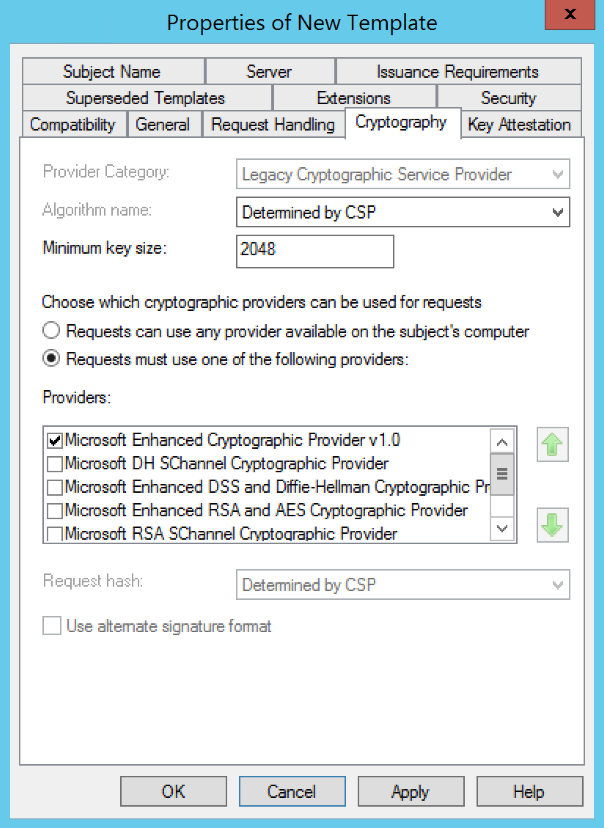
- (WINDOWS ONLY) Go to the Cryptography tab and verify the Minimum key size. HYPR supports a minimum of 1024-bit encryption but recommends you use 2048-bit RSA private keys.
- Select OK to close the Properties of New Template window and create the template.
Creating a Certificate Template for Non-exportable Private Keys
Start by completing Create a Certificate Template on the Server Steps 1-5; then return here to complete the process.
- (WINDOWS ONLY) Go to the Request Handling tab and change the following settings:
| Parameter | Value |
|---|---|
| Purpose | Signature and smartcard logon |
| Allow private key to be exported | Unchecked |
| Prompt the user during enrollment | Selected |
- Go to the Subject Name tab and change the following settings:
| Parameter | Value |
|---|---|
| Build from this Active Directory information | Checked |
| Subject name format | None |
| User principal name (UPN) | Checked |
-
(WINDOWS ONLY) Go to the Extensions tab and edit Application Policies so that the only listed policies are Client Authentication and Smart Card Logon. (Remove any default policies as necessary)
-
(WINDOWS ONLY) On the Cryptography tab:
-
Minimum key size: HYPR supports a minimum of 1024-bit encryption but recommends you use 2048-bit RSA private keys
-
Provider Category: Select Key Storage Provider
-
Choose which cryptographic providers can be used for requests: Select Requests must use one of the following providers
-
Providers: Check Microsoft Smart Card Key Storage Provider
-
-
Select OK to close the Properties of New Template window and create the template.
Issue the Certificate Template on the Server
-
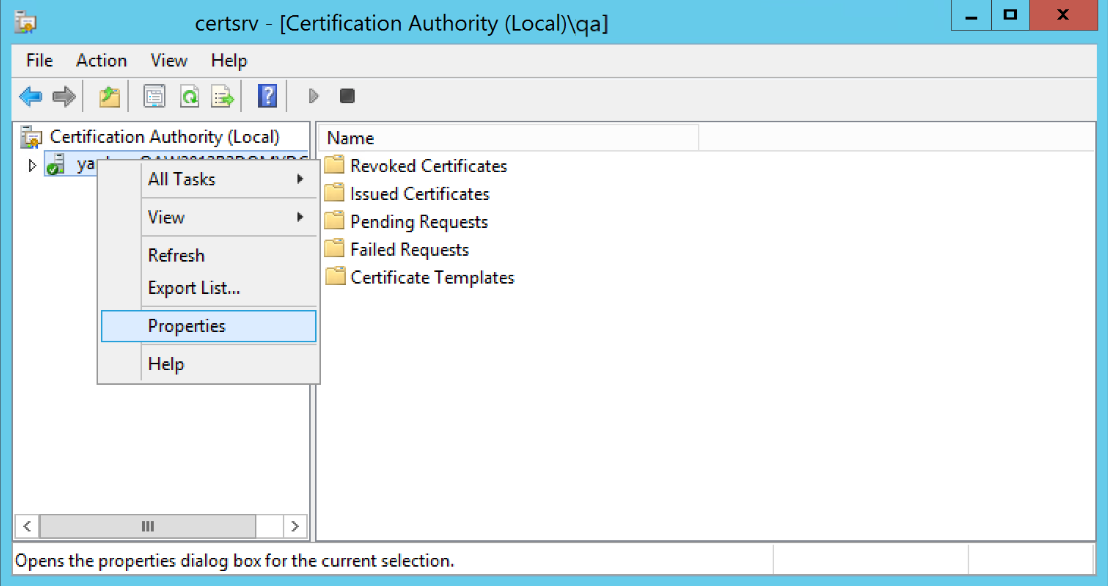
On the Windows server, open the Certification Authority console.
-
In the left navigation pane, right-click on the machine name and select Properties.
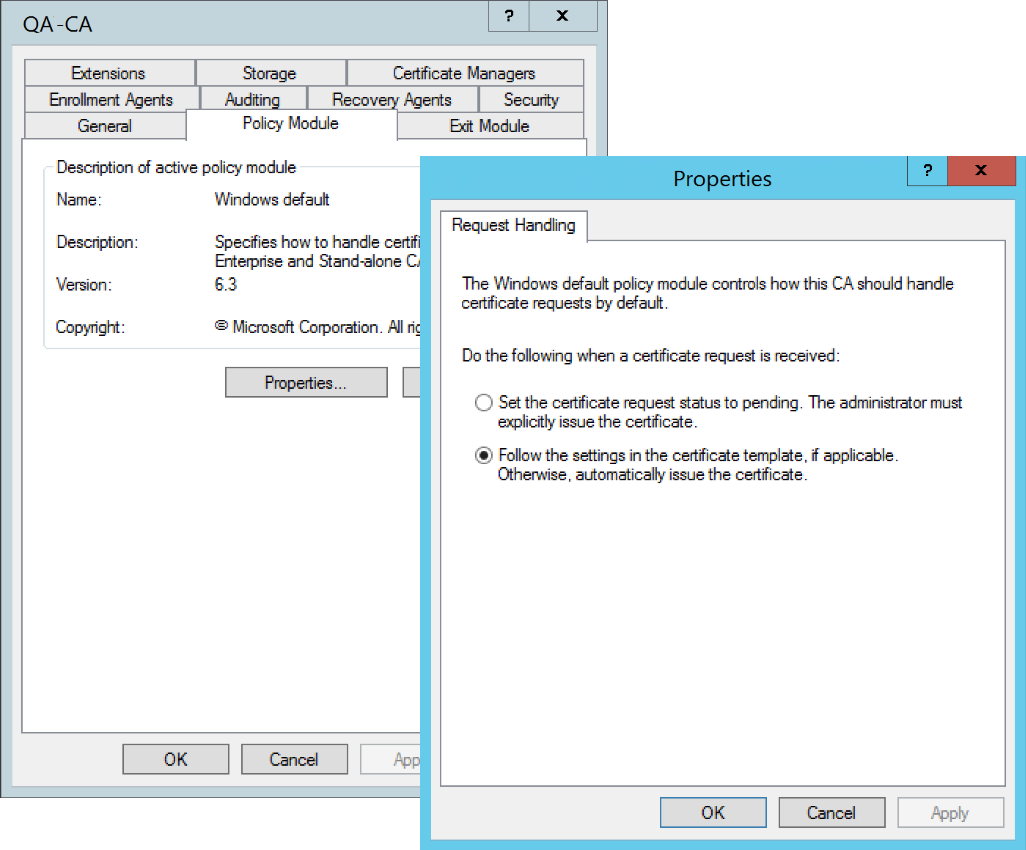
- Go to the Policy Module tab, click the Properties... button, and make sure the "Follow the settings in the certificate template, if applicable. Otherwise, automatically issue the certificate" option is checked for Request Handling.
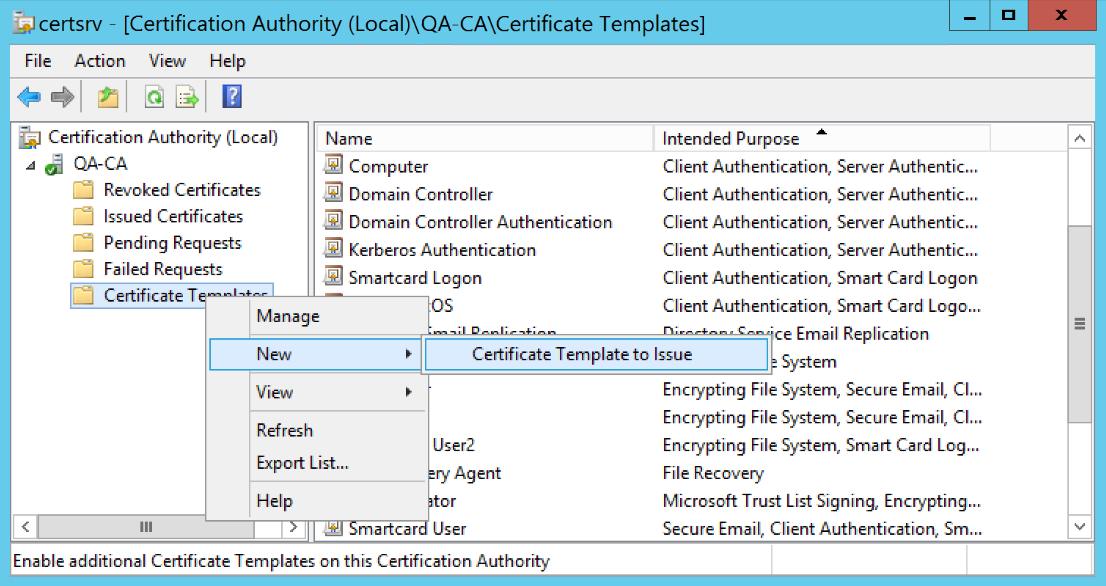
- Back in the left navigation pane, right-click on Certificate Templates and select New > Certificate Template to Issue.
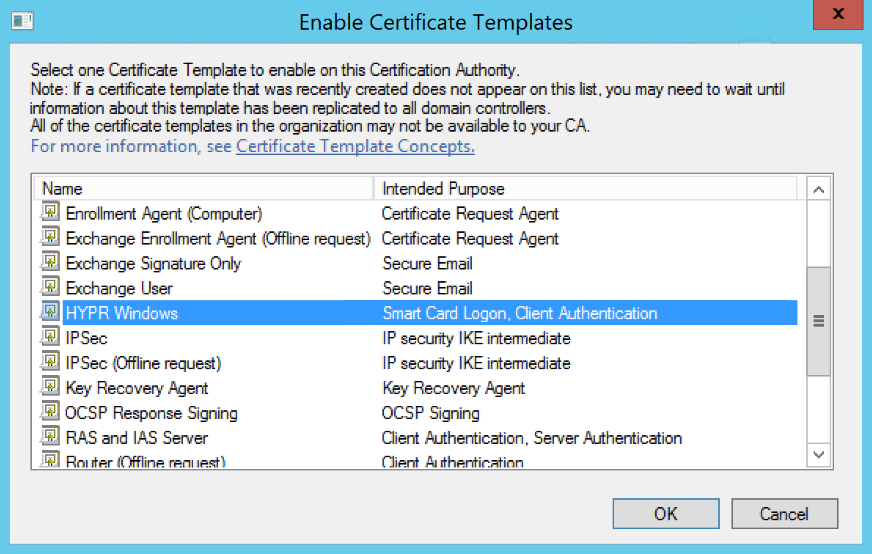
- In the Enable Certificate Templates list, locate the HYPR certificate template you created above. Highlight the template name and click OK to publish it.
Configure HYPR to Use the Certificate on the Workstation
To configure HYPR to use the new certificate, you must modify the installation settings on each workstation where the HYPR Passwordless client application is installed.
Windows Workstations
On a Windows machine, you need to modify HYPR's Certificate Template registry settings.
Active Directory Note
If you named the template hyprwin as suggested above and your client installer hypr.json file was preconfigured by HYPR to use Active Directory, you shouldn't have to make any changes to the registry settings.
Use Regedit to set the registry value:
- Open Regedit on the workstation where the HYPR Passwordless client is installed.
important
Before making any changes, back up the registry for safety.
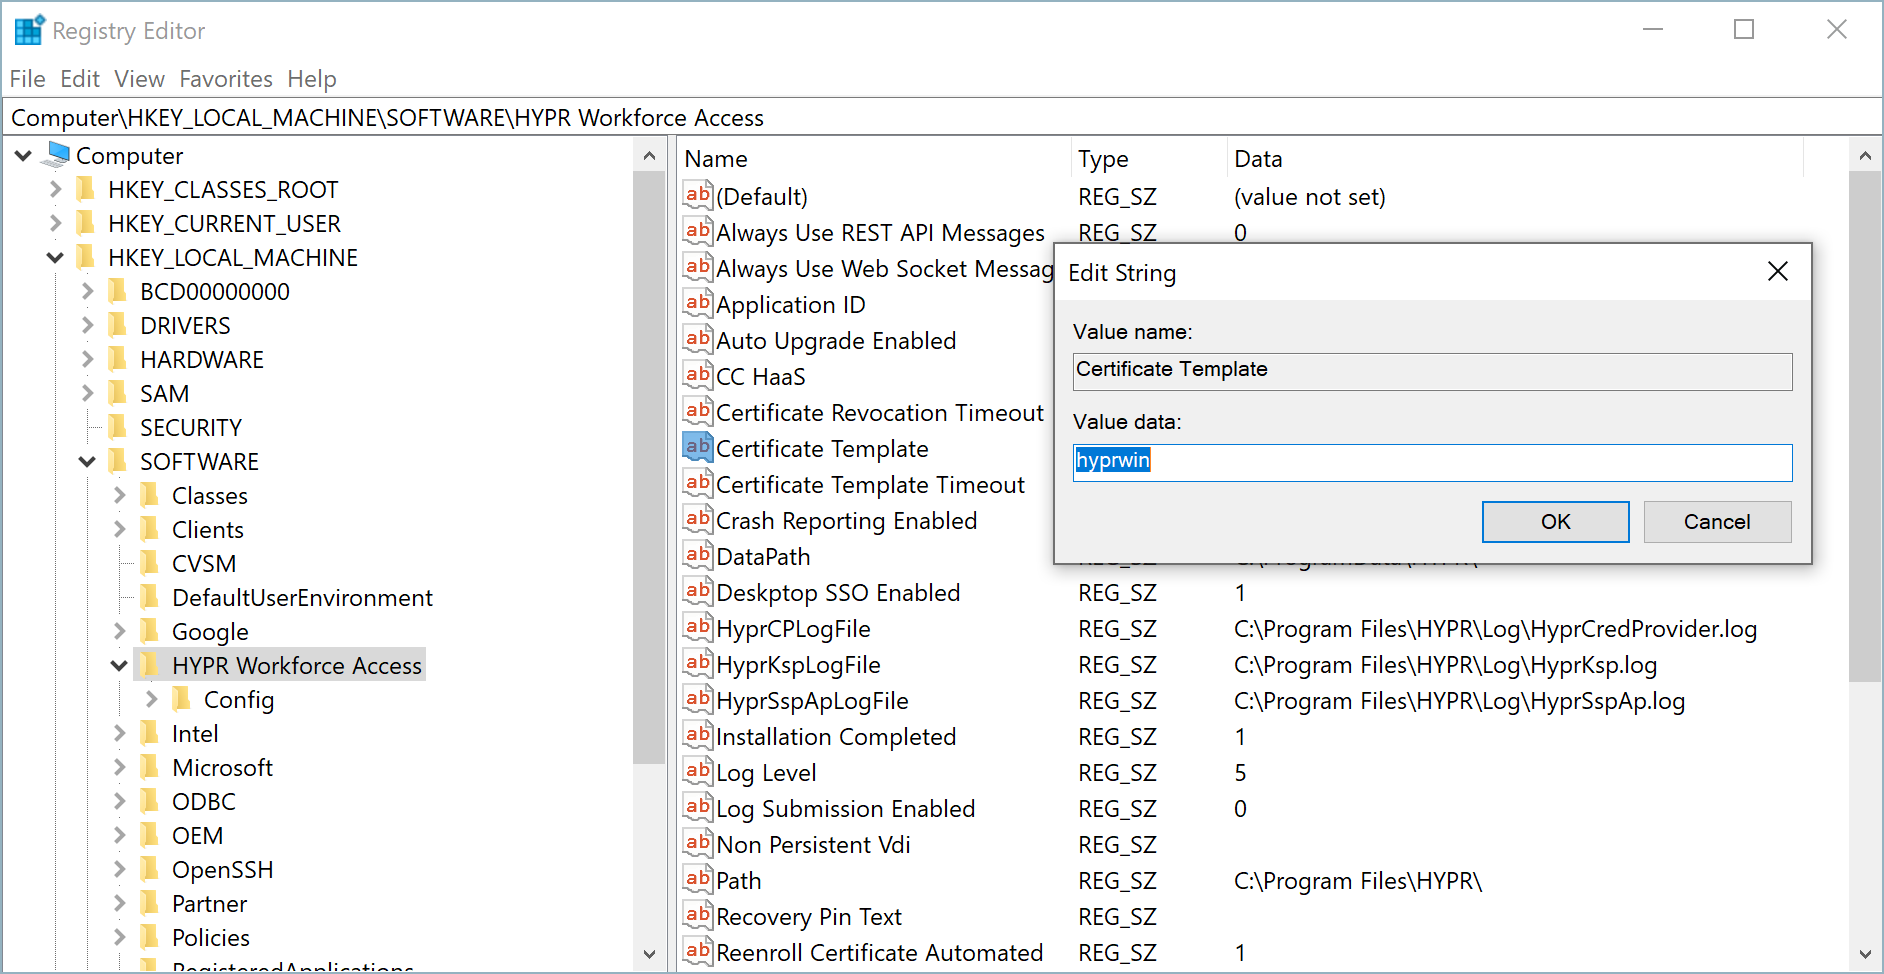
- Locate the following registry key:
HKEY_LOCAL_MACHINE\SOFTWARE\HYPR Workforce Access
- Edit the Certificate Template value and change the data field to the name of the HYPR certificate template you created. Make sure you use the template name (for example, "hyprwin" without spaces), not the template display name ("HYPR Windows").
-
Close Regedit and restart the computer.
-
Open the HYPR Passwordless client and register a new device to confirm the registration is using the new certificate template.
Pairing Device
Pairing a Mobile Device Using the Camera
-
Open the HYPR Mobile App on the mobile device. The app may ask for permission to send notifications. Enabling these is optional.
-
Start the HYPR Passwordless client on the workstation if it isn’t running already.
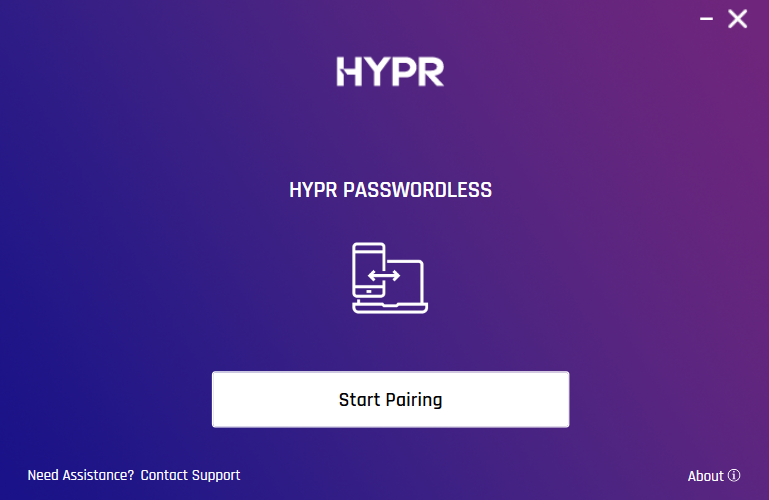
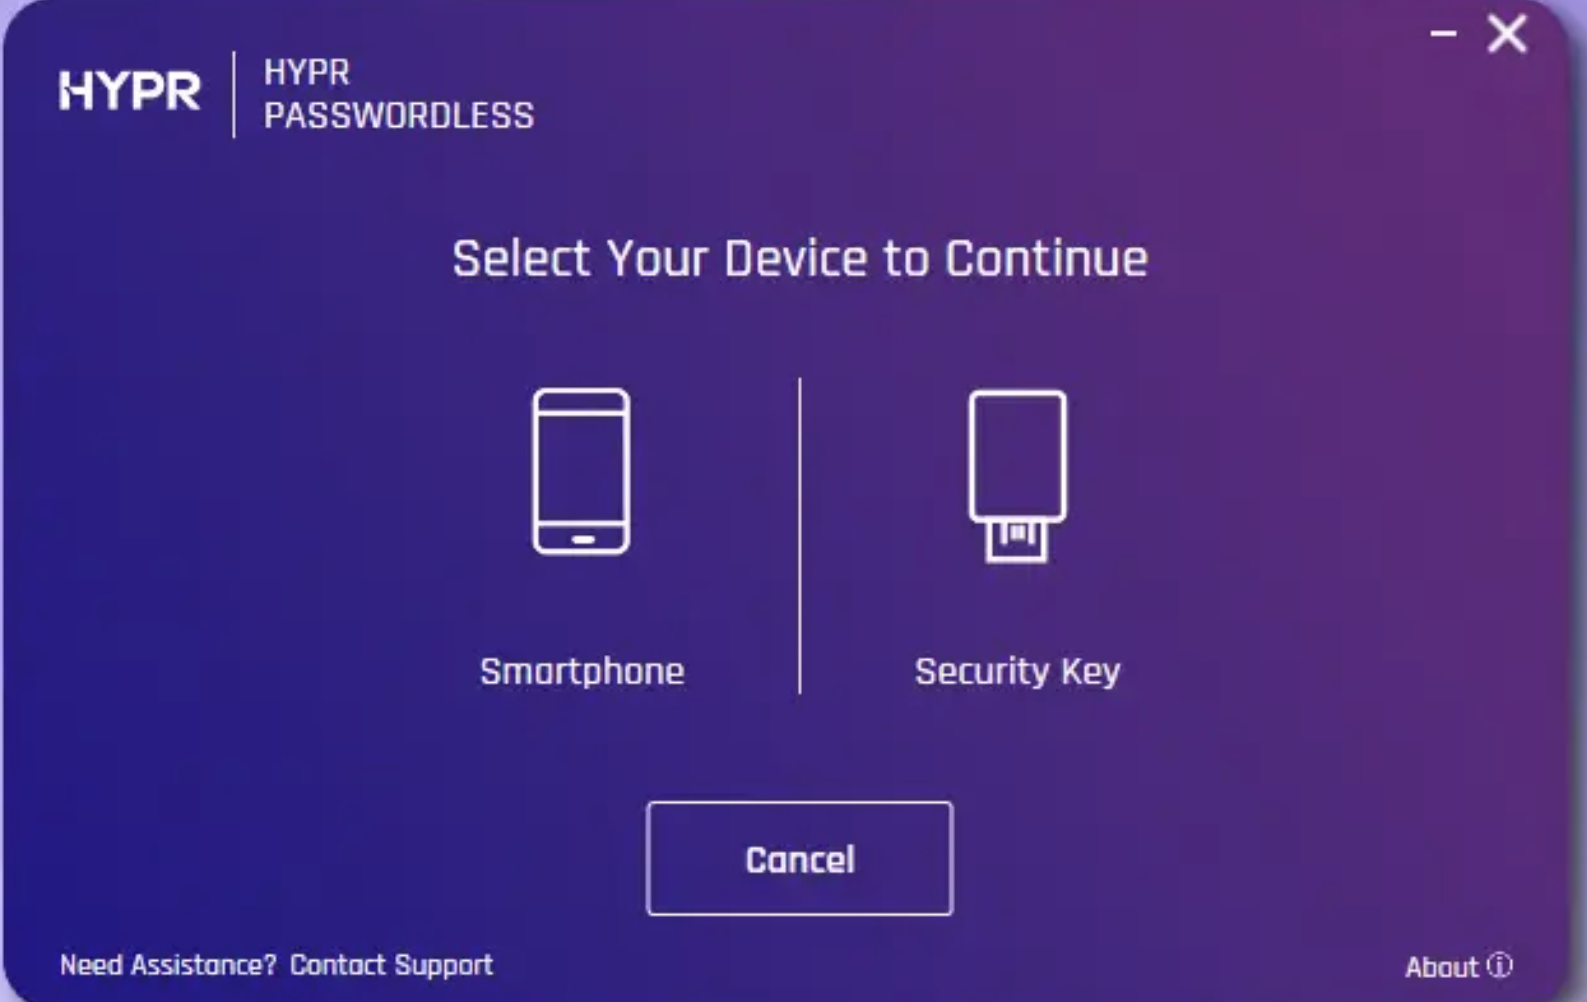
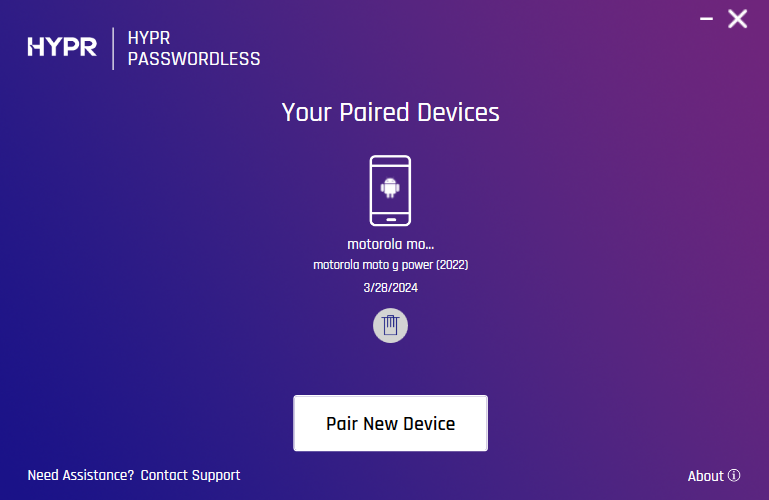
- Click Start Pairing in the HYPR Passwordless client. If you already have a device paired, click Pair New Device. You are presented with the option to pair a Smartphone or a Security Key.
- Select Smartphone and a QR code will appear in the dialog.
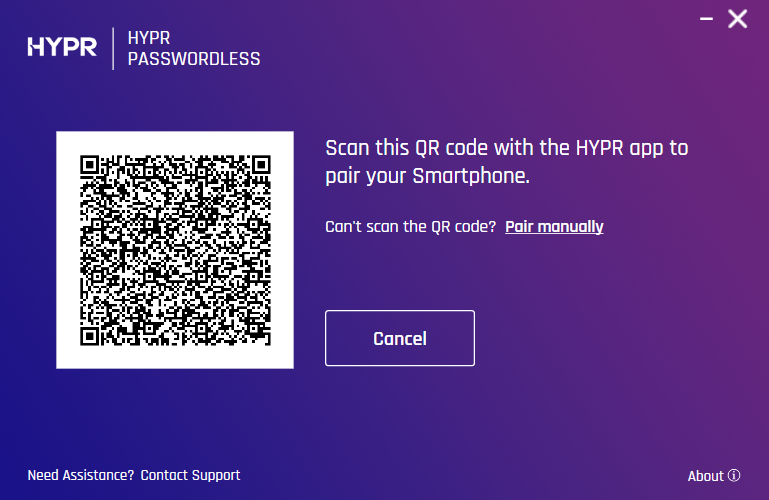
The QR code expires after one minute (or three minutes if the Require User Presence for Registration feature is enabled), and an error message appears in the HYPR Passwordless client. If this happens, click Try Again.
- In the HYPR Mobile App, tap SCAN QR. If the HYPR Mobile App has already been used to pair this device before, the SCAN QR button may not appear; instead, tap the QR code icon above Add Account or Computer or in the upper right.
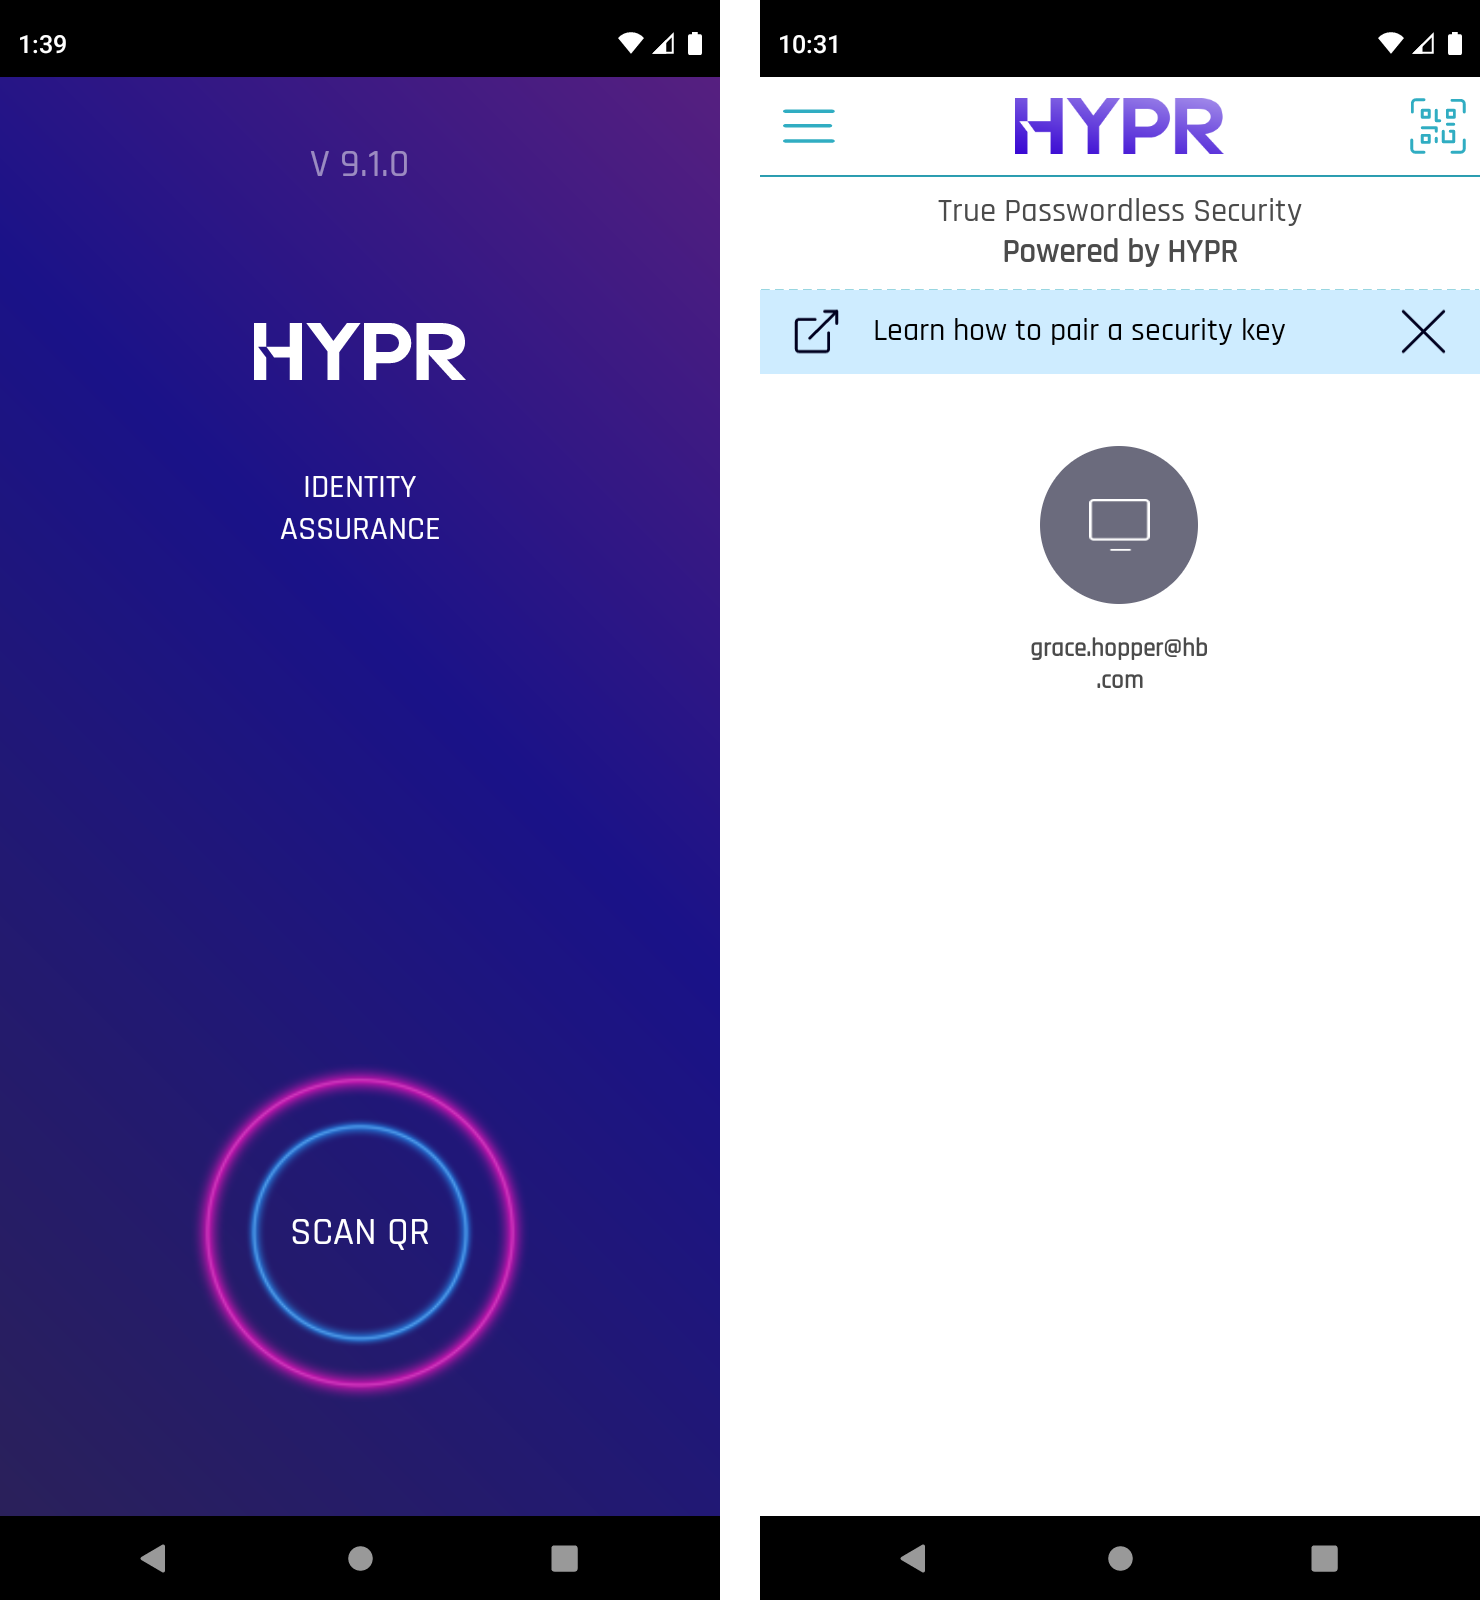
The HYPR Mobile App may request permission to use the device’s camera. It’s important to grant this access; otherwise, scanning the QR code won’t be possible.
If you are unable to use your device's camera with your HYPR Mobile App, follow the instructions for using QR Fallback from the HYPR Passwordless Client.
-
Orient the mobile device's camera to the QR code on the workstation screen.
-
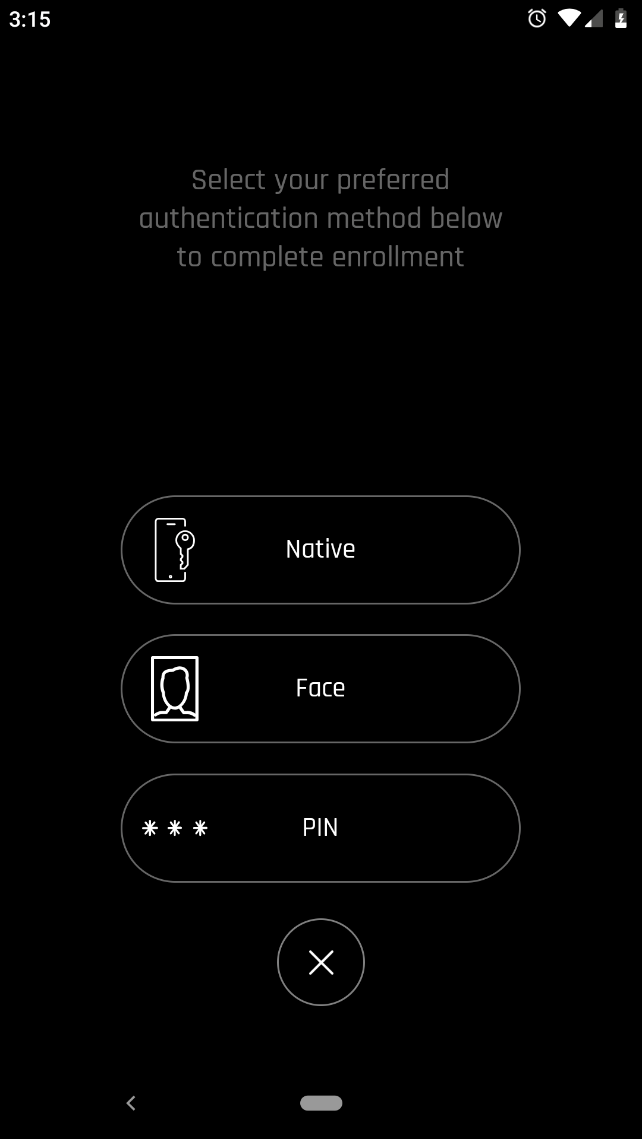
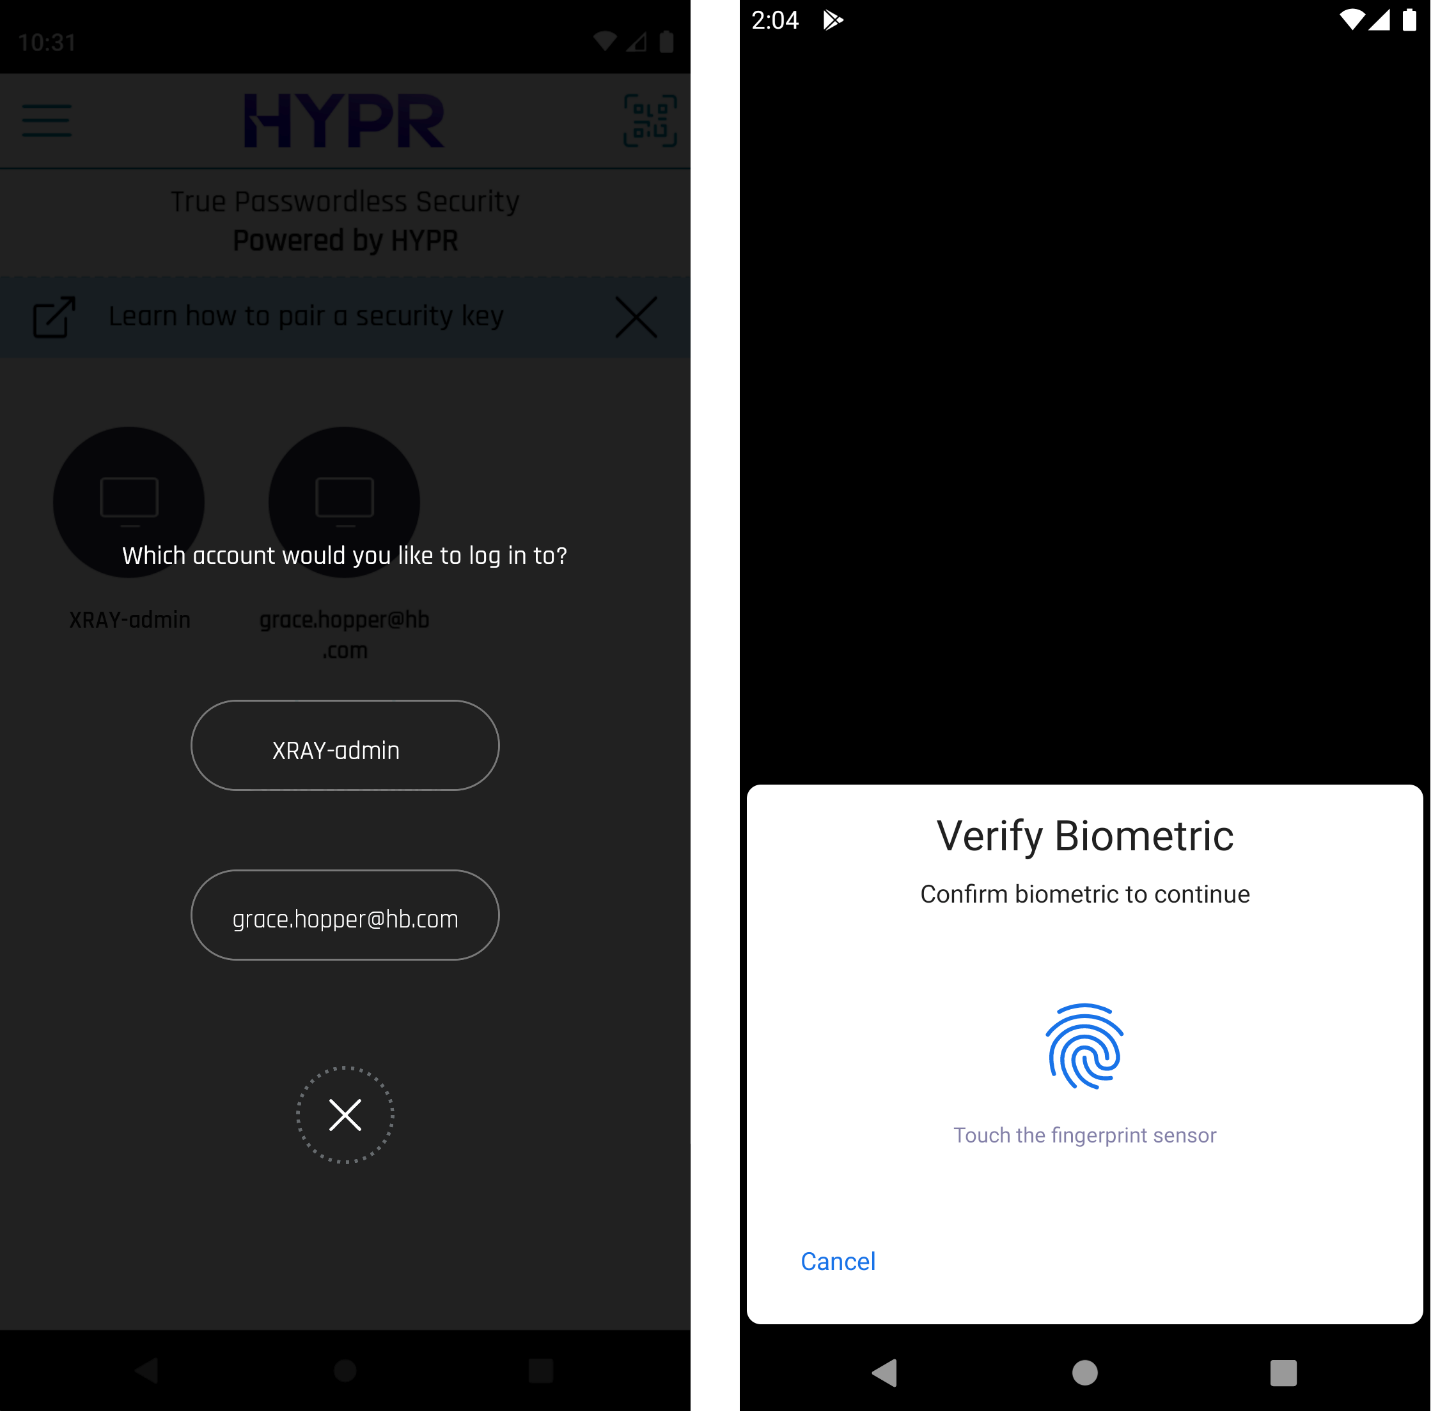
Select the authentication method to be used (face recognition, fingerprint recognition, PIN, etc.) whenever they unlock their workstation with this device. Authentication options vary according to the operating system and version of the device.
-
If users choose the PIN option, they’ll be asked to create a unique PIN for use with HYPR to unlock the workstation.
-
If they choose a biometric method, it must be set up already on the mobile device; on Android devices, select the Native option for biometric identification.
-
Depending upon the policy, you may see other methods of authentication. In this example, Face ID is enabled:
-
-
When prompted, use the chosen authentication method to finish pairing the device.
-
(Windows only) If the Require User Presence feature is enabled in Control Center, authenticate using to the available methods on the workstation (PIN, security key, smart card, etc.), then click OK.

For more information on this feature, see Device Registration and the Require User Presence Feature.
-
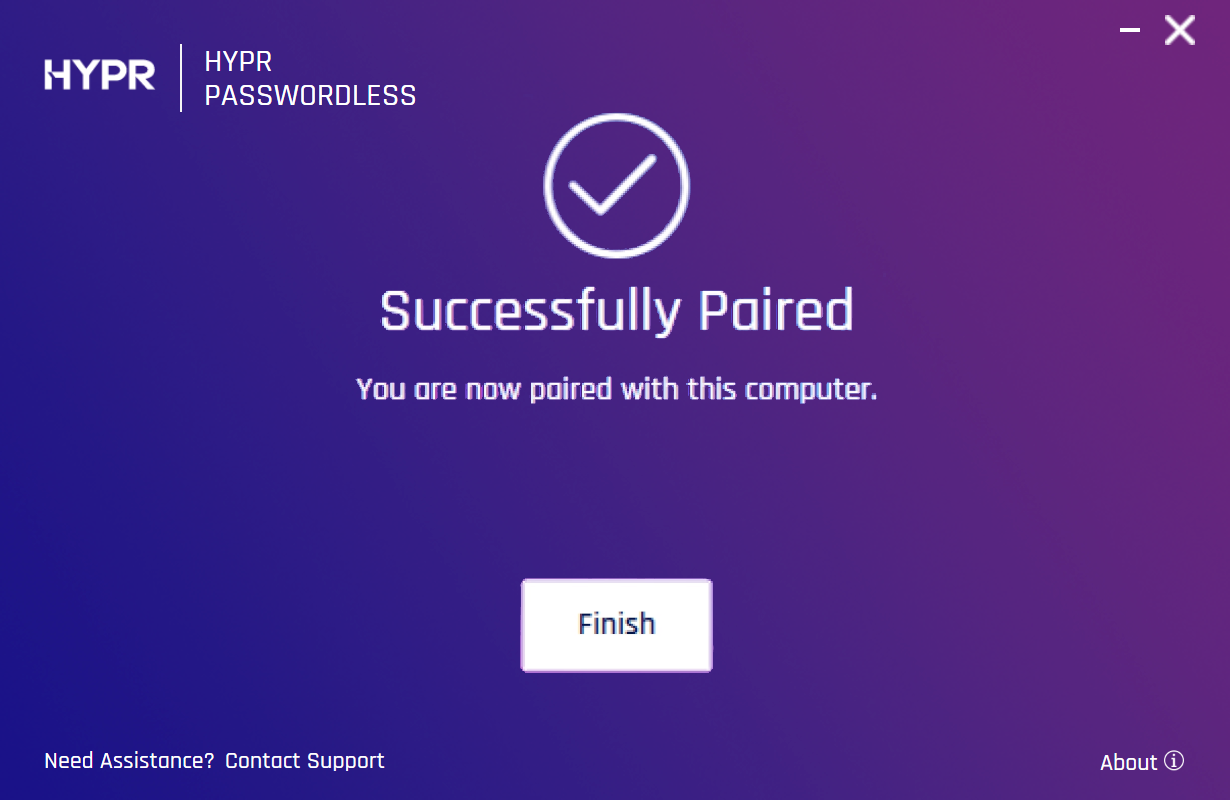
Click Finish.
-
(Optional but recommended) Test the process is working correctly. Please see Testing the New Device.
Registering Security Keys
Pre requisites = Security keys with PIV support (Yubikey/Idemia)
Workstation Registration - Windows
-
Open the HYPR Passwordless client.
-
Click Start Pairing. You will be given a choice of pairing a Smartphone or pairing with a Security Key.
- Select Security Key to continue.
Connect First
Make sure you are connected to your secure network, or a warning will appear upon clicking Start Pairing. If this occurs, just connect to your secure network and click Try again.
- A browser dialog will prompt you to enter the PIN provided by your administrator or through the instruction guide which accompanied your device.
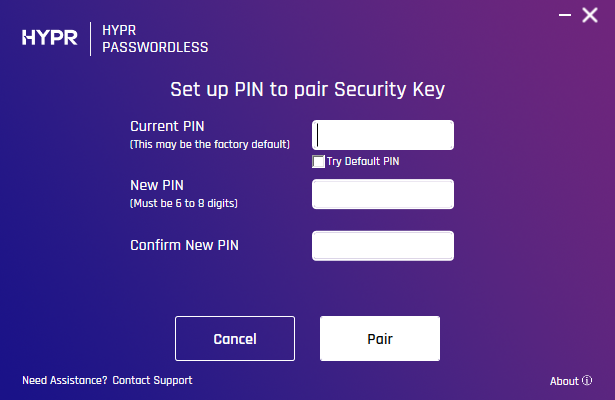
- Enter the new PIN, then confirm it in the following field.
PIN Requirements
-
The PIN must be between 6 and 8 characters.
-
Users are not allowed to choose repeating digits in PINs, such as 111111
-
PINs may have no more than two consecutive numbers, such as 123987
-
Users are not allowed to choose repeating sequences in PINs, such as 121212 or 345345; 123849 is allowed
-
The PIN may not be left as the default value of 123456
-
The PIN may not be on any blocklist; for example, YubiKeys prohibit 159753
-
Valid characters for security key or smart‑card PINs: Numeric, AlphaNumeric, or Any. AlphaNumeric allows ASCII letters A–Z (case‑sensitive). Any allows ASCII 0x21–0x7E (no spaces). AlphaNumeric and Any are only available with Yubico keys
-
Click Finish. Wait for enrollment to complete. You may be asked to authenticate to the workstation.
-
Click Finish to view the paired device.
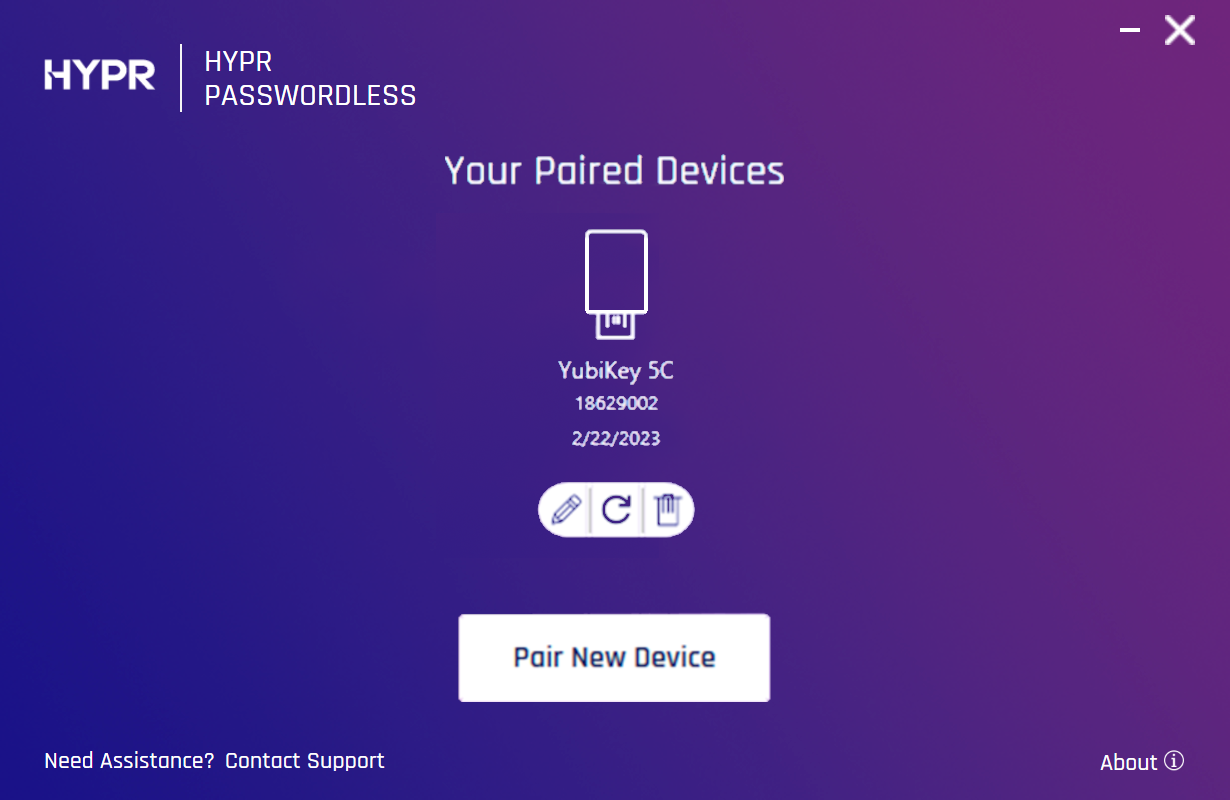
- The HYPR Passwordless client returns to the main screen. The paired security key now appears here with Edit (pencil icon) and Delete (trash can icon) options.
Validating and testing the solution
Login using HYPR mobile App
Windows Login Screen 🡪 Open HYPR Mobile App 🡪 Click the registered Machines 🡪 Authenticate using Pin/Biometric 🡪 Access

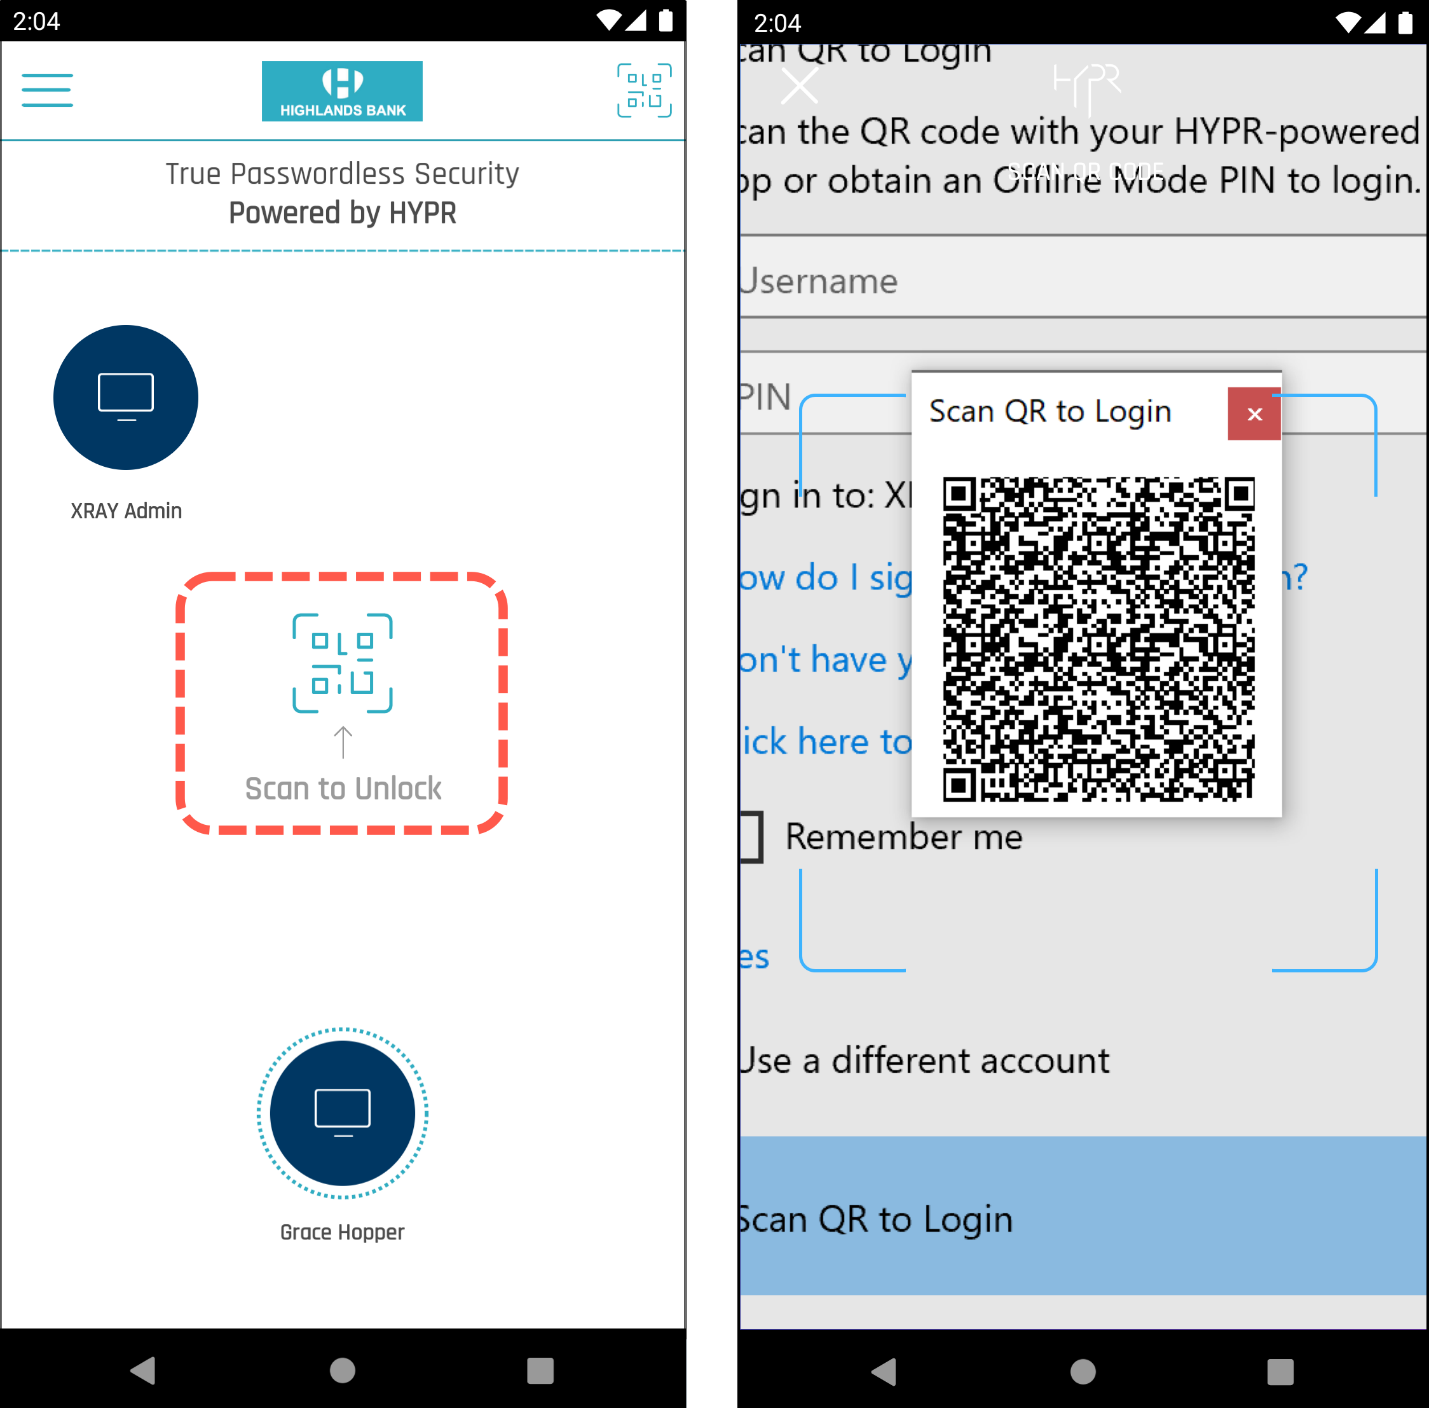
Log in using QR code
Windows Login Screen -> Select Scan QR to Login
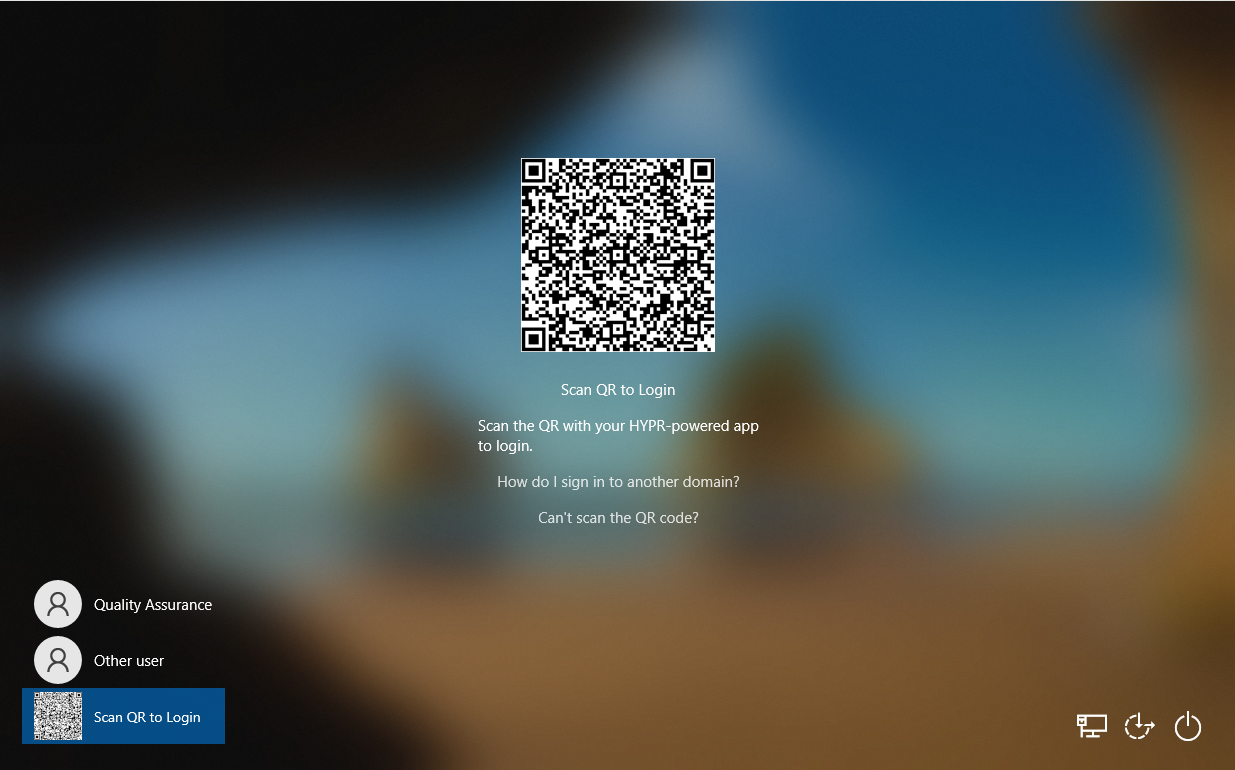
Open your HYPR Mobile App and scan the QR code -> Authenticate with your PIN/Biometrics
Login using Security Key
- Insert your paired Security Key into the USB port of the computer. Windows will offer the smart card icon as an additional login option. Click the smart card icon.
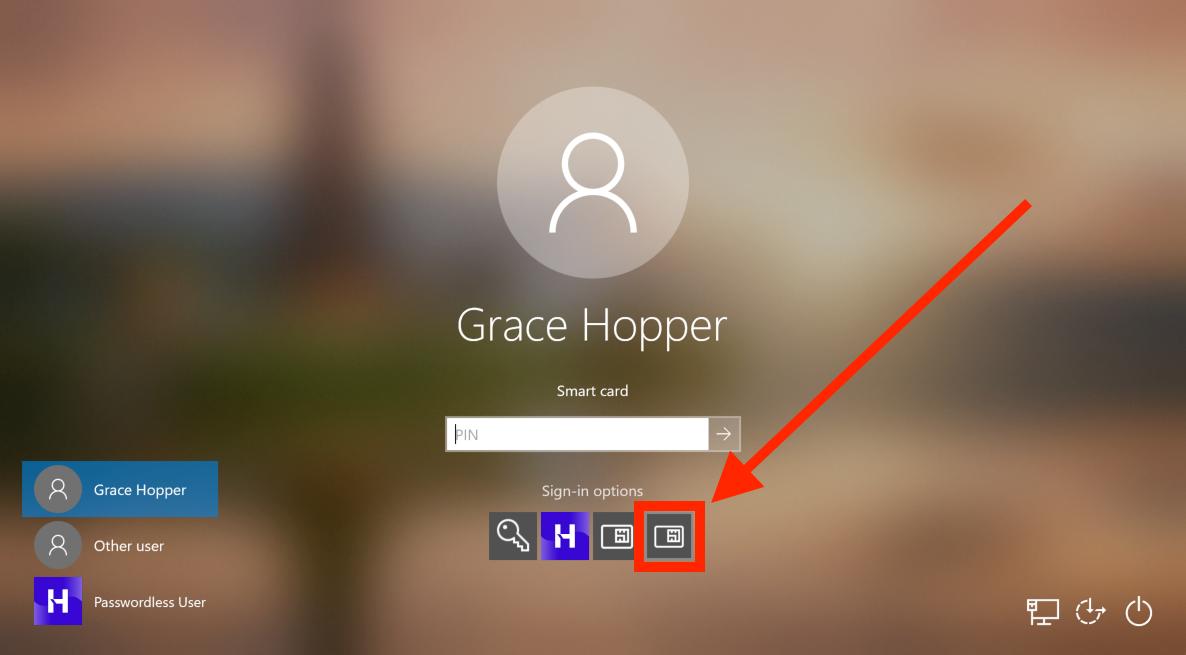
- Type your PIN.
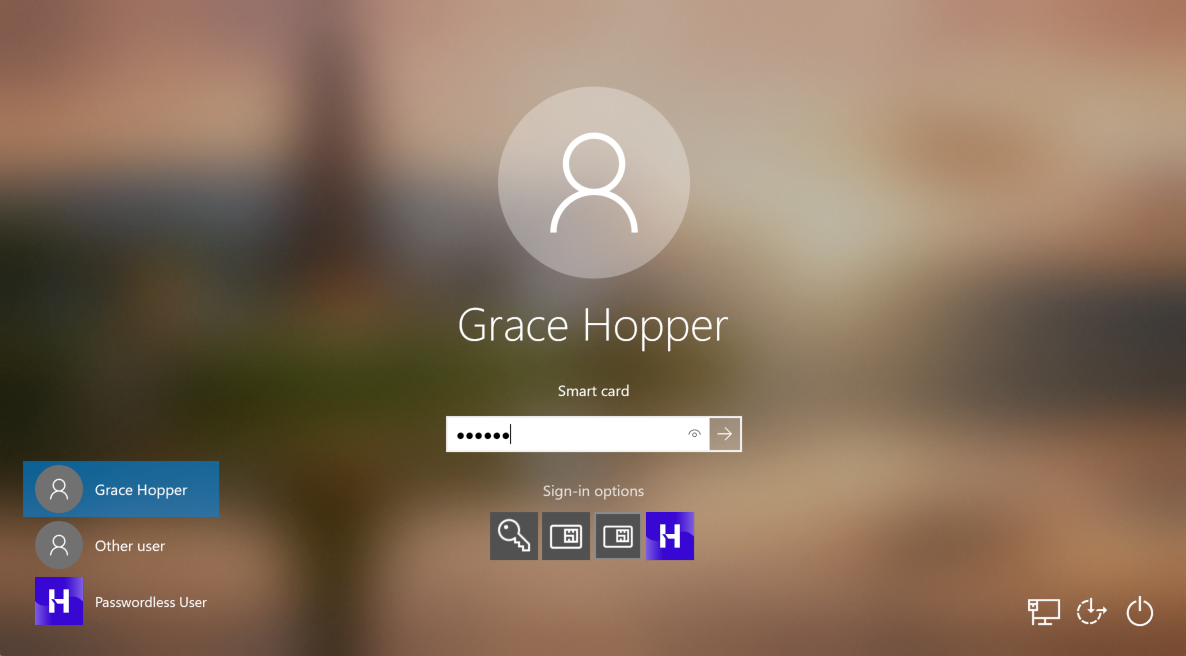
- Press Enter on your keyboard or click the submit arrow to login.
Offline Pin
HYPR's Offline Mode functionality gives users access to their workstation when their mobile device has no internet connection or the workstation is offline for some reason.
Generating an Offline PIN
There are several ways to perform authentication with Offline Mode, depending on which HYPR component is offline.
Groundwork
Users must have completed at least one successful authentication with the HYPR Mobile App before they can use Offline Mode.
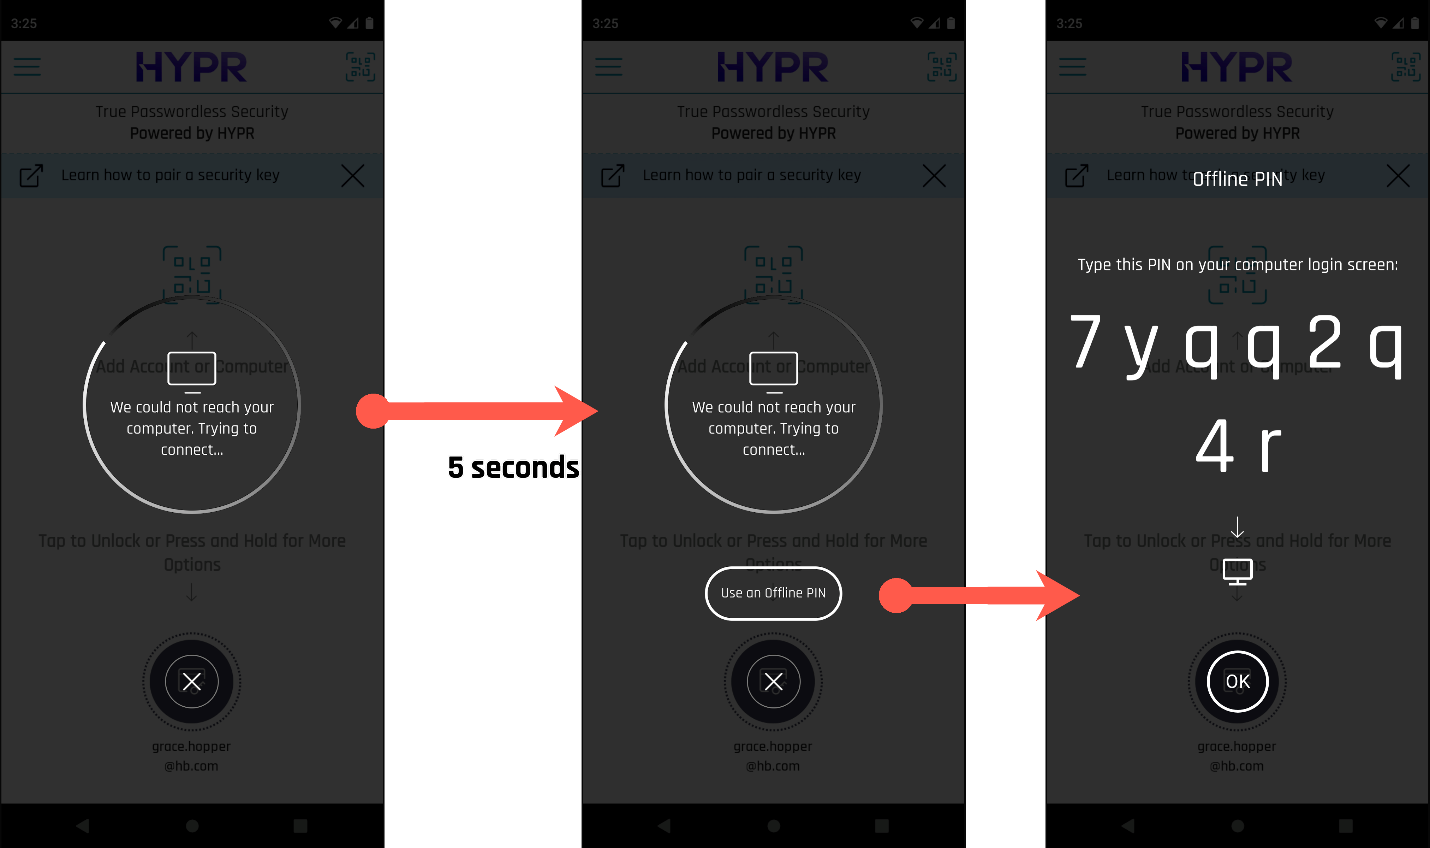
If the Workstation Is Offline
If the HYPR Mobile App can't reach the workstation, the user is automatically offered the offline PIN option after five seconds have elapsed.
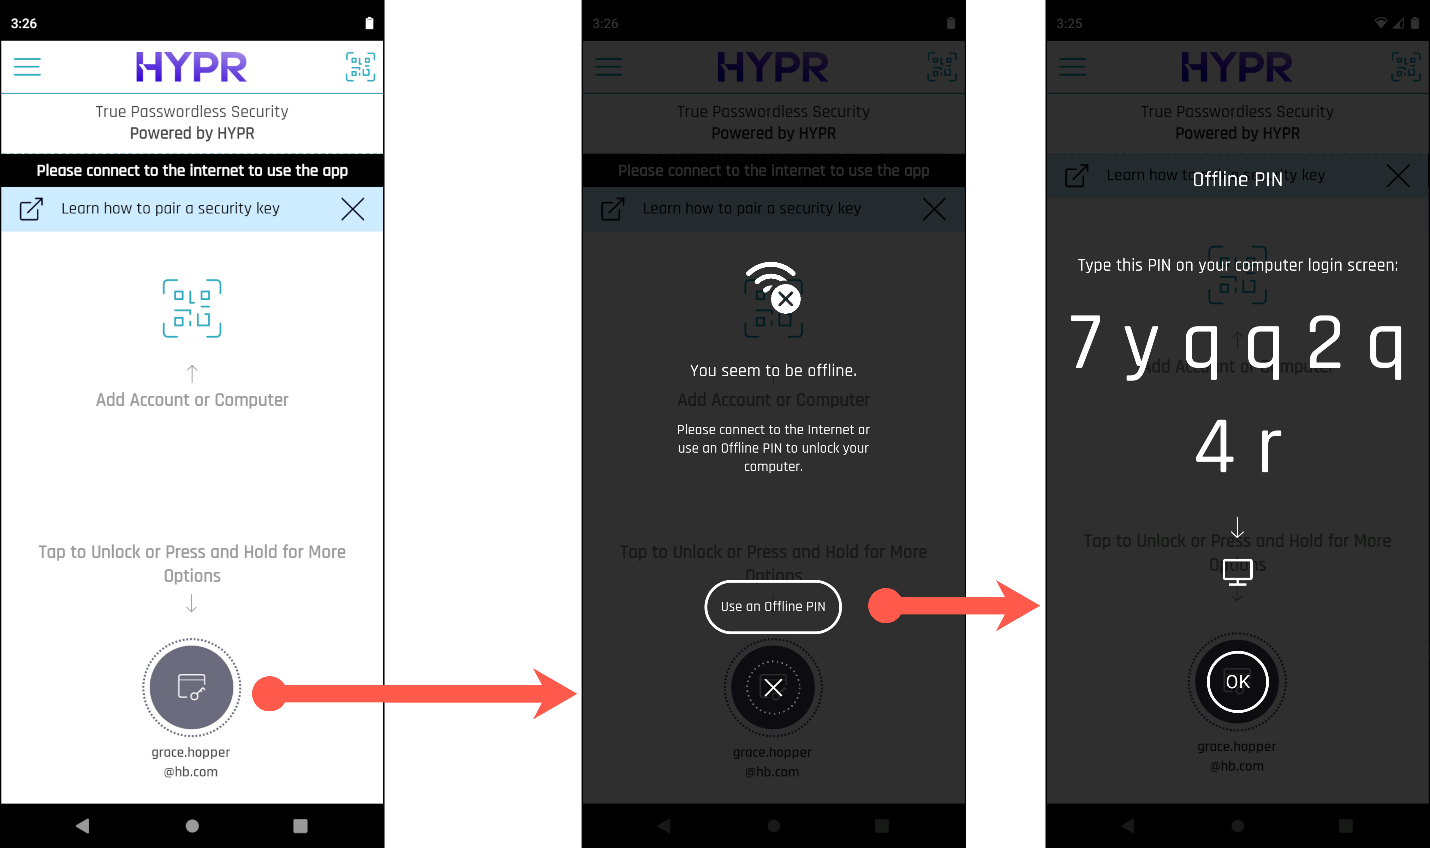
If the Mobile Device Is Offline
If the mobile device doesn't have an internet connection, the HYPR Mobile App displays a message on the main screen and takes the user directly to the offline PIN option when they tap the computer icon to log in.
If the Mobile Device Is Online
If the mobile device does have an internet connection, the user can manually request an Offline PIN if necessary by long-pressing the computer icon on the main screen.
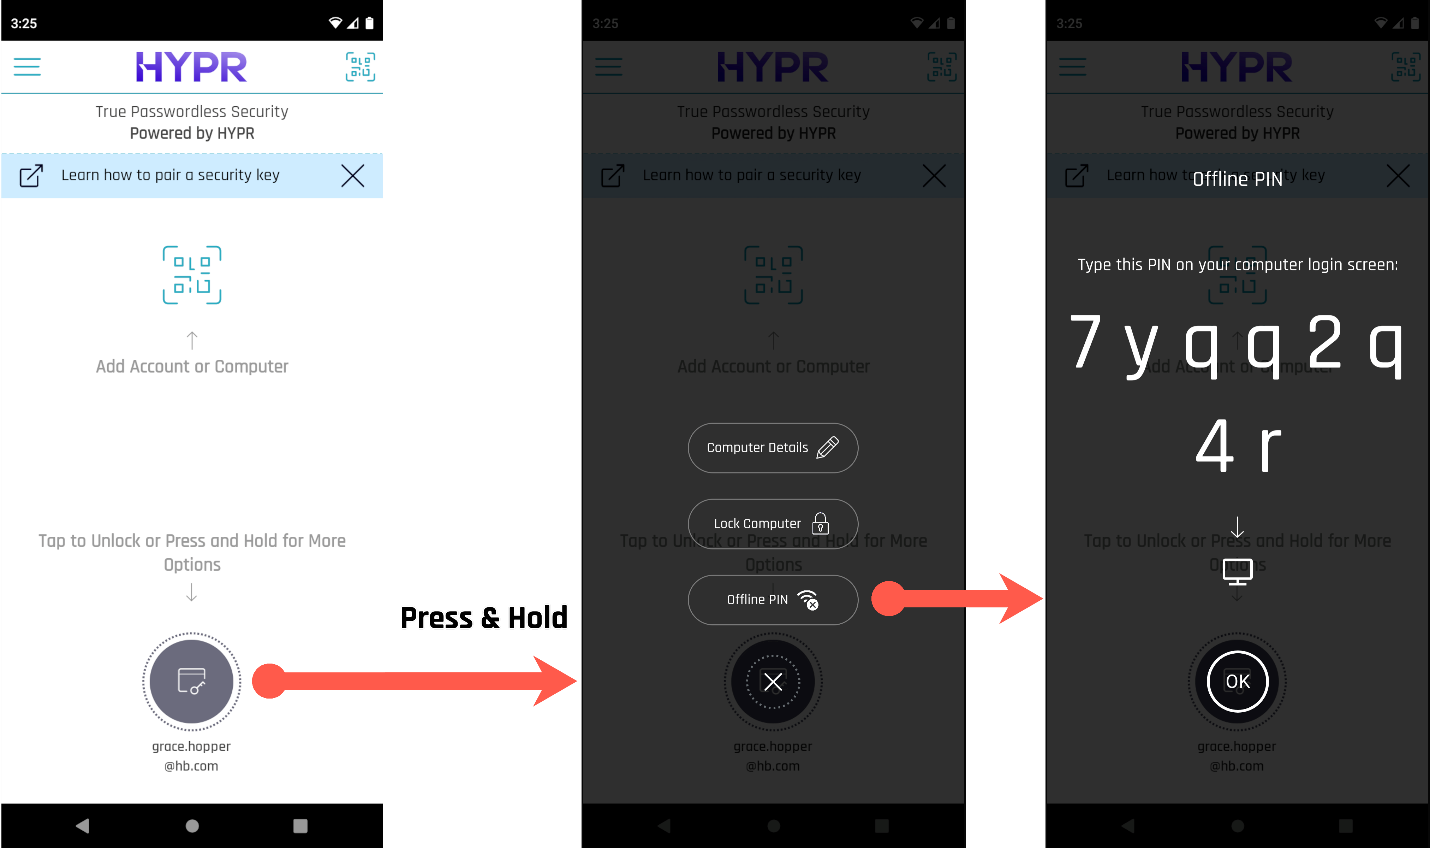
Get Acquainted
The Offline PIN button doesn't appear until the user has completed a successful authentication.
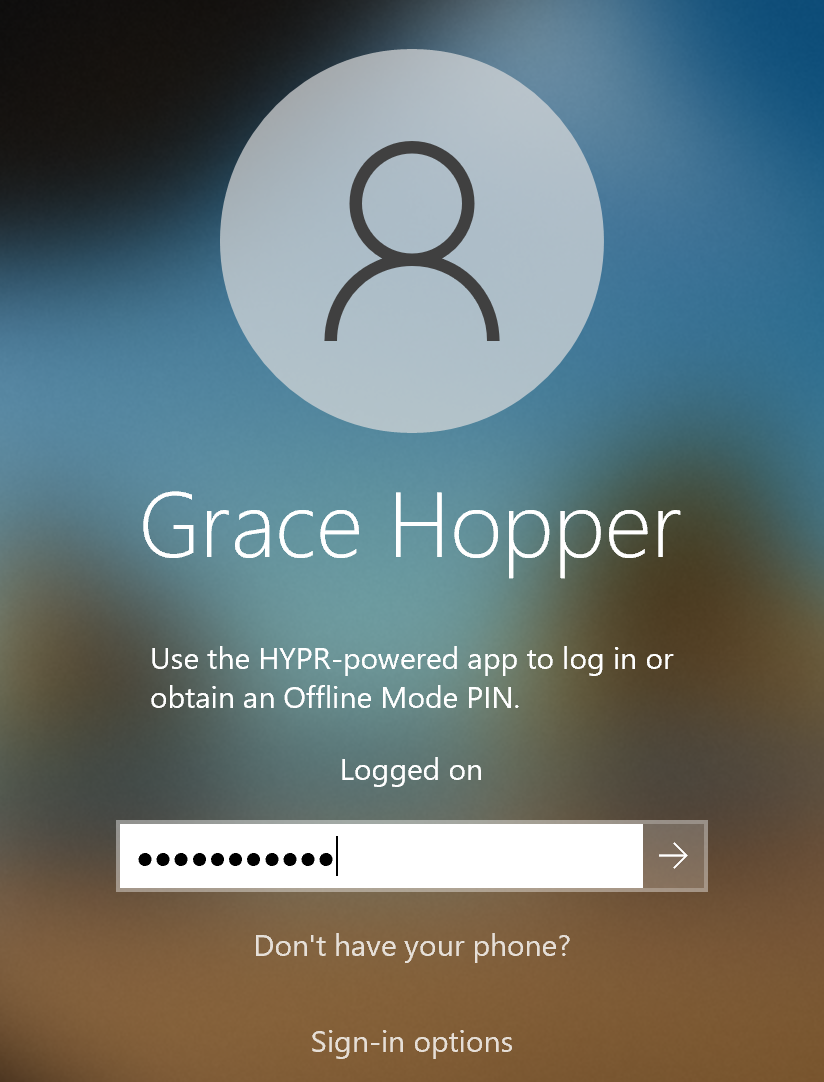
Using the Offline PIN to Log In
After generating a PIN on the mobile device, the user can enter it on the login screen to unlock the workstation.
Replenishing Offline PINs
The HYPR Mobile App will warn the user when they're running low on PINs, based on the allowable number of Offline PINs set via the Control Center Workstation Settings.
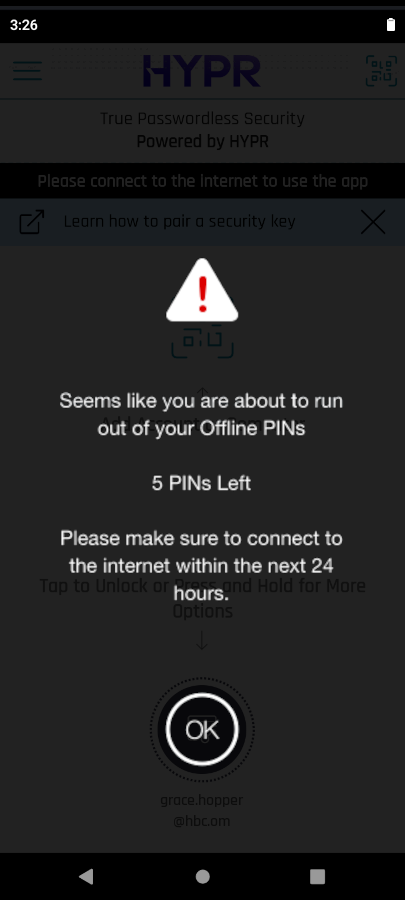
The user must perform a successful online authentication to replenish the PINs on the mobile device. Once all the PINs have been exhausted, an error message displays on the mobile device.
The length of time an Offline PIN remains valid is determined by the Offline PINs set via the Control Center Workstation Settings.
Remote Desktop Login
Logging In to a Remote Desktop
To access a Windows remote desktop with HYPR, the user can choose to initiate the authentication from their mobile device or can scan a QR code on the workstation.
Accounts and Permissions
The account used to log in to the remote machine doesn't have to be the same as the one used to log in to the local machine. However, it must have the necessary access permissions on the remote machine to successfully connect.
It's also not necessary for the HYPR Passwordless client to be installed on the remote machine.
Device-initiated Authentication
If the account being used to connect to the remote machine has previously been paired with the local machine (see HYPR Passwordless and the HYPR Mobile App), the user may initiate the authentication from the HYPR Mobile App.
- Open the Remote Desktop Connection application.
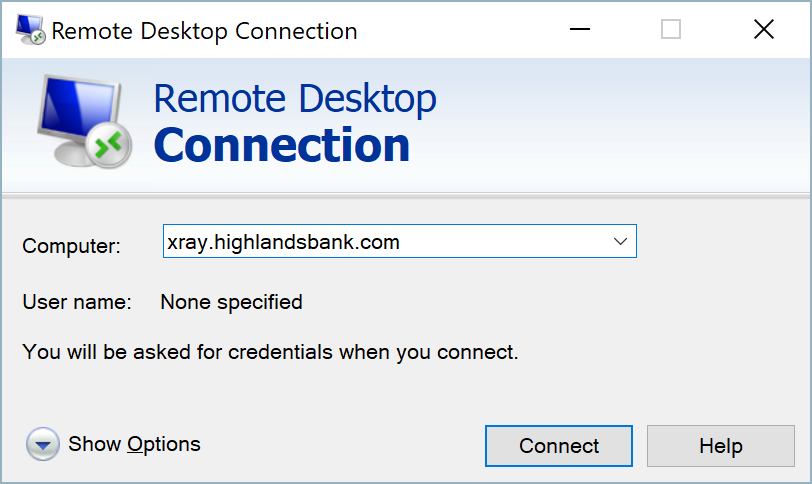
- Enter the address of the remote computer and click Connect to show the Enter Your Credentials dialog.
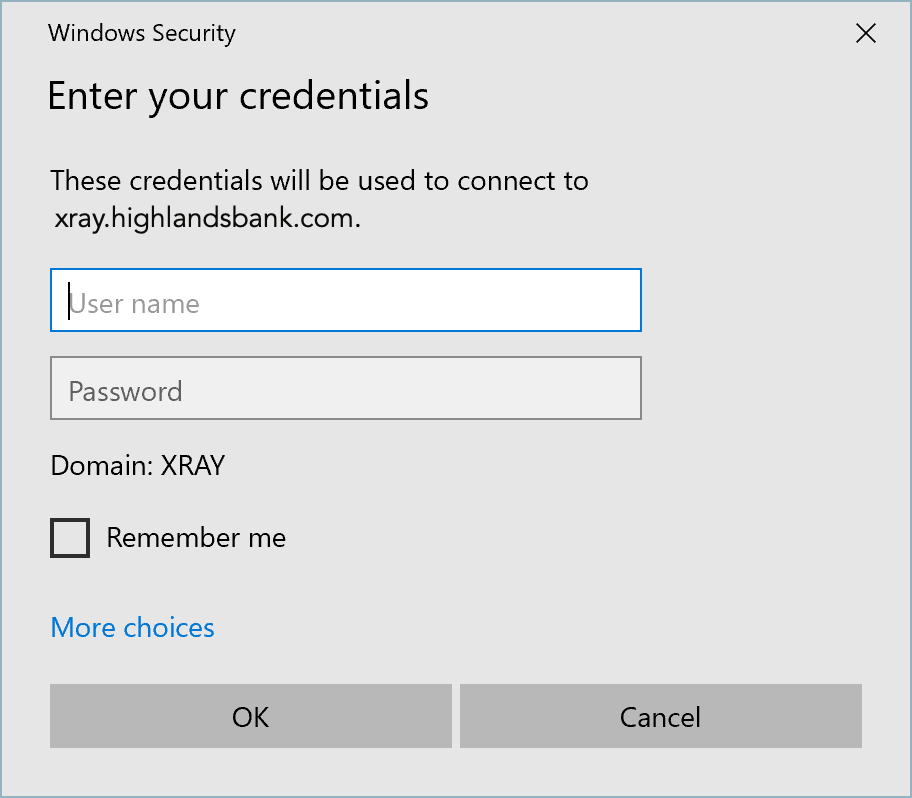
- WITHOUT CLICKING OK, initiate an authentication in the HYPR Mobile App by pressing the relevant computer icon as if logging in locally.
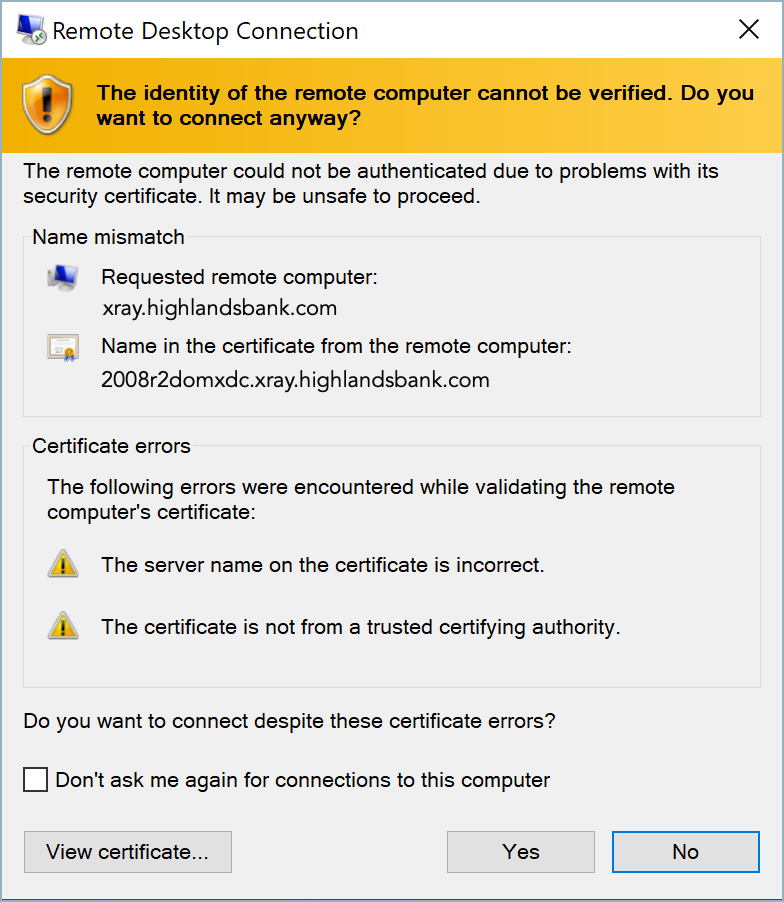
- Wait for the connection to be established and accept the certificate-based authentication warning if necessary. (Check the Don't ask me again for connections to this computer box to skip this warning in future.)
- Wait for the Remote Desktop session to finish authenticating.
Scan QR to Log In for RDP
As an alternative to device-initiated authorization, the user can also scan a QR code on the local machine to unlock the remote machine.
Control Center Settings
The Scan QR to Log In feature is only available if Roaming Users is enabled in Control Center Workstation Settings. Roaming Users is disabled by default.
- Open the Remote Desktop Connection application.
- Enter the address of the remote computer and click Connect to show the Enter Your Credentials dialog.
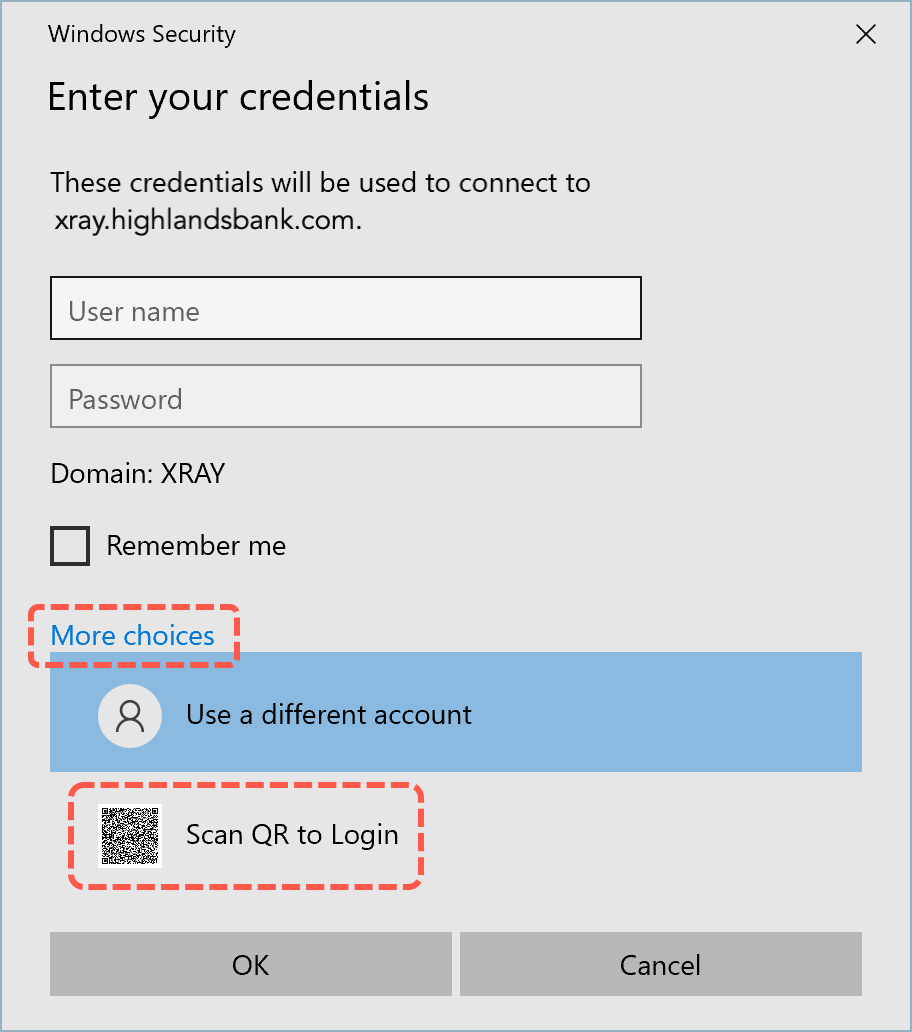
- Click More choices then click Scan QR to Login to expand the choices on the credentials screen.
-
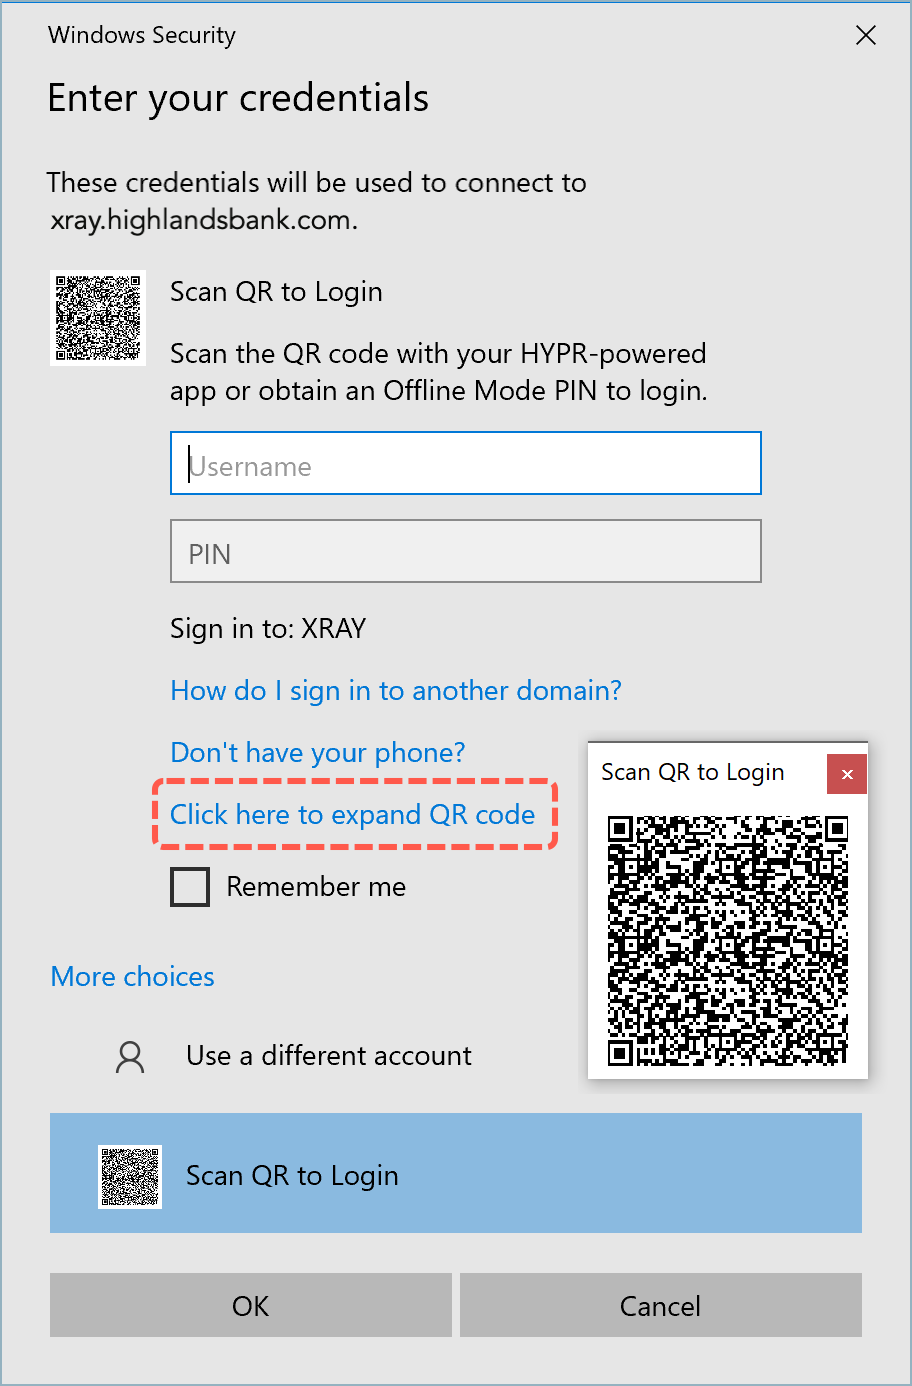
Use Click here to expand QR code to reveal a larger scannable copy of the QR code.
-
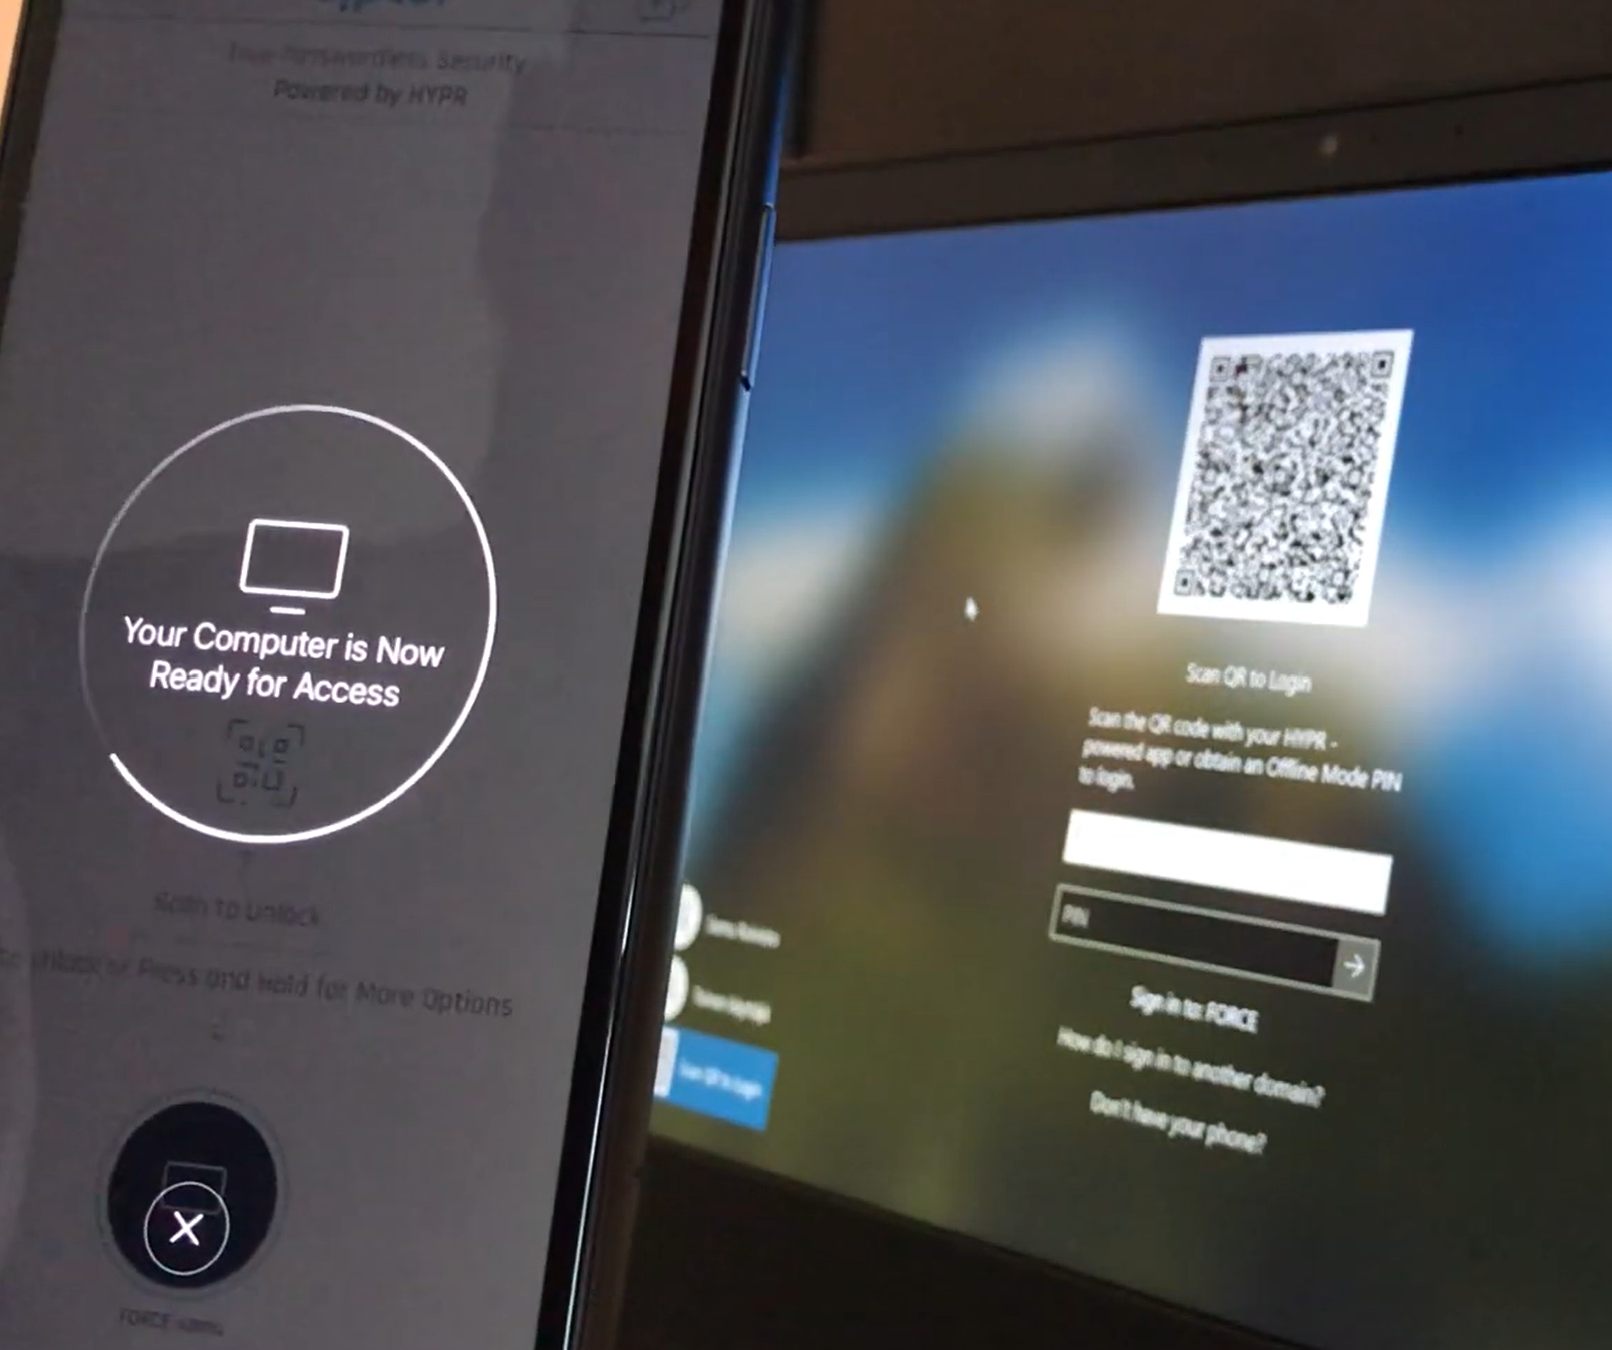
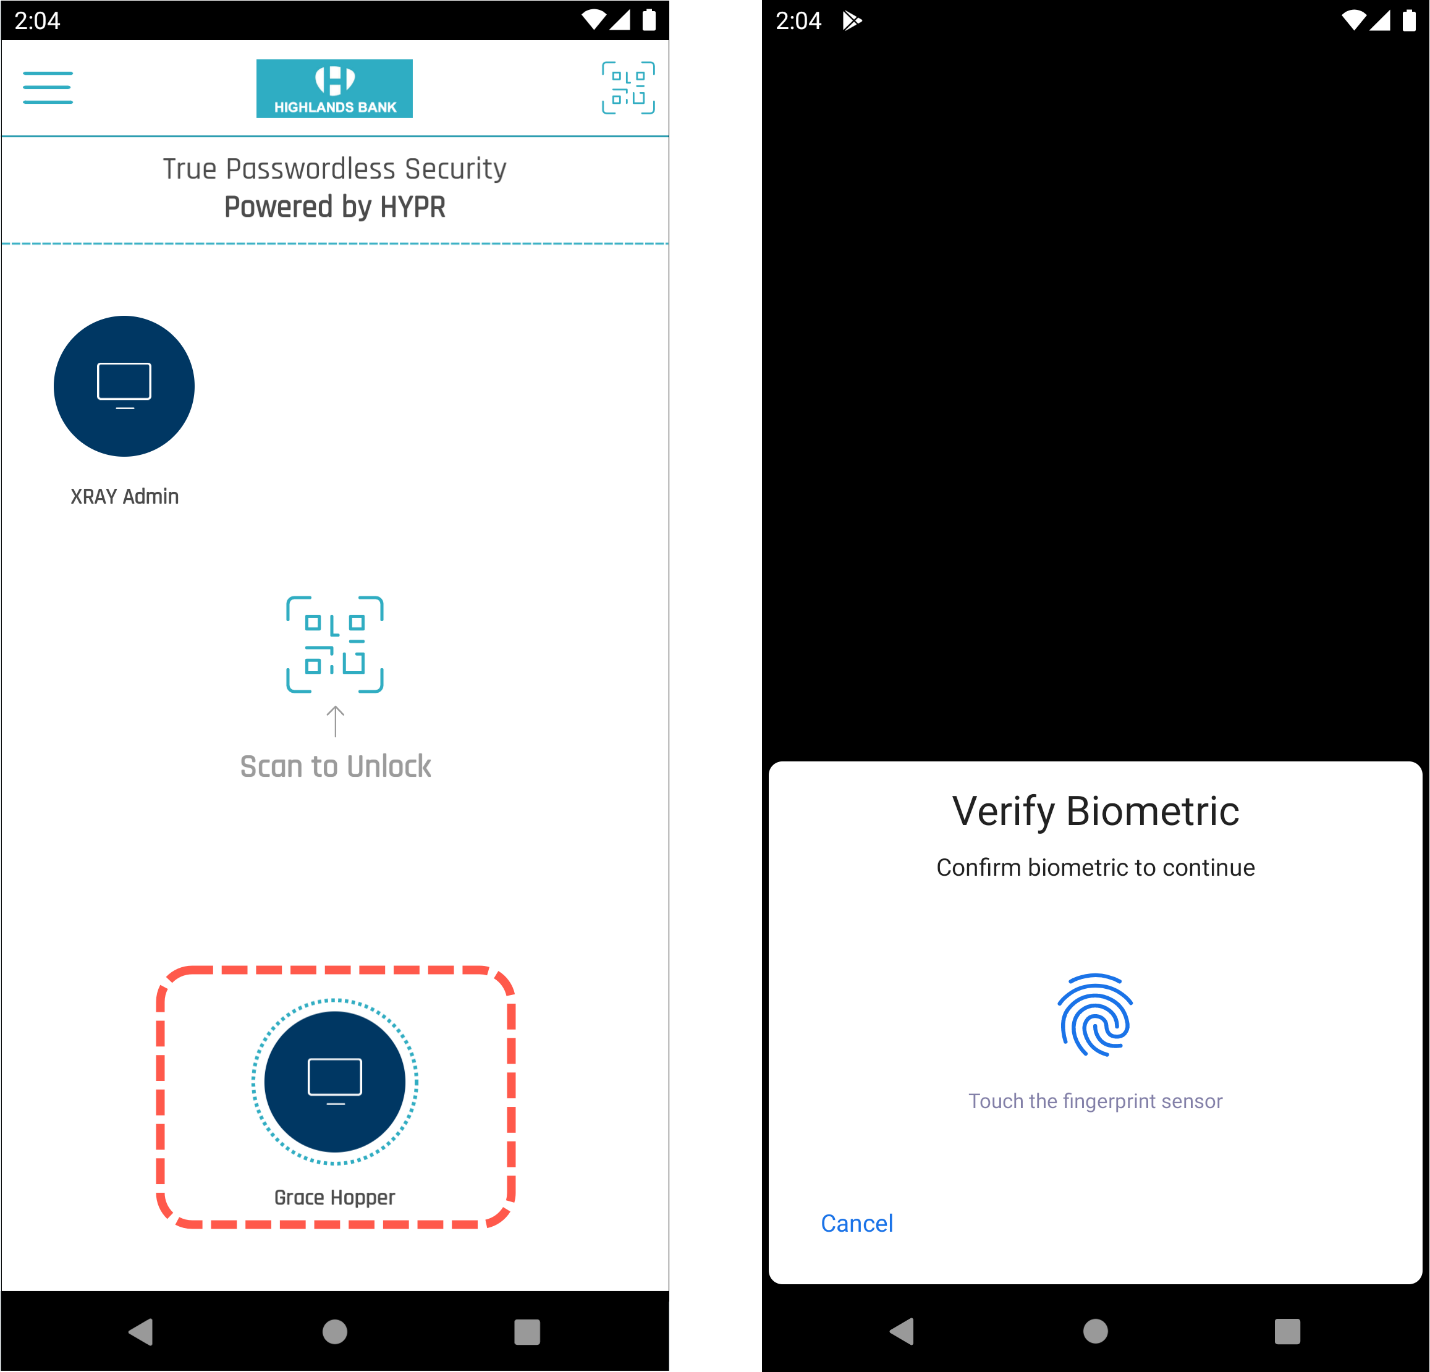
In the HYPR Mobile App, press the Scan to Unlock button and scan the QR code to log in.
- If there's more than one domain-joined account stored on the mobile device, the HYPR Mobile App prompts the user to choose before presenting the identity authorization screen.
- Wait for the Remote Desktop session to finish authenticating.
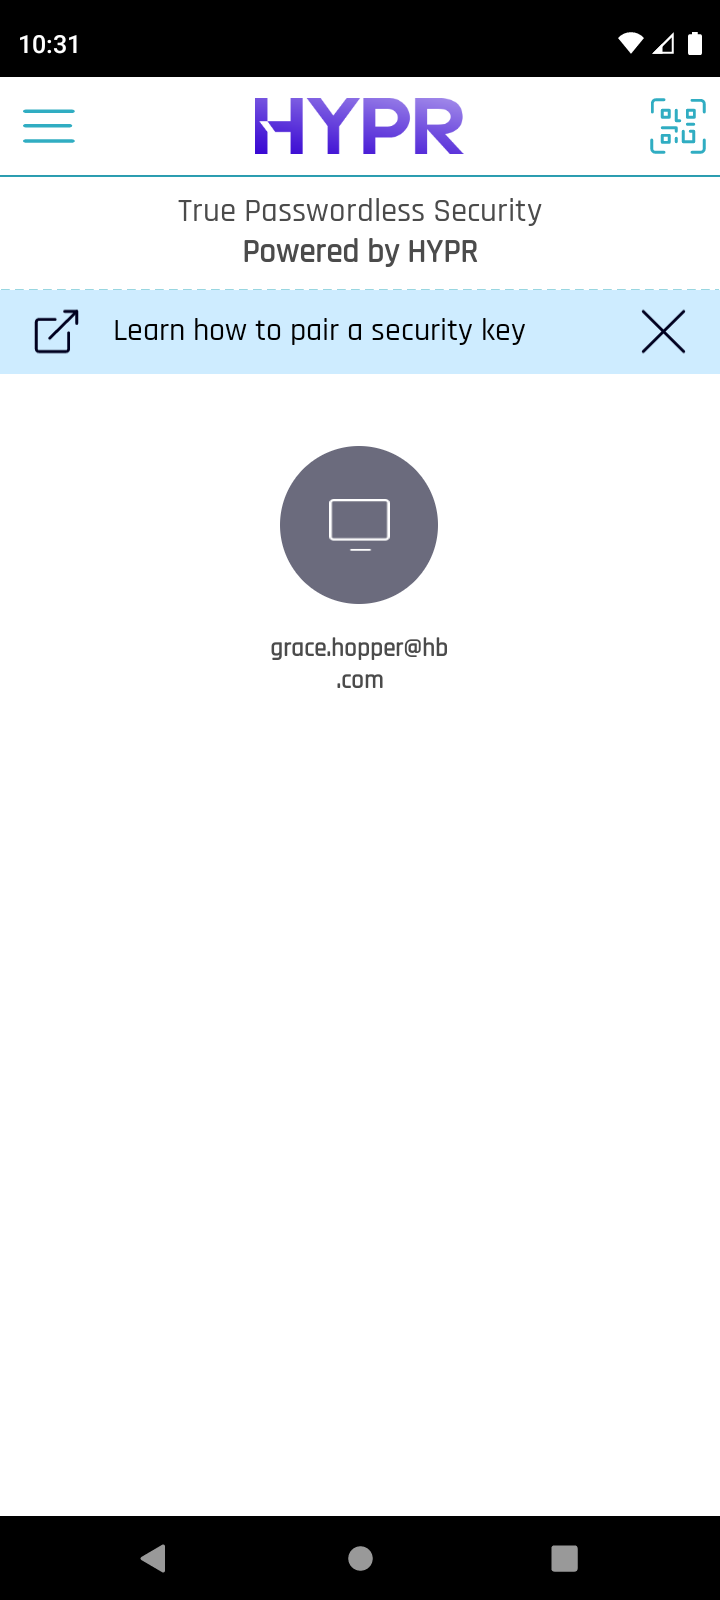
Roaming User Login
Users after registration can subsequently select the Scan QR to Login option on the login screen of any other domain-joined computer. It must have the HYPR Passwordless client installed. Users then simply scan the code with the HYPR Mobile App to access the machine.

Locking the workstation
- Tap the circle labeled with the desired workstation name.
-
A dialog appears: "This computer is already unlocked. Would you like to lock it?" Tap Yes.
-
The workstation locks immediately. HYPR Mobile App displays a checkmark for confirmation, and returns to the main screen.
Best Practices
Lockout Settings
To provide additional security for Offline and Recovery PINs and prevent potential Brute Force Attacks, HYPR recommends enforcing the Lockout Settings in Active Directory for all user accounts. This policy locks a user account if the PIN is entered X number of times incorrectly.
You can learn more about configuring Lockout Settings in the Microsoft documentation.
You can also adjust the amount of allowed retry attempts for certain security keys or smart-cards. See Windows Installation instructions for full details on how to configure these options.
Log Security
By default, the HYPR Passwordless client allows user accounts without admin privileges to access the application log files. This is recommended practice during the initial deployment phase to ensure users can send log files to Admins or HYPR support for troubleshooting. However, after the initial deployment phase is over you should restrict log access to only accounts with local admin privileges.
Setting Log Levels
The HYPR Passwordless cient Log Level can be adjusted to limit the amount of data that is being logged. The following values can be used to adjust the logging:
-
0 = No logging
-
1 = Adds Fatal errors
-
2 = Adds Errors
-
3 = Adds Warnings
-
4 = Adds more Information events
-
5 = Default setting; debug logging
-
6 = Increase to more verbose logging
Level 5 is enabled by default as this provides the needed amount of information for troubleshooting and technical support. Please be aware that reducing the logging level will significantly hinder HYPR's ability to provide technical support.
This log level can be adjusted as follows:
Windows
- Edit the Windows registry's Log level entry located in HKEY_LOCAL_MACHINE\SOFTWARE\HYPR Workforce Access
Setting Log Access on Windows
For controlling access to the C:\Program Files\HYPR\Log folder, you must set parameters when installing the HYPR Passwordless client. See HYPR Registry Keys for more information regarding Windows installation parameters.
During Installation
For setting access to the logs folder on Windows during a fresh install, include the configuration parameter HYPRPROTECTLOGS (in MSI) or protectLogs (in hypr.json).
-
Set to "1" to make the folder readable only by users who belong to the built-in Administrators group.
-
Set to "0" (or omit the parameter) to make the folder readable and writable by all users.
Require User Presence for Registration
Additional measures can be implemented on HYPR Passwordless for Windows deployments to remove the risk of an attacker adding their mobile device while the user's workstation is unattended – for example, the user walks away but leaves the screen or device unlocked.
For additional user verification during workstation device registration, administrators can require users to re-authenticate during pairing to prove their identity. This is configurable in CC in Workstation Settings.
Additional Certificate Revocation Checks
In addition to native Windows' certificate revocation checks, HYPR Passwordless for Windows can be configured to attempt to perform a revocation check before the user gets logged into the workstation. This is configurable on HYPR Passwordless through the User Account Check setting.
Non-exportable Private Keys
For sites wishing to protect security key or smart-card users' private keys, HYPR Passwordless for Windows client allows an additional installation parameter (via both.json and .msi configuration) to cause private keys to be generated on the security key or smart-card, and to never leave that device. This option works alongside the existing mobile certificate template; however, it is mutually exclusive with Security Key Recovery Mode functionality, which depends on exportable private keys.
Deployment strategy and risk mitigation
Pilot Group selection, deployment and testing
Global Deployment using
-
MDM or
-
GPO
-
Enforcing HYPR Passwordless Solution for workstations
-
Password resets consisting of large or complex password
-
Notice of HYPR registration completion to End users and enforcement of HYPR only login. Also Making HYPR the default cred provider
-
Disabling Password Authentication using GPO or registry or Active Directory. If HYBRID, Conditional Access can be used.
Logs and audit trail
Troubleshooting | HYPR Identity Assurance Platform
Workstation Troubleshooting | HYPR Identity Assurance Platform
HYPR Error Codes Table | HYPR Identity Assurance Platform
Audit Trail | HYPR Identity Assurance Platform
Event Descriptions | HYPR Identity Assurance Platform
Upgrading
HYPR Passwordless windows client can be upgraded with a silent install by running the updated binary via UI or via silent install similar to the Fresh Install.
No parameters or Json is required since existing values will be unaffected.
Reboot may or may not be required.
Removing the Passwordless client
Removing HYPR Passwordless client
Removing HYPR Passwordless client will delete all registry keys, installation artifacts, and HYPR user accounts from the target workstation. This action can be performed silently, with the installer user interface, or through Windows Control Panel.
Note
A restart of the workstation is required after the uninstall to complete removal.
Using the Command Line
Uninstall can be executed from the command line using msiexec.exe:
msiexec.exe /x WorkforceAccess_x64.msi
Using Windows Control Panel
-
Navigate in the Control Panel to Apps > Apps and Features.
-
From the menu of installed applications choose HYPR Passwordless and select the option to Uninstall.

-
The uninstallation wizard will be initiated. Follow the prompts to continue with the uninstallation. Windows will require an administrative prompt to complete this uninstallation.
-
Restart your workstation to complete the uninstallation.
Alternative using Intune or command prompt / powershell
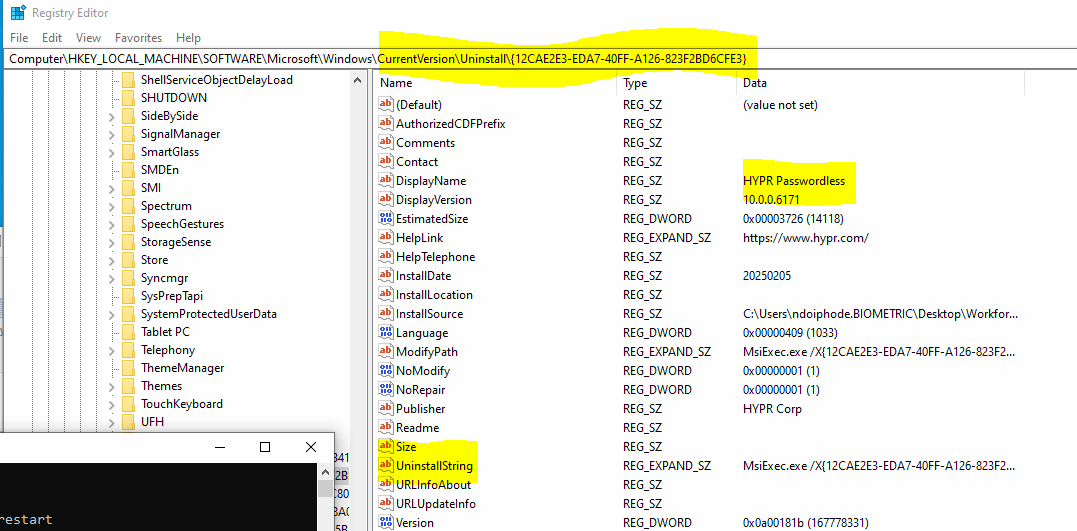
CMD prompt as admin example (note that the HYPR product code may be different for your environment):
MsiExec.exe /X{12CAE2E3-EDA7-40FF-A126-823F2BD6CFE3} /qn /norestart