HYPR Affirm: Overview
HYPR Affirm is the workforce identity verification component of the HYPR platform. It confirms that the person behind a sensitive action is the employee they claim to be, in situations such as these:
- An employee setting up their first sign-in method during onboarding
- An employee recovering access to their account
- A caller asking the help desk for a password reset
- An employee requesting step-up access to a sensitive system
Affirm runs verification flows that your administrators configure. The person being verified is the requester. A flow combines checks such as a one-time code, the employee's location, a government-issued ID with a face comparison and a review by an approver, and records one auditable decision.
HYPR Authenticate handles everyday passwordless sign-in, and HYPR Adapt handles risk-signal-driven adaptation. Affirm establishes trust at the moments of higher risk: onboarding a new identity, recovering a lost one and confirming who is on the other end of a support call.
HYPR Affirm is not available in certain restricted territories, and additional data-sovereignty rules apply in some regions. See Supported Documents by Location for the full list.
Where to Start
Use the following table to find the page for your task.
| If you want to… | Go here |
|---|---|
| Run your first verification flow | Get Started |
| Configure workflows and outcomes | Configuring HYPR Affirm |
| See what end users experience | User Experience |
| Review audit logs and verification activity | Analytics |
| Look up supported documents, verification status values or test cases | Reference |
The Verification Model
A verification flow in HYPR Affirm is a configurable sequence of identity checks that produces a single, recorded outcome. It is the unit an administrator designs and the unit a requester goes through. A flow has three structural pieces:
-
A flow type — Onboarding (a new identity establishing themselves), Recovery Flow (an existing identity regaining access) or CC Admin (Control Center administrator self-attestation). Only one CC Admin flow can exist per tenant, and its only outcome is the redirect to Device Manager.
-
A sequence of verification steps — each step gathers evidence (a one-time password (OTP) sent to a phone, a live photo, a document, an Entra Verified ID credential) and either passes or fails. Steps run in a fixed order; the administrator turns each step on or off and sets its retry limit and failure outcome.
-
An outcome — what happens on completion: send the requester to a destination (Device Manager, an external URL, an Okta password reset page), issue a credential (Entra Temporary Access Pass, Entra Verified ID) or show the requester the verification result.
An administrator creates a flow once in Control Center by selecting verification steps, assigning approvers (or HYPR automated approval) and defining the outcome that fires when the flow completes successfully. HYPR generates a URL for the flow. You can give the URL directly to requesters, or an integration (Okta, Entra, Keycloak, Ping) can invoke it.
Each requester who opens the URL walks through the configured steps. Affirm computes the flow's overall outcome from the per-step results. Whether a single step failure fails the flow depends on the configured per-step failure outcomes and on the flow's risk-signal escalation policy, described in Escalation. Affirm records the result and an evidence package (the inputs it used to make its decision) under a unique Workflow ID, described in Observability.
Verification flows produce a point-in-time decision: at this moment, this requester proved they hold this evidence. They do not produce ongoing assurance. For continuous re-checking of risk signals over time, use HYPR Adapt, the complementary product. Affirm and Adapt can be combined.
See Create and Manage Verification Flows for the admin walkthrough and Configure Verification Steps for each step type and its options.
What Employees Experience
An employee receives a link to a verification flow, for example by email or text message from your organization or from the help desk during a support call. The link opens in a web browser on a phone or a computer.
The employee then moves through a short series of screens:
-
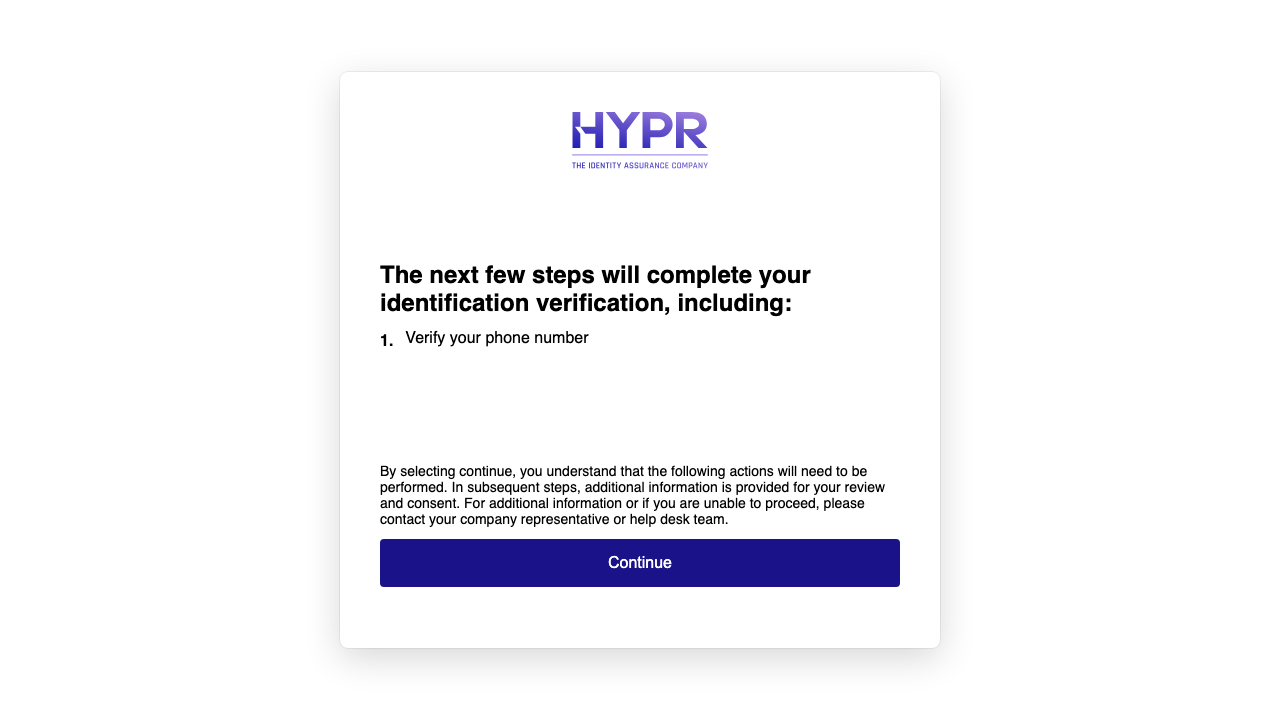
Instructions. The first screen lists the checks in this flow. By default its title reads The next few steps will complete your identification verification, including: followed by one line per check, such as Verify your phone number, Verify your ID documentation or Verify your biometrics. The employee clicks Continue.
-
Consent. The employee reads the consent content and clicks Accept. The Accept button becomes available after the employee scrolls to the end of the content. See Customizable Consent Screen for what the consent screen contains.
-
Username. On the Let's get started! screen, the employee enters their username or email address and clicks Begin.
-
Verification steps. The employee completes each check the flow includes, as described in Verification Methods.
-
Review. If the flow includes an approver, the employee waits while the approver reviews the results.
-
Result. The final screen shows the outcome. On success, the flow can send the employee on to their next task, such as registering a sign-in device, or show a verification ID the employee reads to the help desk.
Administrators can change the wording of these screens and apply your organization's branding with Affirm Studio. User Experience shows every screen the requester and the approver see.
Verification Methods
Each verification flow uses one or more of the following methods. The table describes what the employee does for each method and links to its configuration page.
| Method | What the employee does | Configuration |
|---|---|---|
| Phone number or email verification | Enters a six-digit code sent by text message or email | Phone Number / Email Verification |
| Location | Allows the browser to share its location, or continues with the location of their network connection | Location |
| Document and biometric verification | Photographs a government-issued ID in guided capture screens from HYPR's identity verification provider and, when the step includes a liveness check, takes a photo or short video of their face | Document and Biometric Verification |
| Photo ID and liveness capture | Provides a photo of an ID and completes a live face capture | Photo ID and Liveness Capture |
| Liveness only | Completes a live face capture, which Affirm compares with a photo from your directory | Liveness-Only (Anchor Image) |
| Verified credential | Presents a Microsoft Entra Verified ID credential by scanning a QR code with Microsoft Authenticator | Verified Credentials |
| Compliance screening | Nothing additional for AML Checks and OFAC Checks. With Identity Verification With Document Issuer, enters their date of birth and address if your directory does not provide them | KYC Compliance Checks |
| Approver chat and video | Joins a chat or video call with an approver | Approver Chat and Video |
| Attestation | Nothing additional; an approver reviews the results and approves or declines | Attestation |
| Custom verification step | Completes a step your organization builds | Custom Verification Steps |
For the documents Affirm accepts in each country, see Supported Documents by Location.
Key Capabilities
This section introduces the capabilities you configure in and around a verification flow. Each subsection links to the page that covers the capability in full.
Document and Biometric Verification
The requester presents a government-issued ID, such as a passport, driving licence, national identity card or residence permit, and HYPR's identity verification provider checks it for authenticity. With the optional Liveness Check, the requester also takes a live selfie, which is compared with the document photograph. With With Motion Detection, an option of Liveness Check, the requester records a short head-turn video instead, which protects against digital spoofs.
See Document and Biometric Verification.
Dual Document Verification
For workflows that require two identity documents per requester, for example a passport and a driving licence, Dual Document Verification verifies both documents against a single live capture. The requester captures both documents and then completes one live capture, which both document checks use.
See Dual Document Verification.
Liveness-Only (Anchor Image)
When the requester is already known to your organization, for example through a workstation account or a photo held in your directory, Affirm can compare a live selfie with an anchor image fetched from that directory. This avoids asking known employees to upload personal documents for routine re-verification. If no usable anchor image is available, the requester uploads a photo ID instead.
See Liveness-Only Verification.
How Affirm Resists Spoofing and Deepfakes
Affirm's biometric steps build assurance in layers. Each layer adds a defense against a different class of impersonation attempt, and administrators pick the combination that matches the workflow's threat model. The following table compares the biometric steps and what each adds.
| Step | What's captured | Compared against | What it adds vs. the lighter option |
|---|---|---|---|
| Photo ID and Liveness Capture | Photo ID + live selfie | The face on the ID | The selfie must be taken live with the device camera; a stored photo cannot be uploaded for it. |
| Document and Biometric Verification | Government-issued ID + live selfie (with Liveness Check) | Document photo + name + optional compliance lists | Adds document-authenticity checks (forgery, tampering) and optional KYC/AML/OFAC overlays; the selfie comparison runs only with Liveness Check. |
| + Motion Detection (option of Document and Biometric Verification) | Above, with a short head-turn video in place of the selfie photo | Same | The requester turns their head during capture, which protects against digital spoofs. |
| Liveness-Only (Anchor Image) | Live selfie | Directory-sourced anchor image | Same liveness defense, but the comparison target is a pre-vetted directory image rather than a freshly captured document — appropriate when the requester is already a known internal user. |
Motion Detection is available only in Document and Biometric Verification, as an option of its Liveness Check, and is set per workflow. A workflow that needs a lighter check can use Photo ID and Liveness Capture, or Document and Biometric Verification without Motion Detection. The document and biometric check results are also available to the Risk Policy Builder as per-document risk signals, such as Face Match, Spoof Detection and Not Expired, so a kit can treat each check differently. For example, a kit can deny the verification on one failed check and escalate another to an approver.
For per-step configuration, see Document and Biometric Verification, Photo ID and Liveness Capture, and Liveness-Only (Anchor Image).
Workflow Outcomes and Integration Handoffs
A successful verification fires a configurable outcome. Affirm can hand off to Microsoft Entra ID (issue a Temporary Access Pass, issue an Entra Verified ID credential), to Okta (send the requester to an Okta password reset page), to HYPR's own Device Manager (register a new login method), or to any custom URL with optional dynamic parameters.
Per-Step Retry and Outcome Controls
Each verification step can carry its own retry limit (1 to 10 attempts within a time window of up to 60 minutes) and failure outcome: Deny Verification, Redirect to URL or Continue Workflow, optionally with Escalate to Live Chat. Administrators tune these per step to balance assurance against user friction.
See Injectable Outcomes & Retry Limits.
Network and Location Policy
Affirm can restrict where verifications originate. In the Location step, administrators can configure an IP Address Block List, an IP Address Allow List, a Country Block List (sanctioned countries or a custom list) and Known Locations with a Distance Threshold. With Known Locations, the check passes only when the requester is within a configured distance of their address on file or one of your organization's locations.
See Network and Location Policy.
Escalation
Affirm uses escalation in two independent mechanisms that can be active in the same flow:
-
Approver chain escalation routes a verification decision from one human approver to the next when the active approver fails to respond within their configured timeout. For example, a flow can route from the requester's manager to a designated escalation contact. Escalation approvers can be Manager, Dynamic or Other (a specific email address).
-
Risk-signal escalation routes a verification flow into a higher-friction path (escalation to an approver, a redirect or a denial) when a risk signal fires during step execution.
Administrators build risk-signal policy as Policy Evaluation Kits in the Affirm Risk Policy Builder and assign a kit to a verification flow. A kit holds Pass and Fail rules over the risk signals each verification action emits. Affirm evaluates the kit's rules per action, and the first matching rule decides the action's outcome.
When both mechanisms are active, risk-signal policy decides first. As a step completes, the assigned kit evaluates its Pass/Fail rules:
- A Fail rule with the Deny action ends the flow.
- Redirect immediately sends the requester to a URL.
- Escalate immediately or Continue on failure (escalate) routes the flow into the human-review phase, where the approver chain's timeouts and ordering apply.
- Continue on failure (deny at end) lets the requester finish the flow before the denial applies.
See Approvers and Escalation Approvers for approver-chain configuration and Risk-Signal Escalation Policy for the policy model.
KYC Compliance Screening
As options of the Document and Biometric Verification step, Affirm can run Know Your Customer (KYC) screening in addition to the document and biometric checks: AML Checks (screening against government and international organizations' sanctions lists) and OFAC Checks. The screening results flow into the same outcome and observability surfaces as the rest of the verification.
Affirm Studio (End-User Screen Customization)
Affirm Studio is the visual screen-management interface that lets administrators customize content (titles, descriptions, button labels, error messages) and styling (typography, colors, logo) on every end-user verification screen. Customizations are organized into reusable kits applied per workflow, with desktop and mobile previews available before publish.
Customizable Consent Screen
Administrators can add organization-specific consent content per workflow. Your content sits alongside HYPR's fixed consent notices rather than replacing them.
See Customizable Consent Screen for the consent screen and its order, and Biometric Data and the Privacy Notice for which notice appears when.
Code Customizations and Custom Verification Steps
Affirm exposes a Code Customization API for organizations that need to override default Affirm behavior, for example to pull user identity from a non-standard source, send SMS or email through a corporate gateway instead of HYPR's, or run a proprietary fraud check as a verification step. Customizations cover User Directory lookup, SMS sending and verification, email delivery, outcome handling and image writeback. Organizations can also register entire custom verification steps as pluggable single-page applications (SPAs) alongside HYPR's built-in steps.
See Affirm Customizations and Custom Verification Steps.
Directory Image Writeback
After a successful verification, Affirm can push the captured images (selfie, document scans) to an enterprise directory, such as Entra ID, Okta or Ping Identity, or to a custom endpoint, through a code customization. Your directory then remains the system of record for these images.
See Directory Image Writeback.
How Affirm Moves Images Between HYPR and Your Directory
HYPR is the verifier, and your directory is the system of record for identity images. Affirm provides two complementary mechanisms that move images between the two sides, in opposite directions, without HYPR ever becoming the long-term store. The following table compares them.
| Anchor Image (directory → HYPR) | Directory Image Writeback (HYPR → directory) | |
|---|---|---|
| Direction | Customer directory provides an image to HYPR for a single verification | HYPR sends captured images to the customer directory after a successful verification |
| When it happens | At the start of a Liveness-Only verification flow | After the verification is approved, by HYPR automated approval or by an approver |
| Which step uses it | Liveness-Only (Anchor Image) — selfie compared against the anchor | Document and Biometric and Photo ID and Liveness — document captures and, when taken, the selfie are written back |
| Customer purpose | Verify a known internal user without asking them to upload a fresh document | Keep the directory's stored identity image current, with your directory as the system of record for identity images |
| Implementation hook | User Image Directory Source code customization | USER_DIRECTORY_IMAGE_WRITEBACK code customization |
The two mechanisms compose. For example, use Anchor Image lookups for routine re-verifications of known employees, and use Image Writeback after a fresh Document and Biometric verification to refresh the anchor image in the directory on a configured rotation. The anchor a workflow reads today can be the image a prior verification wrote back yesterday. This keeps the directory's reference image current without giving HYPR ongoing custody of it.
The Audit Trail records AFFIRM_WORKFLOW_ANCHOR_IMAGE events for each stage of an anchor image lookup, with its result, and AFFIRM_WRITEBACK_* events for each writeback.
Helpdesk Operations
The Affirm Helpdesk portal is the agent-facing surface for support teams that need to confirm a caller's identity before completing a sensitive action, such as a password reset, a step-up access grant or an account unlock. A support agent starts a verification flow on the caller's behalf and sends them the link; the caller completes the verification steps. Helpdesk-initiated and self-service verifications use the same verification flows; only the initiator differs.
Agents sign in through your identity provider (IdP) with OpenID Connect (OIDC), and a role claim in the token sets their access:
- A Helpdesk viewer can browse verification activity, see flow status and review past records (read-only).
- A Helpdesk editor can also initialize verification flows on behalf of a caller and send invitation links.
A user whose token carries neither role sees the Access Not Allowed page.
When a caller completes a verification, the final outcome screen can display a verification ID that the caller reads to the agent. The screen reads Please provide the verification ID when contacting your helpdesk. Administrators turn this on per workflow with Display Verification Confirmation ID information on approved screen in the Verified Outcome step. The agent finds and validates the ID in the Helpdesk activity view.
See Affirm Helpdesk for the operations guide, and Okta or Entra ID for the OIDC integration setup.
Data Retention
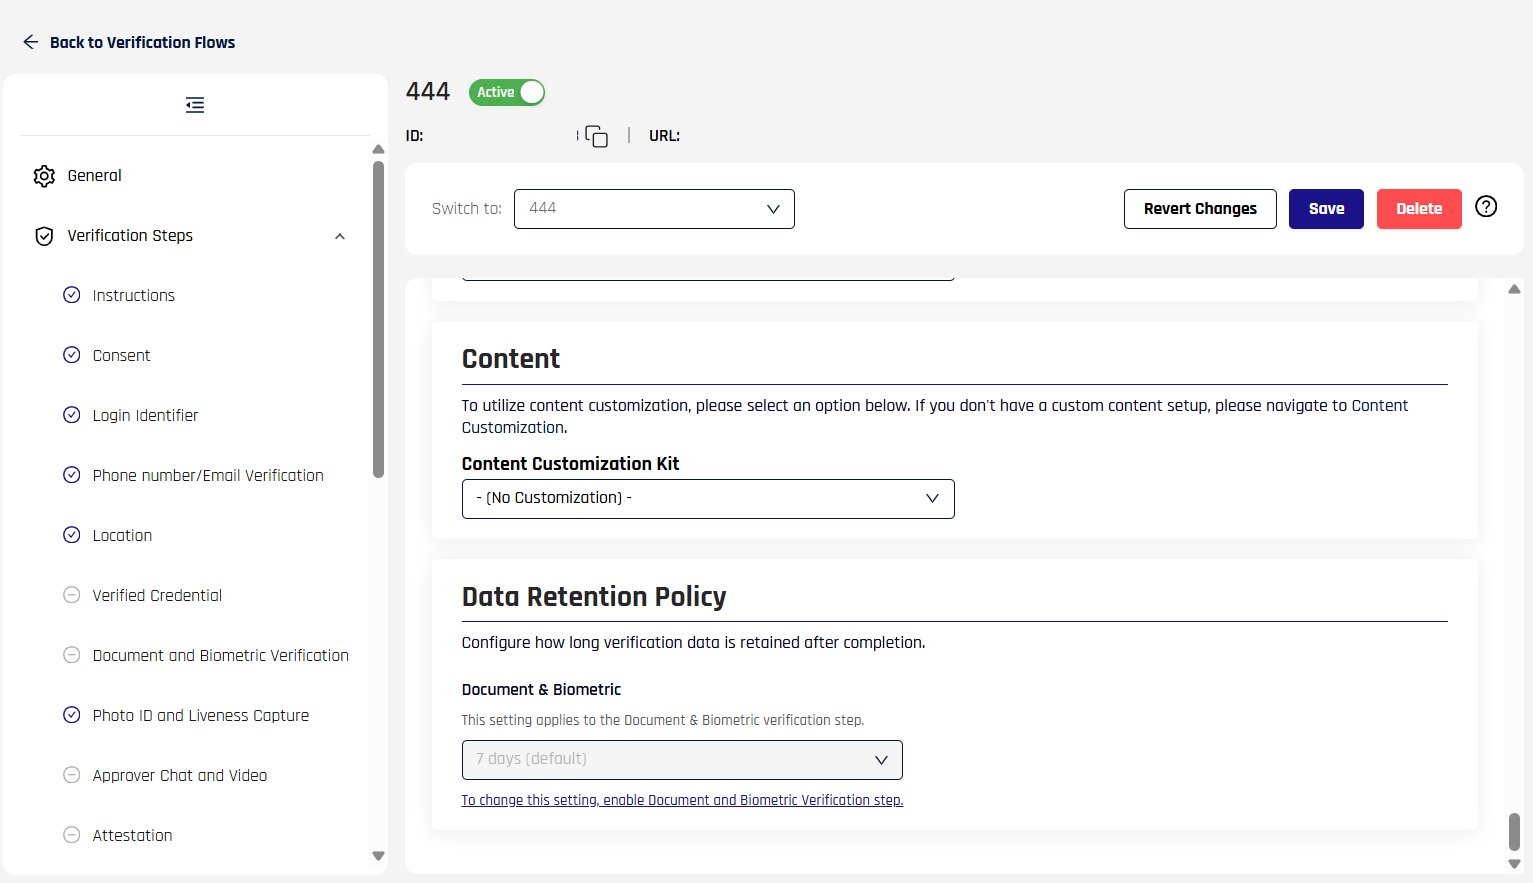
The Data retention policy setting controls how long document and biometric verification data is retained after a verification session completes. It is set per workflow and applies to the Document and Biometric Verification step. The drop-down is editable only when that step is enabled in the workflow.
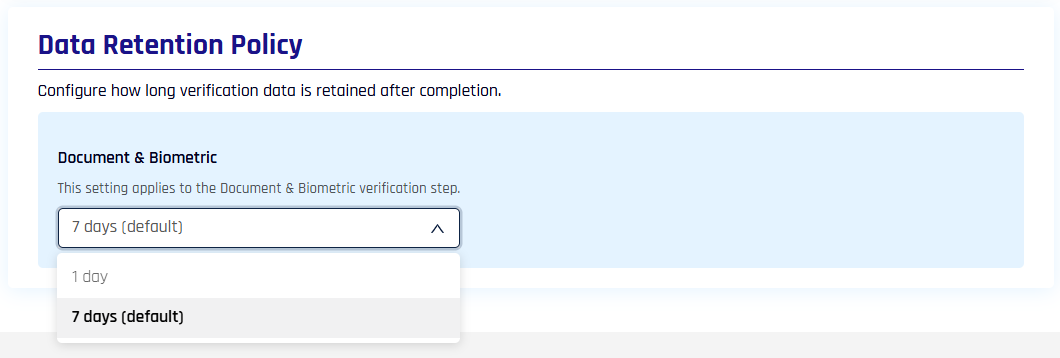
The Document & Biometric drop-down offers two options:
- 7 days (default): document and biometric verification data is retained for 7 days after the session completes
- 1 day: document and biometric verification data is retained for 1 day after the session completes
Confirm with your HYPR representative that the 1-day option is available for your tenant before publishing workflows that select it, and decide on the setting during workflow design.
For the notice people see before any biometric capture, and what Affirm collects and keeps, see Biometric Data and the Privacy Notice.
See Pre-Deploy Checklist for deployment preparation context.
Observability
Every verification flow produces records on four observability surfaces, tied together by one correlation key: the Workflow ID, assigned when a verification attempt starts. It appears as the Workflow ID in the Activity Log and as the Trace ID in the Audit Trail, and the Affirm API uses it to look up that attempt. The four surfaces are the following:
- Activity Log — one record per requester attempt, showing the decision, the approver, per-step outcomes and the evidence collected. Available in Control Center and the Helpdesk portal.
- Audit Trail — events for each verification attempt as the requester moves through it, and for verification flow configuration changes (created, changed, removed).
- Scorecards — the per-verification review surface that approvers, Helpdesk agents and Control Center administrators see. The Scorecard summarizes per-step results: document type and authenticity, face detection and match, liveness, spoofing, AML/OFAC, and address and date of birth (DOB) verification.
- Events / API — every meaningful state change emits an event. The same data is also reachable through the Affirm API for SIEM, BI or custom dashboards.
In the Activity Log, each record shows a workflow status (In Progress, Completed, Abandoned, Expired, Error or Not Started) and a decision (Verified or Unverified). Affirm counts failed attempts for each verification flow and for each step, and these counts drive the workflow and step retry limits.
Each step that gathers evidence (documents, biometric captures, location data, OTP exchanges) produces an evidence package — the raw inputs and the system's evaluation of them. Packages can be embedded directly in the Activity Log detail view (for image-light steps) or referenced by pointer (for image-heavy steps), and are subject to the data retention policy. The Activity Log and the Scorecard show only the steps and attributes the workflow actually uses. For example, a flow without a Location step does not render a Location column.
See Activity Log, Audit Trail, and Verification Status Values.
Tenant Enablement
HYPR enables some Affirm capabilities per tenant rather than letting you turn them on in Control Center. If a feature described on this page is not visible in your tenant, contact your HYPR representative to confirm enablement for your environment.
For the list of Affirm capabilities that HYPR enables per tenant, see Affirm Feature Flags.
HYPR Affirm API
HYPR Affirm provides an API for advanced integration and automation. With the API, you can create, read, update and delete verification flows and configurations, trigger flows programmatically, assign customizations and OIDC overrides, and query verification outcomes for downstream systems.
For complete API documentation, see the HYPR Passwordless API collection.
Validation and Testing
When validating an Affirm deployment, include both functional and non-functional checks:
- End-to-end verification outcomes across your active workflow types
- Retry-limit and failure-outcome behavior, including escalation paths
- Data-quality and policy scenarios (missing attributes, location/policy mismatches, compliance screening failures)
- Performance and reliability checks for your target user journeys
For a baseline test-case checklist, see Affirm Deployment Test Cases.