Risk-based Authentication Strategies Playbook
Requirements and Specifications for Risk-based Authentication Strategies Deployment
This playbook describes how to design, implement and roll out risk-based authentication using HYPR Adapt, including signal ingestion, policy authoring and safe deployment practices.

Introduction
HYPR Adapt provides real-time risk assessment and adaptive policy-based security controls that protect your users, systems, and business.
It enables organizations to proactively identify and mitigate identity-related risks, all while enhancing the user experience and reducing friction.
HYPR’s presence on mobile, endpoint, and web interfaces provides a comprehensive set of data points. In addition to the signals coming from the HYPR clients, you may also ingest signals from third-party services, such as Crowdstrike, using web hooks. The data from third-party services can then be used to construct risk policies that take action based on the business requirements.
This playbook describes what to consider when you deploy HYPR Adapt into your environment.
What will be the end result of this solution playbook?
The goal of this playbook is to aid you in planning and deploying HYPR to mitigate risk in your IT services. HYPR Adapt, in conjunction with HYPR Authenticate and HYPR Affirm, provide a holistic approach to reducing risk. This playbook concentrates on HYPR Adapt and covers the following topics:
- Translating business requirements into risk policies
- Preparing your HYPR tenant for your deployment
- Understanding HYPR Adapt signals
- Understanding the HYPR Adapt built-in policies
- Developing custom policies
- Production roll-out strategies
While each organization has unique needs, there are common scenarios addressed by the built-in policies. For everything else, you have the option to develop your own policies to meet specific requirements.
Preparing for the solution deployment
Feature flags govern behavior of the HYPR cloud-based tenants. HYPR Adapt related feature flags are disabled by default and you will need to work with the HYPR Deployment Team to enable the flags appropriate to your solution. The following table lists the available Adapt feature flags and their purposes.
Feature flags (set by HYPR deployment team)
| Name | Description |
|---|---|
| ENABLE_ADAPT_POLICIES | (Required) Enables Adapt functionality |
| ENABLE_SEND_CONTINUOUS_SIGNALS | (Optional) Not recommended to start with |
| SEND_DEVICE_SIGNAL_DURING_AUTHENTICATION | (Optional) Enables sending mobile signal to CC, inline with the auth request. This avoids timing issues with the mobile signal arriving after the auth decision |
| SEND_WORKSTATION_SIGNAL_DURING_UNLOCK | (Optional) As opposed to the SEND_WORKSTATION_SIGNALS flag, this one asks the WS to send the signal inline with the auth request. This ensures that we always have the latest signal while executing the policy and avoids any timing issues between the latest signal and auth request. |
| SEND_WORKSTATION_SIGNALS | (Optional) Enable workstation signals, request Location and System details will be collected, cached and sent to CC |
| ENABLE_ADAPT_UNAUTHENTICATED_WEBHOOK | (Optional) Allows for the web hook streaming of event data |
| CC_ANALYTICS_DASHBOARD | (Optional) Enables Adapt dashboard |
Work with your HYPR account representative to determine which feature flags are needed to meet your business requirements.
Requirements analysis
This solution touches on various aspects of end-user experience, business expectations and IT administration. Take the time to gather detailed requirements from the stakeholders, before going too far down the deployment path.
This section is a placeholder for the recording of requirements gathered from the stakeholders. Record a concise statement of the requirement and then provide the interpretation in the context of this HYPR solution.
Requirement Example
Statement: Our company needs to verify the identity of existing employees on a regular basis to prevent employment fraud.
Interpretation: North Korean individuals fraudulently obtain employment with U.S. companies as remote IT workers, using stolen and fake identities. The North Korean actors were assisted by individuals in the United States, China, United Arab Emirates, and Taiwan, to successfully obtain employment. By requiring regular identity verification, this fraud can be mitigated.
| Question | Answer |
|---|---|
| How frequently do you need to perform an IDV check? | |
| Are you performing IDV as part of the onboarding process? | |
| Do you have any employees that would be exempt from this policy? |
Requirement Template
Statement: [Add concise statement of the requirement]
Interpretation: [Add a discussion of the requirement and how the solution addresses it].
[Review the requirement with the stakeholders and record any questions/answers in the below table]
| Question | Answer |
|---|---|
User experience flowchart
Formulating business requirements often starts with how the solution impacts the end-user experience. The below flowchart shows an example of such a flowchart in the context of HYPR Adapt using the Crowdstrike and Login Limits policies as examples.
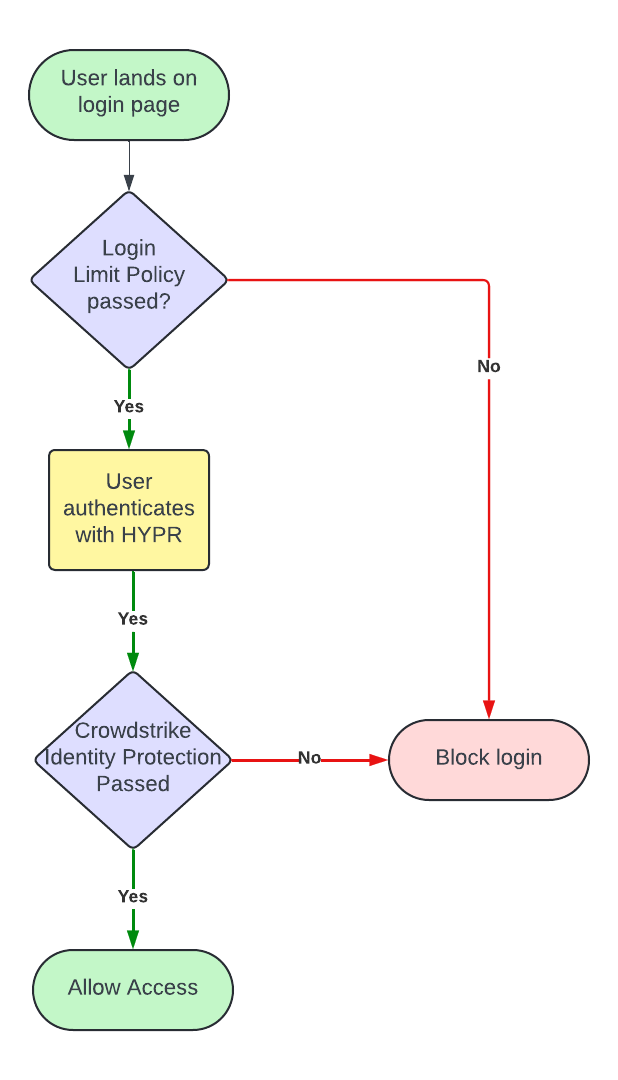
Your flowchart may differ, but creating a UX flowchart serves as a tangible talking point when determining requirements with your stakeholders.
Solution diagram
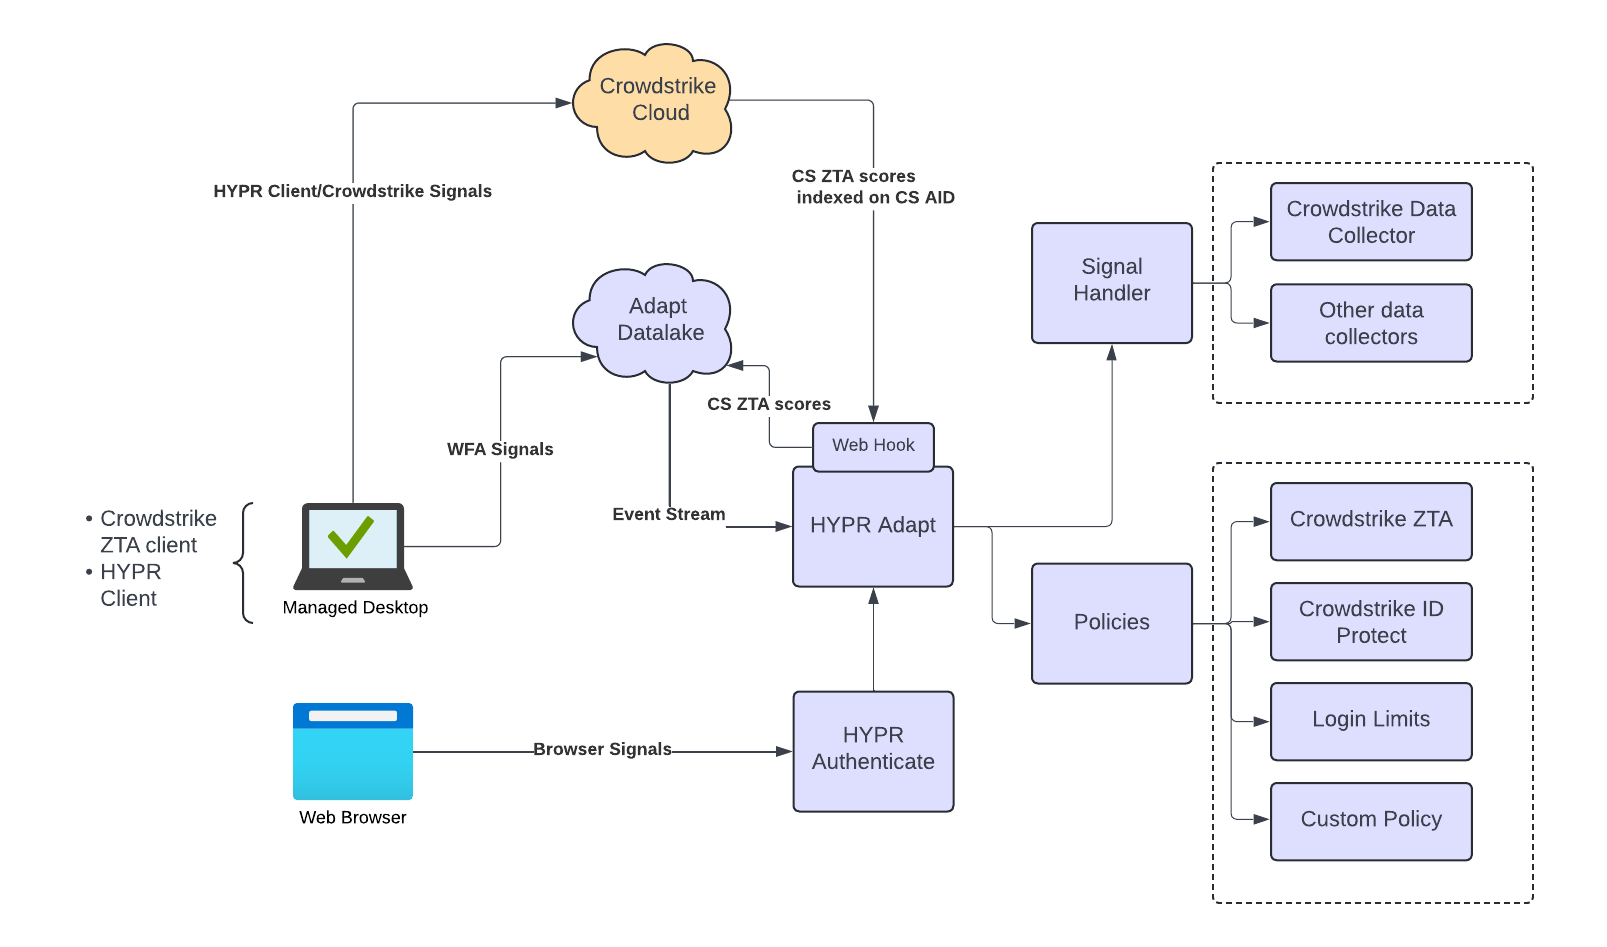
In addition to the UX flowchart, a component diagram aids in determining the IT components and networking requirements. A solution diagram can depict the flow of data that occurs during user operations. The following example diagram depicts the various components involved in the solution.
Solution design
When designing a solution with HYPR Adapt, we recommend the following approach:
- Determine what policy or policies are needed to meet the business requirements. If the built-in policies do not match your business requirements, you will need to develop a custom risk policy. See the Appendix for more information on developing a custom policy.
- Consider what signals (i.e. data) is needed to evaluate your policy. HYPR components, such as the HYPR desktop client, the mobile app and passwordless authentication, generate signals out of the box. Adapt also has some built-in signal handlers to ingest data from third-party systems. If the signals required by your policies are not available out of the box, then you will need to develop a custom signal handler. See the Appendix for more information on developing a custom signal handler.
- Determine where in the flow you need the policy evaluation to take place. The HYPR Control Center allows you to assign a policy to one of a number of evaluation points.
- Validate the design against the UX flowchart described earlier in this playbook and ensure each of the business requirements have been addressed.
The design process will likely require some iteration, balancing requirements with potential limitations of existing systems.
Signal handlers and risk policies
This section outlines the steps for configuring HYPR Adapt signal handlers and risk policies. HYPR provides some signal handlers and polices that are ready to use out of the box. If your use case doesn’t align with any of the provided ones, then you can develop a custom signal handler or policy.
Signal handlers
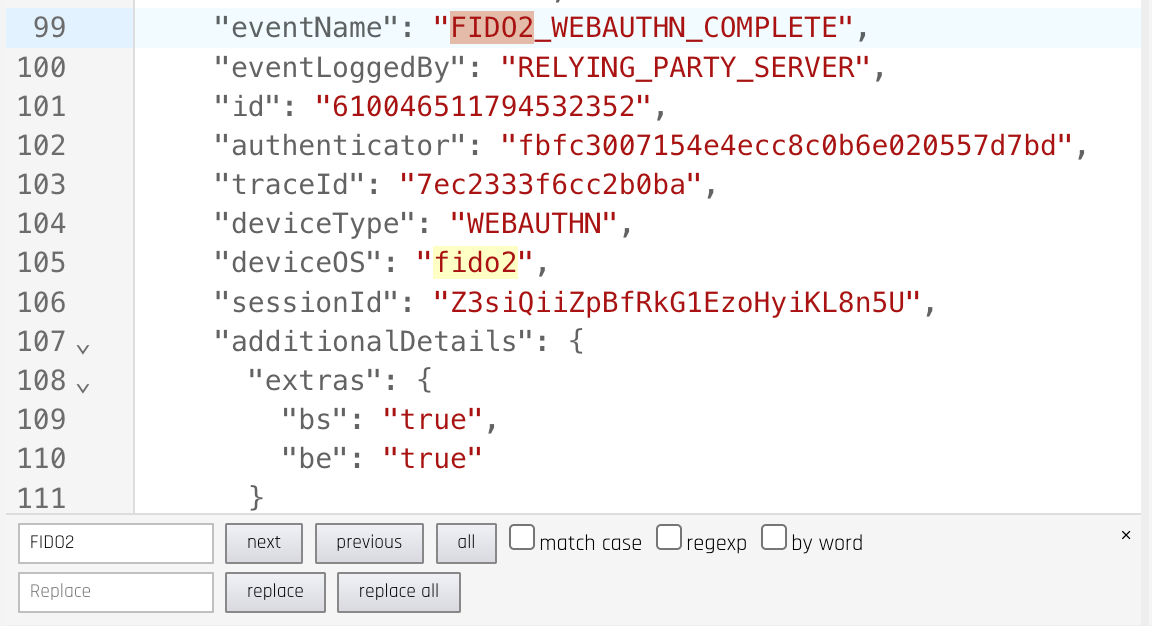
Adapt receives signals from the various HYPR components (the mobile app, the desktop client and the server) in the form of events. For example, after a successful FIDO2 authentication, the FIDO2_WEBAUTHN_COMPLETE event is logged by the server in the audit trail log. Such events are also sent as signals to Adapt when the associated feature flag is enabled. Signals from the HYPR components thus come for free. However, should you need signals from a different source, you will need to configure a Signal Handler.
In Adapt, signals flow through a sequential pipeline of signal handlers. Each handler operates within an isolated ECMAScript runtime environment, without access to browser APIs. Please review our online documentation for more information on How Signal Handlers Work.
Out of the box signal handlers
HYPR comes with a number of signal handlers pre-installed and available for use. These are referred to as Templates in the Control Center. If you would like to base a security policy based on signals from any of these sources, you can simply configure the signal handler and the data will start flowing to Adapt.
At the time of this writing the following signal handlers are available.
| Name | Type | Description |
|---|---|---|
| Slack Message Sender | Acton Executer | Sends a message to Slack on an action event. |
| CrowdStrike Inbound Webhook | Data Collector | Receive inbound webhook calls from CrowdStrike. |
| Okta Inbound Webhook | Data Collector | Receive inbound webhook calls from Okta. Respond to verification calls from Okta. |
| TOR Scheduled Data Collector | Data Collector | Collect IP addresses for TOR exit nodes (TOR traffic leaves the network at these nodes). |
| TOR Data Enricher | Data Enricher | Flags a signal suspected of originating from a TOR node. |
Please see Signal Handler Management in the online documentation for the details on how to configure these signal handlers.
Custom signal handlers
To create a custom signal handler, follow the same steps as outlined in Signal Handler Management , but choose Custom
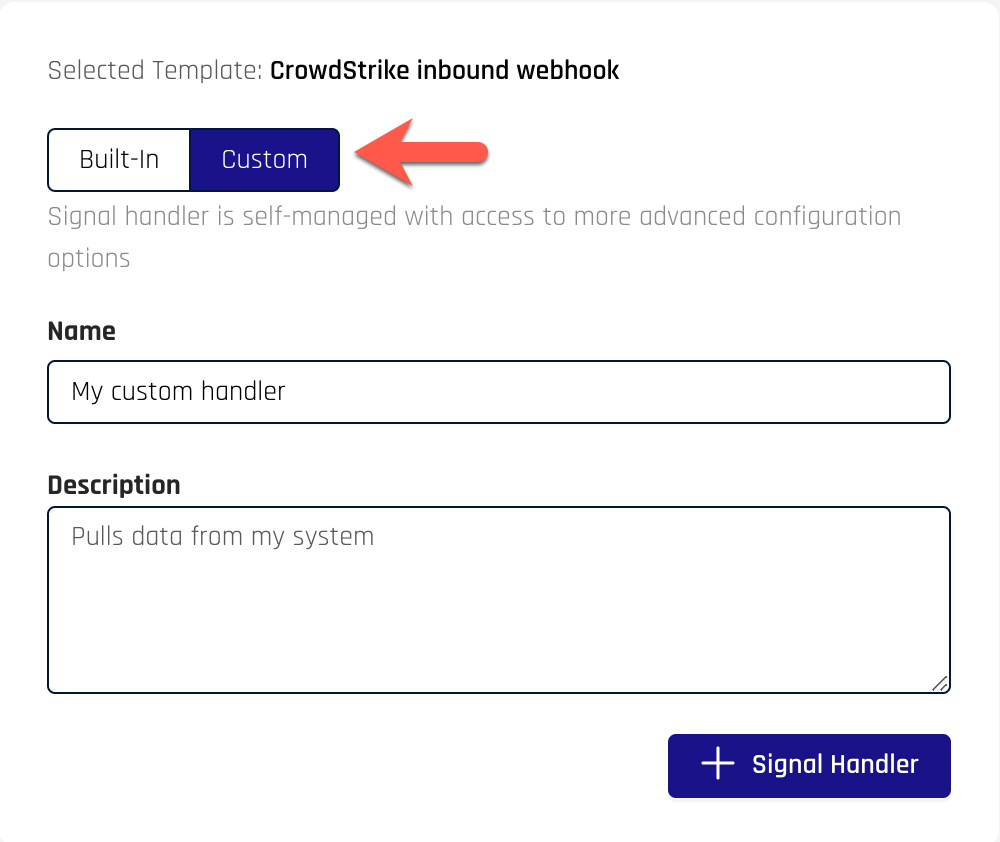
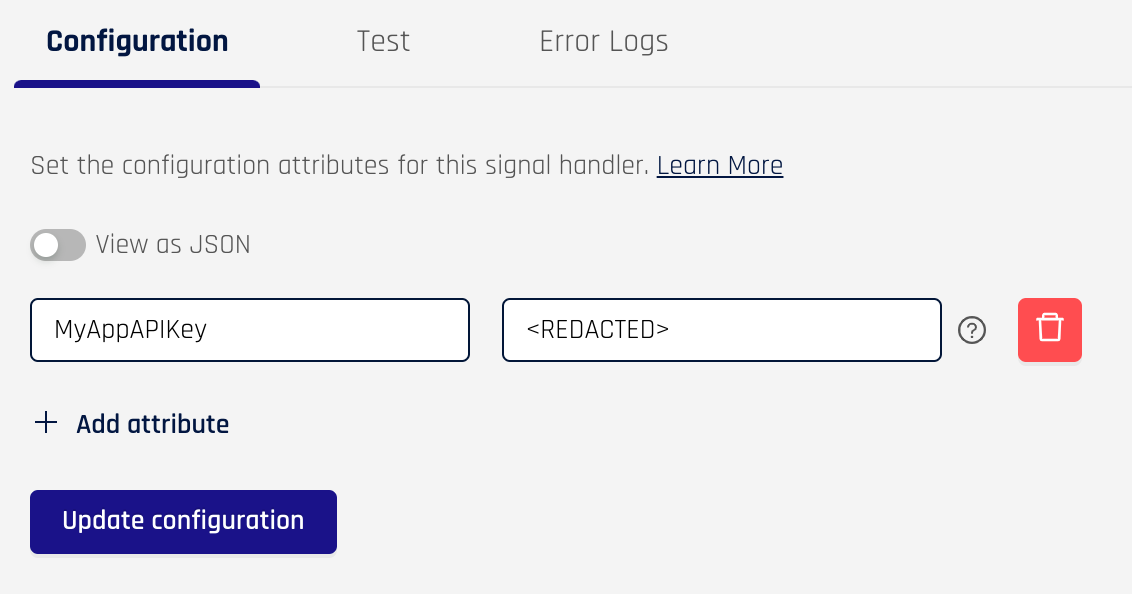
Modifying the configuration parameters
The rendering of the configuration page shows the configuration from the Template, but also the ability to delete fields and a toggle for “View as JSON”.
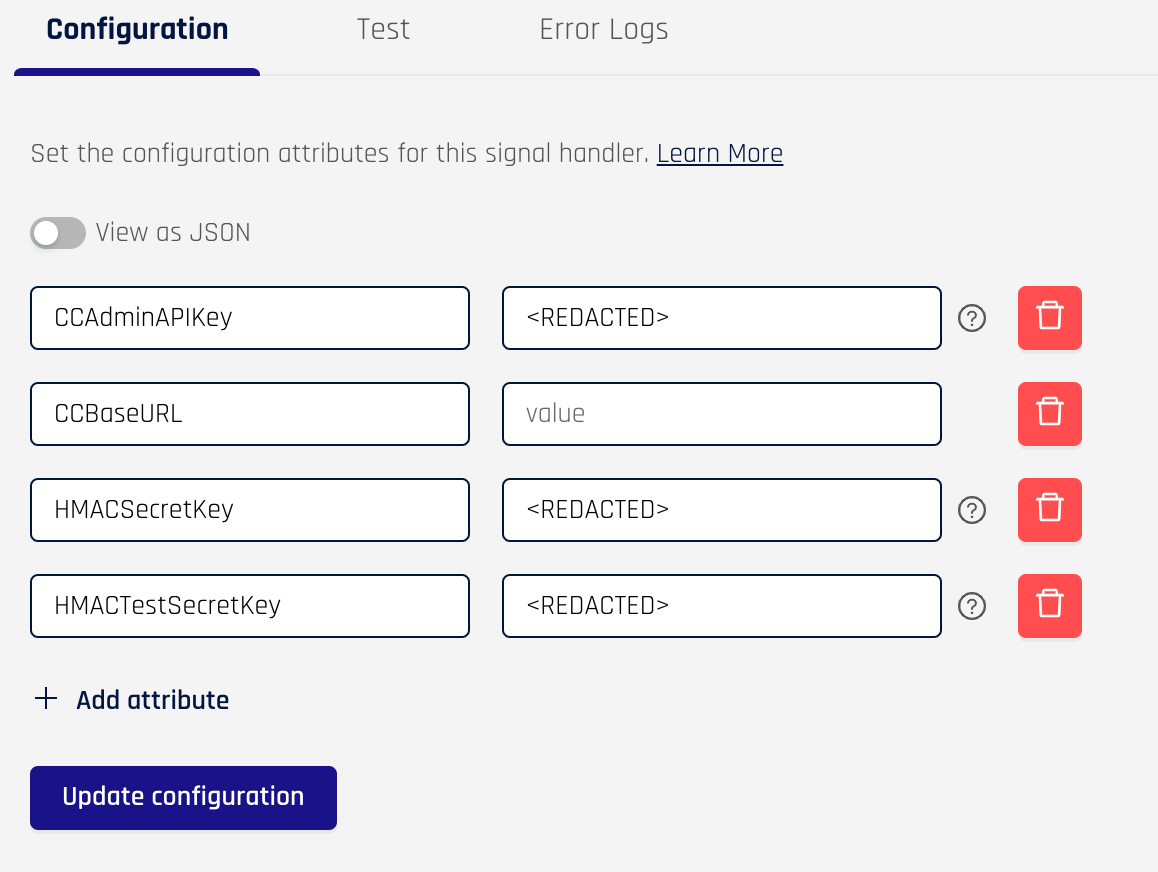
You will likely need to change the fields to match the configuration parameters required for your signal handler. Click on the “View as JSON” toggle
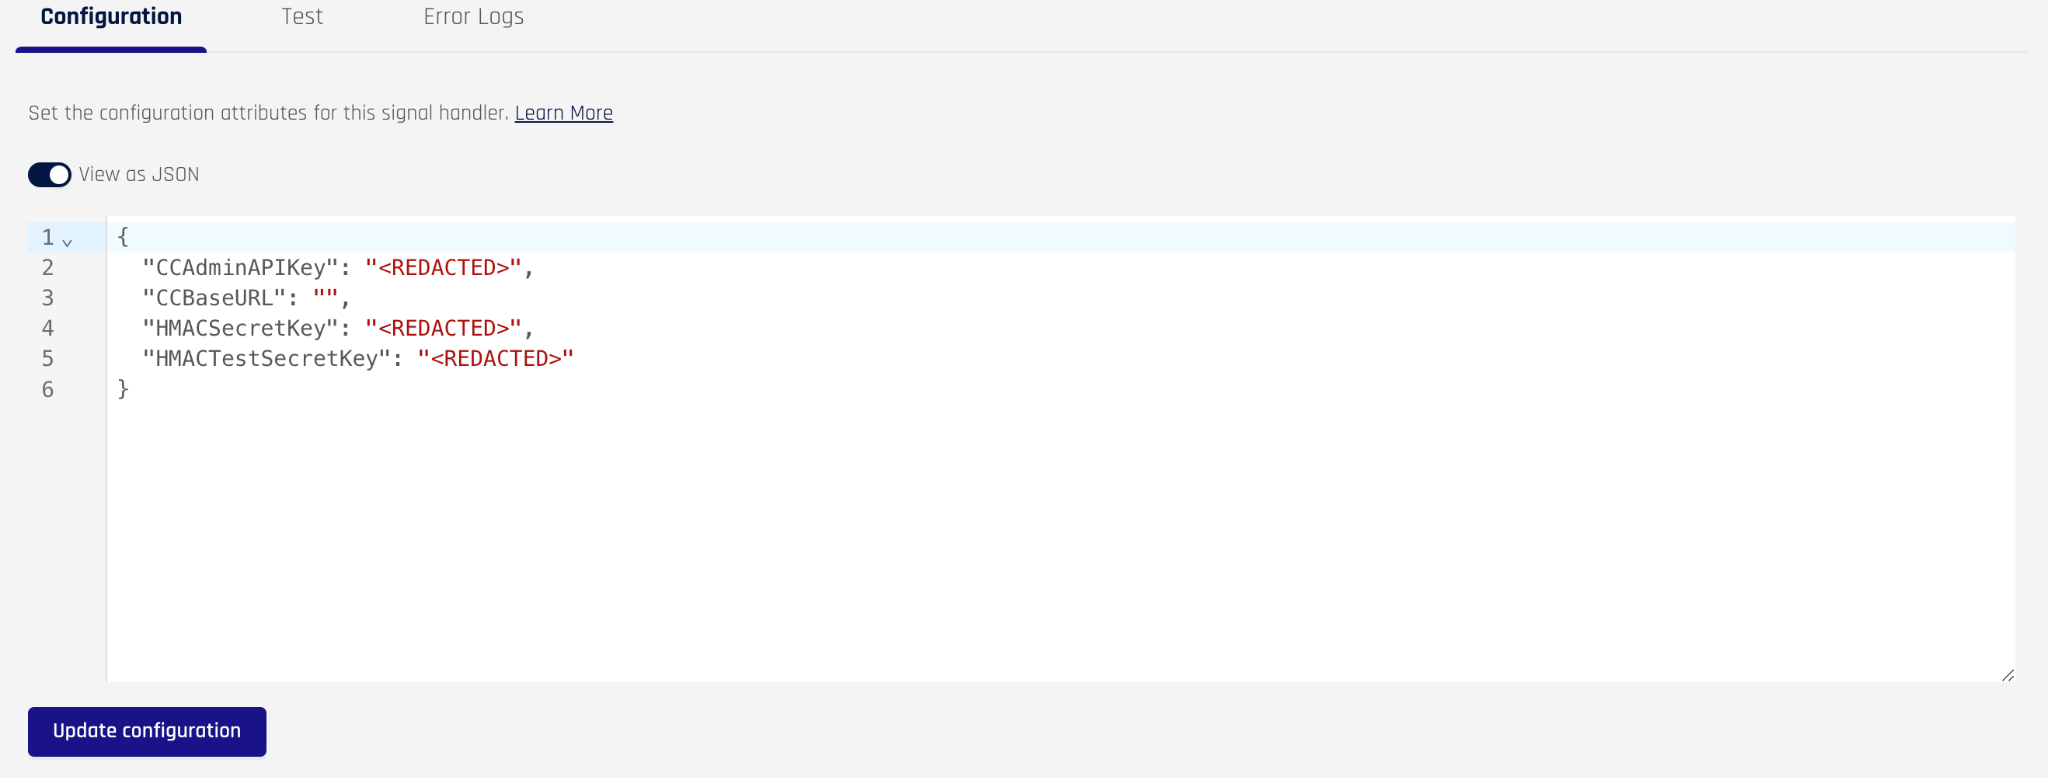
Edit the JSON to include the variables you need
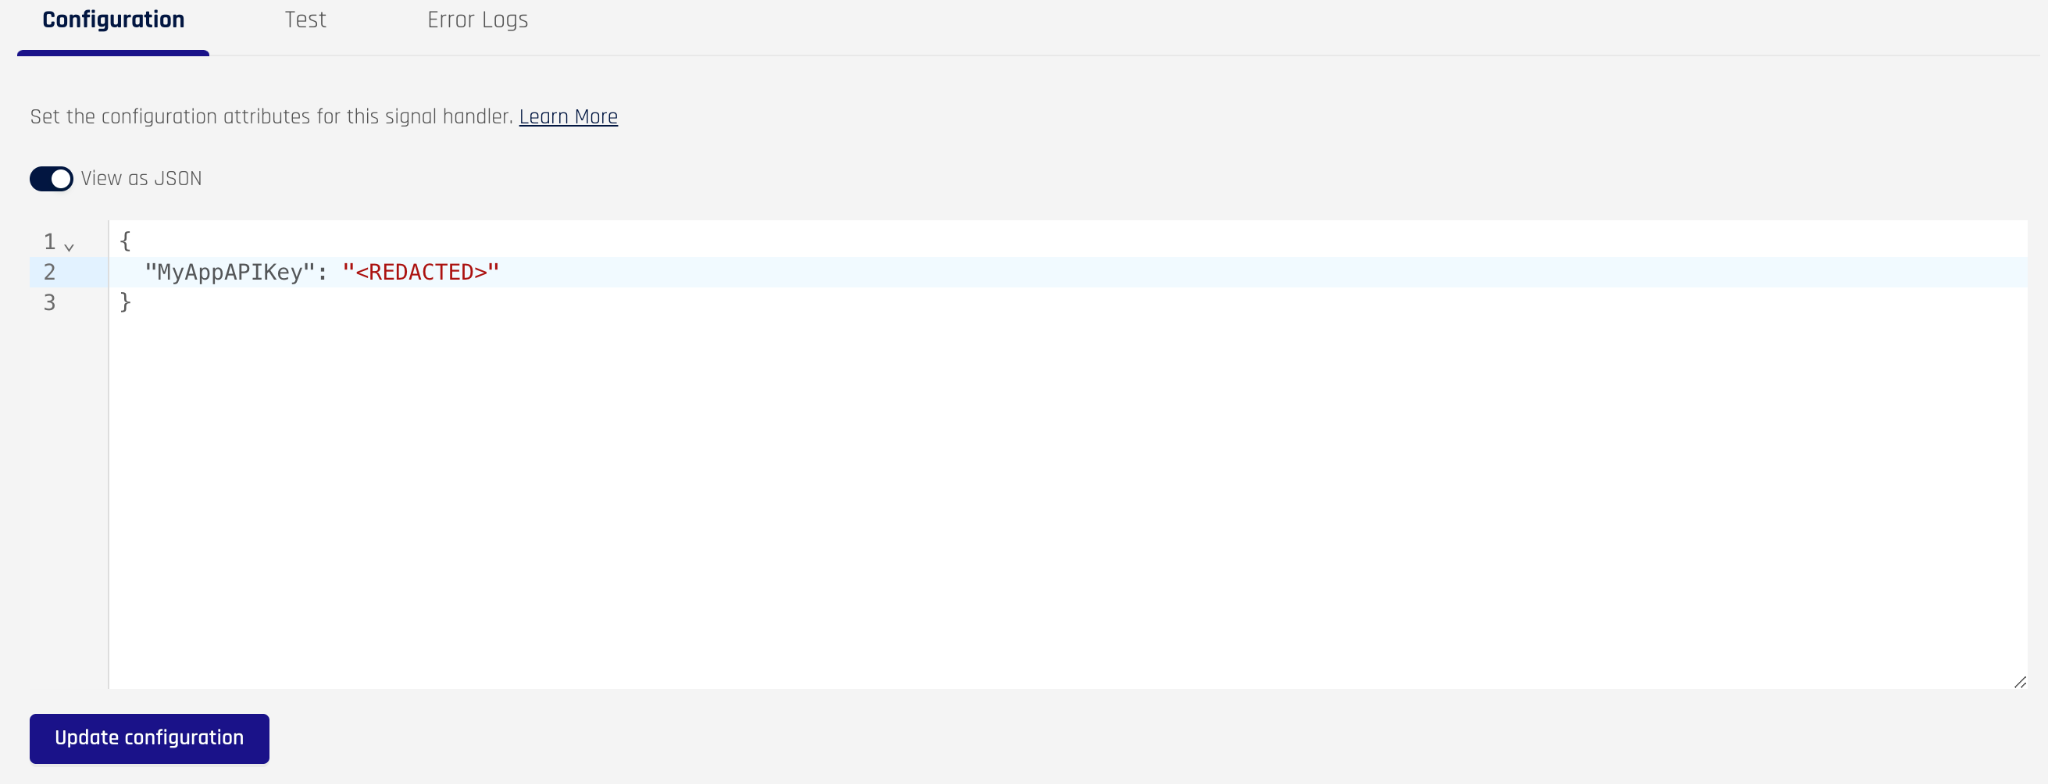
Click update configuration and you’ll see your changes reflected in the form
Modifying the signal handler code
Having created a custom signal handler from one of the out of the box templates, you are now ready to modify the template code to tailor it to your needs. In the HYPR Control Center, navigate to HYPR Adapt > Signal Handlers and click on the custom handler you created. You will see a panel on the right. Click on the Test button.
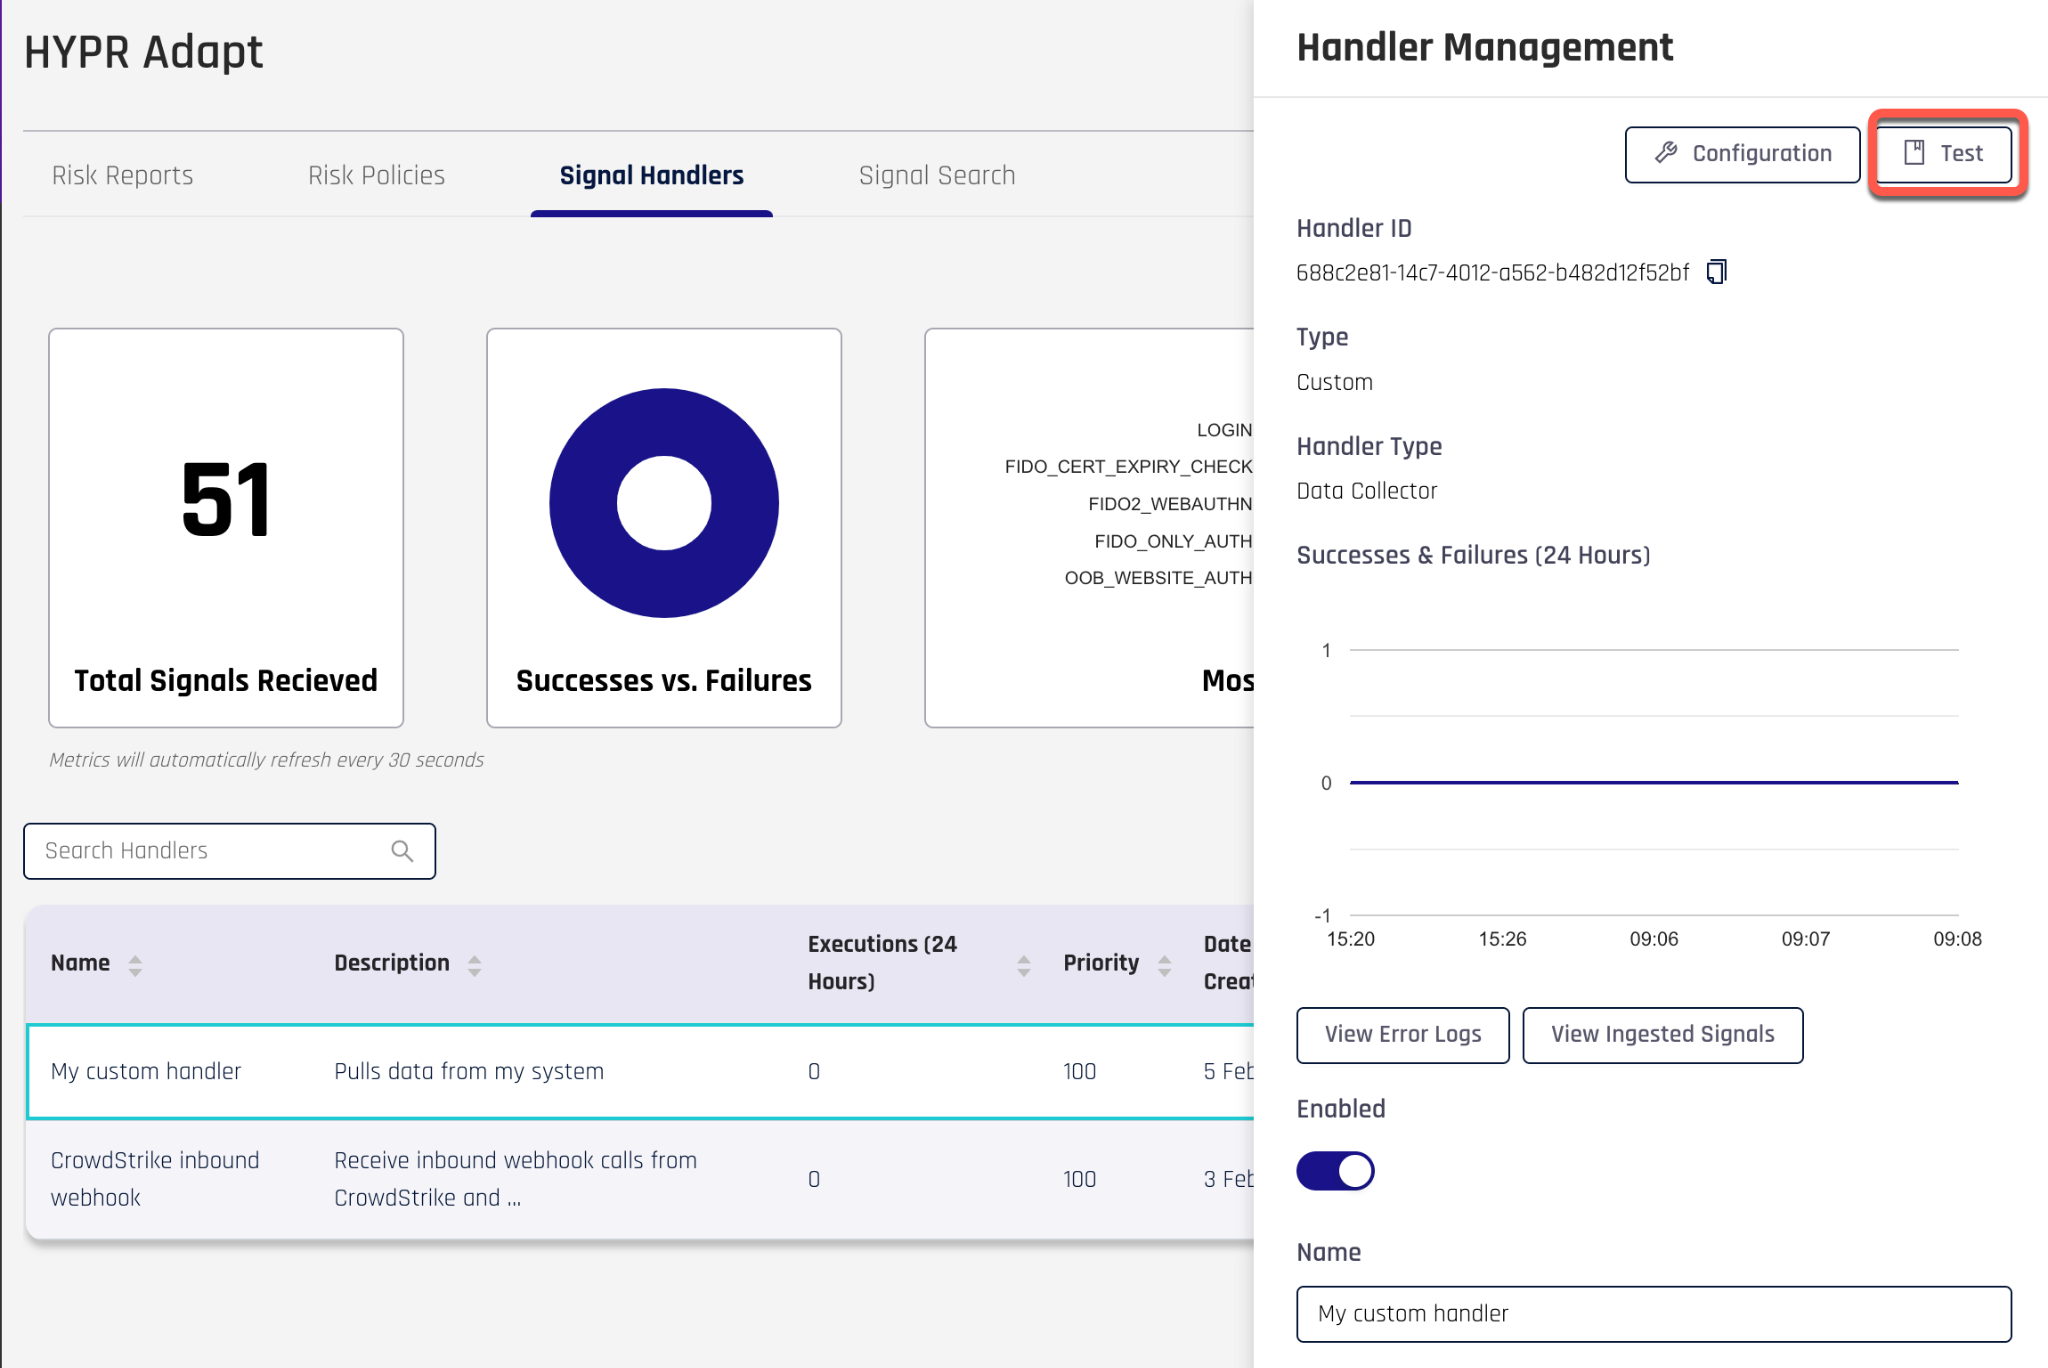
Clicking on the Test button brings you to a new screen, which is used to develop the signal handler code. The page has three text boxes:
- the large box containing the script code
- the Input box containing a sample signal for testing
- the Logs box, which gets populated when you send the test signal to your handler code
You can use the supplied template code as a starting point for coding your signal handler. You may also need to change the input data to match the required inputs for your signal handler. For more information on how to develop a custom signal handler, please see Signal Handlers Structure.
Risk policies
HYPR Adapt policies allow business security requirements to be codified into your HYPR identity assurance implementation. Adapt relies on the Open Policy Agent (OPA) framework, which uses the Rego policy language for coding policy. Each HYPR Adapt instance runs a local OPA engine to evaluate policy.
Policies play a central role in HYPR Adapt:
- policies are rules that evaluate against input signals
- input signals are events generated by HYPR components or optionally signal handlers gathering data from external sources
- policies only get evaluated if they are assigned to an evaluation point
- evaluation points are markers in the HYPR authentication flow, where the authentication flow is paused while a policy is evaluated by Adapt
- policies allow the authentication flow to be interrupted if the conditions of the policy are not met
When a policy is triggered at an evaluation point, the HYPR server initiates the policy evaluation against Adapt. The below diagram shows how HYPR Adapt evaluates a policy.

- The evaluation point triggers the policy evaluation with CC calling out to Adapt with the policy ID.
- Adapt retrieves all events for the user over the requested time period
- Given the policy ID, Adapt retrieves the Rego policy code from storage
- Given the policy code and events, Adapt asks the OPA engine to evaluate the policy. OPA returns the result to Adapt.
- Adapt returns the result to CC
Depending on the policy evaluation result, HYPR CC may interrupt the authentication flow to perform additional identity verification or it may block access.
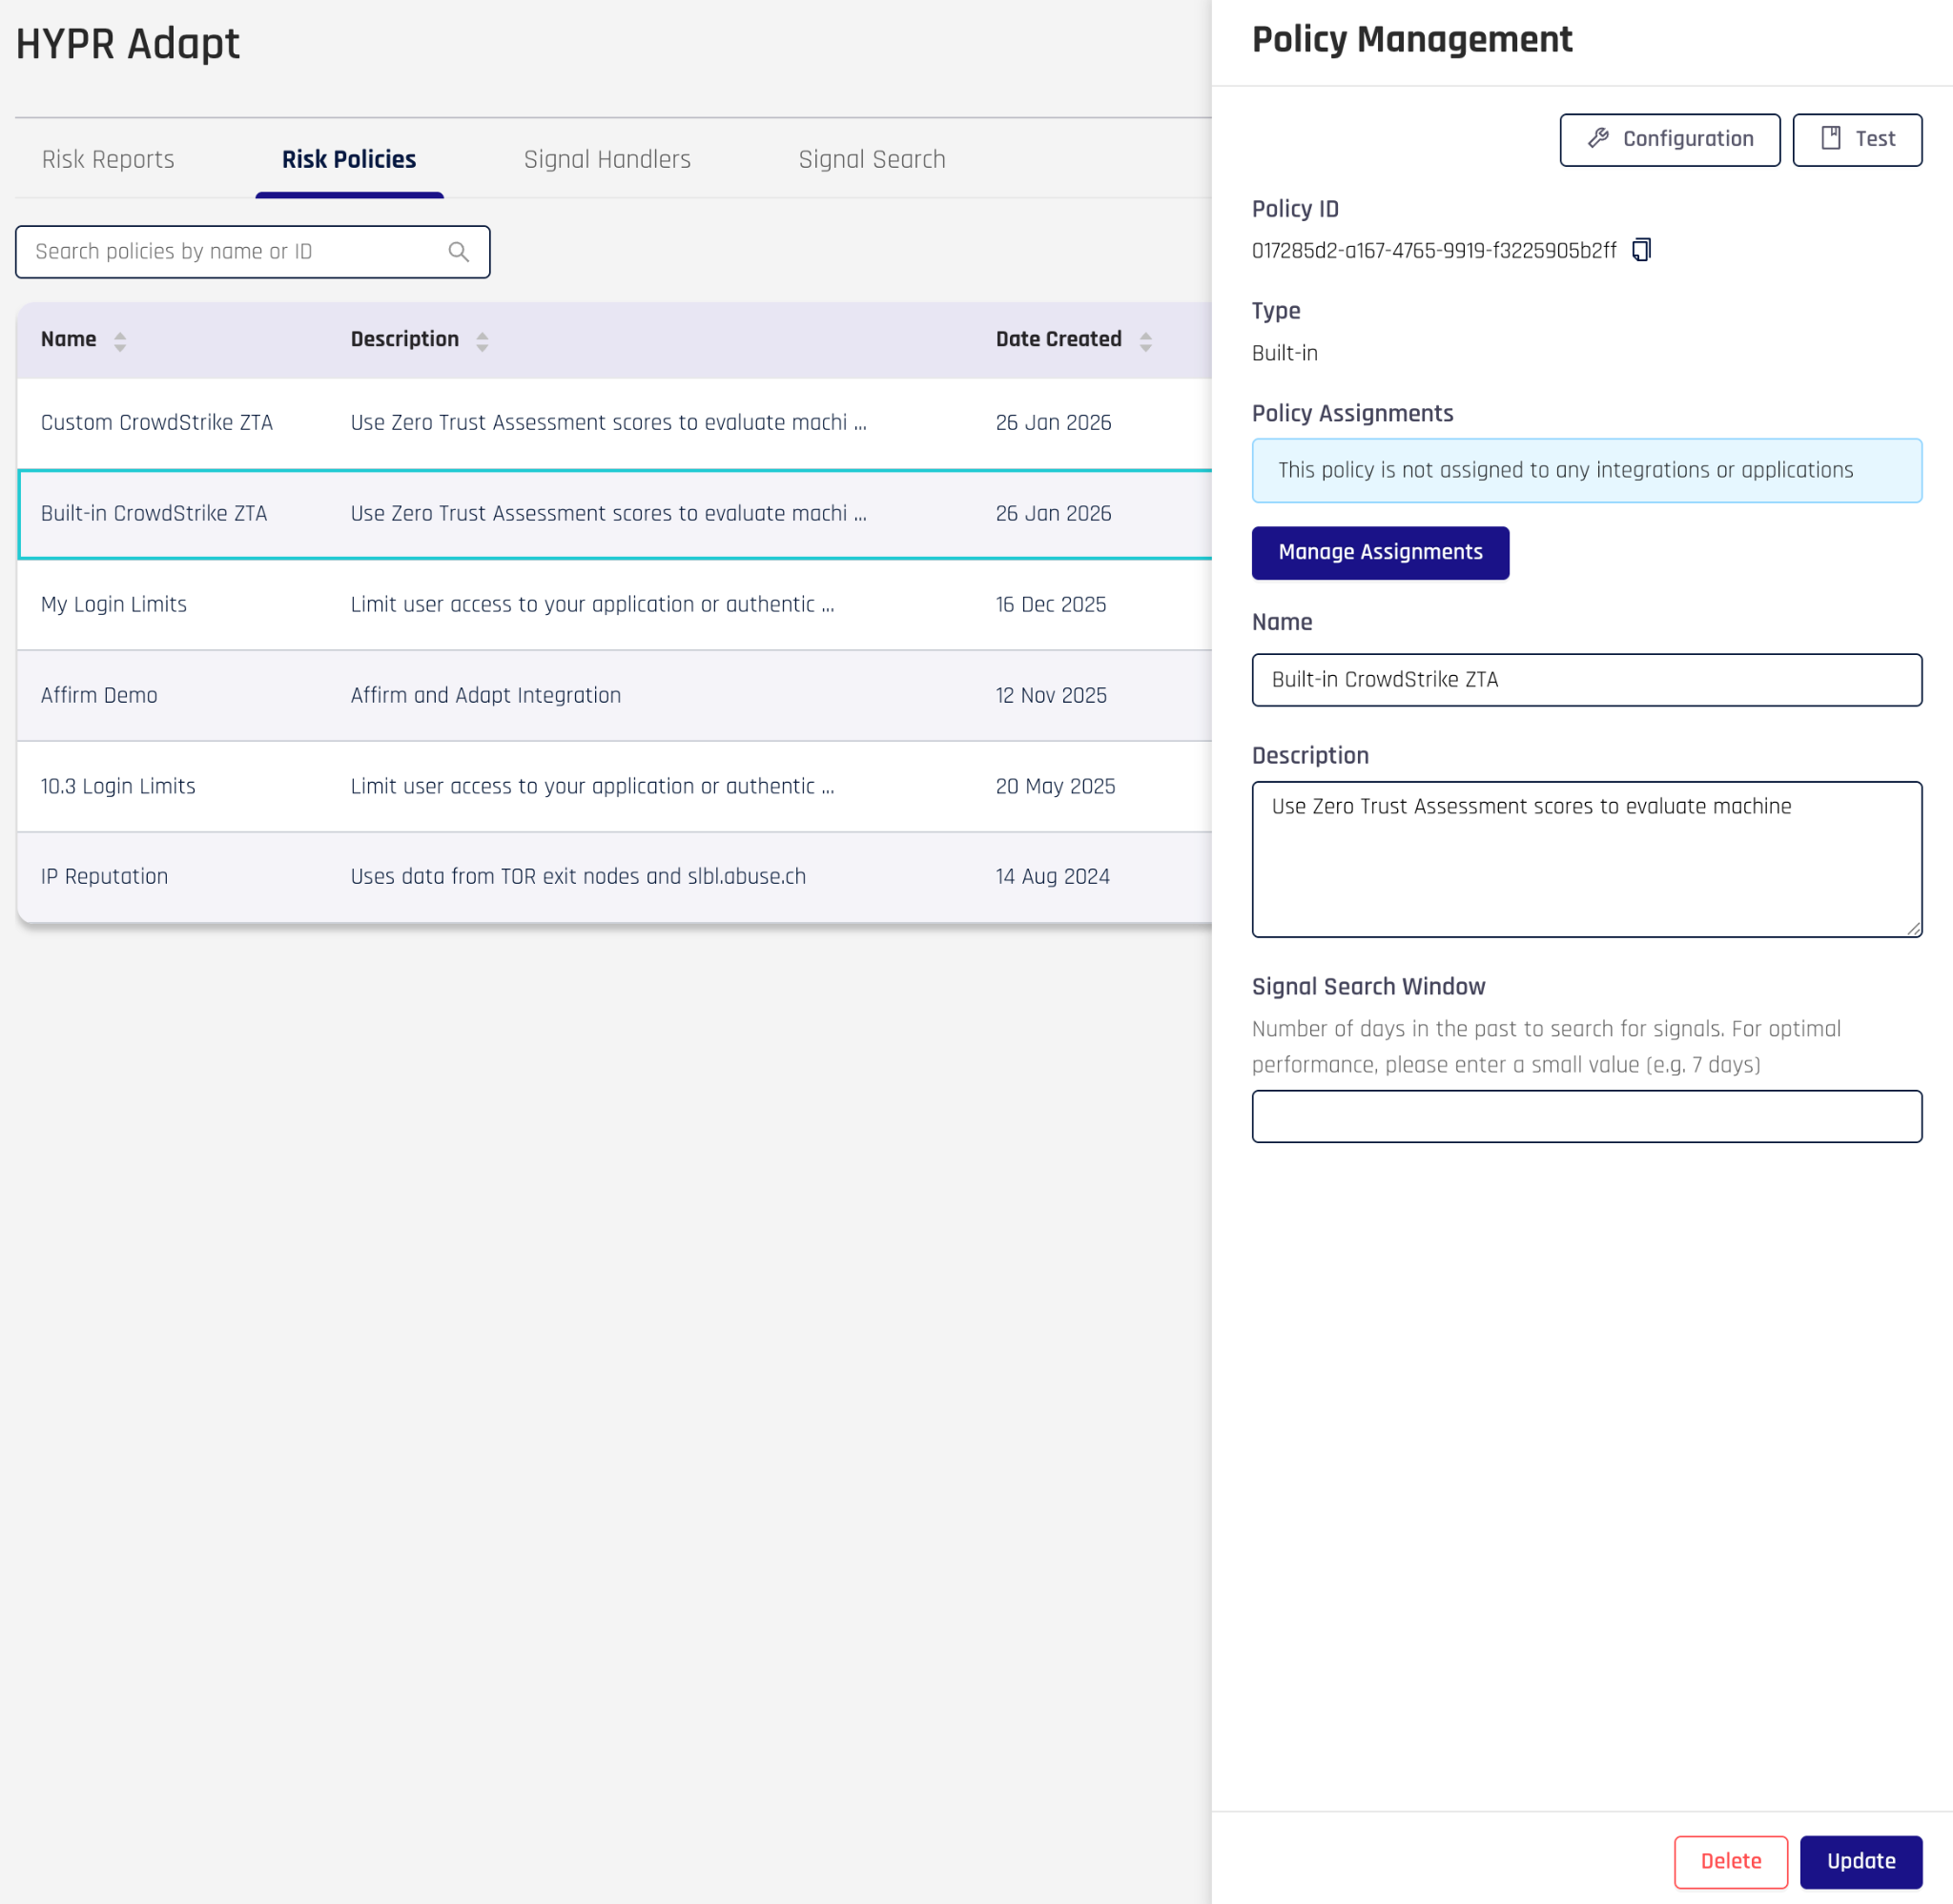
Out of the box risk policies
HYPR comes with a number of policies pre-installed and available for use. These are referred to as Templates in the Control Center. If any of the built-in policies fulfill your requirements, you can simply configure the policy as described in the online documentation.
At the time of this writing, the following policies are available.
| Use case | Policy name | Description |
|---|---|---|
| Push Bombing / Brute Force prevention | Login Limits | Limit user access to your application or authenticator options after multiple authentication failures. 📚 See product doc |
| Trusted Network Locations | Workstation Unlock | Denies workstation unlock if the user is not in a list of pre-approved networks. 📚 See product doc |
| Identity Risk / Identity Verification | Affirm/Adapt Integration | Force a re-affirmation flow upon a risk condition before authentication. 📚 See product doc |
| Brute Force prevention | Monitor Authentications | A basic policy that tracks and optionally blocks login access when a failed authentication attempt occurs. 📚 See product doc |
| Third-party Integration | Crowdstrike Identity Protection | Policy based on the Crowdstrike Identity Protection score. 📚 See product doc |
| Third-party Integration | Crowdstrike ZTA | Policy based on the Crowdstrike Zero Trust Assessment (ZTA) score. 📚 See product doc |
| Location‑based authentication policy | Okta User Location Policy | Pulls user profile information from Okta and evaluates location |
Please see Risk Policy Management in the online documentation for the details on how to configure these policies.
NOTE: if you are curious to see the Rego code associated with the built-in policies, you can create a custom policy using one of the built-in policies as a template, as covered in the next section.
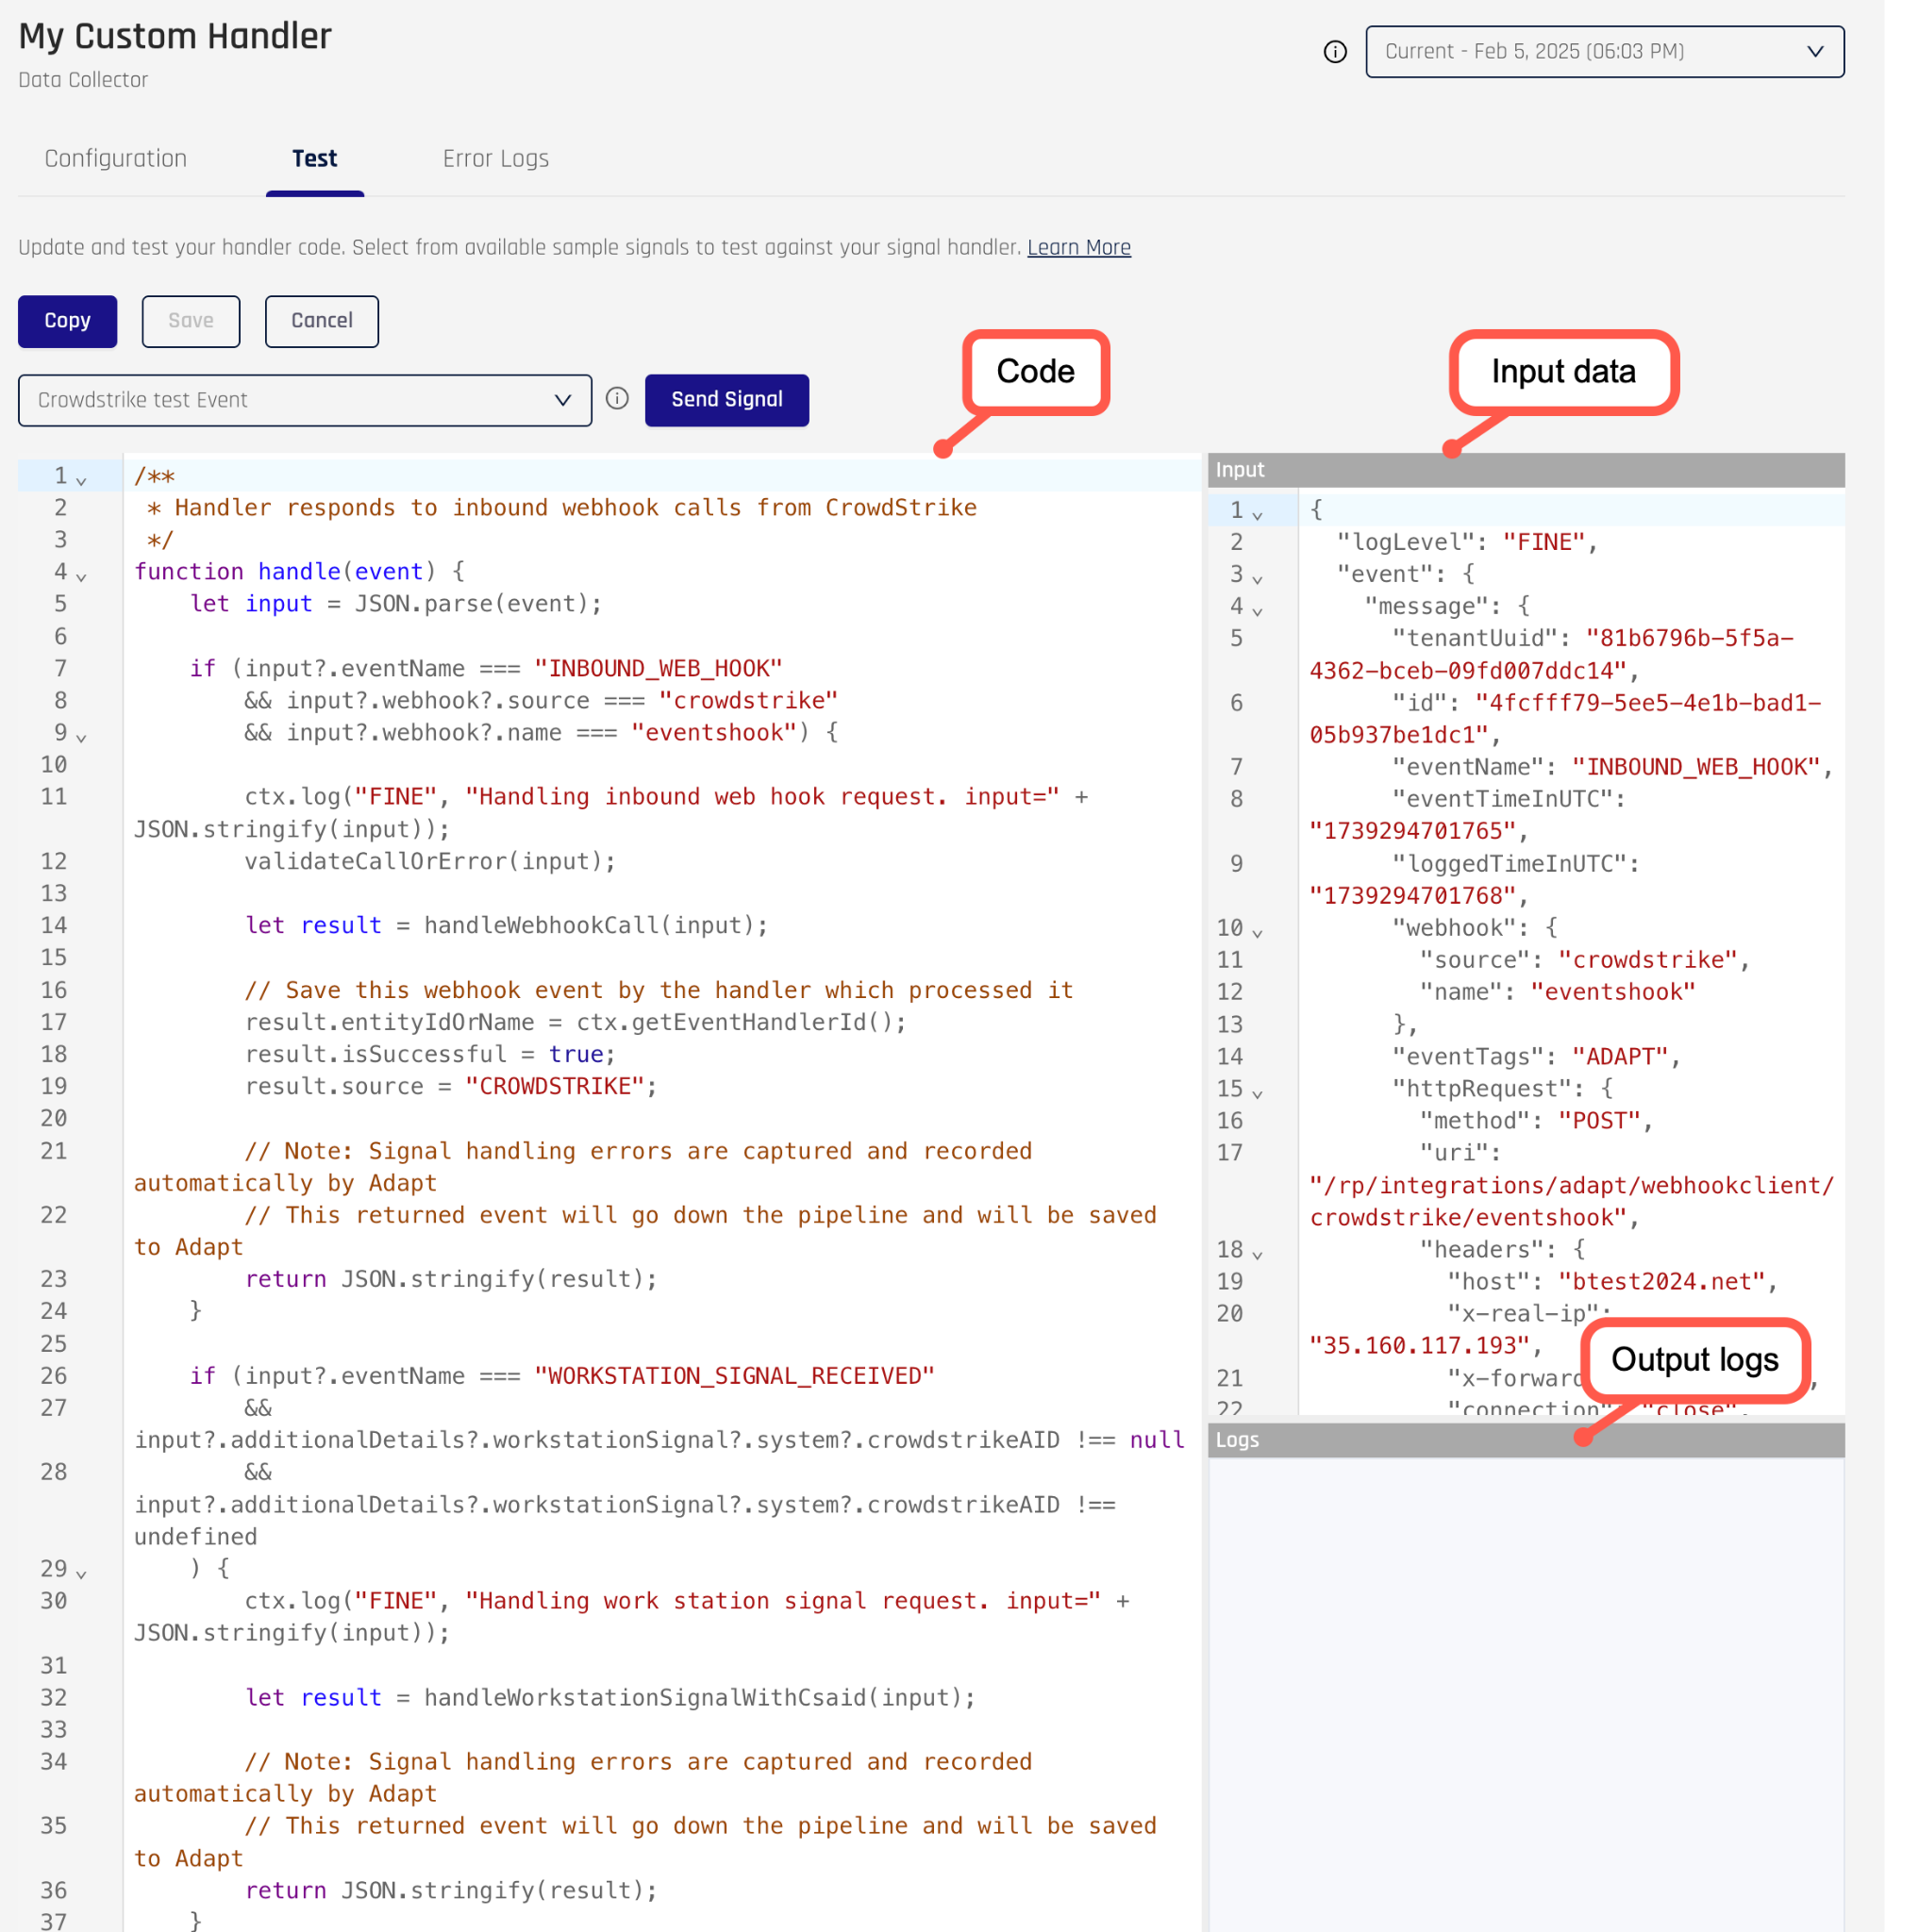
Custom risk policies
If built-in policies do not meet your requirements, then you will need to create a custom policy. You start with one of the built-in policy templates, choose Custom and then modify or replace the Rego code to your liking. For more information on developing a custom policy, see the tutorial in the Writing Custom Policies in the online documentation.
Creating and testing risk policies
The HYPR Documentation provides good guidelines for creating new risk policies. One thing to note when creating a policy is the “Built-in” and “Custom” tabs. Whether you plan to use a built-in policy or create a custom policy, you must still choose a template on the left. At that point, the box on the right becomes editable. If you choose “Built-in”, then you will be able to use the policy as is and will not be able to view the Rego code that defines the policy. If you choose “Custom”, you can also choose to use the policy as is, but you will also be able to view the Rego policy code. This is useful if you want to understand how the policy works or if you plan on writing your own policies in the future.
The difference between the two will be evident in how the Test screen is rendered.
Testing built-in policies
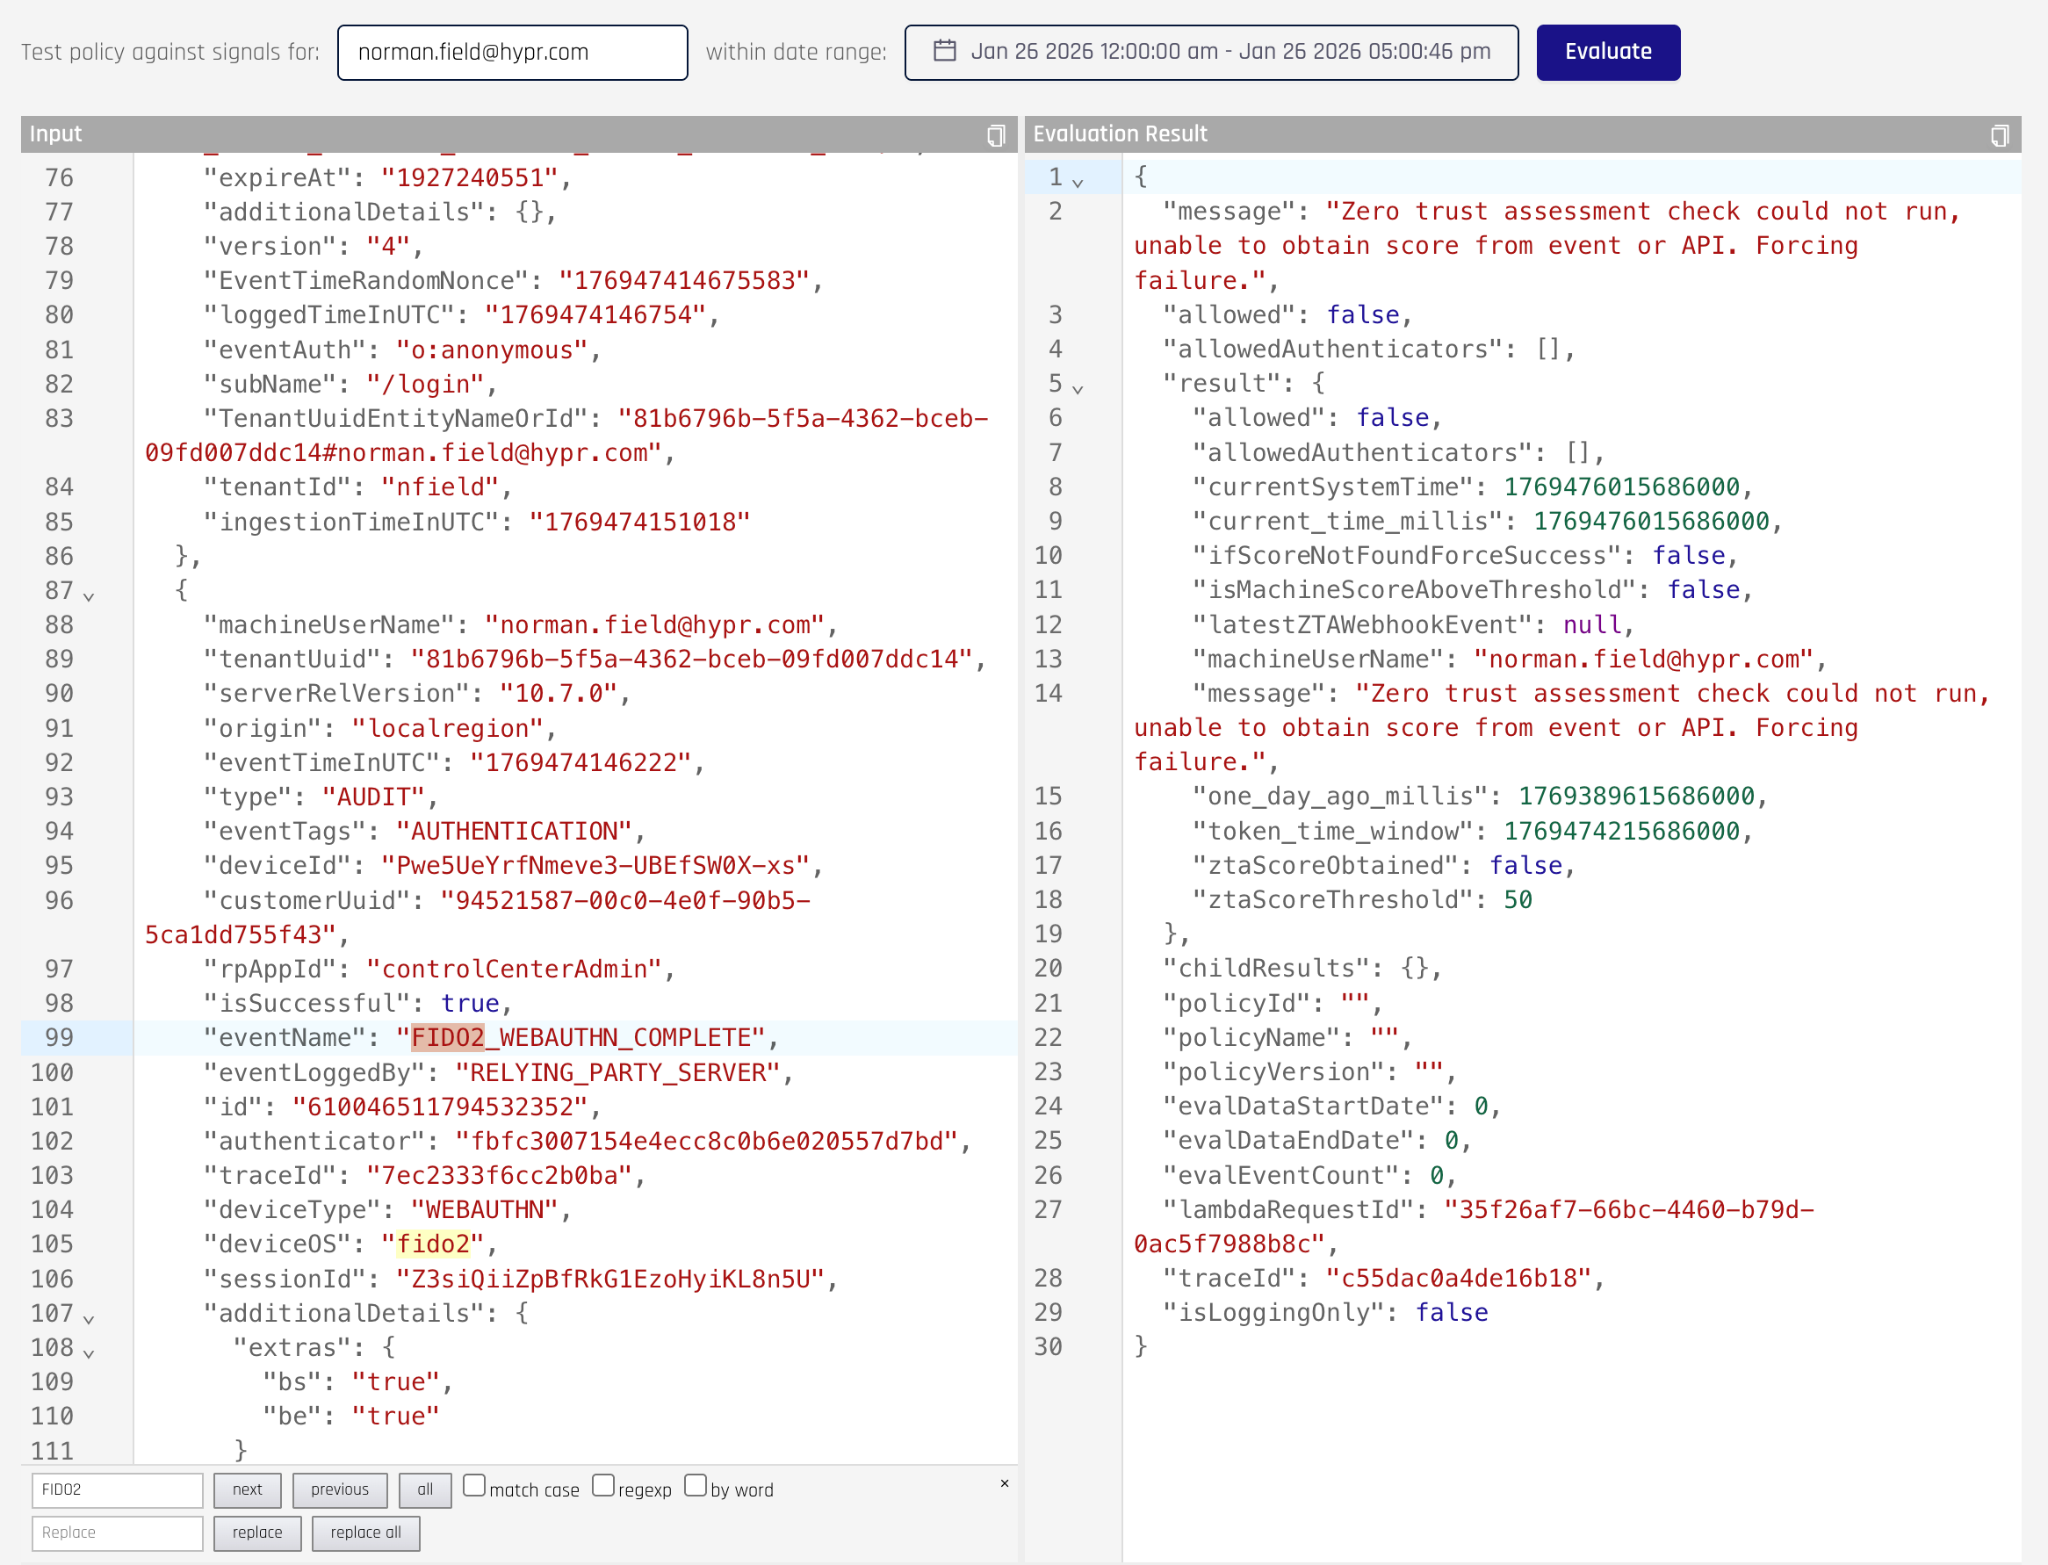
After creating the built-in policy, click on the policy in the listing. This brings up a panel on the right-hand side.
Click on Configure to set the parameters for the policy and fill in the required values
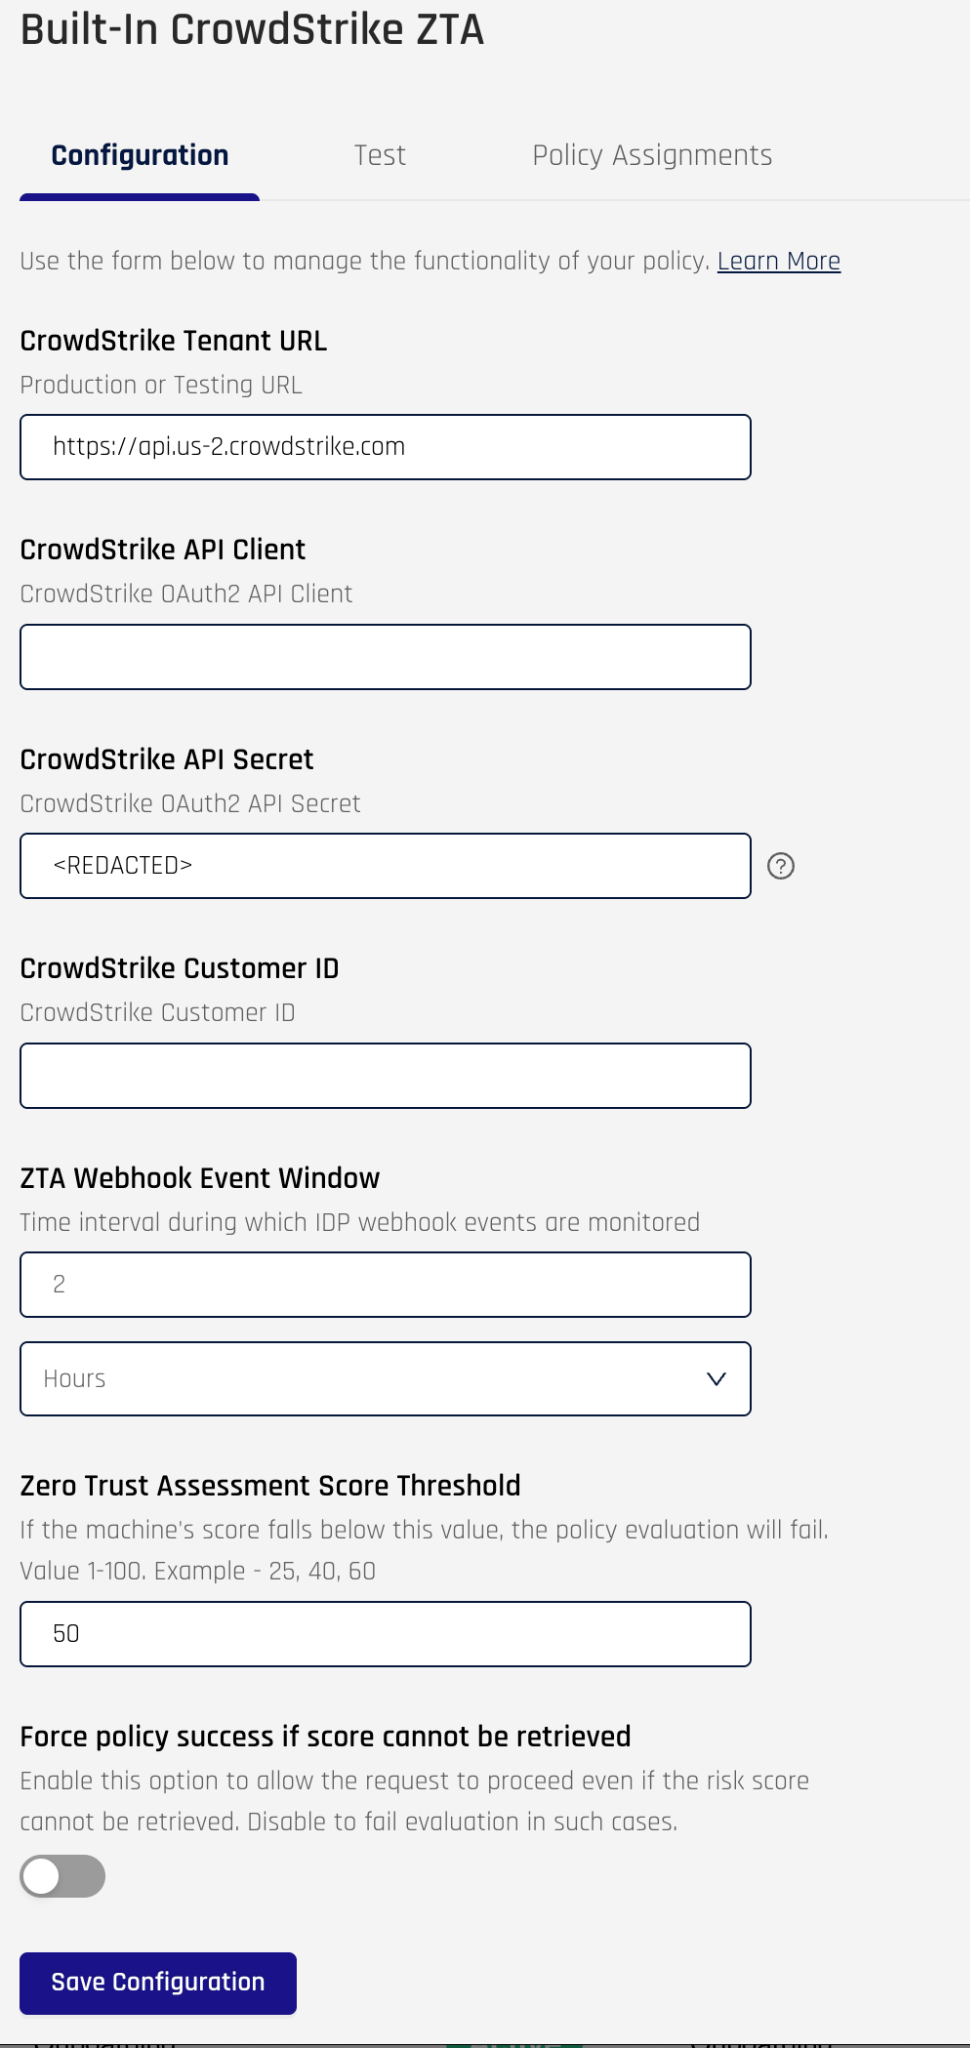
Next click the Test tab, which will render the page where you can test the policy
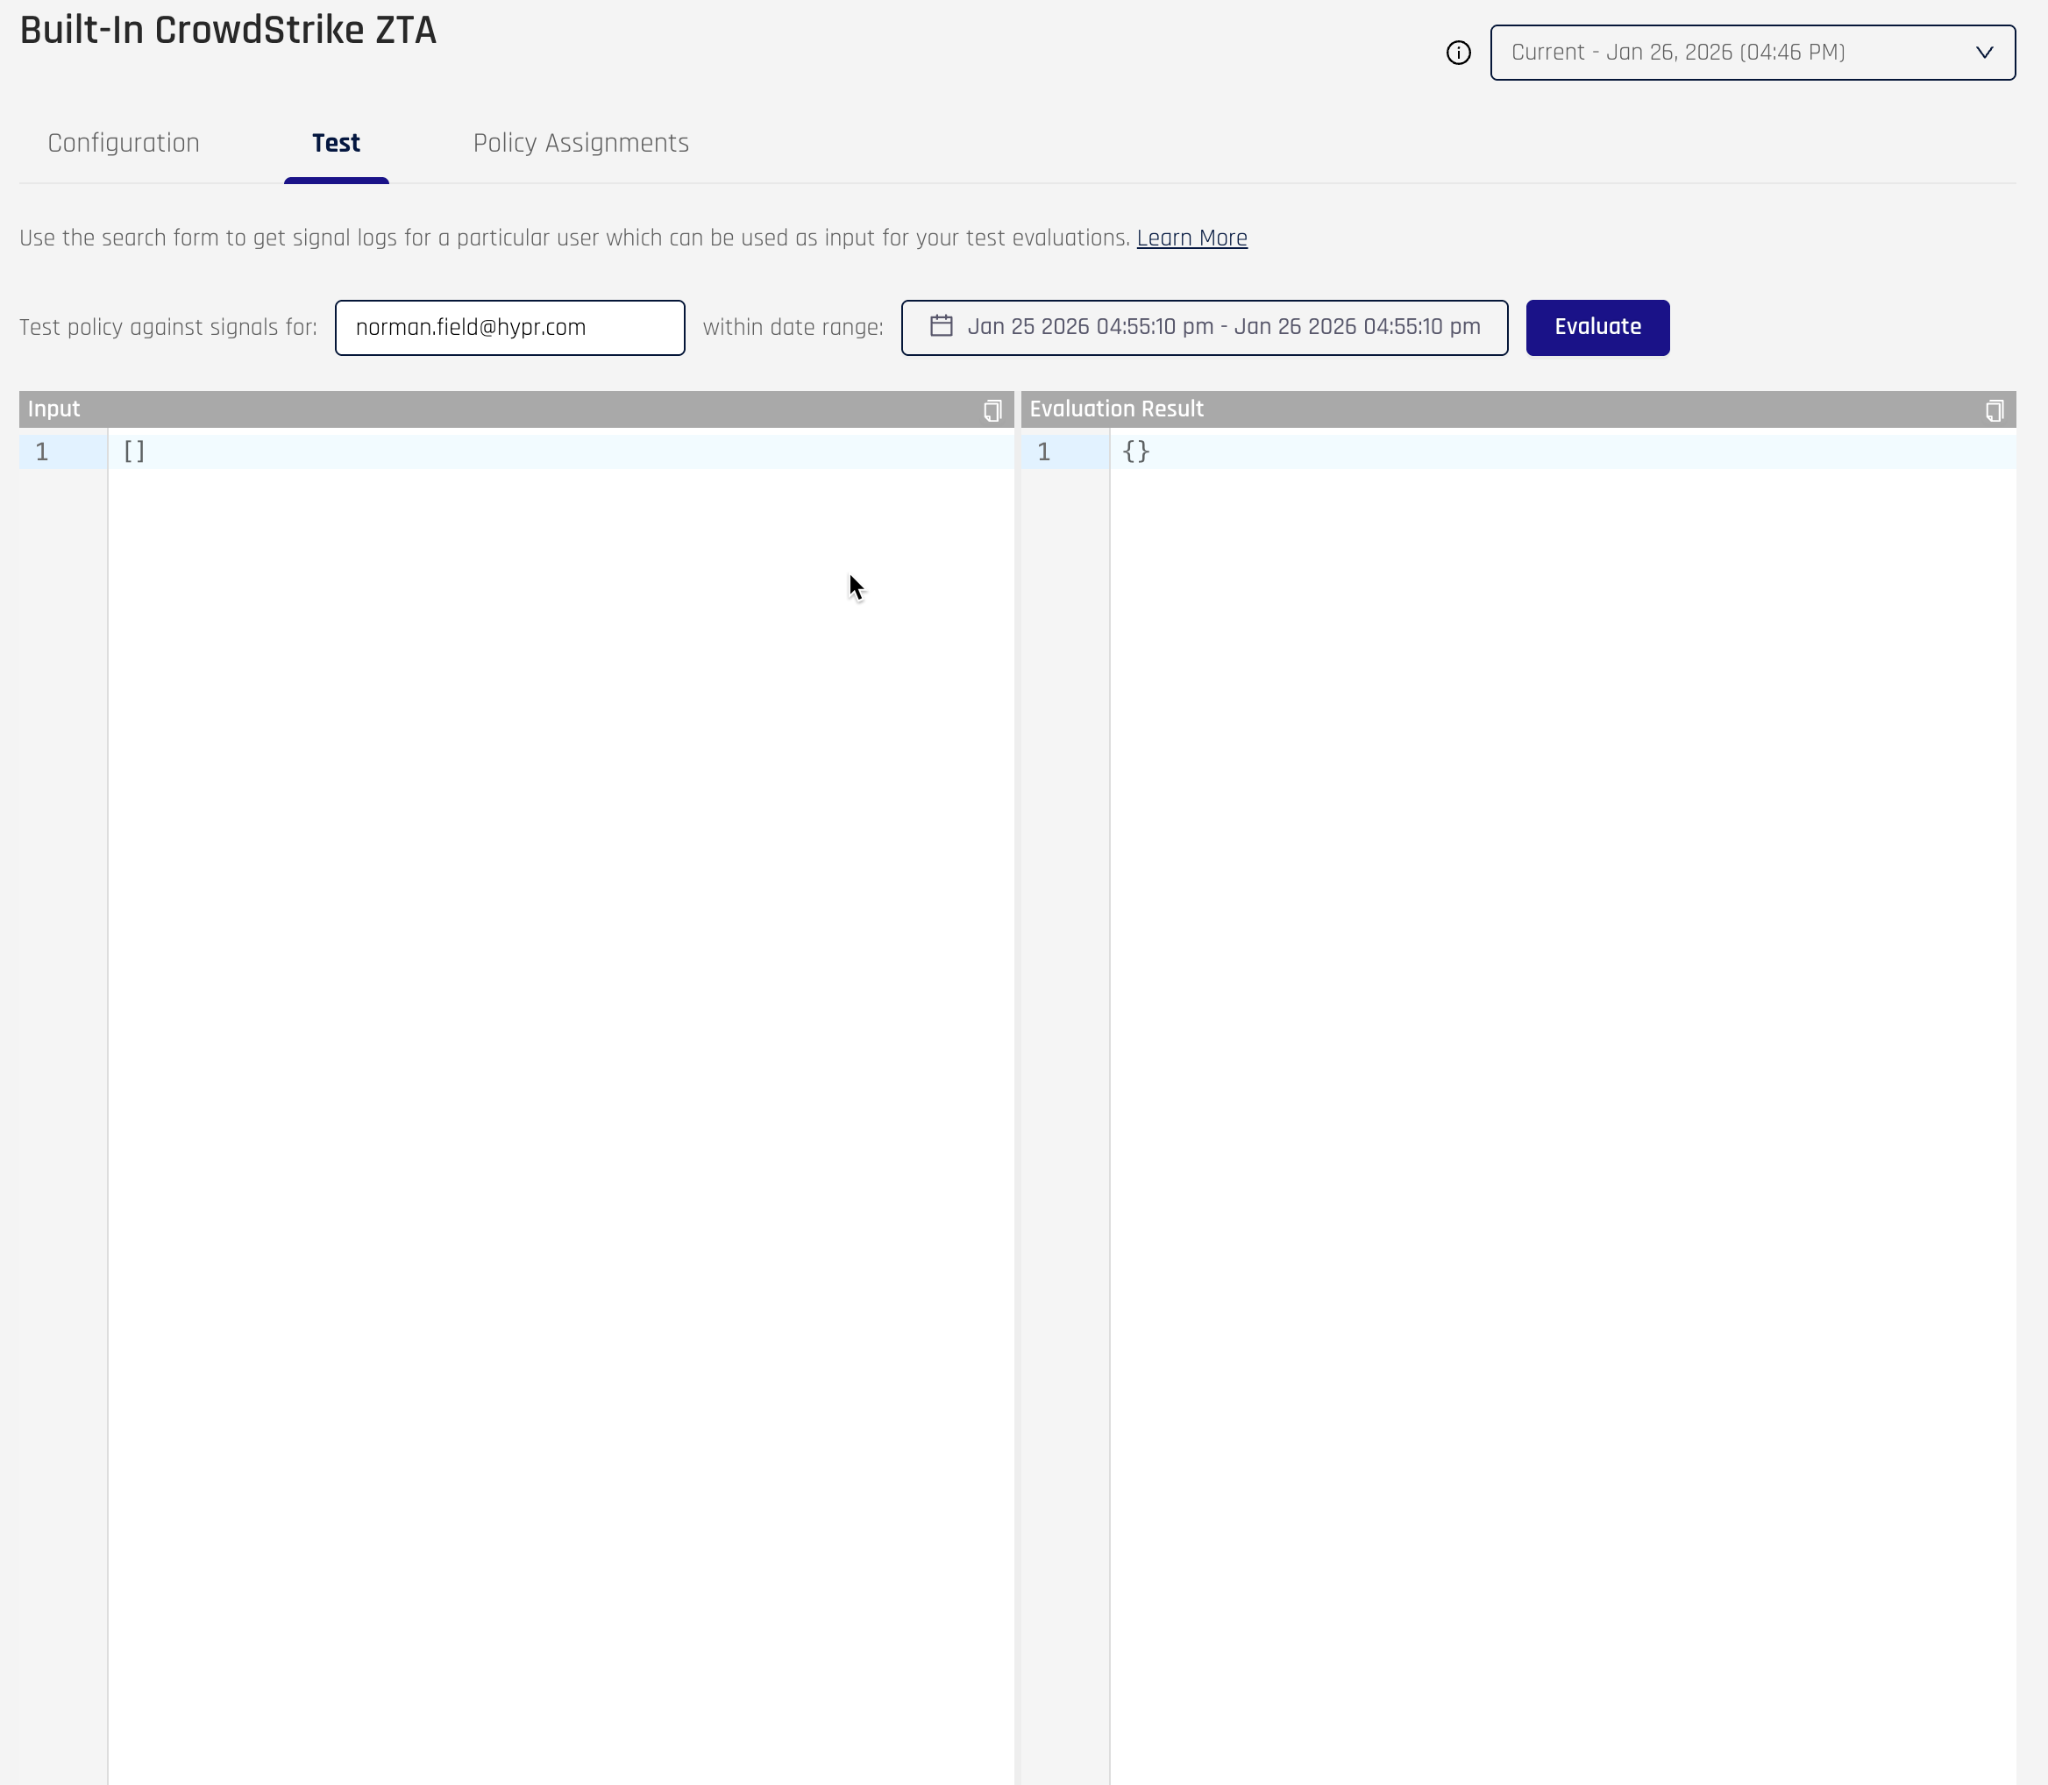
The left Input field represents the signals, on which the policy evaluates. The Evaluation Result on the right is the output of the policy after evaluation. The process for using this screen involves:
-
Enter a username you want to test the policy against
-
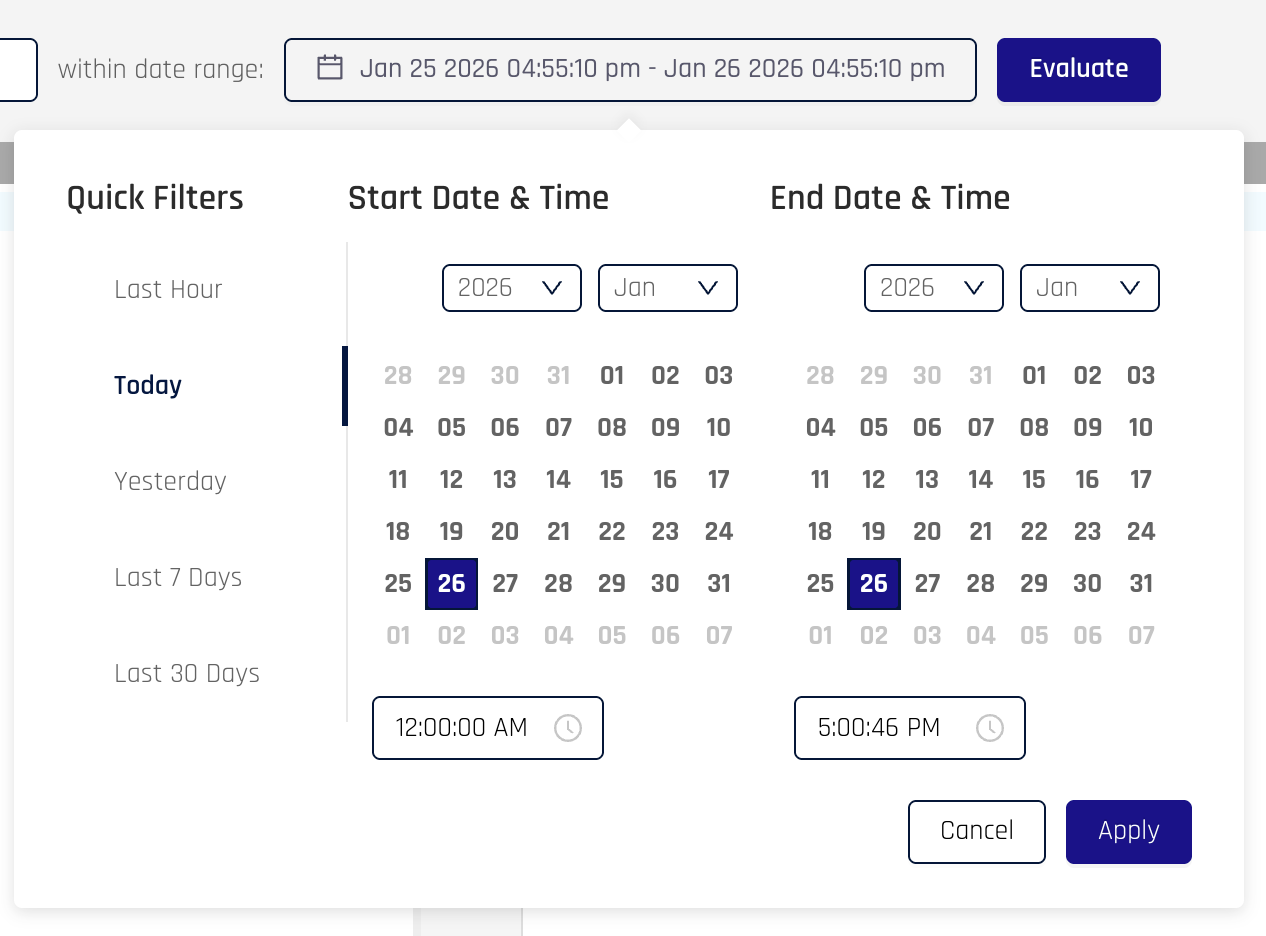
Click on the date range and select the time frame in which the event occurred. For example, click the Today quick filter
-
When you click the Apply button, HYPR will retrieve all signals it has for that time frame and display them in the Input field

-
You can click in this field and use CTRL-f to bring up a search feature to look for a particular event
-
Next, click the Evaluate button to run the policy against these input signals
-
The result will provide a message and detailed result attributes. In particular, the policy will have the “allowed” attribute, which will be either true or false. This represents the result of the policy. In the previous screenshot the policy did not have the Crowdstrike signals required to evaluate the policy and returned a policy result of false.

If the policy does not have the signals needed to evaluate the policy, then you must perform the user authentication flow with the desired user in order to generate the signal.
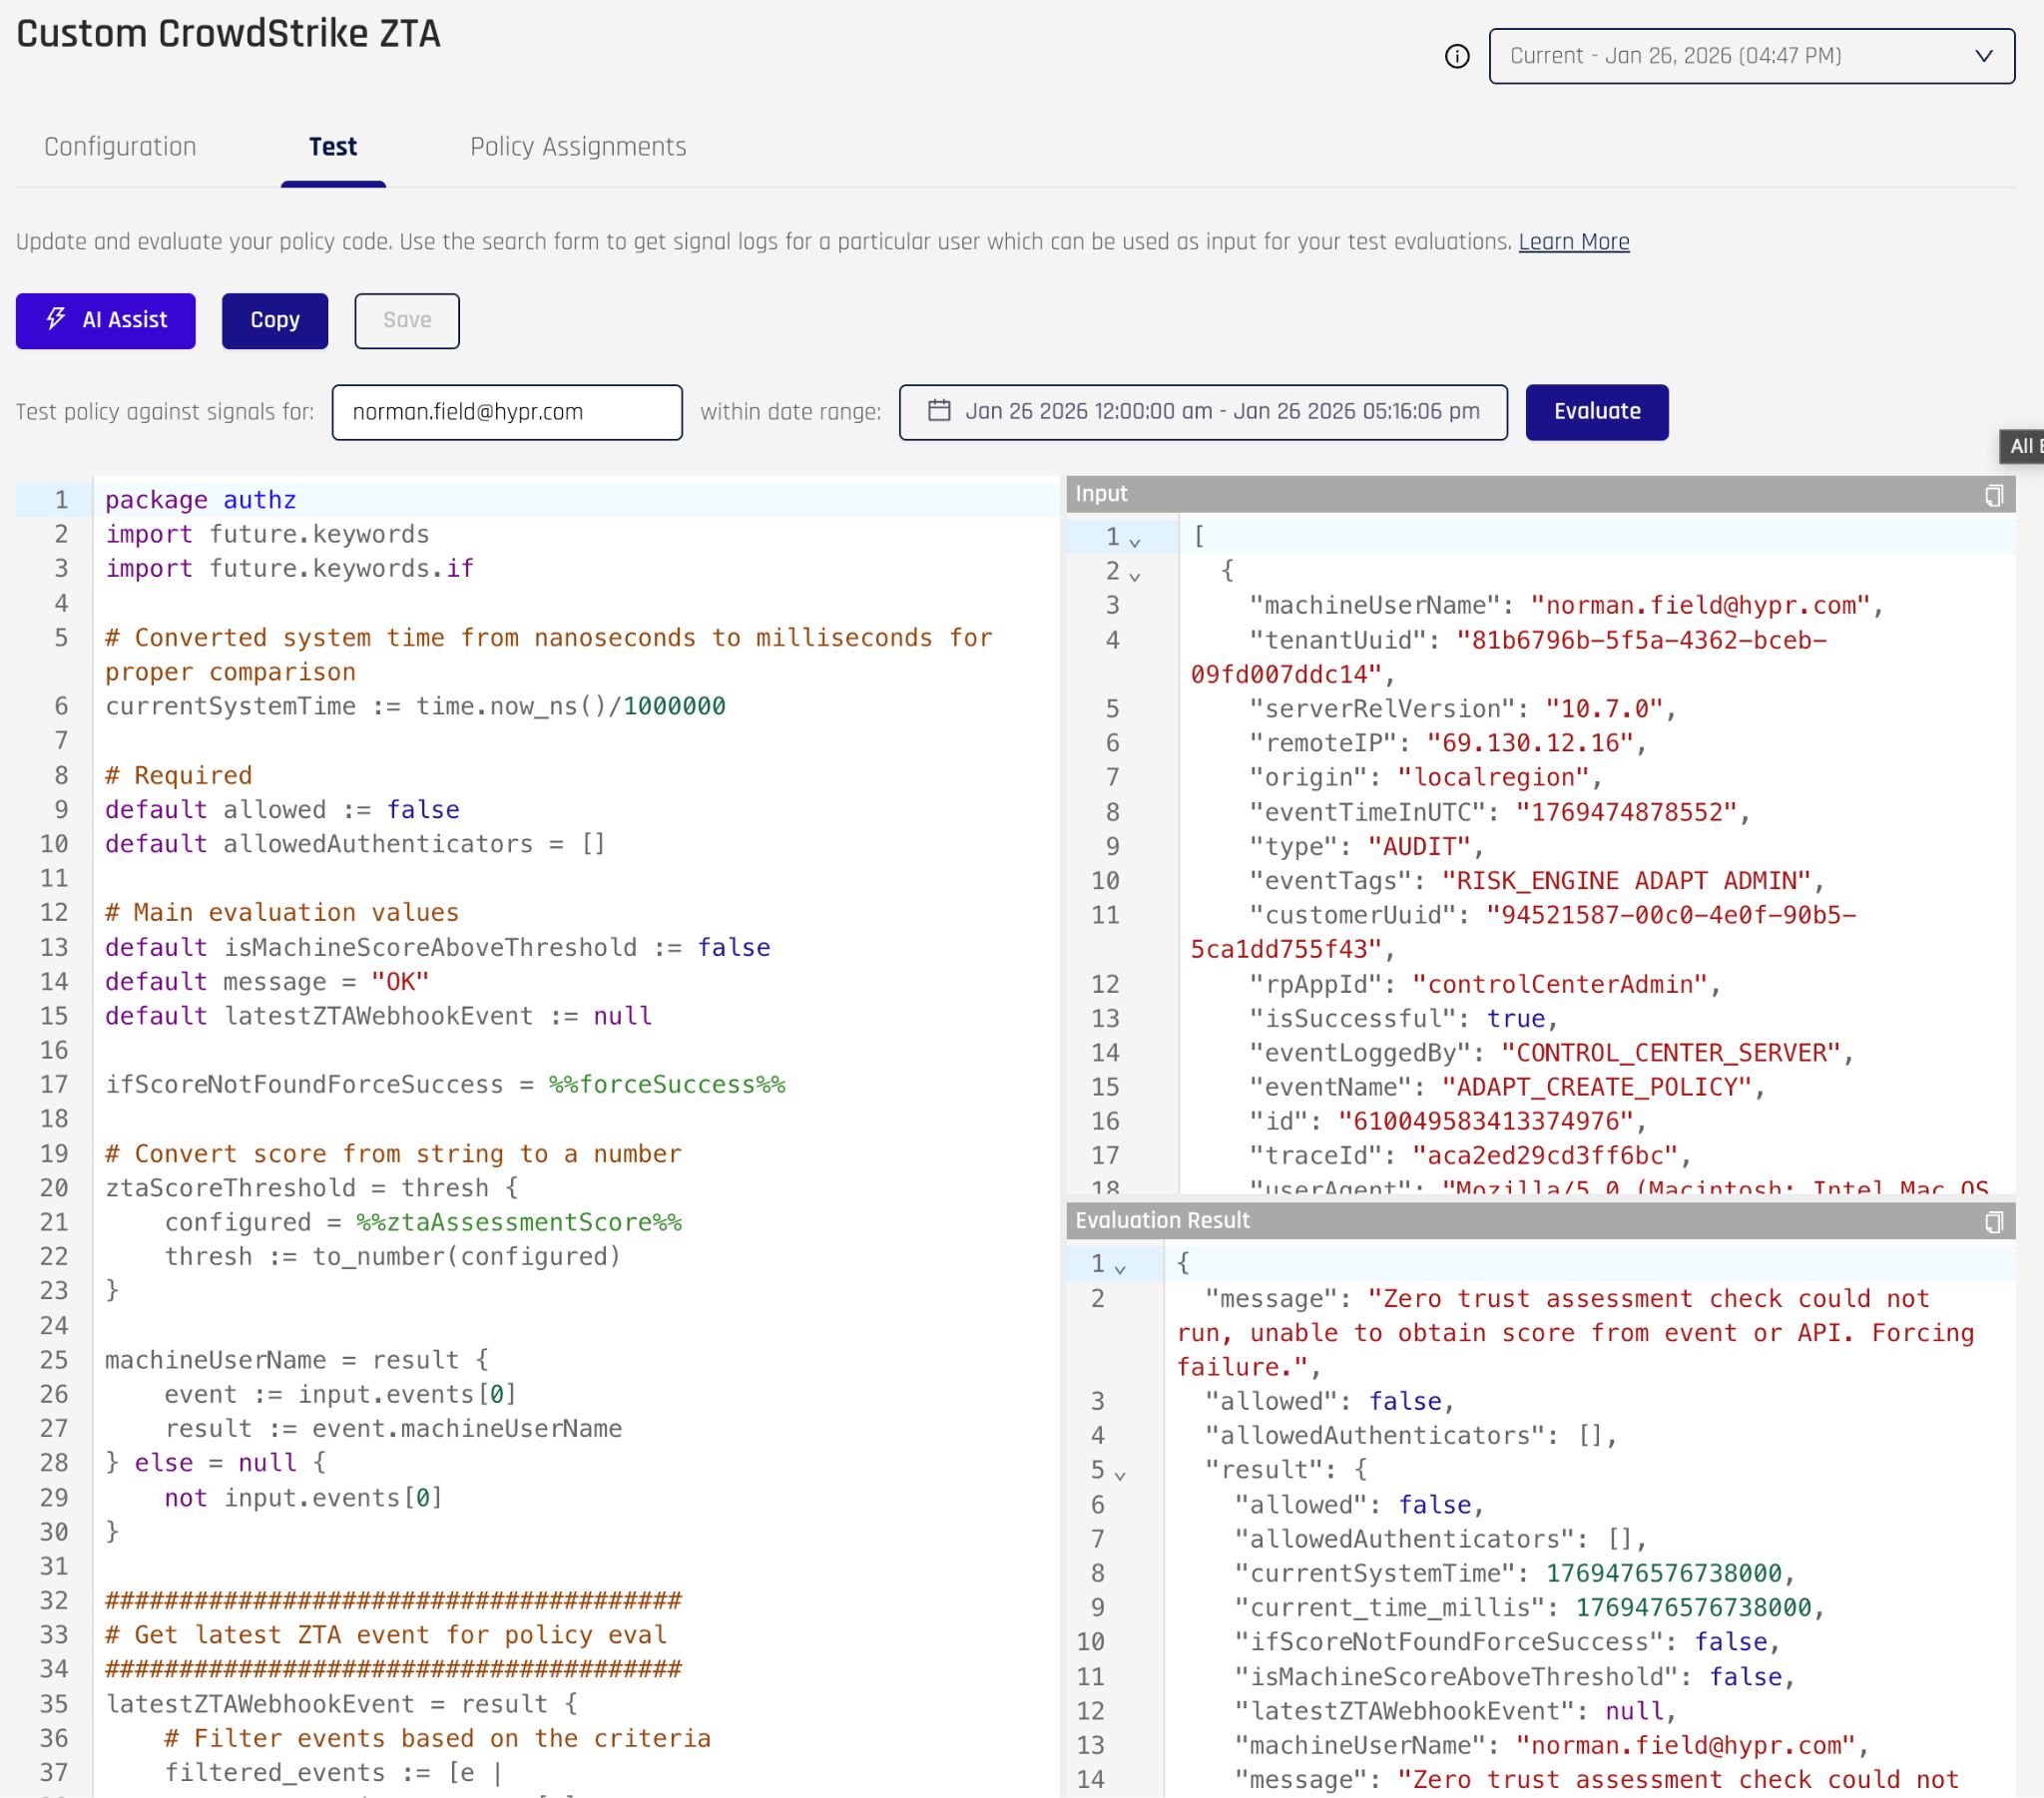
Testing custom policies
Custom policy testing mimics built-in policy testing, but the screen rendering shows the policy code, which you can change if you like. If you are learning how to use Rego, making small changes to the policy code is a good way to gain an understanding of what the code is doing.
Assigning policies to evaluation points
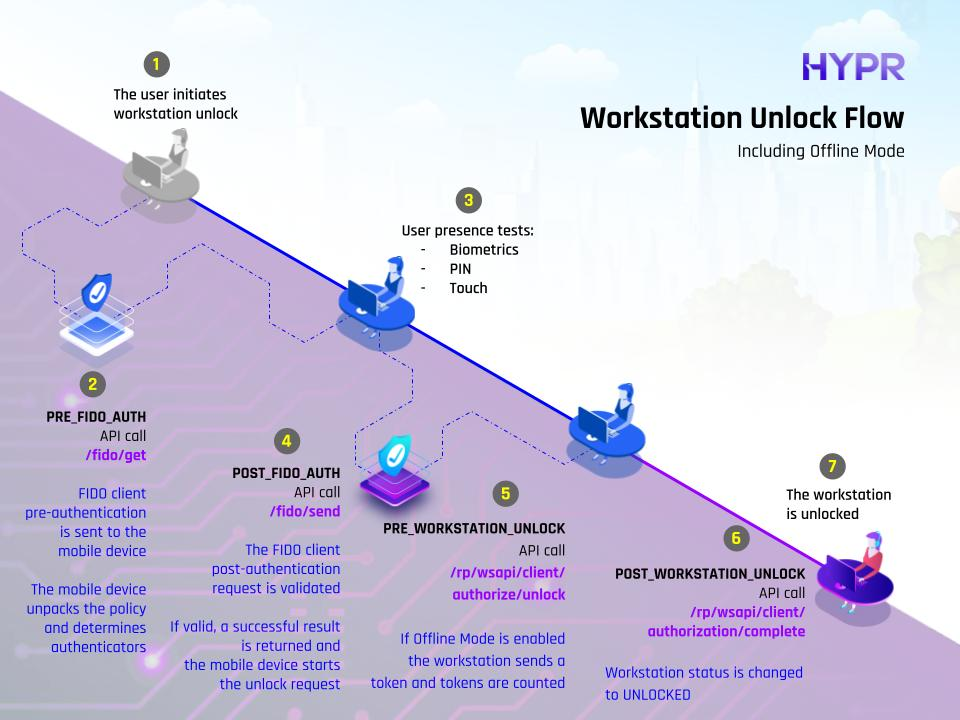
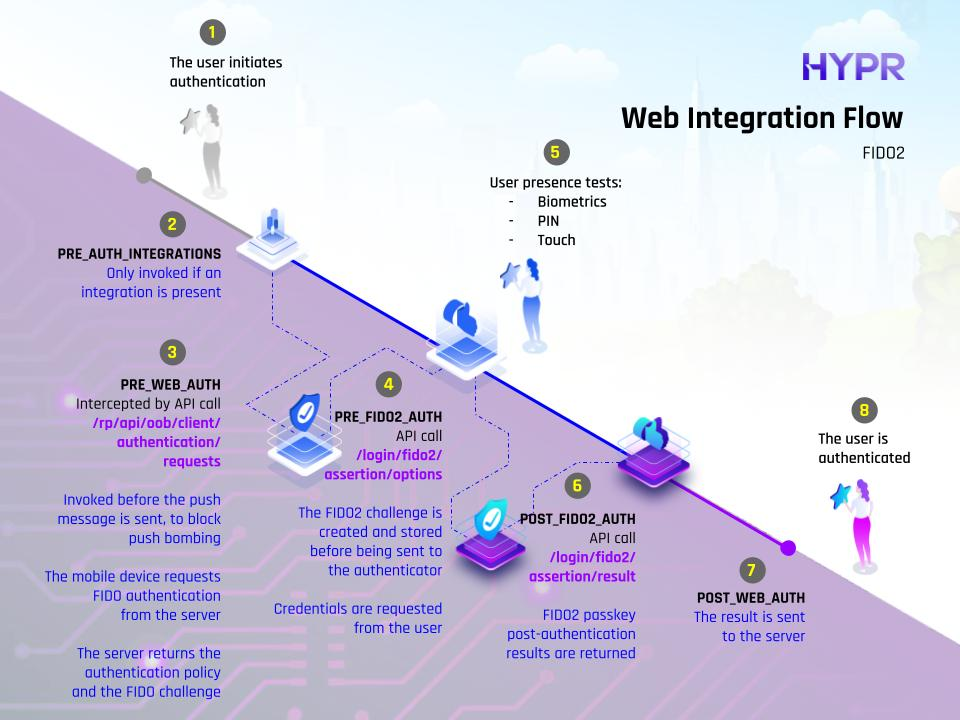
Policies do not have any effect on runtime activities until they are assigned to an evaluation point. Once a policy is assigned to an evaluation point, the policy is evaluated for every user execution that intersects that evaluation point. In most cases, policies are assigned to evaluation points within a HYPR authentication flow. Each authentication flow has multiple evaluation points, to which a policy can be assigned. The following table describes each of the five authentication flows.
| Authentication Flow | Use Case |
|---|---|
| Workstation Unlock Flow | HYPR Passwordless client is used in conjunction with the HYPR Mobile app to unlock a workstation |
| Web Integration Flow (FIDO2) | HYPR Integration (e.g. Entra) has been configured for SSO and the user has a registered passkey |
| Web Integration Flow (HYPR Mobile App) | HYPR Integration (e.g. Entra) has been configured for SSO and the user has a registered UAF credential with the HYPR Mobile App |
| Basic FIDO2 Flow | Custom web application that uses the HYPR API. Also, applies to the HYPR ADFS plugin and the PingFederate Plugin. The user has a registered passkey. |
| Basic Mobile Flow | Custom web application that uses the HYPR API. Also, applies to the HYPR ADFS plugin and the PingFederate Plugin. The user has a registered UAF credential with the HYPR Mobile App |
Mapping evaluation points to authentication flows
The following diagrams show the available evaluation points for each of the HYPR authentication flows.
Workstation Unlock Flow
Web Integration Flow (FIDO2)
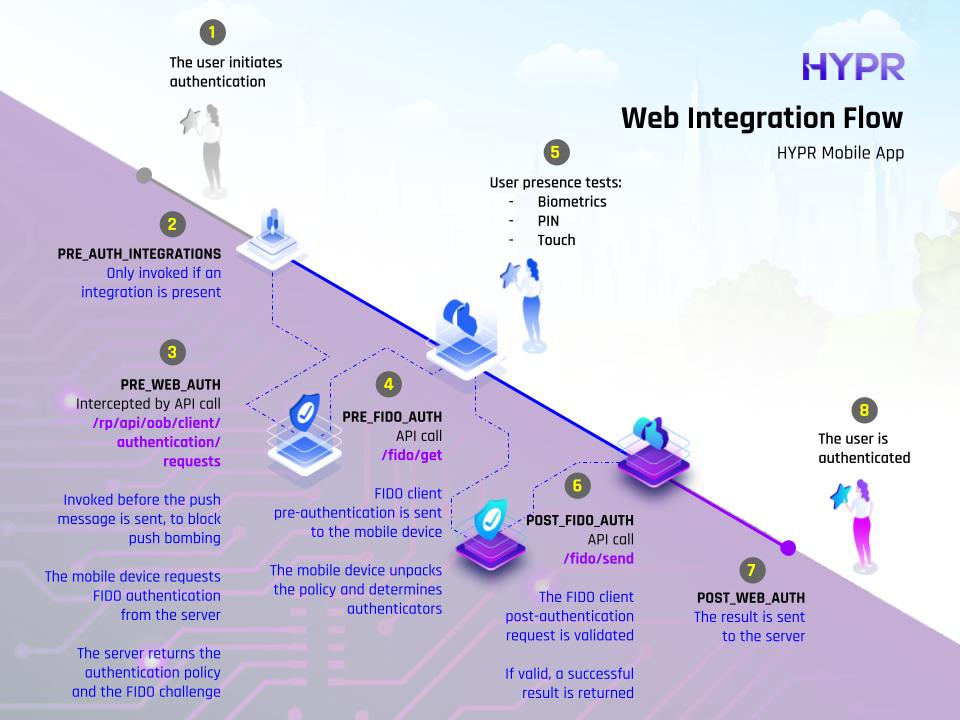
Web Integration Flow (HYPR Mobile App)
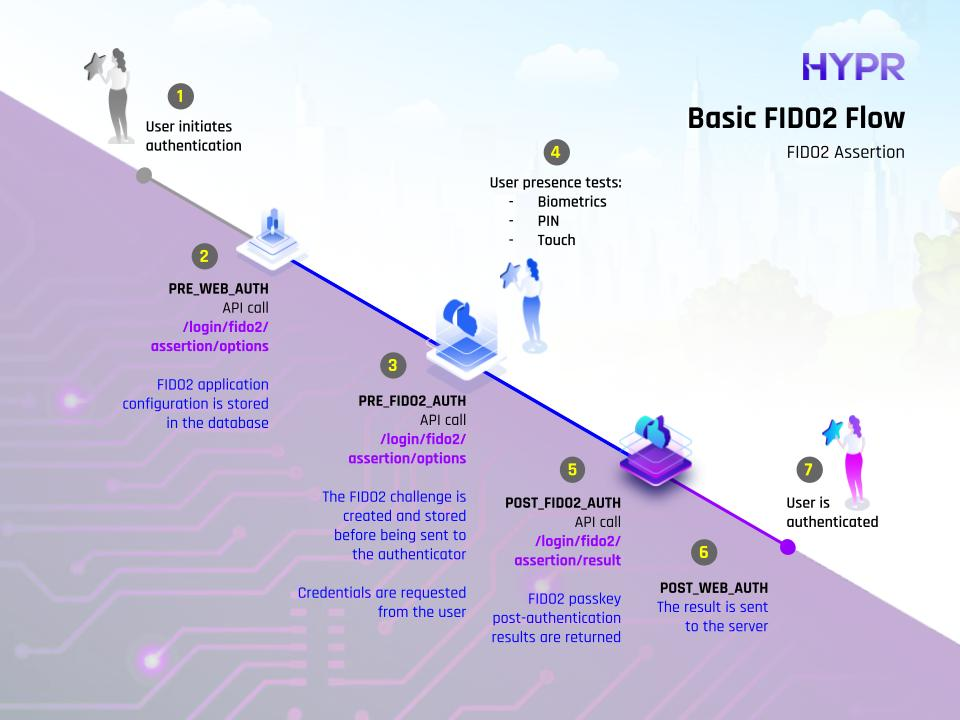
Basic FIDO2 Flow
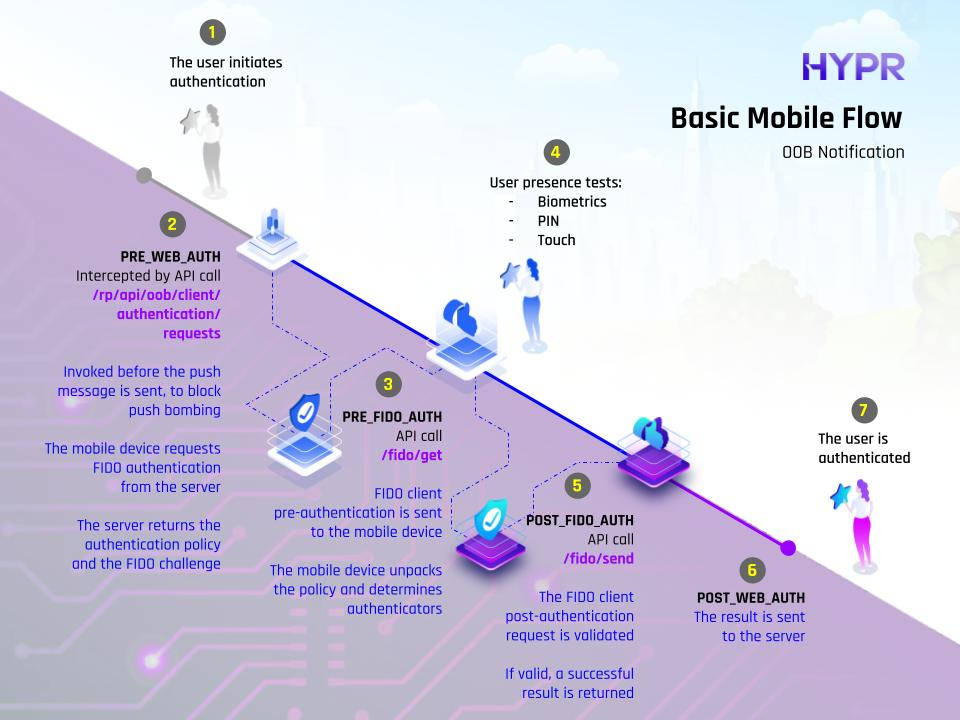
Basic Mobile Flow
See the below table for more details on the evaluation points.
| Name | API Value | Description |
|---|---|---|
| Web Pre-auth | PRE_WEB_AUTH | For OOB/QR flows, this is invoked before the push message is sent, to block push bombing. For FIDO2, this is invoked on assertions/options, since there is no other pre-step for FIDO2. |
| Web Post-auth | POST_WEB_AUTH | For OOB/QR flows, this is invoked after the user completes the authentication. For FIDO2, this is invoked after the assertion is validated. |
| HYPR Mobile Pre-auth | PRE_FIDO_AUTH | Evaluates before HYPR Mobile App authentication; on fido/get/auth. |
| HYPR Mobile Post-auth | POST_FIDO_AUTH | Evaluates after HYPR Mobile App authentication; on fido/send/auth. |
| FIDO2 Passkey Pre-auth | PRE_FIDO2_AUTH | Evaluates before FIDO2 passkey authentication; on fido2/assertion/options. |
| FIDO2 Passkey Post-auth | POST_FIDO2_AUTH | Evaluates after FIDO2 passkey authentication; on fido2/assertion/complete. |
| Workstation Pre-Unlock | PRE_WORKSTATION_UNLOCK | At the start of the workstation unlock request; on client/authorize/unlock. |
| Workstation Post-Unlock | POST_WORKSTATION_UNLOCK | At the start of the workstation unlock request: - client/authorization/complete/{sessionId}- client/verification/complete/{sessionId} |
| HYPR Integration Pre-auth | PRE_AUTH_INTEGRATIONS | Perform the policy check before an authentication request from a HYPR integration. For example, the native HYPR login calls the PRE evaluation point before it displays the authentication options. This is not invoked by Control Center directly — only when a policy evaluation is requested on these points via API. |
| HYPR Integration Post-auth | POST_AUTH_INTEGRATIONS | Perform the policy check after an authentication request from a HYPR integration. For example, the native HYPR login calls the POST evaluation point after the user performs the HYPR authentication. This is not invoked by Control Center directly — only when a policy evaluation is requested on these points via API. |
Logging Only Enforcement
Deploying a new authentication policy into a production environment affects all users, who utilize the authentication flow, to which the policy is assigned. In order to avoid an unexpected wide-spread disturbance, it’s recommended to initially deploy the policy in “logging only” mode. This can be enabled during the policy assignment. The policy still gets evaluated and logs the result, but does not take any action. You can monitor how the policy would impact users if the policy was being applied. The Analytics dashboard in the HYPR Control Center allows you to monitor how many users would fail/pass the policy.
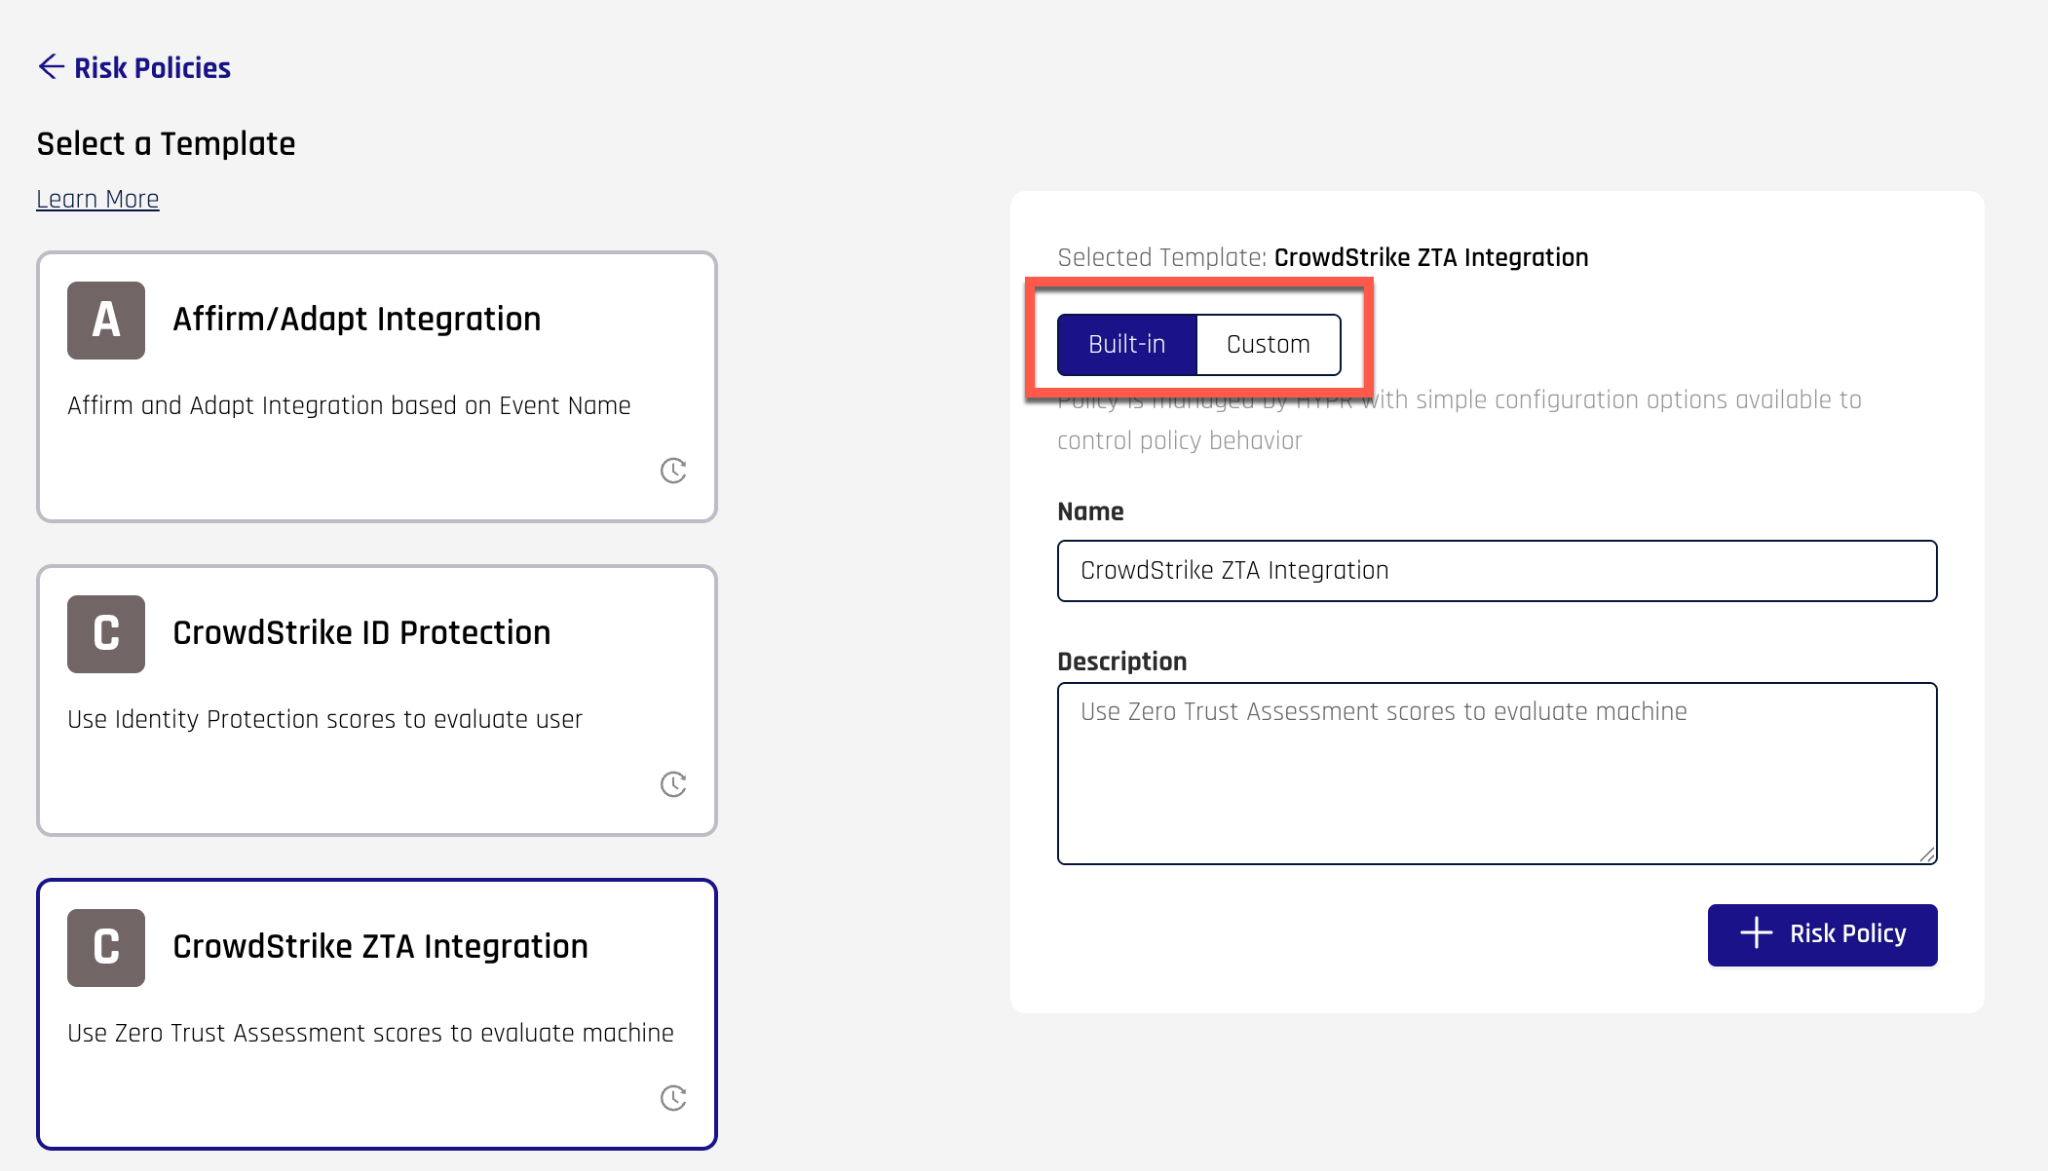
Assigning a policy the evaluation point
Once you have a policy that has been thoroughly tested, you are ready to apply the policy to the live system.
-
Navigate to HYPR Adapt > Risk Policies and click on the policy
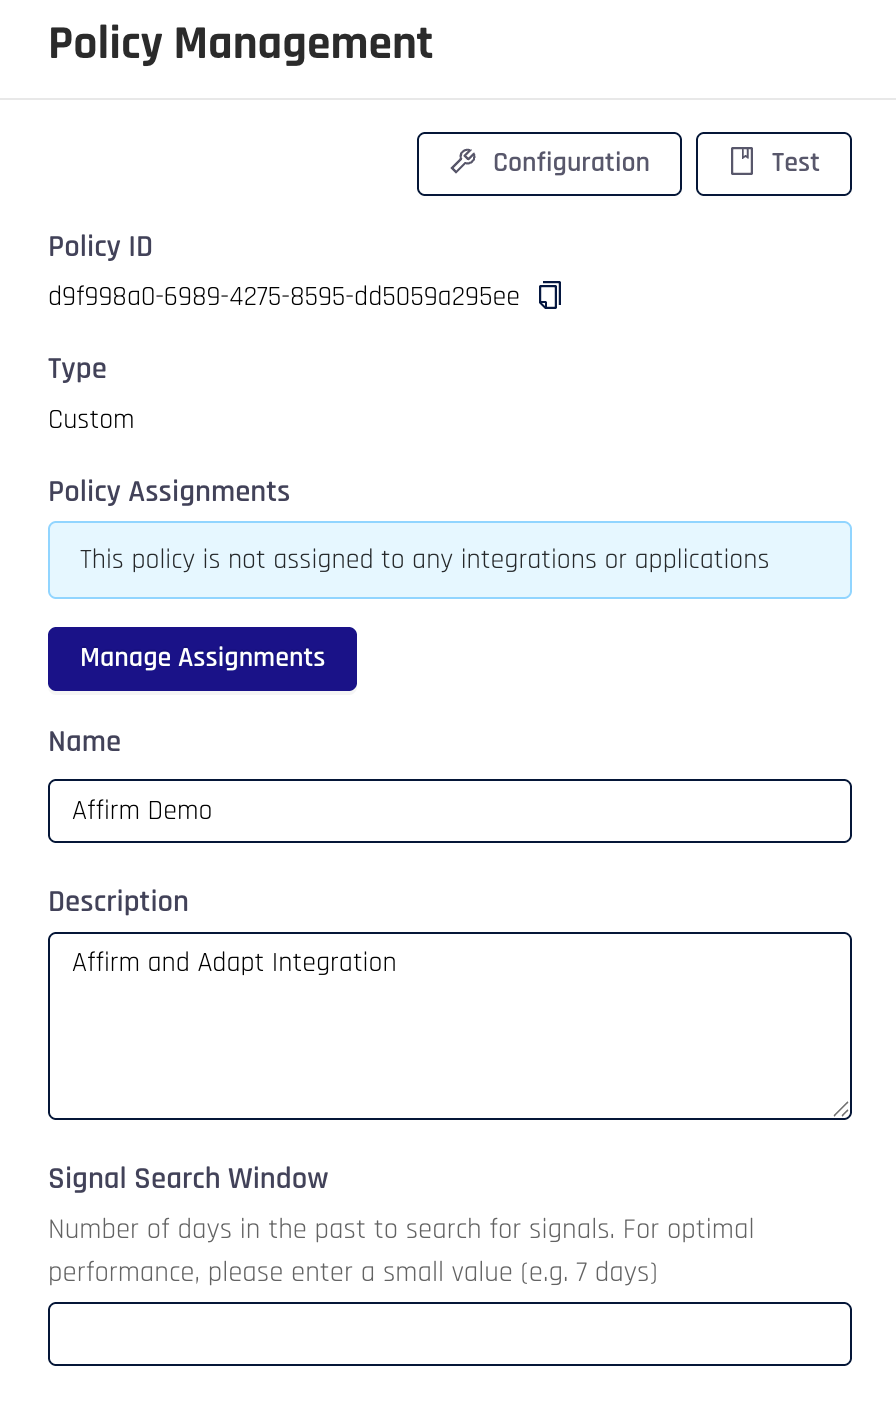
-
Click on the Manage Assignments button
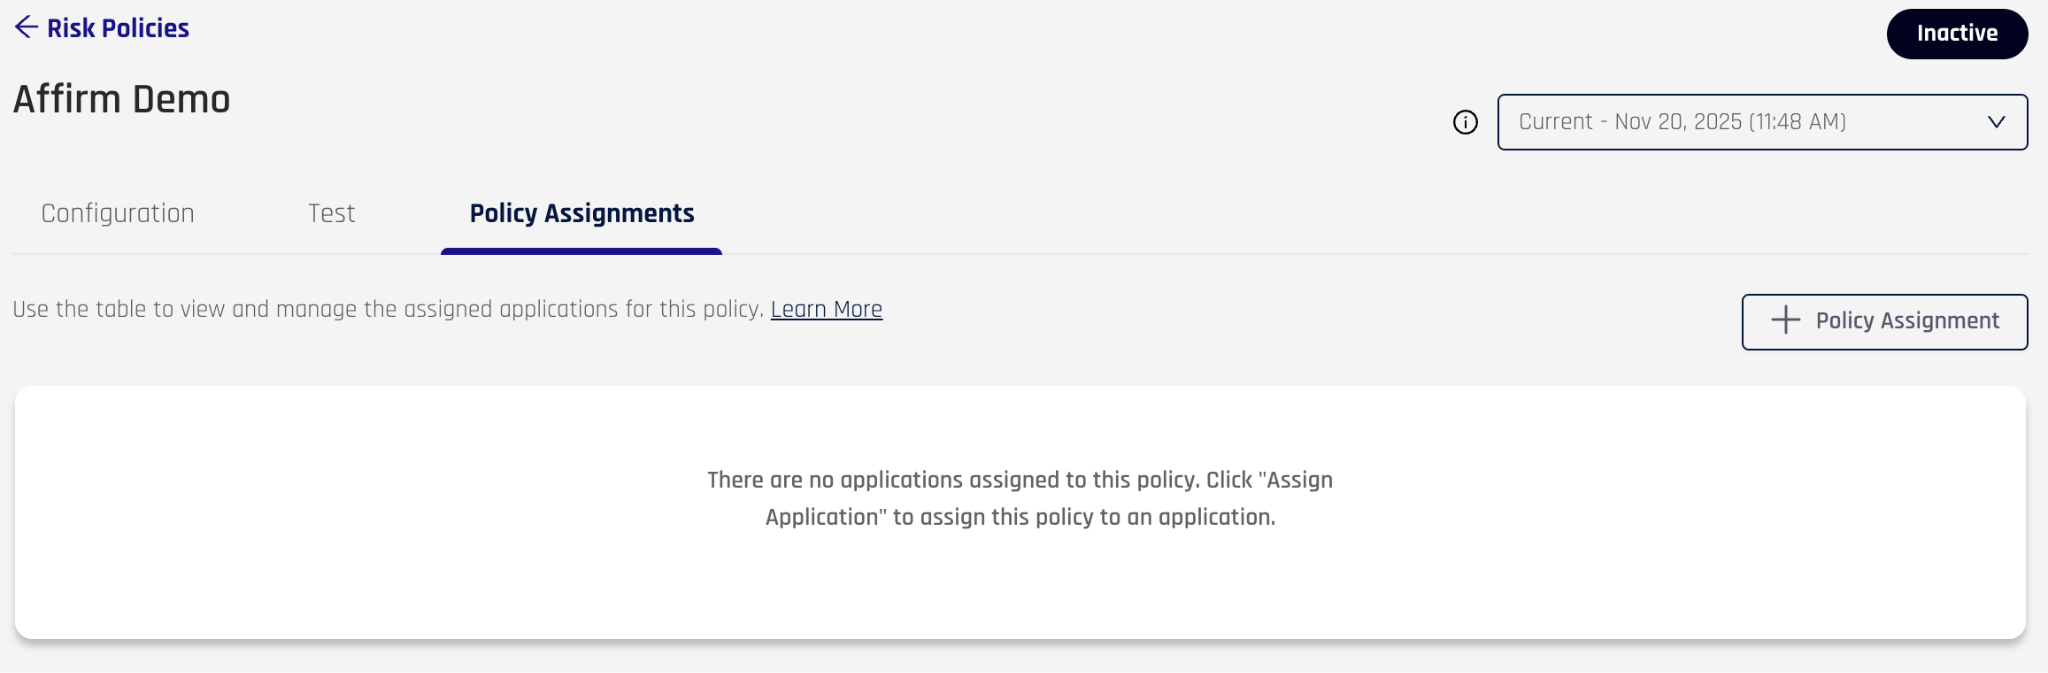
-
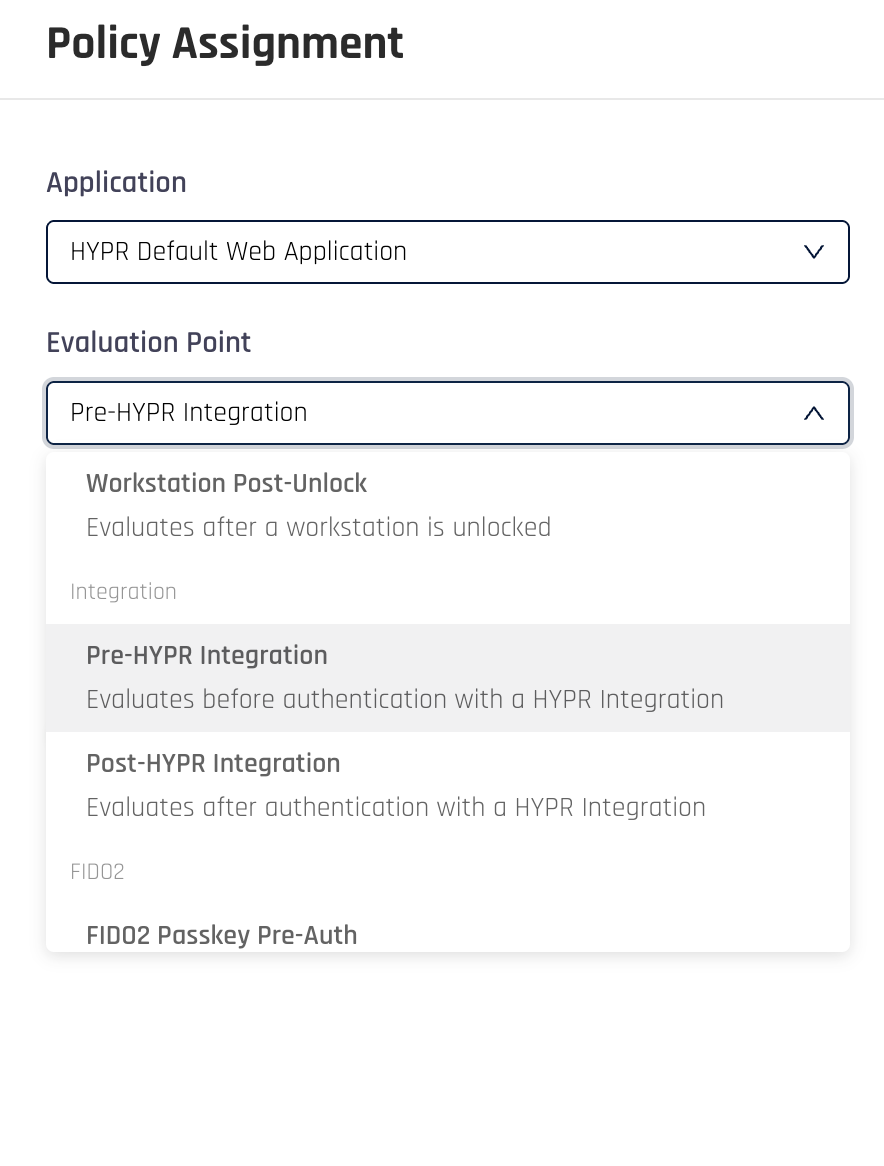
Click on the +Policy Assignment button and select the Application, to which the policy should apply. Then choose the evaluation point from the drop-down list.
-
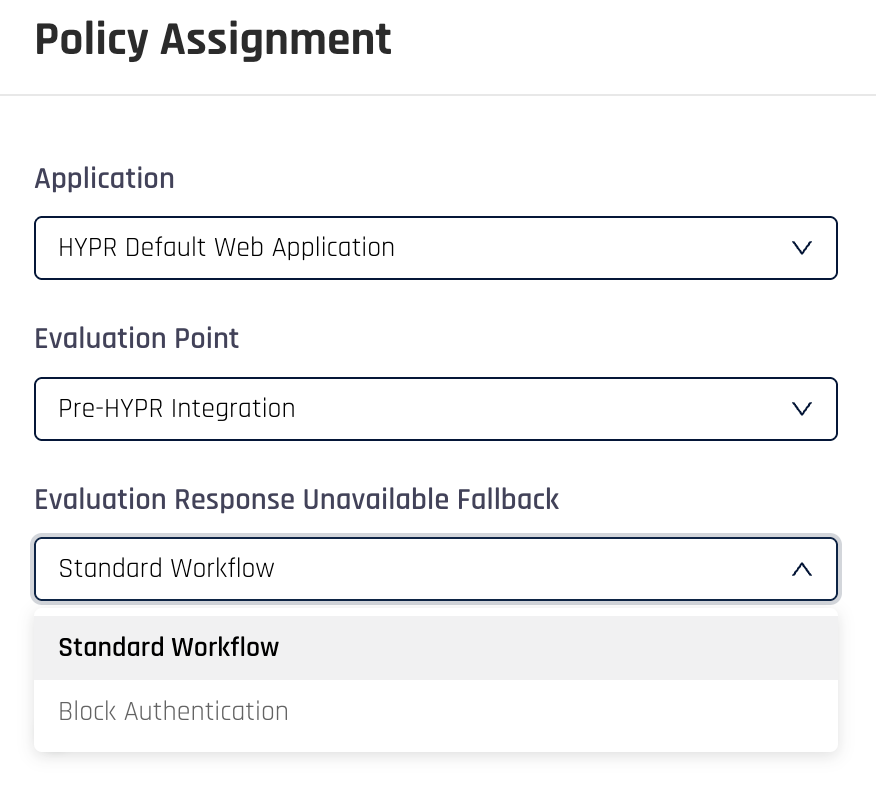
Choose the behavior you would like if the policy is unable to evaluate. Standard Workflow means proceed with the authentication and Block Authentication means halt the authentication flow. It’s best to start with Standard Workflow.
-
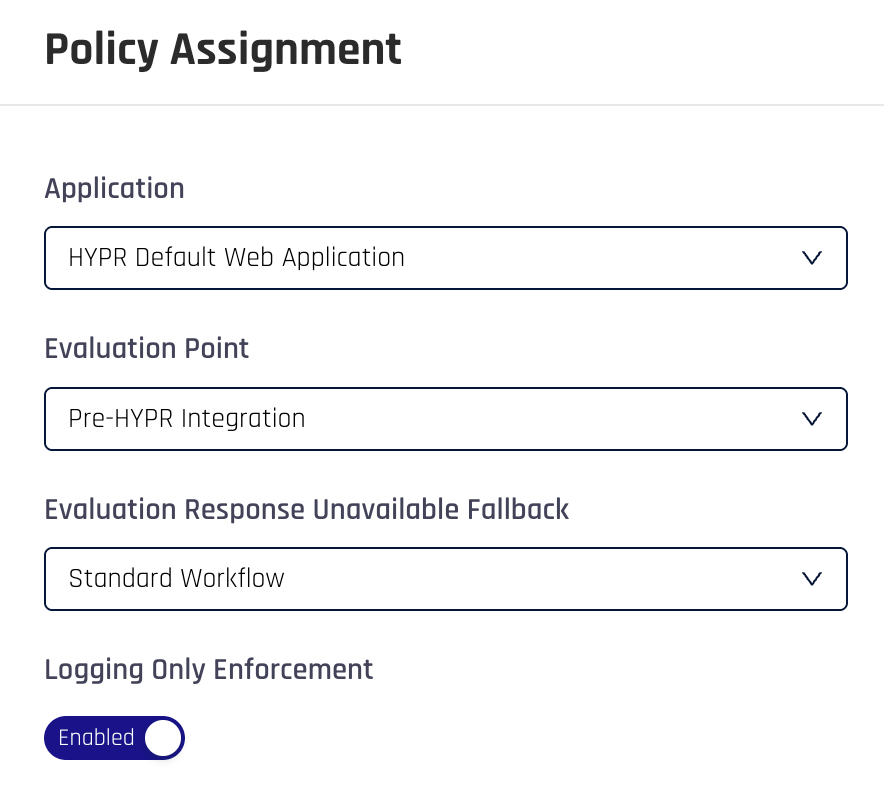
Finally, when rolling out a new policy, it’s best to enable Logging Only Enforcement. This means that the policy gets executed and the results logged, but does not take any actions. It allows the authentication to proceed regardless of the policy result.
See the HYPR Documentation for more details.
Deployment strategy and risk mitigation
The most important aspect of policy deployment is understanding the impact on the end-user population. This can be done before involving end-users by assigning the policy in the logging-only mode and monitoring the policy evaluation results.
A successful deployment is built on the following process:
- Follow the guidance provided in the Solution Design section of this document to ensure the policy meets the business objectives
- Create and test the policy
- Assign the policy to an evaluation point in logging-only mode
- Let the policy soak in production for several weeks in logging-only mode and monitor the policy impact using the Adapt Dashboard.
- When ready, disable logging-only mode and carefully monitor the solution for several weeks as users start experiencing the impact of the policy.
As always, any issues encountered during a deployment can be reported to support@hypr.com.
Monitoring the solution
Once you have assigned a policy and you have disabled logging-only mode, then you’ll want to keep track of how the policy is settling into your environment. This is particularly important in the first couple of weeks after the policy has been deployed. For this activity, use the Adapt Dashboard found under the Analytics link in the left navigation pane. The dashboard can also be used to drill down into individual policy evaluations when troubleshooting.
Appendix 1: How to configure Crowdstrike for HYPR Adapt
Crowdstrike ZTA
The CrowdStrike HYPR Adapt policies require some configuration to be completed in CrowdStrike before the policies can be executed. This section describes those configurations.
Client Dependency
The CrowdStrike ZTA policy relies on the risk score calculated by the CrowdStrike client running on the end-user’s desktop. To ensure coverage of your enterprise, ensure the CrowdStrike client is deployed to your desktops.
Webhook Configuration
Enabling the Adapt CrowdStrike webhook integration requires a few steps on both CC and CrowdStrike
Configuring Webhook Client
- In Falcon Navigation Bar go to CrowdStrike Store > All Apps
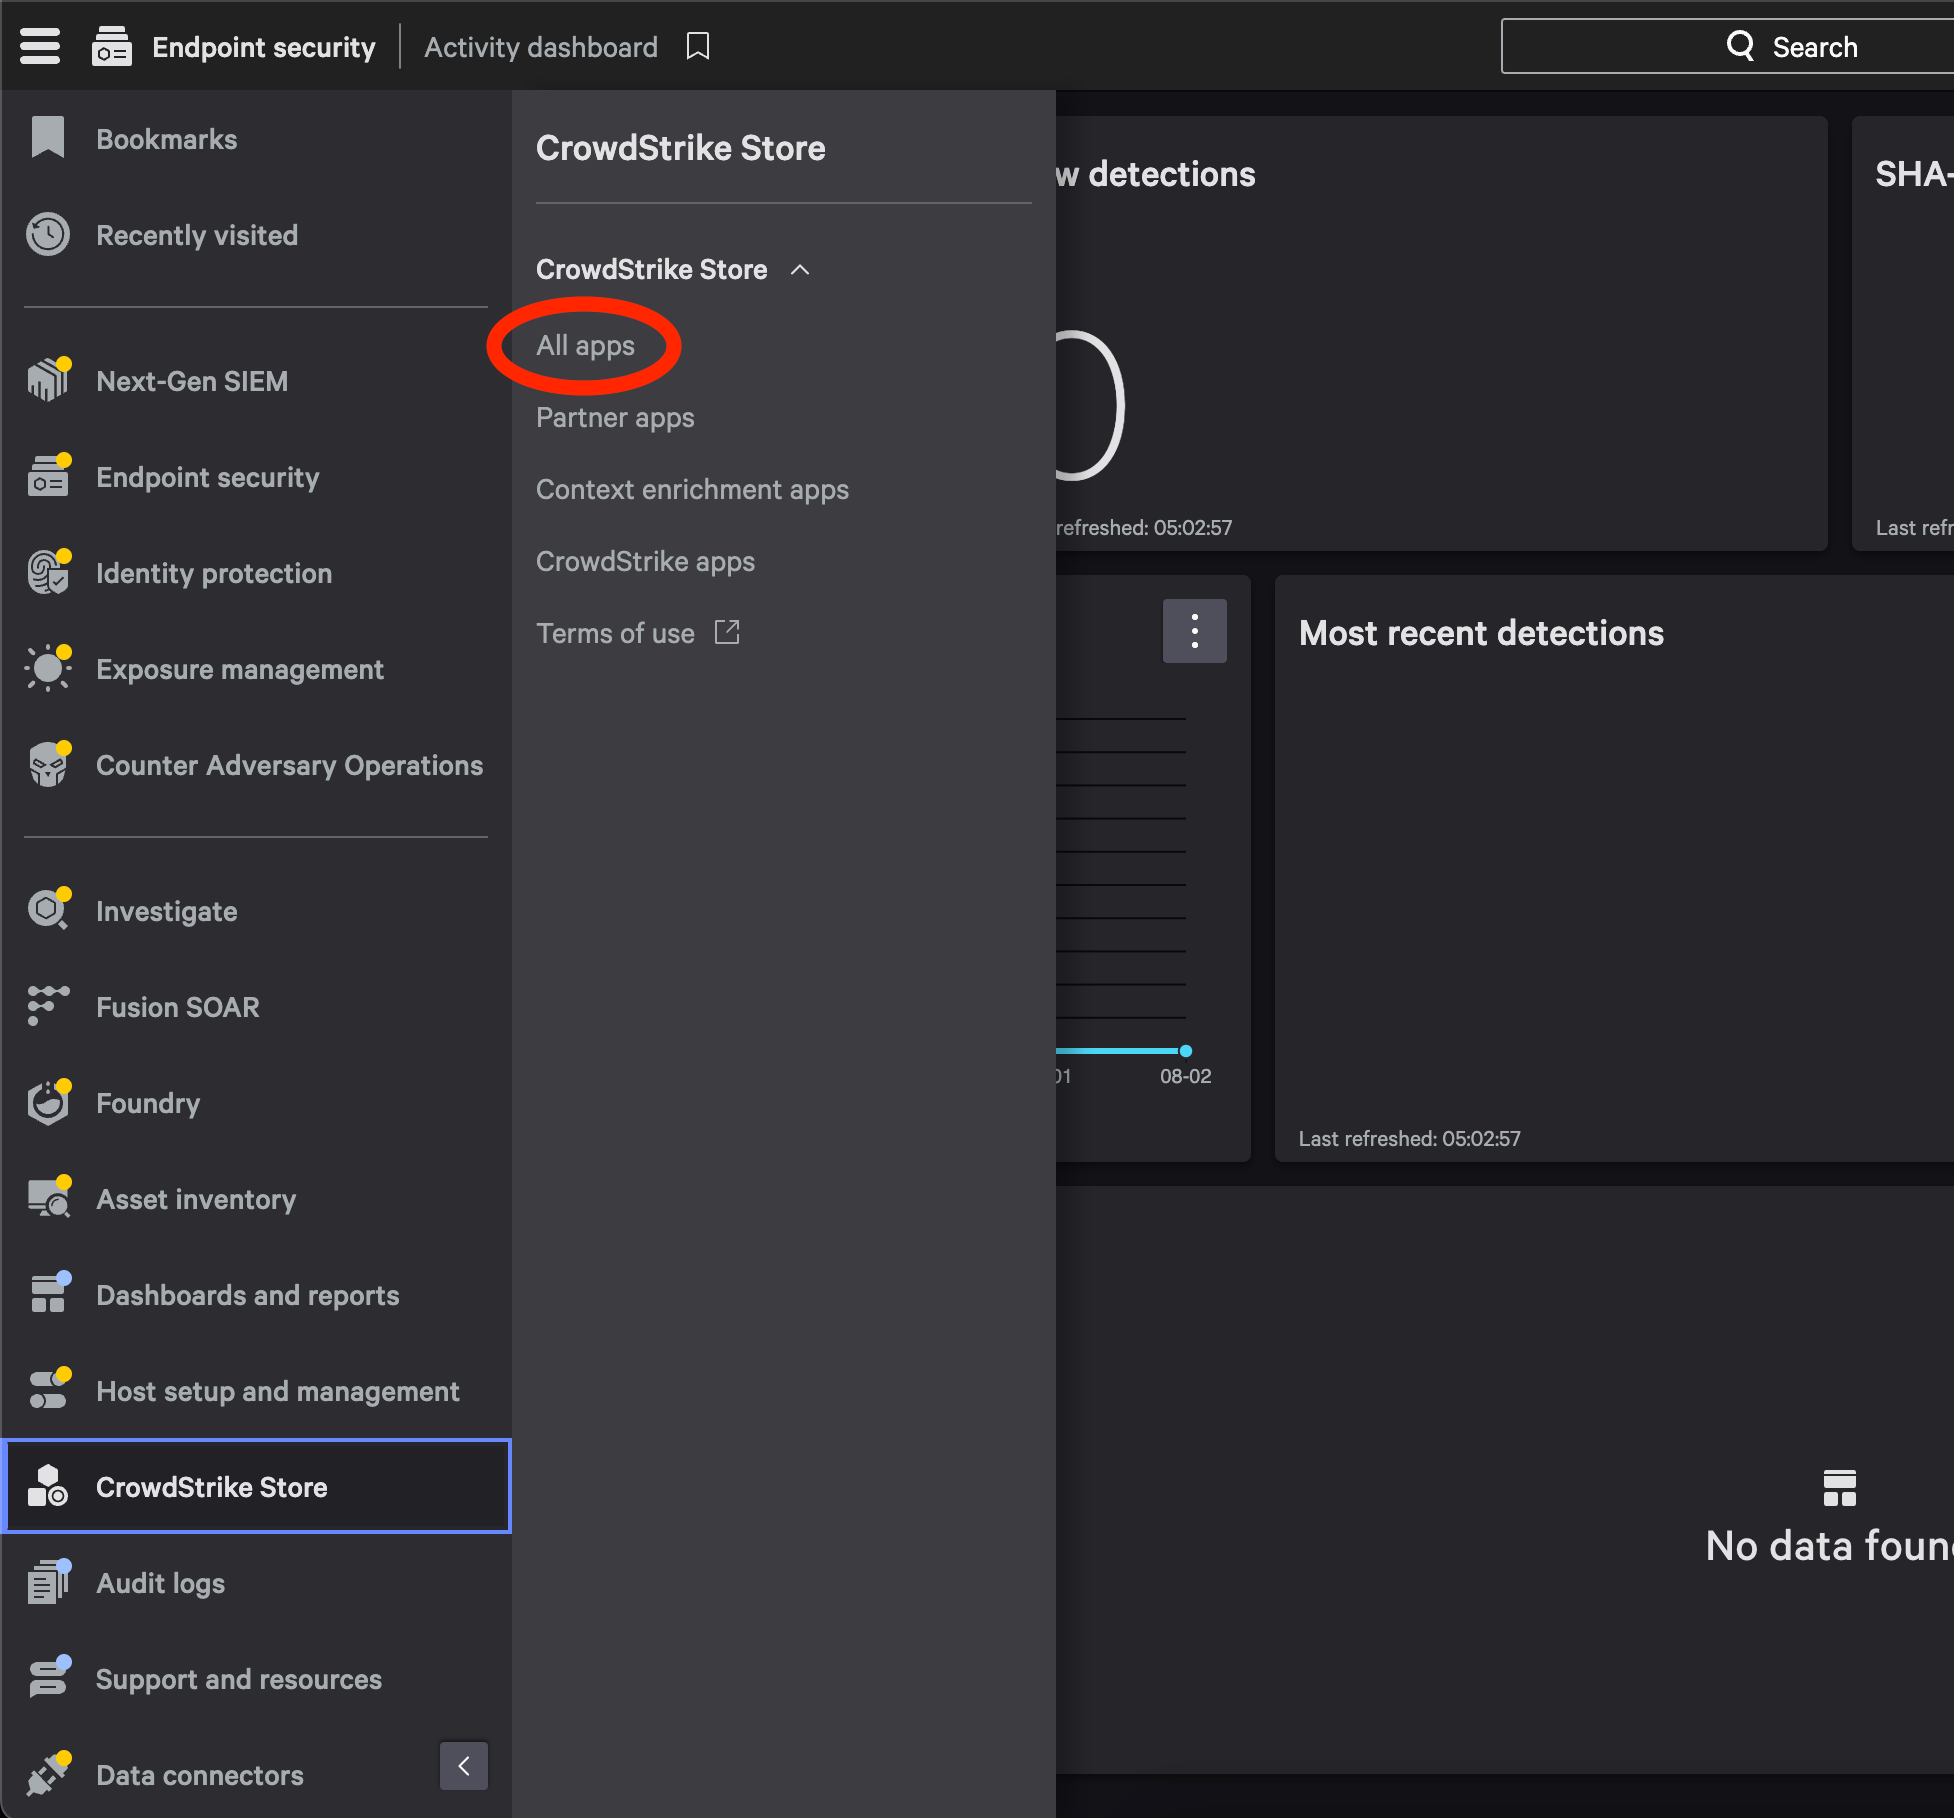
- In CrowdStrike Store select Webhook application
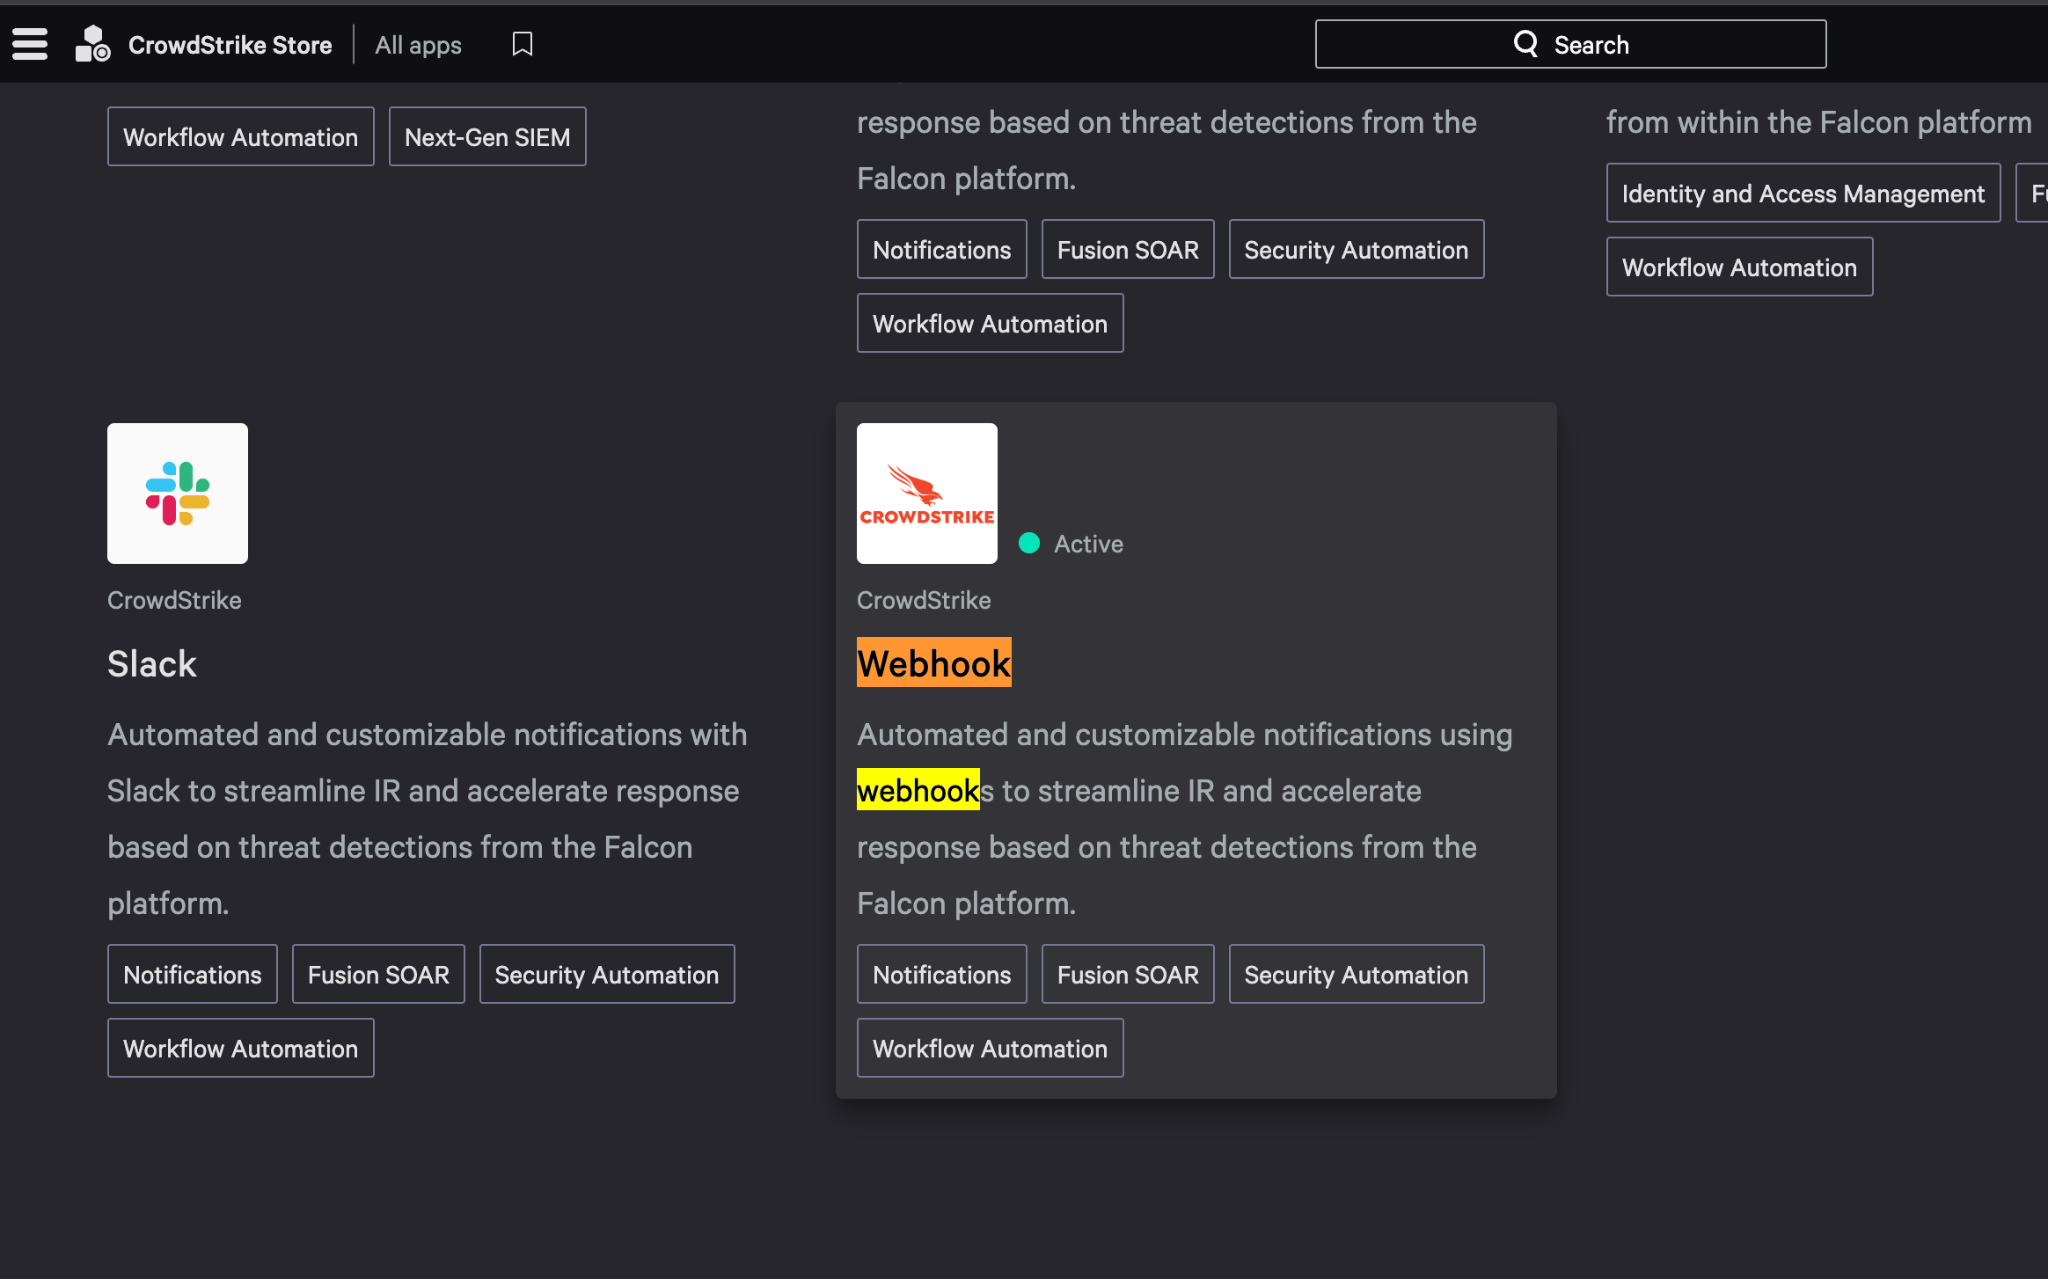
- Click Configure, will open a pop-up window. In this window, select Add Configuration
Name can be whatever, but note it because this name will be used to assign Workflow Webhook calls
Set Webhook URL to your HYPR Control Center base URL followed by the integration path. For example:
https://your-cc-base-url/rp/integrations/adapt/webhookclient/crowdstrike/eventshook
Set HMAC Secret Key to: (Save this as it will be need for HYPR control center configuration)
| Random 25 Character Secret |
|---|
Set Signature Header Name to:
| x-cs-primary-signature |
|---|
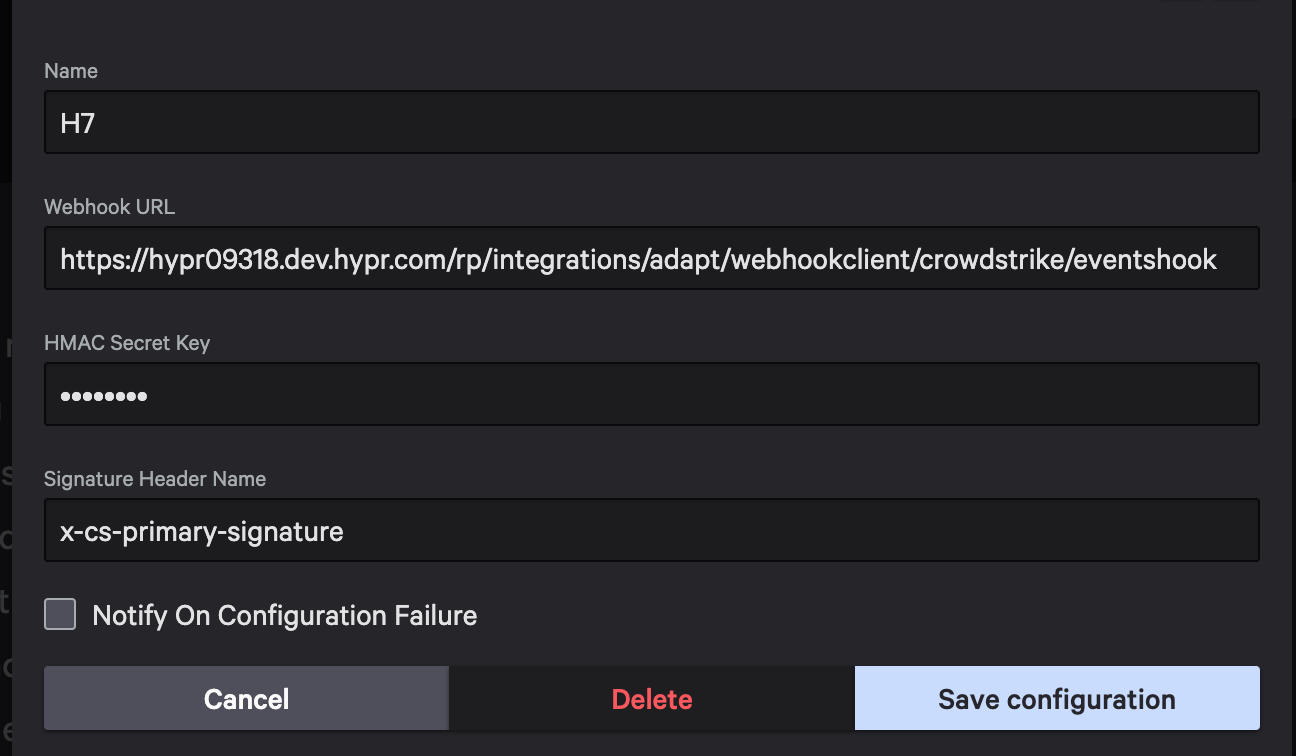
- Save Configuration
Configuring Workflows
Workflows will be what defines when this webhook is fired, and what information will be included in the data sent to Control Center. We will be working with keeping track of Identity Protection Risk Scores as well as Zero Trust Assessment results
Getting to Workflow config in CrowdStrike: In Navigation Bar go to Fusion SOAR > Workflows
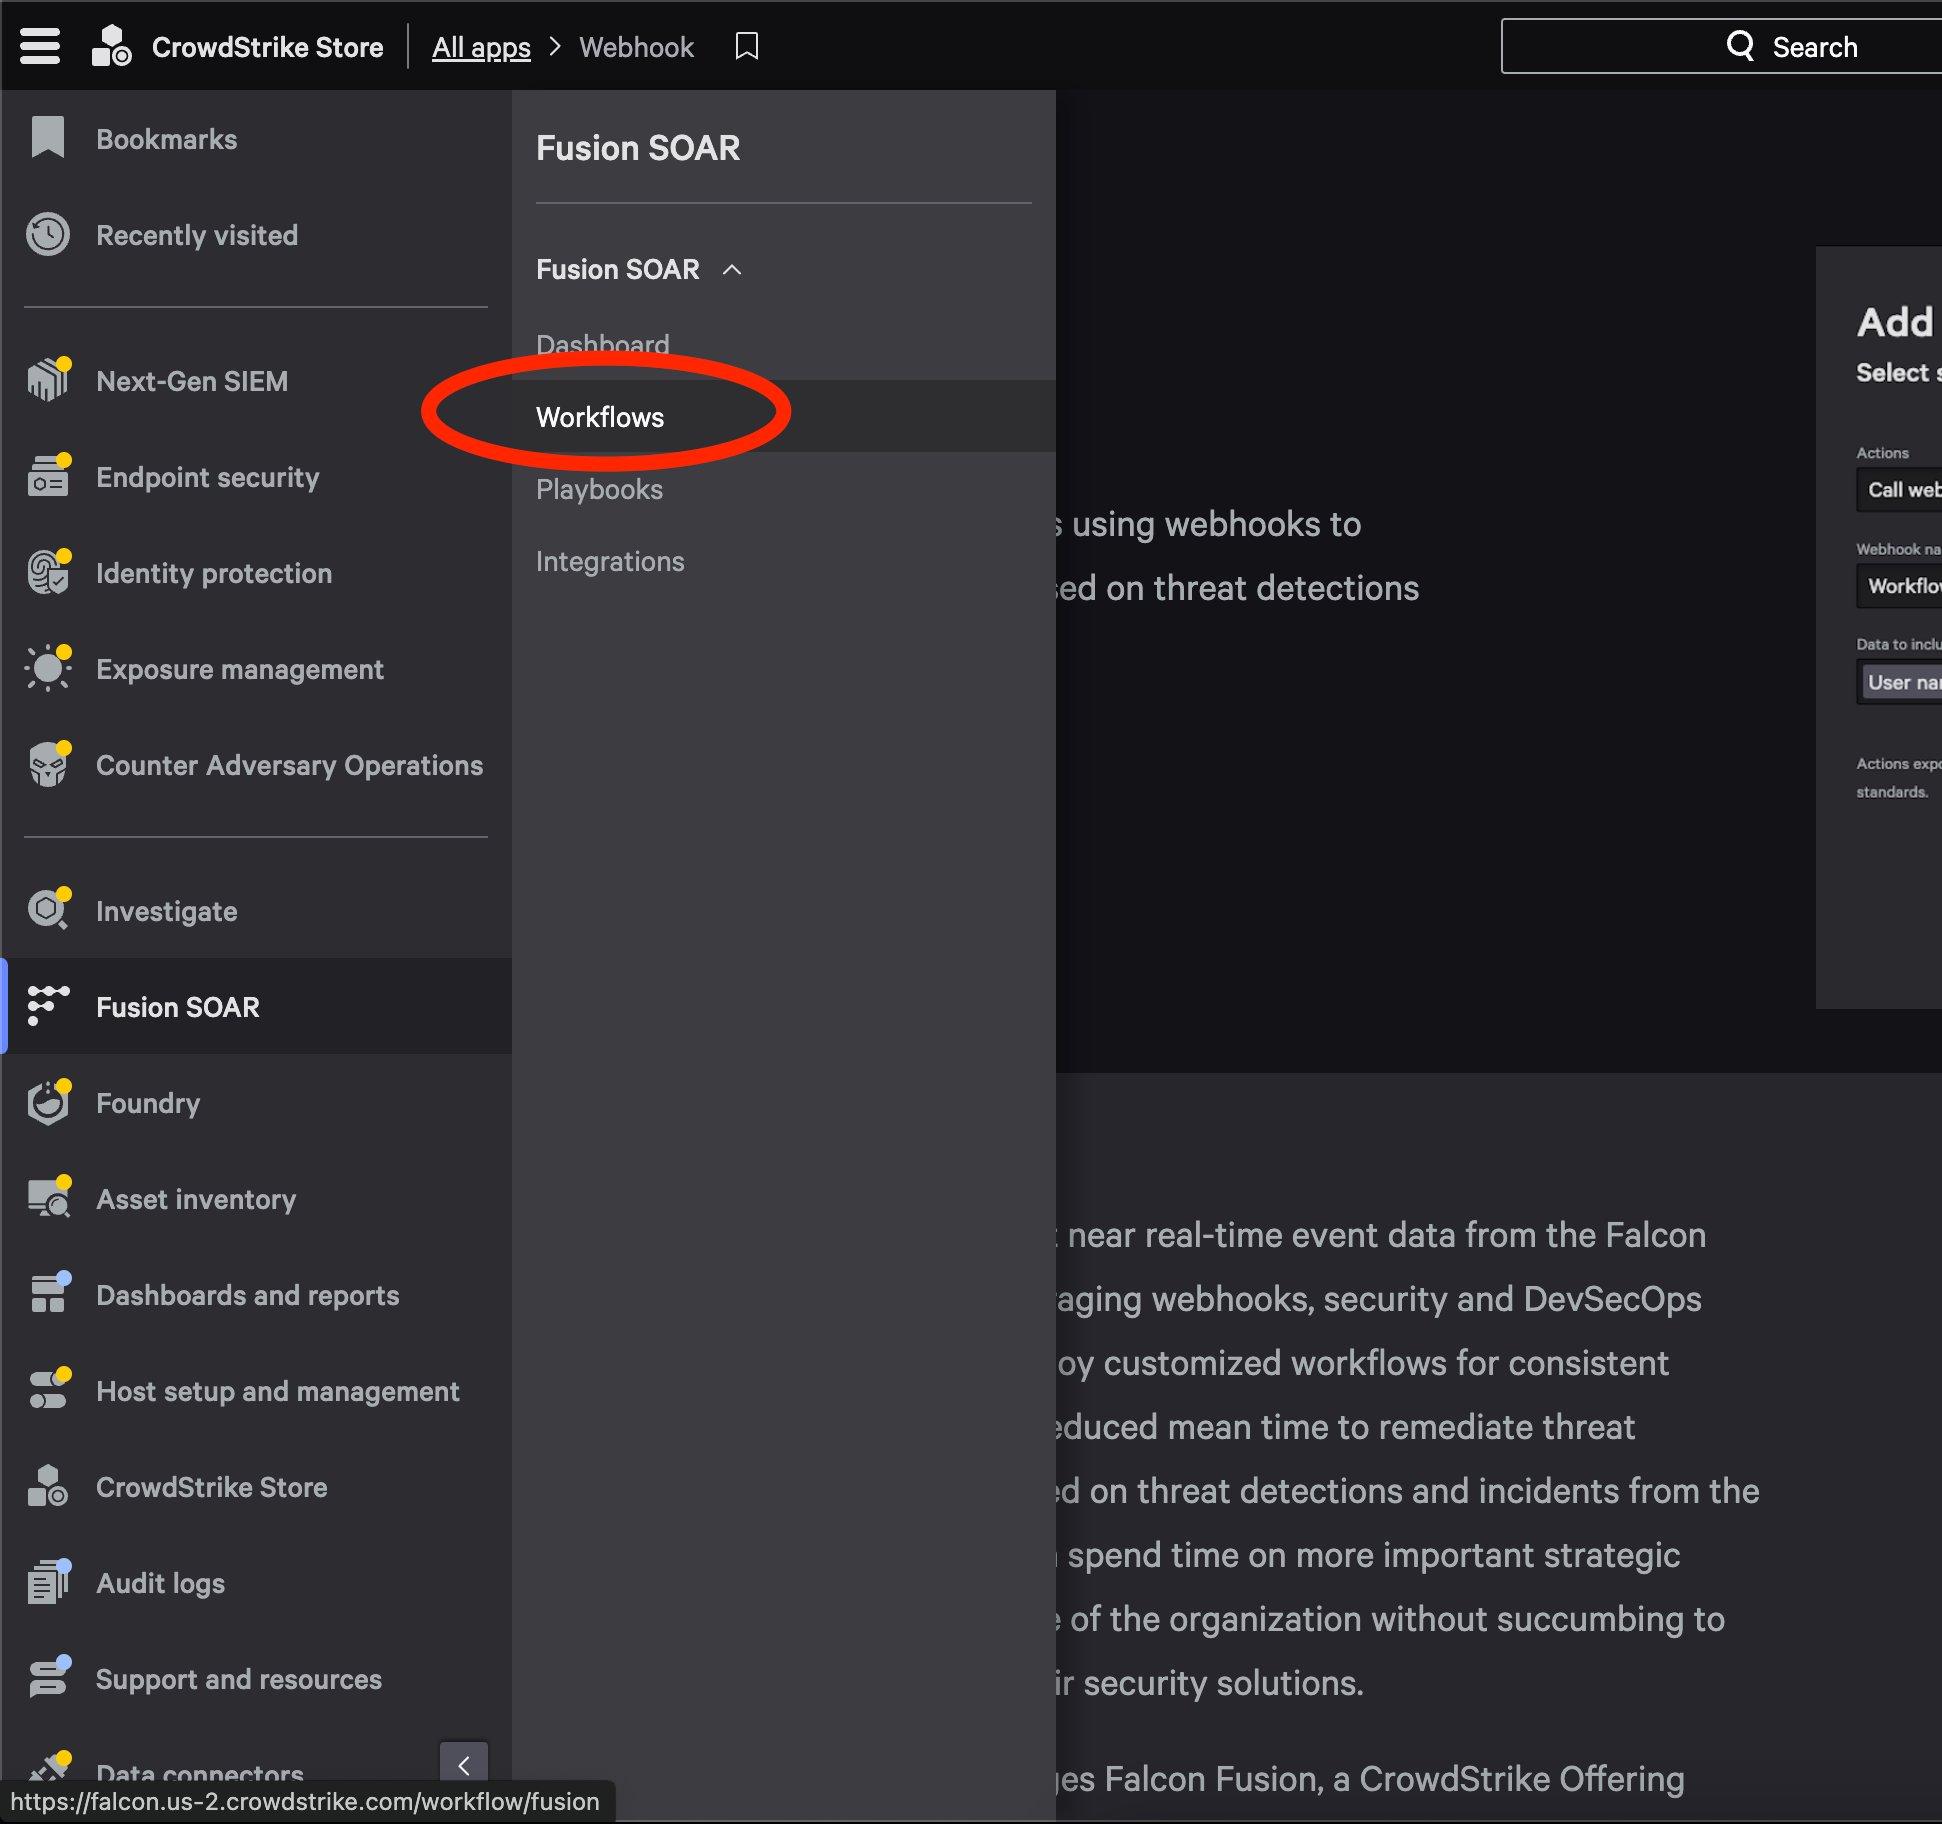
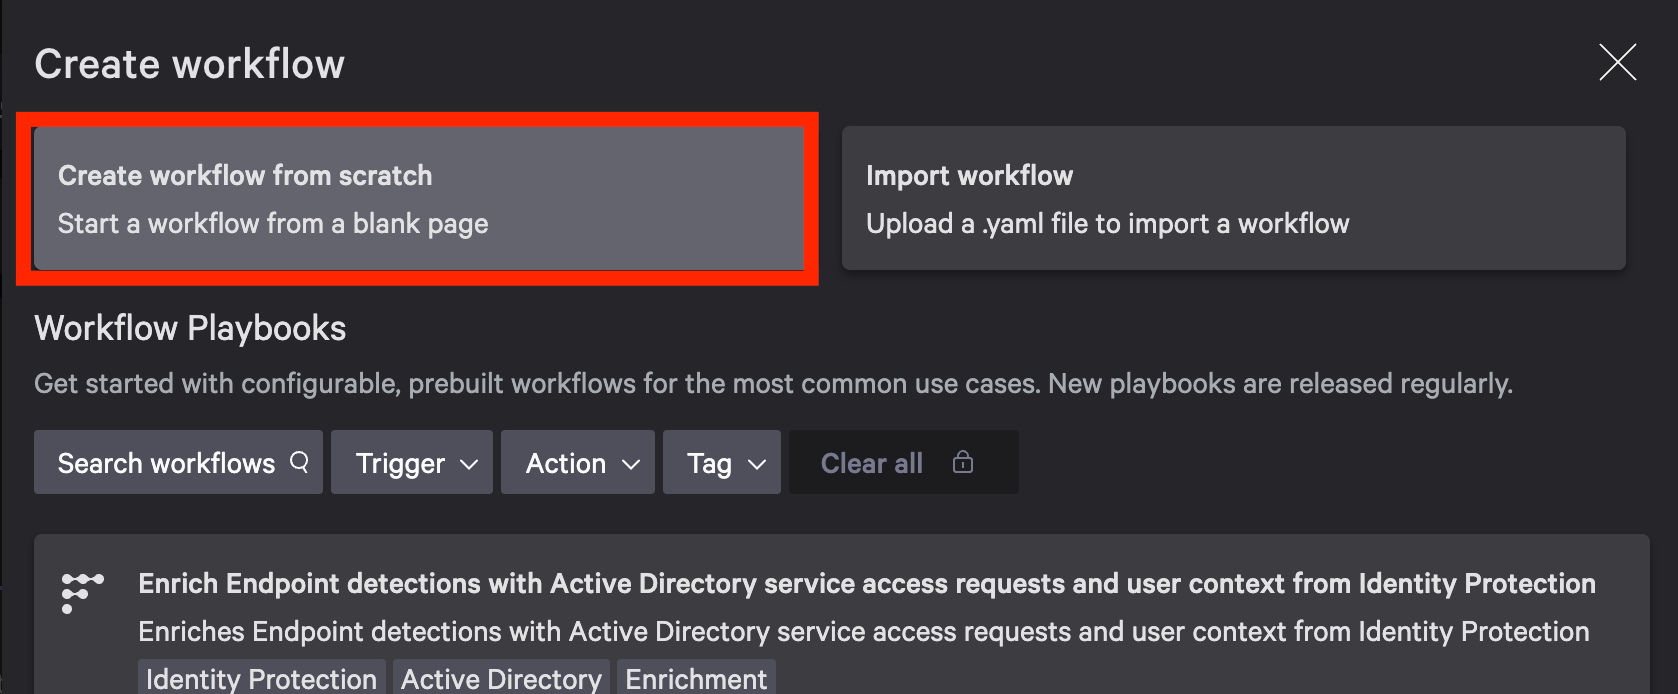
Creating Zero Trust Assessment workflow
-
In Workflow dashboard, click Create Workflow on the top right of the page
-
In popup window select Create workflow from scratch
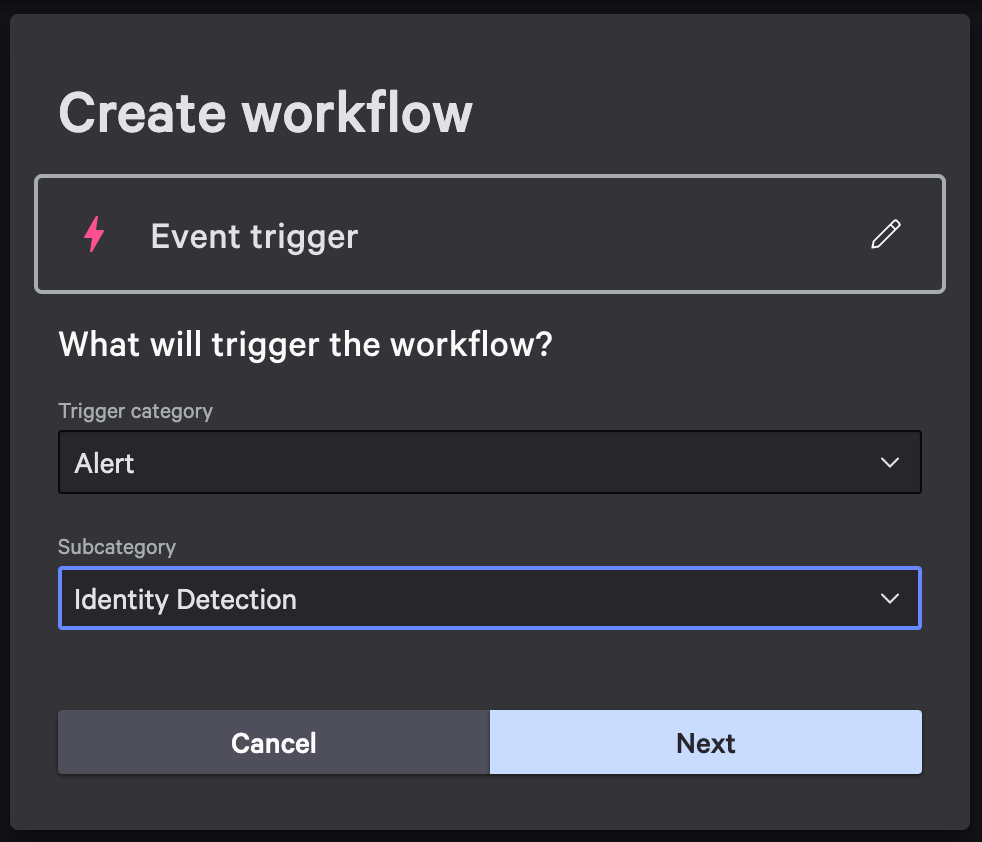
-
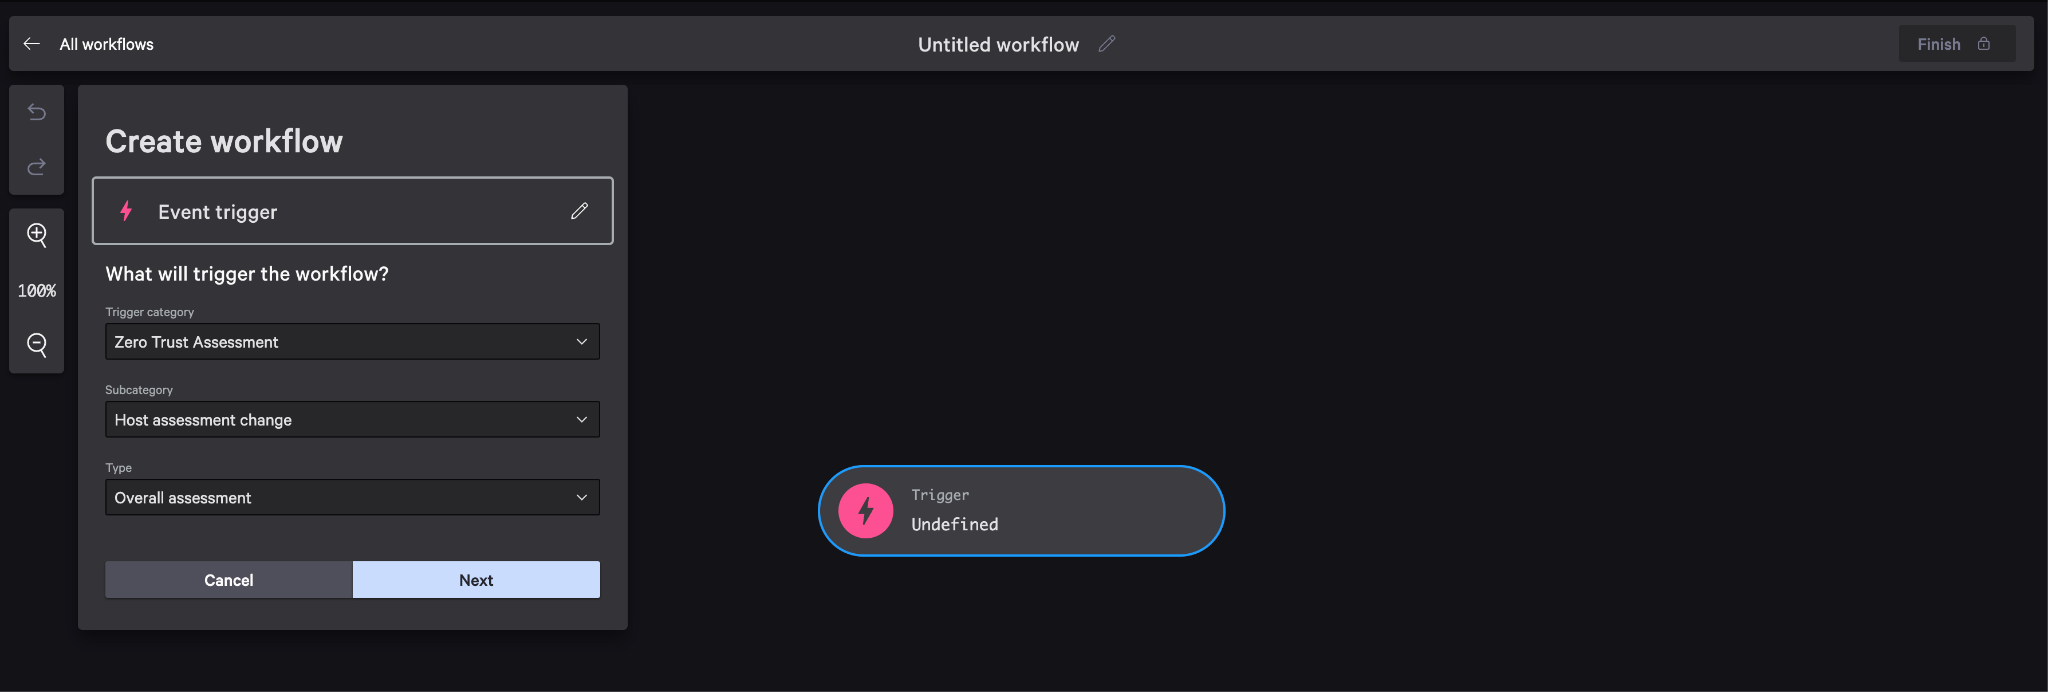
Select Event as “What will trigger the workflow?”
-
Configure Event trigger as follows then hit Next
-
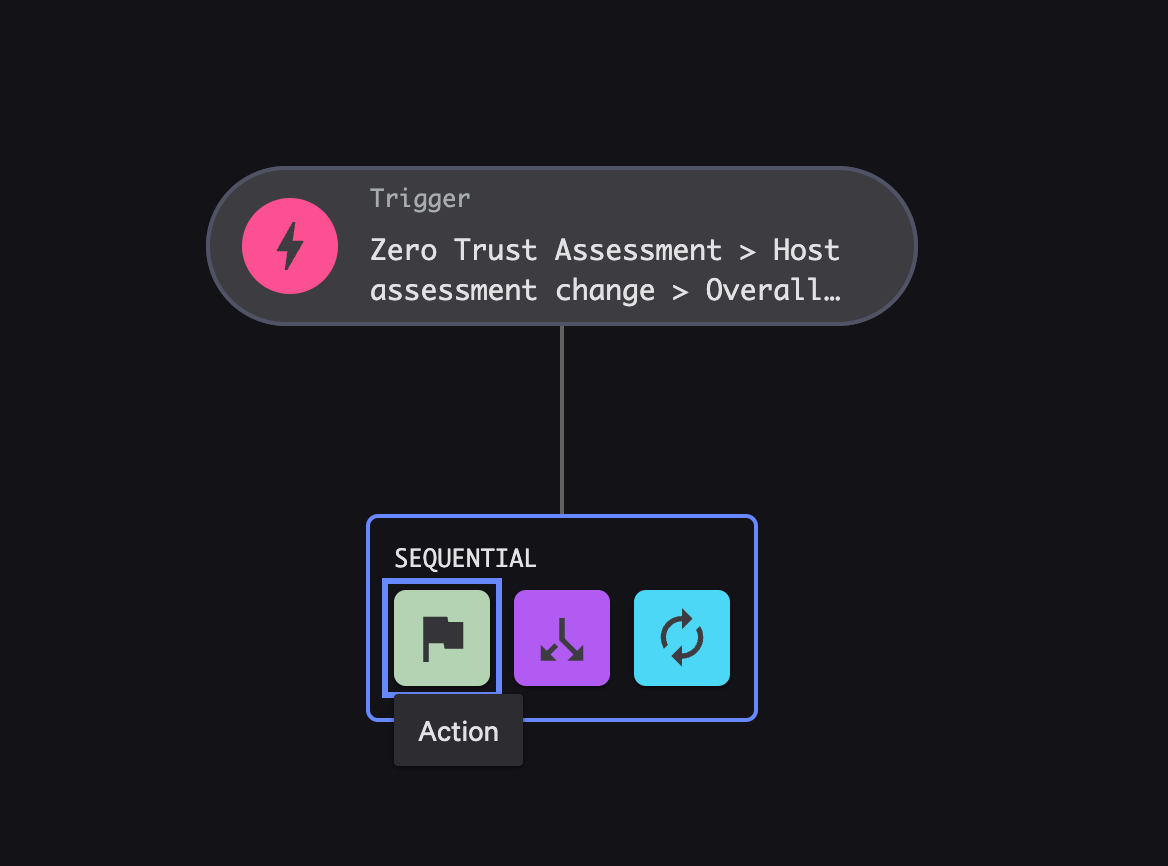
Hover over the trigger object that has been created, and an arrow will appear. Click this arrow, then choose Action as the sequential step
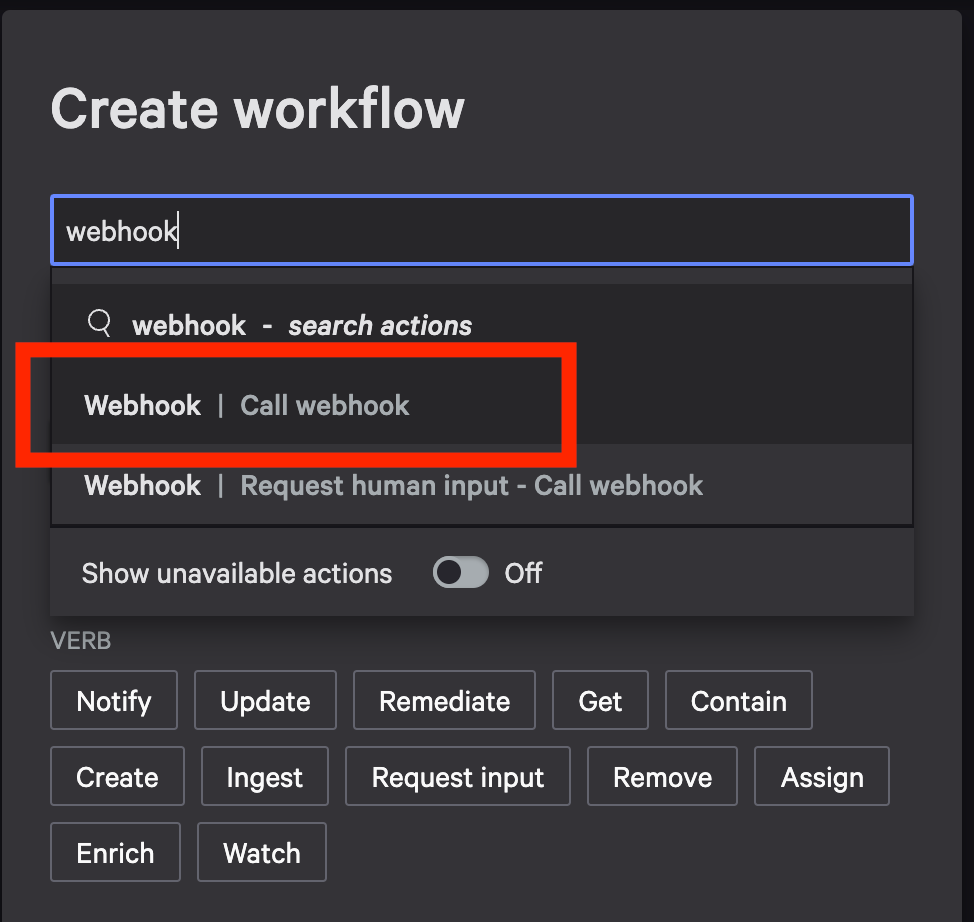
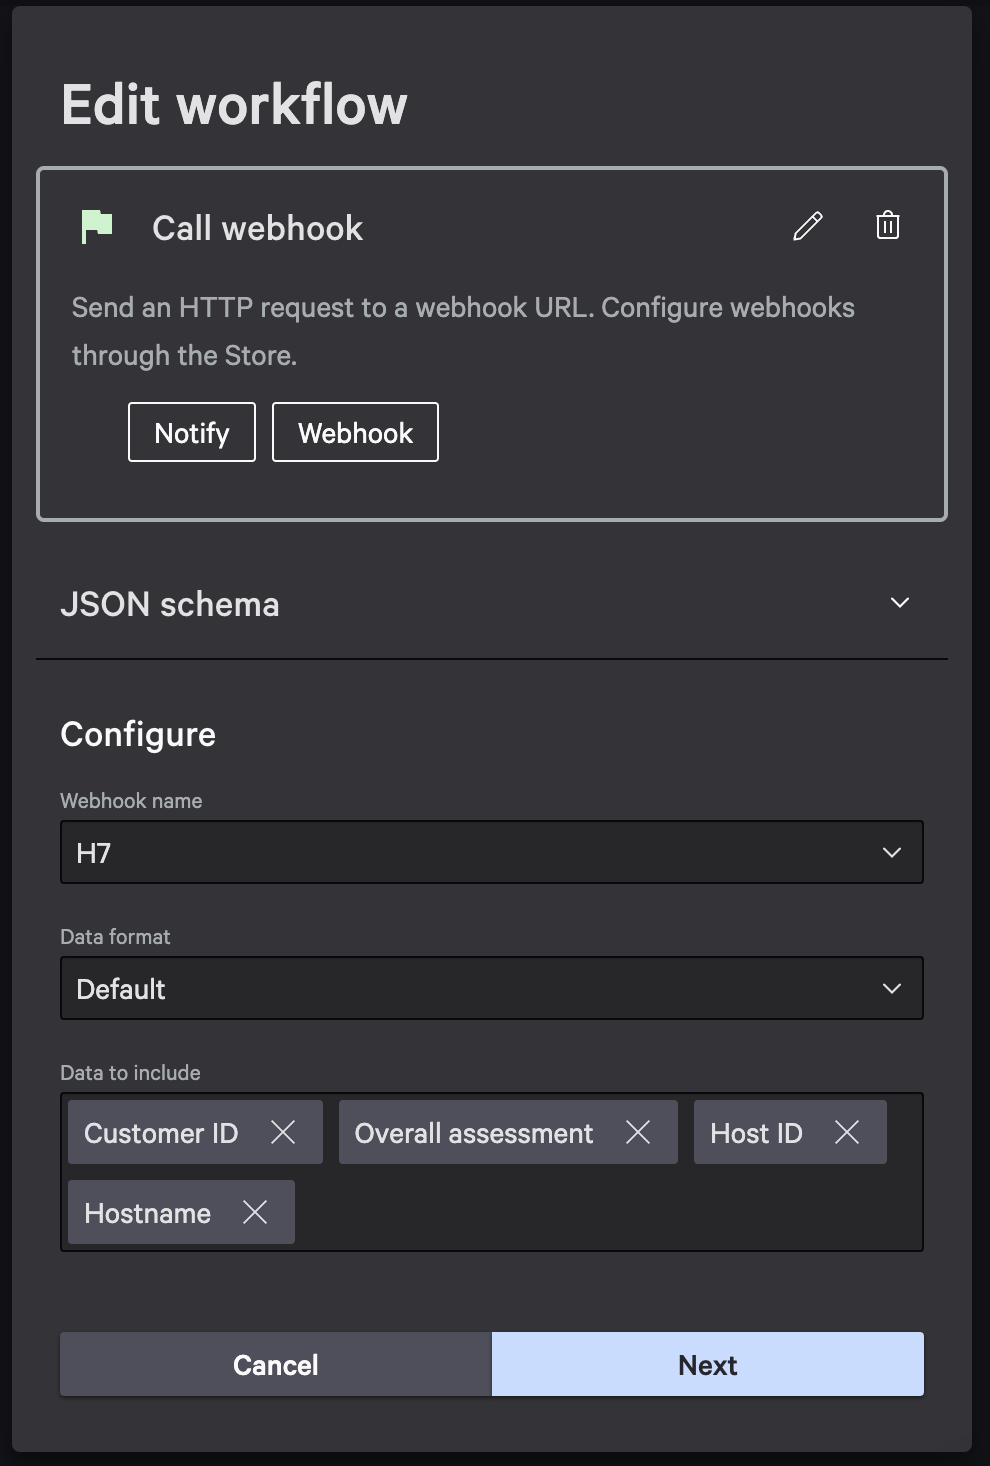
- In the new window, search webhook for workflow commands. Choose Call webhook as the action
-
Configure the Webhook call
-
Webhook name that we just created should be selected here
-
Default Data format will go into CC as JSON so that is fine as is
-
Choose data elements of the ZTA to include in payload. Add attributes specified below, other attributes can be added optionally
-
-
Hit Next, then select Finish at the top right of the page.
This will bring a final confirmation window, be sure to select ON for Workflow status, so the webhook begins sending data immediately
Creating Identity Protection workflow
-
See ZTA steps for exact details
-
Configure Event trigger as follow then hit Next
-
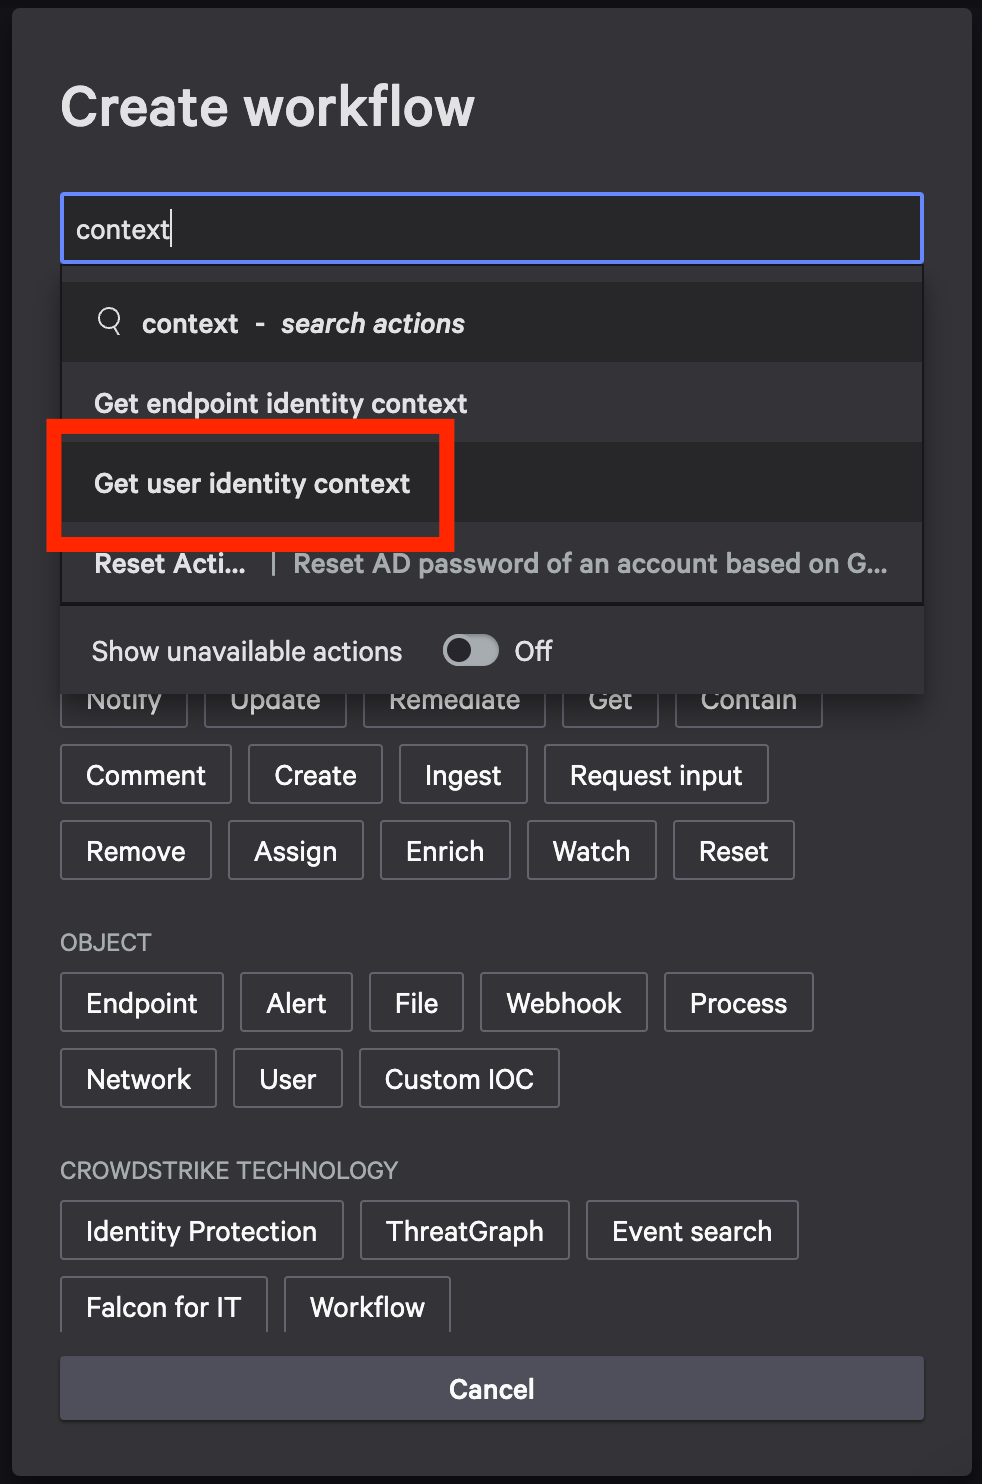
Hover over the trigger object that has been created, and an arrow will appear. Click this arrow, then choose Action as the sequential step
-
In the new window, search context for workflow commands. Choose Get user identity context as the action
-
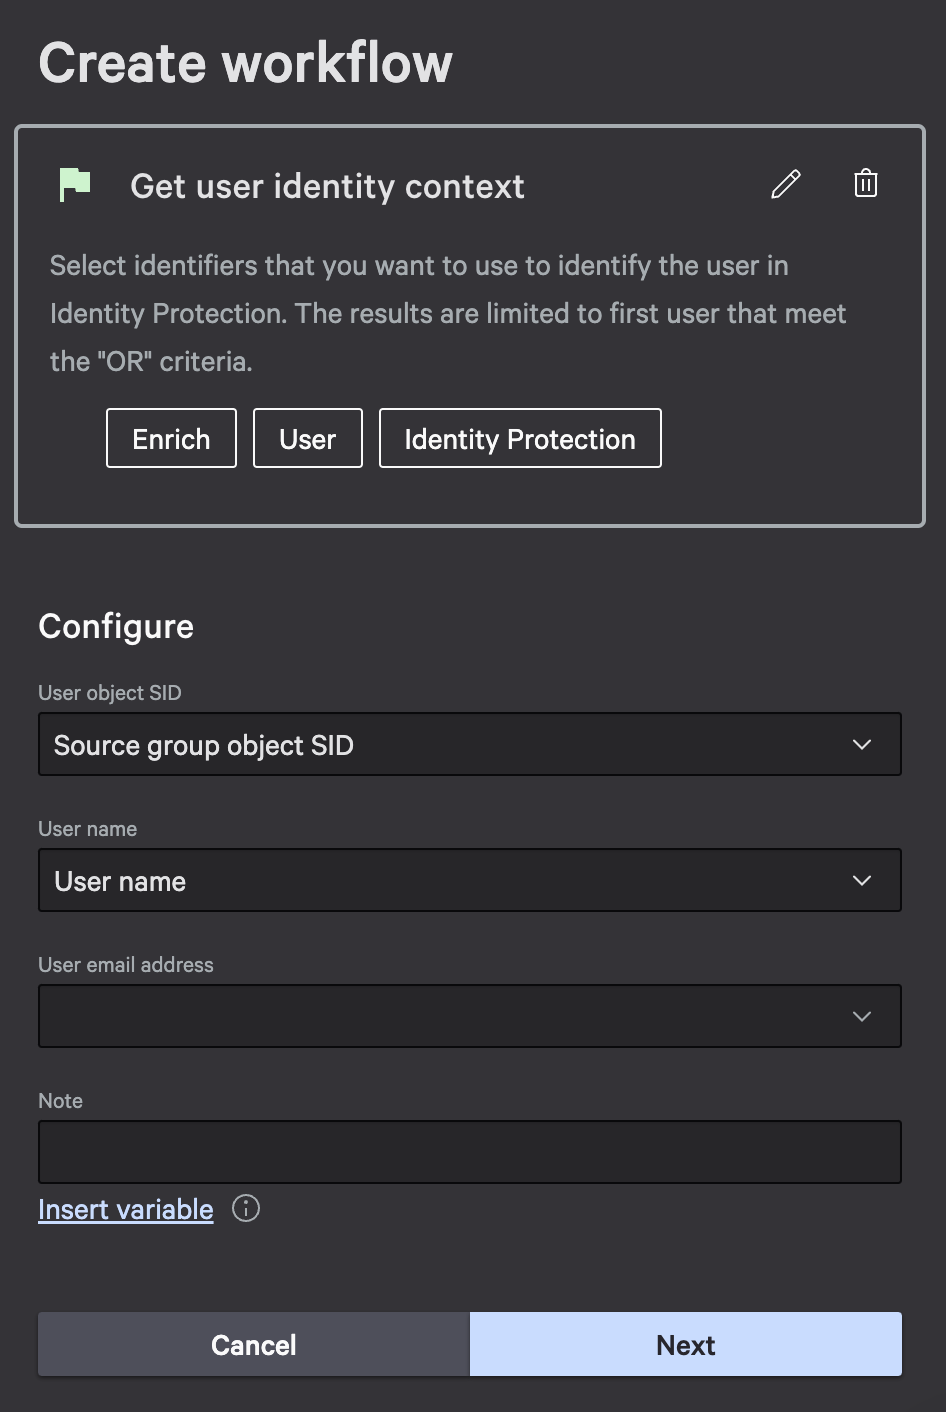
Hover over the new context action, but now select Condition as the sequential step

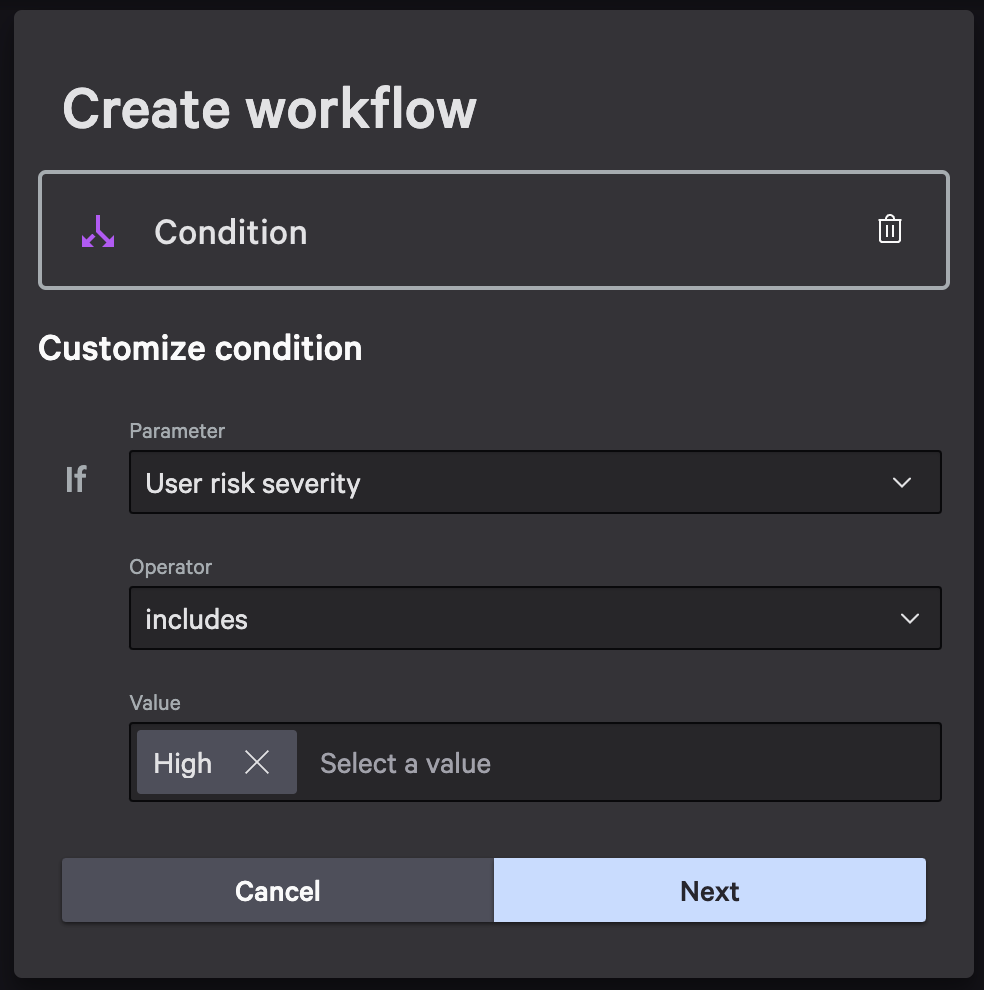
-
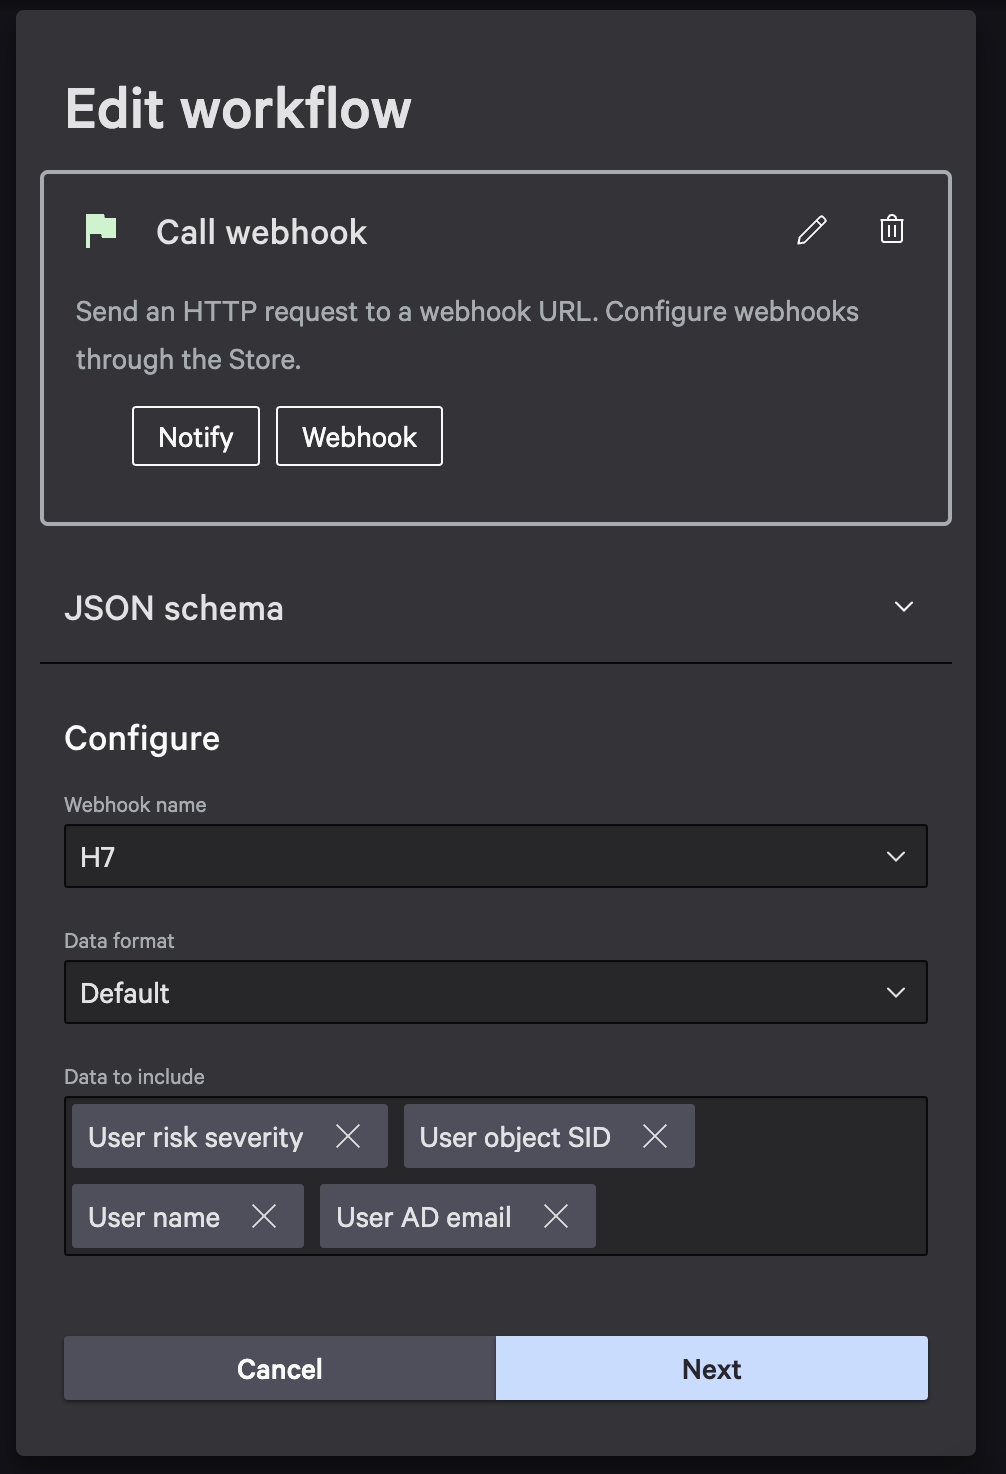
Hit Next, now from this new TRUE piece of the workflow we want to hover over that an add an Action to a user having a Risk Severity including true. This is where we will add a webhook call. See Step 6 of ZTA instructions.
-
Webhook name will be the same as the one we configured in the beginning of the doc Data to include should have all the following, plus whatever attributes desired. Select Next and Finish.
This will bring a final confirmation window, be sure to select ON for Workflow status, so the webhook begins sending data immediately
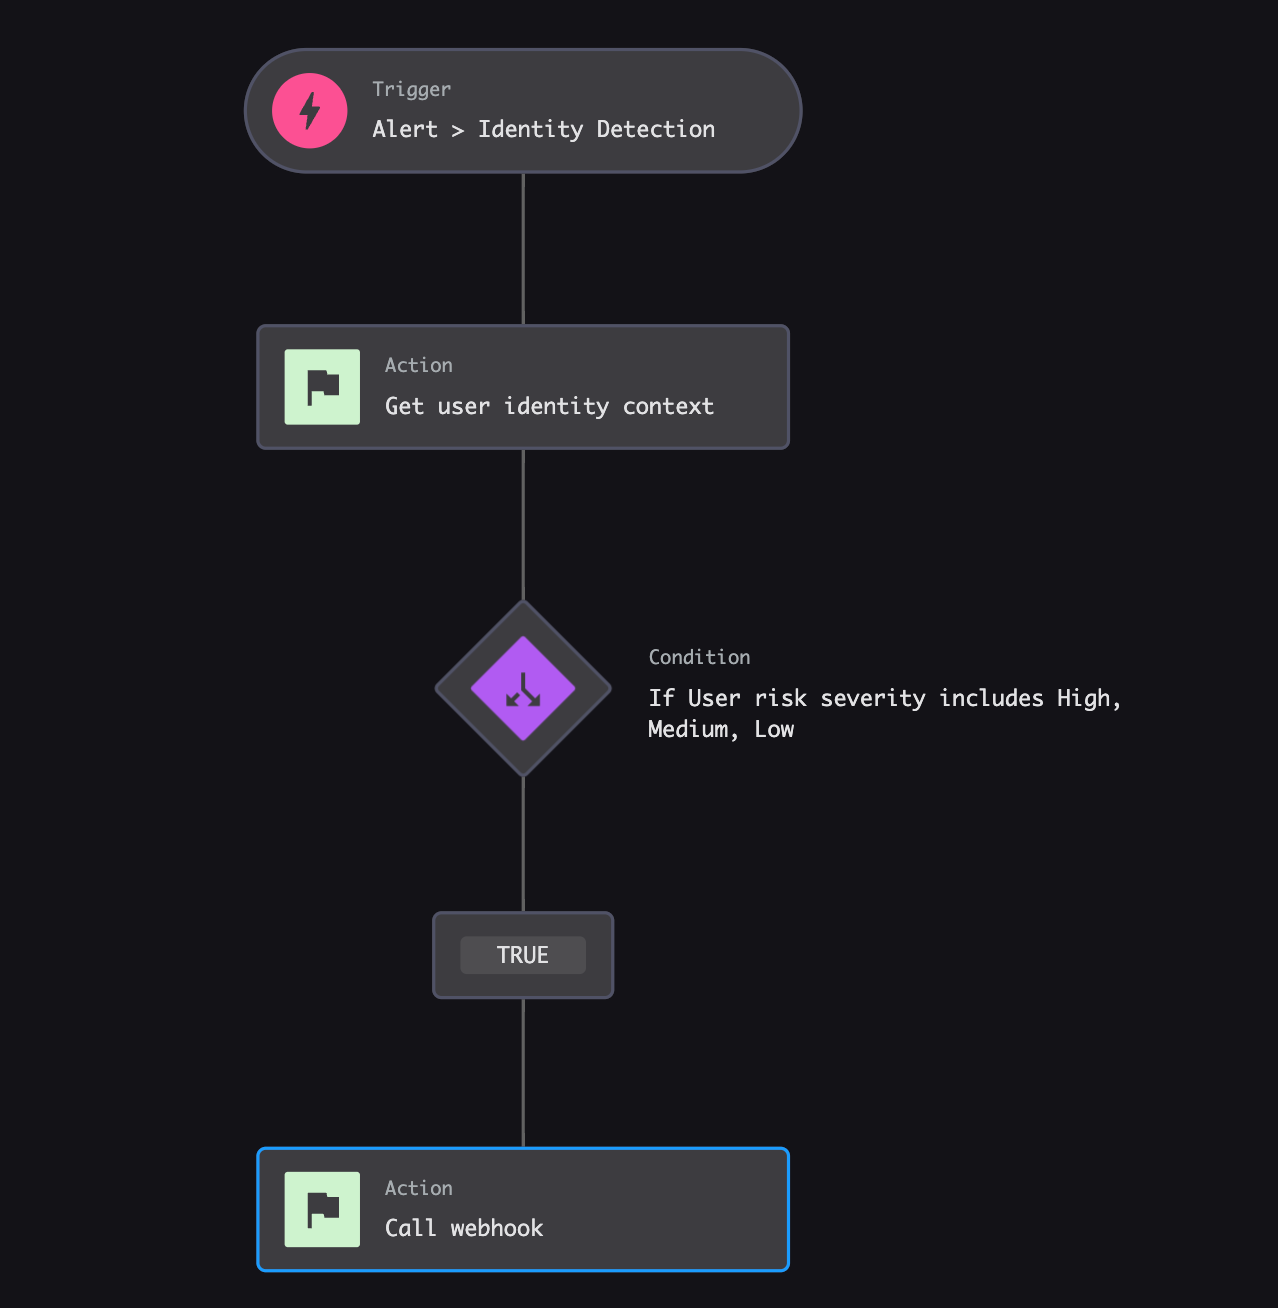
Final Results expected for Identity Protection Workflow:
API Client Configuration
We need to capture the following information from CrowdStrike and feed it into the HYPR Control Center (HYPR CC). This will allow HYPR Control Center to connect to Crowdstrike.
HYPR Control Center
-
Log into control center and go to HYPR Adapt tab.
-
Select + Risk Policy
-
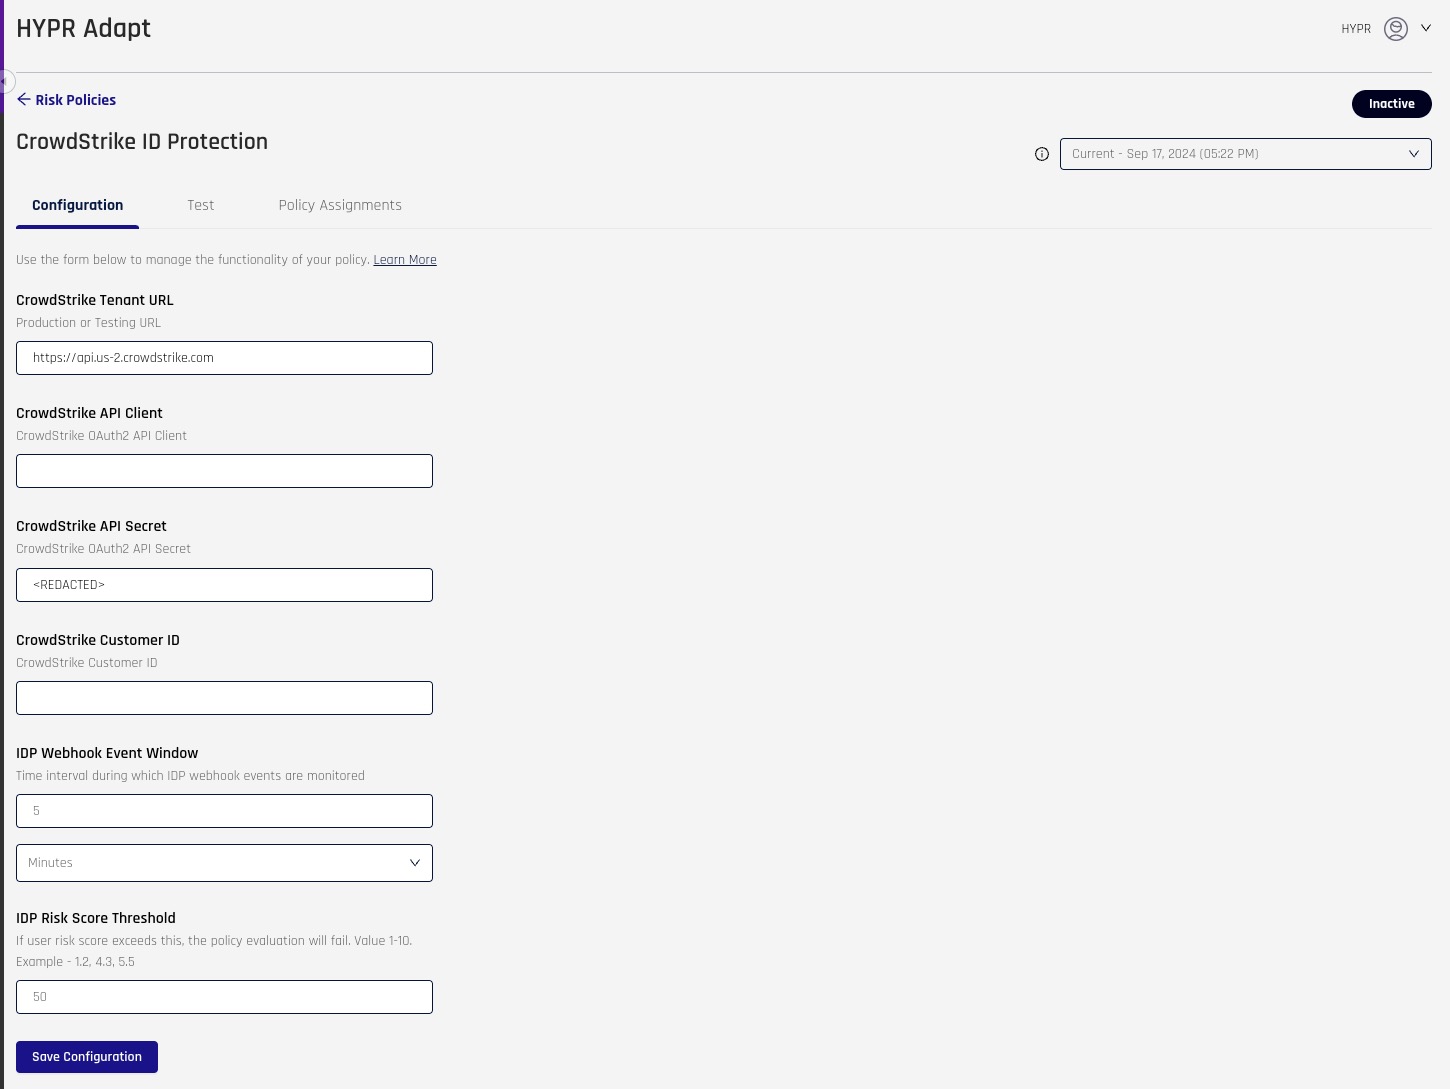
Select CrowdStrike ID Protection and select + Risk Policy.
- For CrowdStrike ZTA integration, you will use the same values you generate below from the CrowdStrike Console.
-
Select Configuration
-
Following is what is needed from CrowdStrike Console. Steps below will show you how to capture this information from CrowdStrike Console
CrowdStrike Console
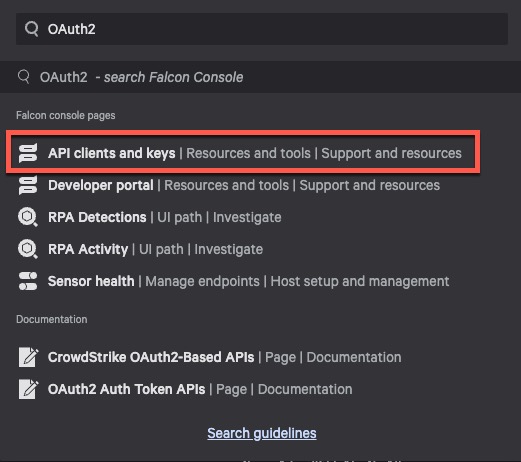
- Once Logged into CrowdStrike, Search for “OAuth2”. You should see API Clients and Keys, select that
-
On the top you should see Base URL. This should be the same for everyone if not then update it in the, “CrowdStrike Tenant URL” within HYPR CC.
-
Click on Create API Client within CrowdStrike Console

-
Name it whatever you like and apply the following permissions.
-
Identity Protection Assessment : READ
-
Identity Protection Entities: READ
-
Identity Protection GraphQL : WRITE
-
Workflow : READ & WRITE
-
Zero Trust Assessment : READ
-
-
After you select CREATE, this will give your client secret
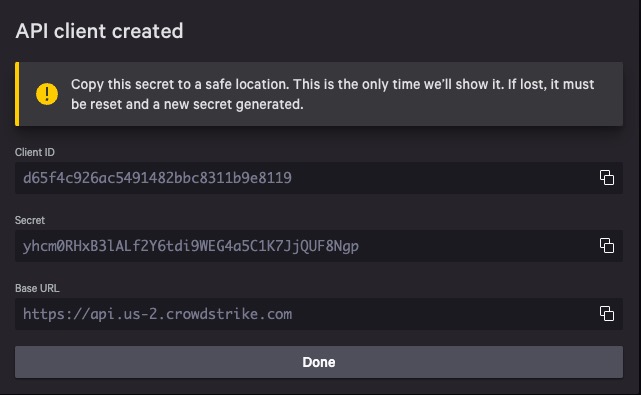
Save SECRET in a secure location as this is only displayed once
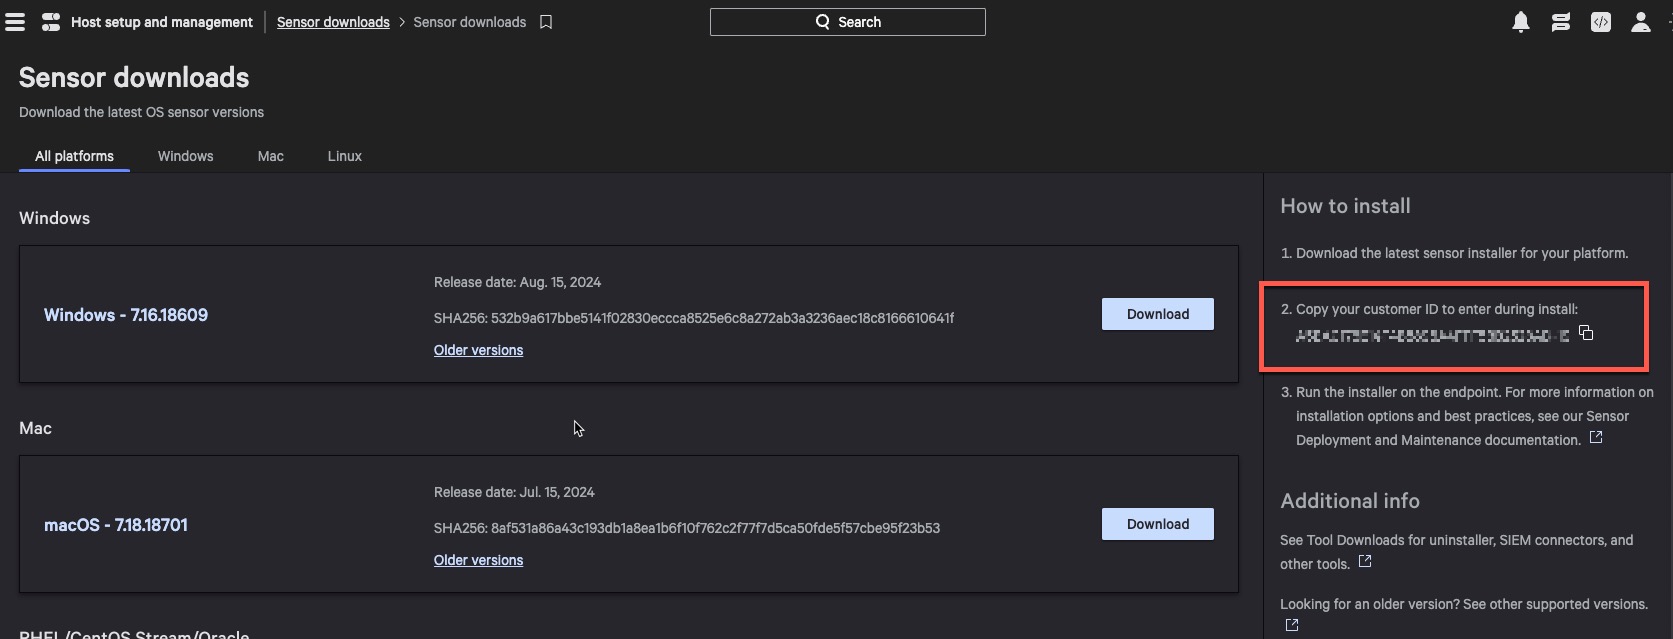
- For Customer ID, you will need to go CrowdStrike Console, Hamburger menu -> Sensor Downloads.
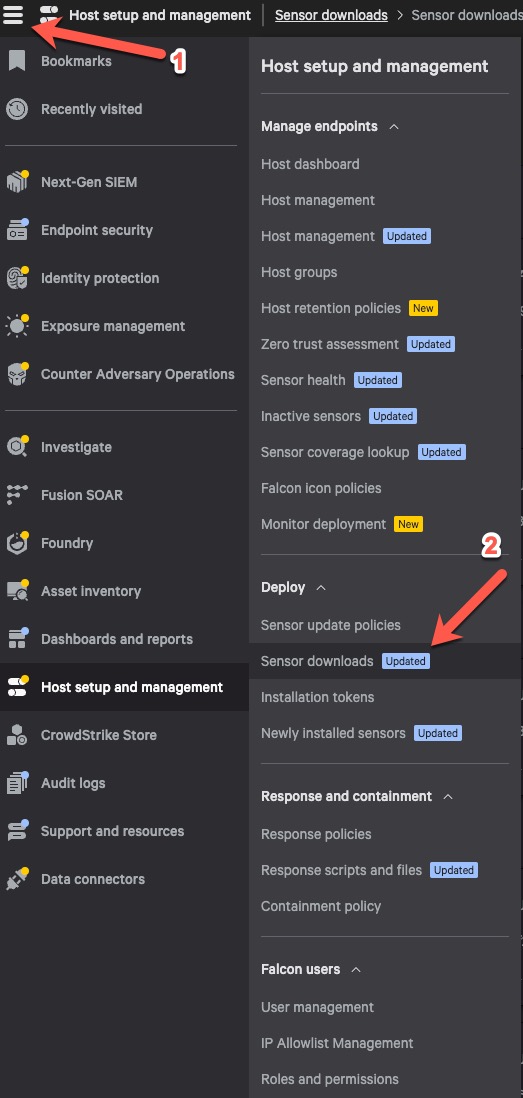
-
Within the Sensor downloads page, you will see you Customer ID on the right side.