Identity Verification and Assurance Strategies Playbook
Consideration for an Affirm Deployment
This playbook helps you plan and deploy HYPR Affirm verification flows for common enterprise use cases (onboarding, helpdesk and account recovery).

Introduction
HYPR Affirm is an automated identity verification solution designed to ensure that employees and customers are who they claim to be at all times. It provides fast, secure, and passwordless identity verification throughout the user lifecycle.
Key Features of HYPR Affirm:
-
Prevent Identity Fraud: Utilizes advanced verification technologies to detect and prevent unauthorized access.
-
Simplify and Automate Identity Verification: Streamlines the verification process, reducing administrative overhead.
-
Continuous Identity Proofing and Verification: Allows for re-verification at critical moments throughout the user lifecycle.
-
Secure and Accurate Verification Methods:
-
Document Verification: Validates official documents like passports and driver's licenses, detecting any forgeries or alterations.
-
Facial Recognition: Employs cutting-edge technology to detect spoofing tactics such as photos or masks.
-
Location Detection: Compares geolocation against expected locations while adhering to global regulations.
-
Chat and Video Verification: Combines AI and human interaction for secure verification through chat systems and live video feeds.
-
Manager Attestation: Allows supervisors to attest to an employee's identity, further strengthening security.
-
Benefits of Using HYPR Affirm:
Automated Screening: Reduce manual review requirements through automated checks
Comprehensive Monitoring: Track compliance results across all verification flows
Cost Reduction: Eliminate need for multiple vendor integrations
-
Fraud Prevention: Identify high-risk individuals before granting access.
-
Improved User Experience: Offers a fast, intuitive identity verification process that removes user friction.
-
Automated Screening: Reduce manual review requirements through automated checks.
-
Cost Reduction: Eliminate need for multiple vendor integrations
-
Comprehensive Monitoring: Track compliance results across all verification flows
-
Regulatory Compliance: Assists in meeting guidelines such as NIST IAL2 and adheres to data privacy laws like PCI DSS, GDPR, and CCPA. Also, meet KYC, AML, and OFAC requirements for financial services
-
Integration Flexibility: Integrates with various credential systems, including Windows Temporary Access Pass (TAP), and supports a Zero Trust security framework.
What will be the end result of this solution playbook?
After completing this playbook, you will have:
-
Defined specific use case(s), where Affirm solves your identity verification business needs
-
Established the source of truth for the identity verification user data. Often this is an identity provider such as Okta or Entra, which sources the user data from HR. NOTE: this step may require coordination with other departments within your organization
-
Created one or more Affirm verification workflows that implement the business logic
-
Outlined a schedule to rollout Affirm to your organization
Planning for a HYPR Affirm deployment
Generally speaking the best first step(s) for implementing and getting the most out of your investment in HYPR Affirm is to define the current business challenges you wish to address through identity verification. The next section provides a template for recording business requirements and documenting any associated questions that may need to be resolved before implementation can be accomplished.
Requirements analysis
Requirement Example
Statement: Streamline onboarding process for new hire / user
Interpretation: The current business process involves human inspection of a scanned verification document (passport, driver’s license, etc.), which is a prerequisite for creating user accounts in the IT system. The business would like to automate verification to improve security and accuracy of new hires. In addition, the user should be able to immediately register to create their primary authentication account.
| Question | Answer |
|---|---|
| What ID would you like users to enter on the “Let’s get started” screen? This is typically a username or email address, but could also be another value like employee ID. Whatever value provided will be used to lookup the user profile in the system of record. | |
| Document verification requires Affirm to retrieve First Name and Last Name from a system of record to compare with the names on the ID. What system do you want to retrieve that data from? | |
| How would you like to integrate identity verification into your existing onboarding process? | |
| How will the user’s get notified to start the IDV flow? | |
| Do you have any branding or content customization requirements? | |
| What HYPR web application do you want to want to use for creating the initial HYPR registration upon successful verification? |
General Approach for Affirm Verification Flows
Regardless of the business use case, you need to make some determinations to configure an Affirm verification flow. The below process is a good starting point:
-
Determine what ID you would like users to enter on the “Let’s get started” screen? This is typically a username or email address, but could also be another value like employee ID. Whatever value provided will be used to lookup the user profile in the system of record.
-
Decide which verification steps are needed to meet the business requirements. The more steps, the more friction is added to the user experience. More steps increases the level of assurance, but also increases the burden on the user.
- For higher‑risk flows, consider enabling Document and Biometric Verification with Document Type Restriction so that only a limited set of high‑security government‑issued documents from allowed issuing countries can be presented to the user.
-
Each verification step requires some information from the user profile from the system of record. For example, document verification requires first name and last name. For each of your verification steps, review the documentation to make sure what data is required and check to see if that data is available in your system of record.
-
If you are not using the HYPR Okta or EntraID Integrations, you will need to write a custom Javascript program to query your system of record for the user profile information. See Customizations in the product documentation for more information.
-
Determine what the outcome of the verification flow should be in the case of both successful verification and unsuccessful verification. If one of the default outcomes provided does not match your use case, then you will have to write an Outcome customization.
-
Finally, if you would like to change the text or use your own branding, you should review the HYPR features Configuring End User Screen Management and Affirm Studio and plan out the design accordingly.
Following the above procedure should cover the majority of use cases.
HYPR Affirm Overview
HYPR Affirm adopts a workflow model for identity verification. Users are given a URL and are guided through a series of steps (screens), in which users are asked to present identifying information. Configuring Affirm as an administrator involves creating a workflow by choosing which verification steps are to be included in the workflow. Once the workflow has been created, Affirm generates a URL to be given to the end user.
Verification Steps
Affirm offers the following verification steps. These steps require user profile information from the system of record (SoR) to be used as a basis for comparison.
| Name | Description | Required user data |
|---|---|---|
| Login Identifier | Initiates the HYPR Affirm identity verification process. This option will always display Required. | Login identifier must be present in the SoR. |
| Escalate to Live Chat | If this feature is toggled On and the requester fails the identity verification checks, the requester is immediately placed into a video and chat session with the approver. | SoR for the user must contain a manager identifier. If not, an approver must be explicitly configured into the flow. |
| Phone Number/Email Verification | SMS code requires the requester to enter an SMS code that is sent to a phone number or email address. | Either phone number or email address. |
| Location | A location based upon the requester's IP address will be displayed to the approver. | Full address. |
| Document and Biometric Verification | This step involves presenting a document (such as passport or driver’s license) that gets compared against the identity data from HR. It may optionally include a liveness check. If Document Type Restriction is enabled, the requester can only select and upload from a limited set of document types (for example, passport or driver’s license). | First name and last name. |
| Photo ID and Liveness Capture | Requires either upload of a valid photo ID or use of a directory-sourced anchor image (depending on configuration), followed by a real-time selfie that is compared to the reference image to verify a match. This step does not inspect identity data and only concerns image comparison to mitigate risks of deepfakes. Note: This step would normally be used instead of Document and Biometric Verification. For anchor-image (liveness-only) configuration details, see Configuring Liveness-Only Verification (Anchor Image). | None. |
| Approver Chat and Video | Opens a chat window between the approver (often a manager) and the requester. | SoR for the user must contain a manager identifier. If not, an approver must be explicitly configured into the flow. |
| Attestation | Required in order for the workflow to issue an outcome (to complete successfully). An approver must review the request before the outcome is issued. The approver is either a person or HYPR automated approval. HYPR automated approval calculates approval based on the results of the previous steps. | SoR for the user must contain a manager identifier. If not, an approver must be explicitly configured into the flow. |
| Verified Outcome | What to do after the verification succeeds. | None. |
| Unverified Outcome | What to do after the verification fails. | None. |
Details for each of these steps can be found on the HYPR documentation web site.
Pre-configured Workflows
In order to accelerate the workflow creation process, Affirm offers a number of canned workflows based on business use case and desired friction level. Pre-configured business cases are
-
Onboarding - for new hire scenarios
-
Recovery Flow - for credential recovery
-
CC Admin - for onboarding HYPR Control Center admin accounts
For each of these scenarios, you may choose a friction level. Friction in this case refers to the number of verification steps needed to complete the workflow. There are six levels of friction:
-
Highest
-
High
-
Medium
-
Low
-
Lowest
-
None (no verification steps are pre-selected)
See Appendix A for which verification steps are included in each friction level.
Application assignment
Application assignment associates an Affirm verification flow with an Identity Provider (IDP) integration previously configured in HYPR Authenticate. IDP integrations allow HYPR to be used as a passwordless authentication mechanism to the IDP. Each IDP integration has an associated application name, often referred to as relying party application (or rpAppId). Affirm uses the existing IDP application to retrieve user profile data needed as a baseline for the identity verification. If you do not already have an IDP integration with HYPR, you can create one just for this purpose (either Entra or Okta).
If you do not have an IDP or would like to use a different source, you can use the Advanced Customization to write the Javascript to retrieve user profile data from your system of record.
You will need to have an IDP integration for the following scenarios:
-
The selected Verified Outcome is Redirect to Device Manager to register a new login method
-
You are not using an Advanced Customization to retrieve identity data from an external data source
If one of those two scenarios applies, then you will select the application during the configuration of the Affirm workflow.
See HYPR Integrations for more information on creating an integration.
Advanced settings
There are two types of advanced settings in HYPR Affirm:
-
Customizations - custom code that gets executed during a workflow
-
OIDC Settings - sets up Affirm as an OIDC relying party
These advanced settings provide flexibility for business scenarios that do not fit into the out-of-the-box Affirm workflows.
Customizations
HYPR Affirm allows multiple types of customizations that override the default behavior in key parts of the verification flow. For example, if you need to pull user profile data from an external system rather than an IDP integration, then you write Javascript code to retrieve that data as part of the IDV flow.
Types of customizations are
| Customization Type | Description |
|---|---|
| User Directory | Specifies the user info source. |
| SMS Sending | Sends SMS via a custom REST call instead of HYPR's SMS service. |
| SMS Verifying | Handles the result of a verified SMS code through a custom REST call instead of HYPR's SMS service. |
| Sends emails through a custom REST call instead of HYPR's SMTP servers. | |
| Outcome API Call | Executes after the verification decision has been made at the end of the flow. |
For customizing the email templates themselves (branding edits, template revisions, version history, and custom image uploads), see Email Notification Customization.
See Customizations for more details.
OIDC Settings
OIDC settings can be used to trigger OIDC authentication for the requester or approver.
Currently, these are only assignable to a verification flow via the HYPR Affirm API.
For the requester, this will force an OIDC authentication at the specified part of the flow. It must be assigned to the verification flow, and the setting for the specific step should be enabled to trigger when the authentication should take place.
For the approver, this will force an OIDC authentication before the approver enters a verification flow to which they were invited via email or SMS.
Affirm Studio
Affirm Studio is the screen management interface for HYPR Affirm. It lets administrators design the content and messaging for each verification step by creating reusable “kits” of screen customizations (titles, descriptions, instructions, button labels and other copy) and applying those kits to one or more verification flows. Changes can be previewed before they are applied, ensuring that end-user screens follow corporate branding and communication guidelines across the entire workflow. See Configuring End User Screen Management and Affirm Studio for how to tailor the look and feel of your verification workflows.
Affirm API
HYPR Affirm offers REST APIs to integrate Identity Verification into custom web apps or other integrations. For example, a self-service password reset page could invoke an Affirm verification flow prior to displaying the password reset page, thereby minimizing phishing attempts. See HYPR API docs for more information.
Solution deployment overview
Affirm is quite simple to configure, but preparation is key to ending up with a solution that meets the business requirements.
You can use the following as a checklist to make sure you cover all the bases:
- Identify the Affirm verification flow steps that align with your business requirements
- Determine what the outcome of successful and unsuccessful flows should look like
- Ensure you have access to the HYPR Control Center
- Request HYPR deployment team to enable the relevant functionality in your HYPR Control Center (see Appendix B: Feature Flags)
- Configure your IDP integration or external data source
- Configure your verification workflow
Solution deployment use cases
This section describes some typical use cases, in which Affirm automates traditionally manual business processes with a high degree of assurance.
Onboarding New Employees
Affirm is well-suited to the new employee onboarding scenario. With remote work dominating the workforce, the days of going to the security office to present a photo ID are gone.
Once you create a verification flow with the steps needed to assure proper user identification. The use case would look like this:
-
The HR system is updated with the new employee data and automatically emails them (to their personal email address if they don’t have a corporate email yet) a link to the Affirm verification flow.
-
The user successfully completes the verification flow.
-
The hiring manager is notified that the user completed and inspects the result of the verification flow.
-
If appropriate, the manager approves the verification and the onboarding process continues as usual.
New Hire Workstation Onboarding
Imagine being able to access all of your applications on your first day of work at a new company. With the HYPR Passwordless desktop application, HYPR Mobile App with Passkeys and the Microsoft Entra ID integration, this scenario is possible. Not only that, but the user never needs to know a password.
Configuration
-
Configure the Microsoft Entra ID HYPR Enterprise Passkey integration
-
Deliver the Entra hybrid workstation to the new employee with the HYPR Passwordless client pre-installed
-
Configure an Affirm verification flow with the Redirect to Device Manager to register a new login method outcome
User experience
-
The new employee receives their corporate desktop machine and an email with a link to the Affirm verification flow.
-
After successful verification, they are presented with a registration screen where they register a passkey using the HYPR Mobile App.
-
They boot up their workstation and scan a QR code on the login screen, which logs them into their workstation using HYPR passwordless authentication using a passkey.
-
They can now access Microsoft using the same passkey and from the Entra portal they can access other corporate application via SSO
Helpdesk
Affirm includes a separate web-based application targeted for Help Desk operators. For obvious security reasons Help Desk operators are required to identify the users who call in for support. Oftentimes this includes shared secrets like a PIN or “Secret” questions and answers. The Affirm Help Desk application relieves the operators of the burden of having to validate callers via methods prone to social engineering.
Here’s a scenario where the Helpdesk application shines:
-
A user calls the Helpdesk for support, which requires the Helpdesk Operator to verify the identity of the user.
-
The Helpdesk Operator logs into the HYPR Helpdesk Application
-
The Helpdesk Operator clicks on the Verification Flows tab to see the list of configured verification flows.
Operators with the Help Desk Editor role can initialize a workflow. Users assigned the Helpdesk Viewer role can inspect workflow links, status, and results, but they cannot start a new verification.
-
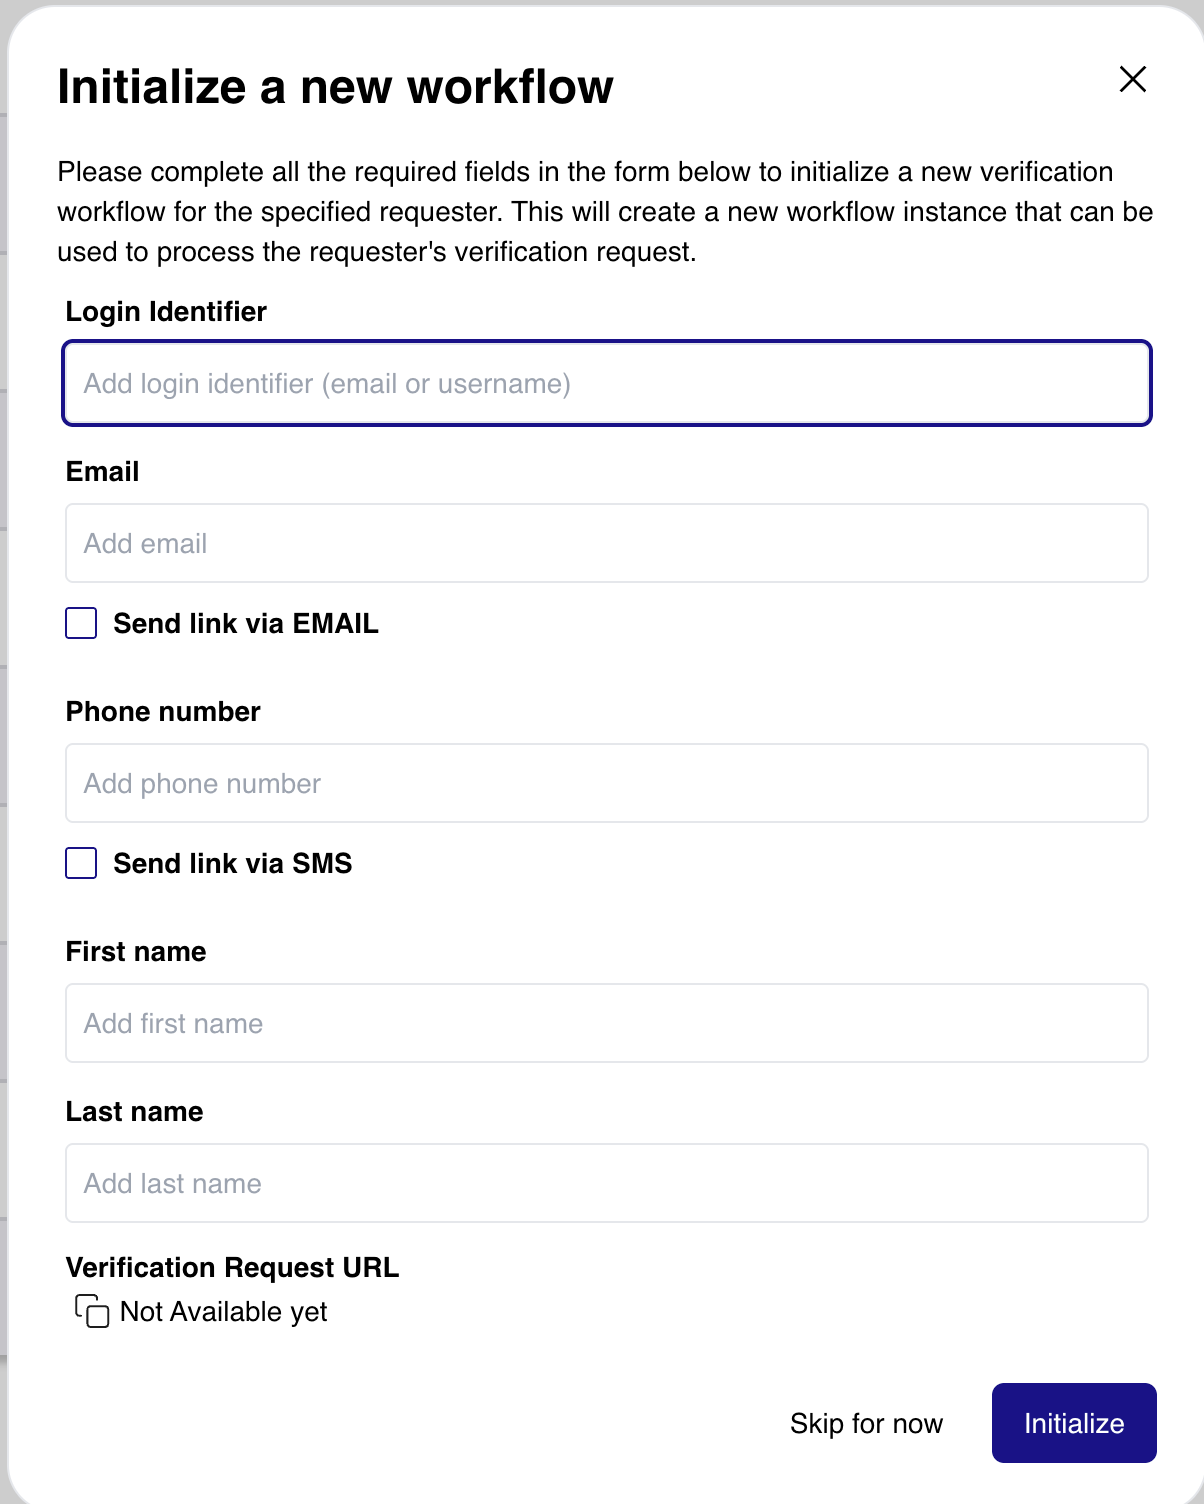
The Helpdesk Operator clicks the Initialize link to start an identity verification flow for the user.

-
The Helpdesk Operator fills in the form and clicks the Initialize button
-
The end user receives the link and executes the flow until completion, which will render either Approved or Denied.
-
The end user shares the code provided on the Approved/Denied screen of the verification flow.
-
The Helpdesk Operator clicks on the Helpdesk tab (if they are not already there), which presents a list of completed flows in reverse chronological order.
-
The Helpdesk Operator can use the search bar or just visually inspect the list to locate the flow that matches the code supplied by the user.
-
The Helpdesk Operator confirms verification:
-
If the Decision column has the green Approved status, then the user is verified.
-
If the Decision column has the orange Not Associated status, then the user did not complete the flow.
-
If the Decision column has the red Denied status, then the user failed one or more of the steps. In this case, the Details link can be clicked to determine why the user failed. At this point, the Helpdesk Operator follows a pre-determined business process for this scenario.
-
-
If the user successfully completes the verification, the Helpdesk Operator can proceed to assist the user.
Pre-requisites
Ask your HYPR representative to enable the features for using the Help Desk application. These feature flags are:
-
AFFIRM_PAID
-
AFFIRM_HELPDESK_SUPPORT
Configure authentication method
There are two methods to authenticate to the Helpdesk application:
-
Use HYPR passwordless authentication to authenticate directly to the Helpdesk application
-
Use an IDP as an OIDC provider to login to the Helpdesk application relying party
Configuring HYPR authentication
-
Login to the HYPR Control Center and switch to the Advanced Mode.

-
Create an RP application called “helpdesk” (you can name it something else if you like)
-
Switch back to Standard mode for the Control Center
-
Navigate to Affirm > Helpdesk Settings > Universal Configuration
-
Select “helpdesk” (or the name you chose) from the drop down menu

-
Navigate to Affirm > Helpdesk Users
-
Click the Add User button
When adding a user, you can assign either the “Affirm Helpdesk Viewer” or the “Help Desk Editor” role. The editor role allows the Helpdesk operator to initiate a verification with a requester, while the viewer role can inspect existing workflow links, status, and results but cannot initialize a new verification.
Configuring IDP authentication
This step involves setting up an OIDC flow between an IDP and the HYPR Helpdesk application. You will need to configure an OIDC client on your IDP. You must send an OIDC claim called “affirm_helpdesk_role”, which must be set to one of two values: AFFIRM_HELPDESK_VIEWER or AFFIRM_HELPDESK_EDITOR.
Once your OIDC client on the IDP has been configured, you can configure HYPR as the relying party.
-
Login to the HYPR Control Center and switch to the Advanced Mode.
-
Create an RP application called “helpdesk” (you can name it something else if you like)
-
Select the “helpdesk” RP app from the drop-down
-
Navigate to ADVANCED CONFIG > IDP Management
-
Fill in the form with the OIDC URLs
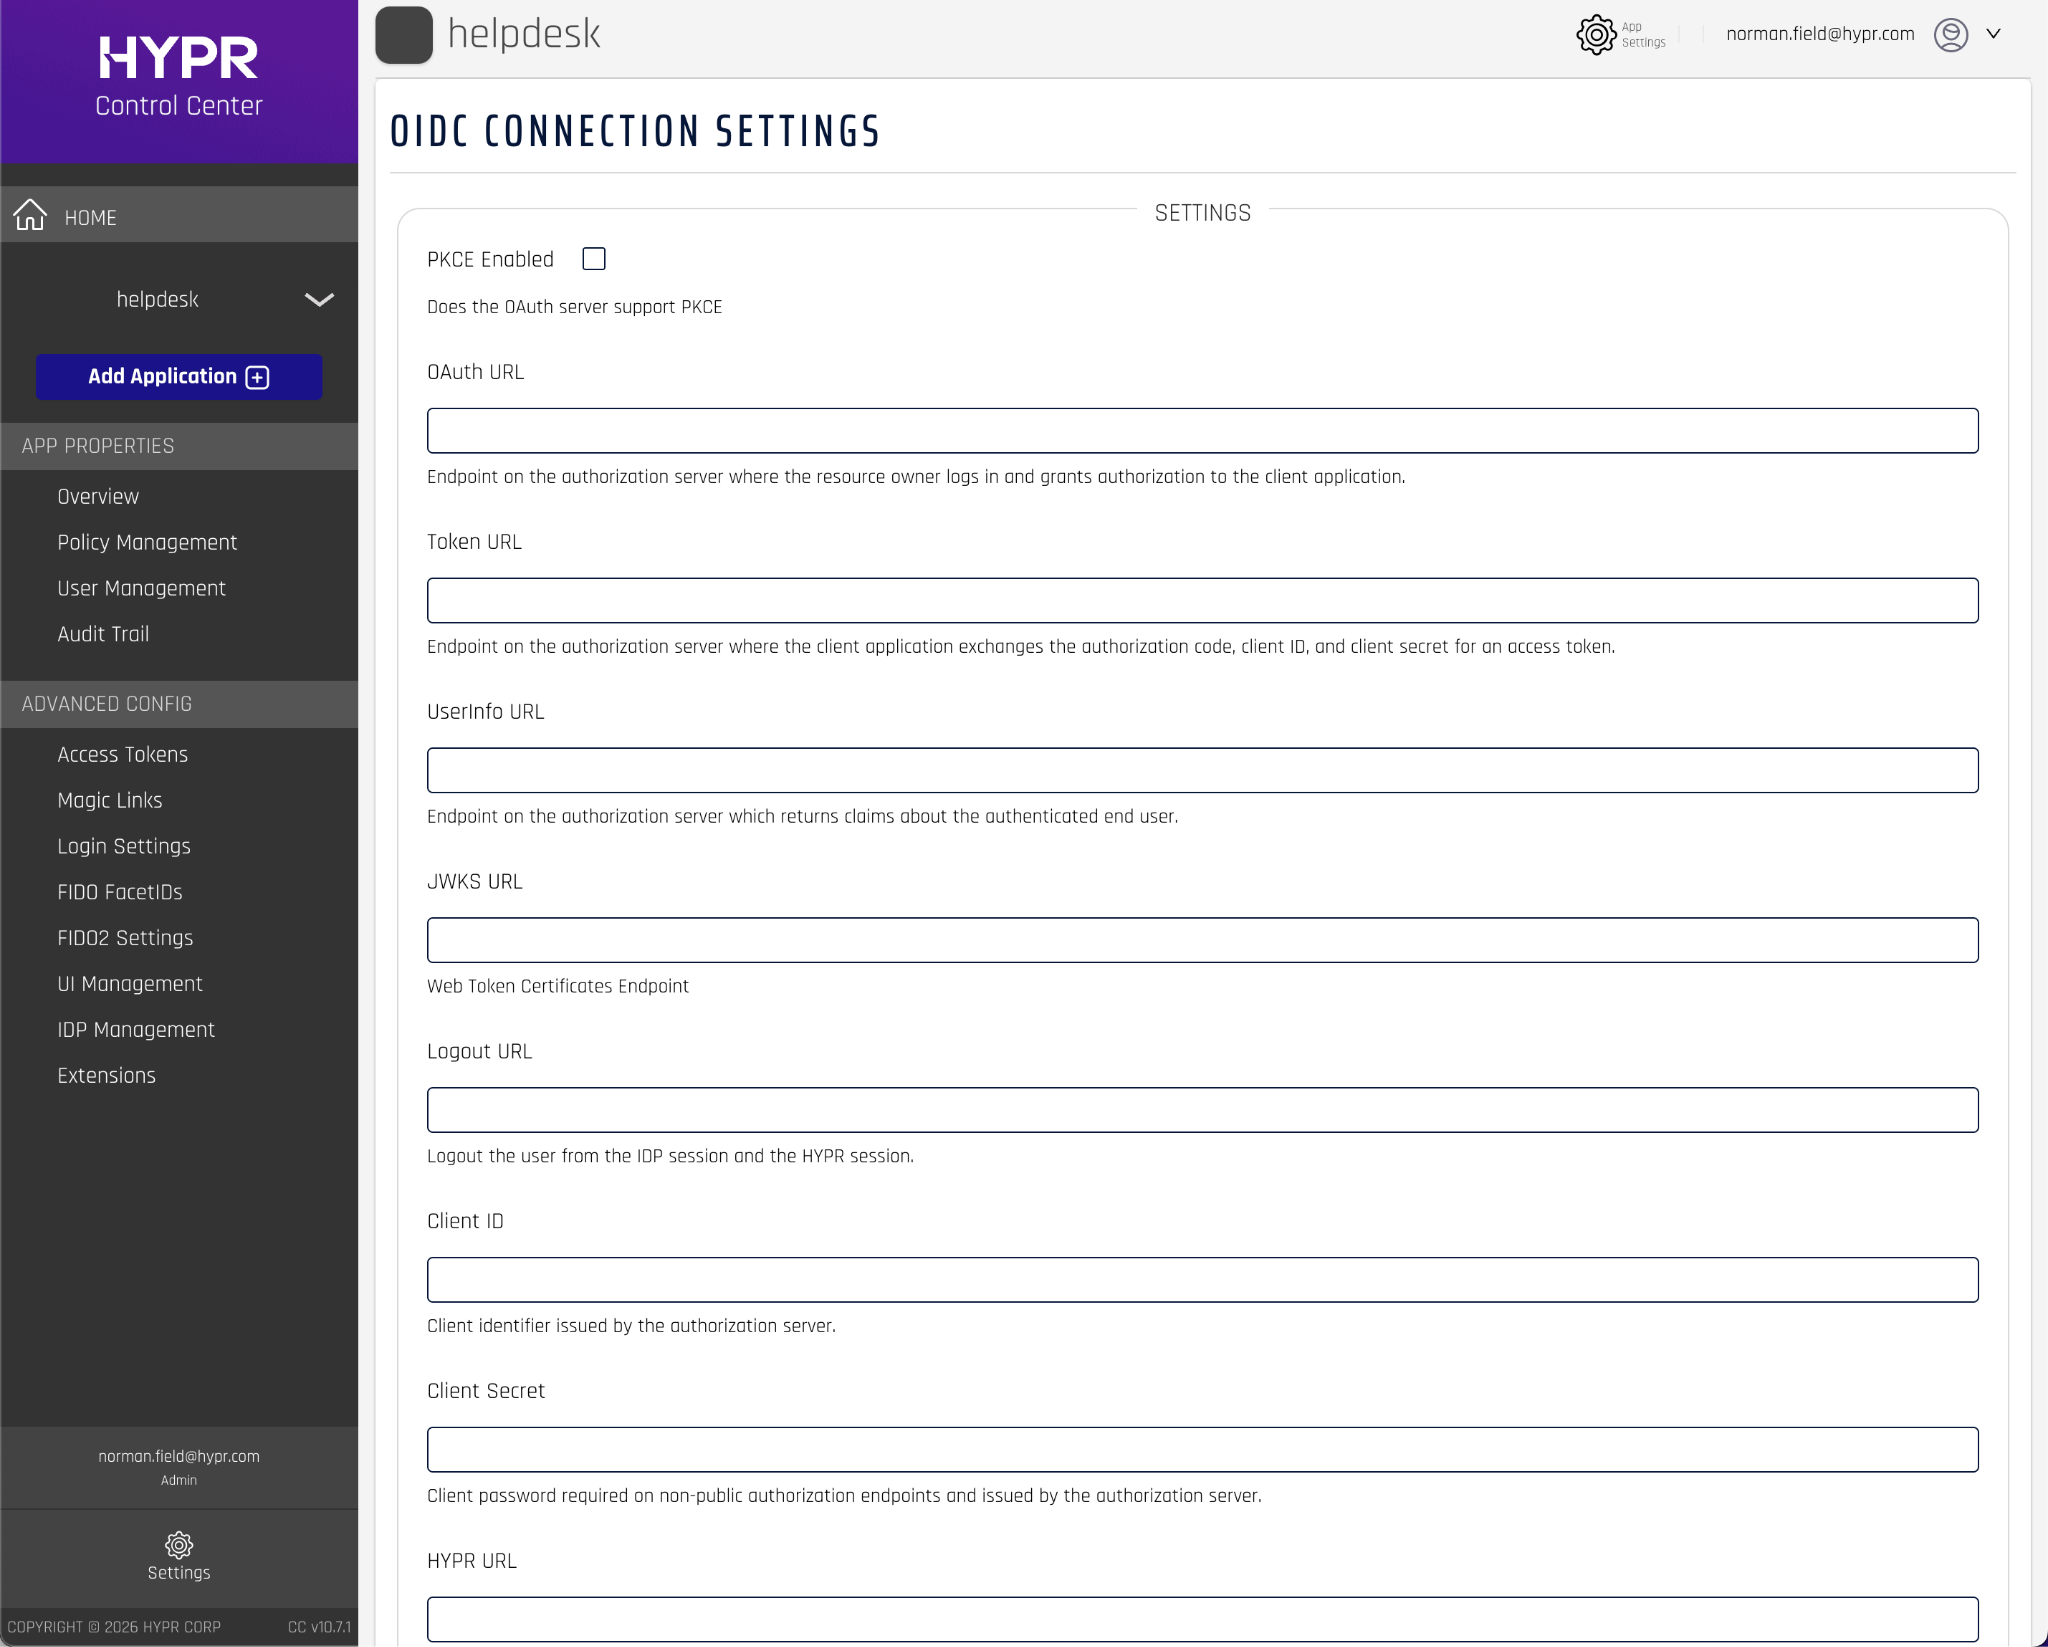
NOTE: the HYPR URL field is https://<my tenant>.hypr.com
Accessing the Helpdesk application
Once the feature has been enabled you can access the Affirm Helpdesk application via the URL
https://<my tenant>.hypr.com/cc/ui/idv/support/helpdesk
See HYPR Affirm Help Desk Support for more details.
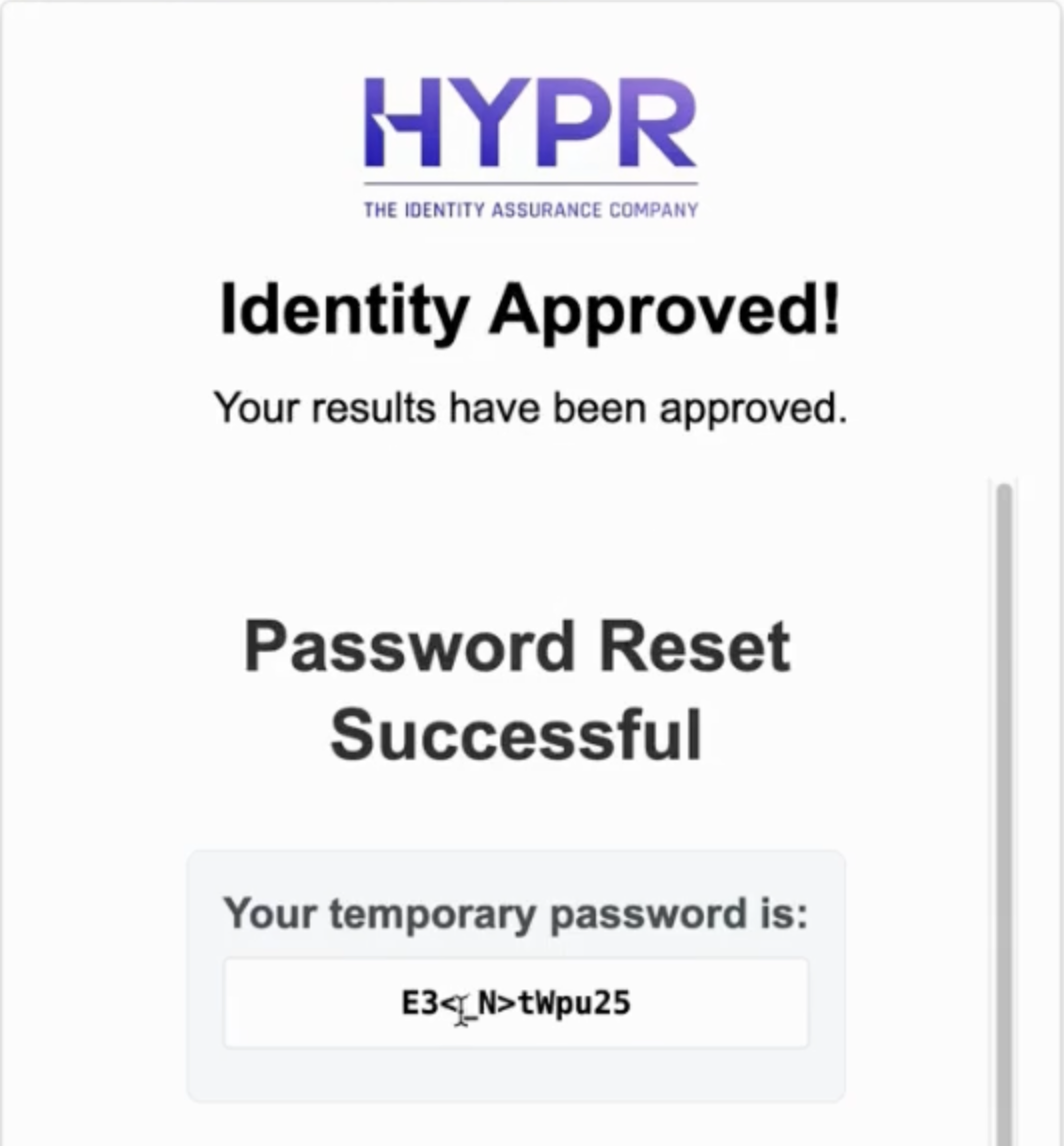
Password Reset
One of the most common Helpdesk calls involves a user who has lost or forgotten their password. While the Affirm Helpdesk application can address this use case, the scenario can be refined even further to eliminate the Helpdesk altogether.
The idea is to replace the typical “Forgot password?” link with an Affirm verification link.
Configuration
-
Create an Affirm verification flow with the steps needed to assure proper user identification
-
Create an Outcome customization that makes API calls to your user directory or IDP to reset the user password. The Outcome customization is Javascript code that gets executed after the verification flow completes.
-
Display the new password to the user when they successfully verify their identity
Tips and Tricks
IDV failure modes
documentation.onfido.com guide: document report breakdown descriptions
"breakdown": {
  "data_comparison": {
    "result": "consider",
    "breakdown": {
      "first_name": "consider",
      "last_name": "consider"
    }
  },
  "data_validation": {
    "result": "consider",
    "breakdown": {
      "gender": "clear",
      "date_of_birth": "clear",
      "document_numbers": "clear",
      "document_expiration": "consider",
      "expiry_date": "clear",
      "mrz": "",
      "barcode": "consider"
    }
  },
  "image_integrity": {
    "result": "clear",
    "breakdown": {
      "image_quality": "clear",
      "supported_document": "clear",
      "colour_picture": "clear",
      "conclusive_document_quality": "clear"
    }
  },
  "visual_authenticity": {
    "result": "consider",
    "breakdown": {
      "fonts": "clear",
      "picture_face_integrity": "clear",
      "template": "clear",
      "security_features": "consider",
      "original_document_present": "consider",
      "digital_tampering": "clear",
      "other": "clear",
      "face_detection": "clear"
    }
  },
  "data_consistency": {
    "result": "consider",
    "breakdown": {
      "date_of_expiry": "",
      "document_numbers": "consider",
      "issuing_country": "",
      "document_type": "",
      "date_of_birth": "consider",
      "gender": "",
      "first_name": "consider",
      "nationality": "",
      "last_name": "consider",
      "multiple_data_sources_present": "clear"
    }
  },
  "police_record": {
    "result": "",
    "breakdown": {}
  },
  "compromised_document": {
    "result": "clear",
    "breakdown": {}
  },
  "age_validation": {
    "result": "clear",
    "breakdown": {
      "minimum_accepted_age": "clear"
    }
  },
  "issuing_authority": {
    "result": "",
    "breakdown": {
      "nfc_active_authentication": "",
      "nfc_passive_authentication": ""
    }
  }
}
Adding a Custom User Directory Source
HYPR Affirm verifies user attributes such as email, phone number and address from a directory source. Affirm Advanced Settings offer the ability to add custom Javascript code to pull user data from external sources. HYPR has already created customizations for popular systems such as:
-
Okta
-
Microsoft Entra ID
-
Workday
-
Savyint
-
Everbridge
-
and more
Please contact your account manager to obtain code for these integrations.
Test Cases
HYPR documentation provides example test cases for validating an Affirm deployment.
Analytics Dashboard
The HYPR Control Center provides an Analytics Dashboard for seeing trends in user verifications. The dashboard allows you to drill down into detailed events to inspect the status of individual user verifications. See HYPR Documentation for more information.
Activity Log
The Affirm Activity Log provides a high-level overview of recent verification flows and their results. This is useful for troubleshooting when a user reports an issue during the verification process.
Appendix A: Friction Levels
Friction levels offer pre-configured verification steps based on how much friction you are willing to present to the user. The higher the friction level, the higher the assurance level.
Highest Friction
Includes the highest level of verification steps.
Verification steps
- Phone Number Verification: ENABLED
- SMS Code: ENABLED
- Location: ENABLED
- Identity Verification: ENABLED
- Document Authentication: ENABLED
- Liveness Check: ENABLED
- Name Checking: ENABLED
- Photo ID and Liveness Capture: DISABLED
- Approver Chat and Video: ENABLED
- Attestation: ENABLED
Approver assignments
- Manager Assigned
High Friction
Includes multiple verification steps.
Verification steps
- Phone Number Verification: ENABLED
- SMS Code: ENABLED
- Location: ENABLED
- Identity Verification: DISABLED
- Document Authentication: DISABLED
- Liveness Check: DISABLED
- Name Checking: DISABLED
- Photo ID and Liveness Capture: ENABLED
- Approver Chat and Video: ENABLED
- Attestation: ENABLED
Approver assignments
- Manager Assigned
Medium Friction
Includes a balanced number of verification steps.
Verification steps
- Phone Number Verification: ENABLED
- SMS Code: ENABLED
- Location: ENABLED
- Identity Verification: ENABLED
- Document Authentication: ENABLED
- Liveness Check: ENABLED
- Name Checking: ENABLED
- Photo ID and Liveness Capture: DISABLED
- Approver Chat and Video: DISABLED
- Attestation: DISABLED
Approver assignments
- HYPR Automated Approver Assigned
Low Friction
Involves minimal verification steps.
Verification steps
- Phone Number Verification: ENABLED
- SMS Code: ENABLED
- Location: ENABLED
- Identity Verification: DISABLED
- Document Authentication: DISABLED
- Liveness Check: DISABLED
- Name Checking: DISABLED
- Photo ID and Liveness Capture: ENABLED
- Approver Chat and Video: DISABLED
- Attestation: DISABLED
Approver assignments
- HYPR Automated Approver Assigned
Lowest Friction
Designed for maximum ease.
Verification steps
- Phone Number Verification: ENABLED
- SMS Code: ENABLED
- Location: ENABLED
- Identity Verification: DISABLED
- Document Authentication: DISABLED
- Liveness Check: DISABLED
- Name Checking: DISABLED
- Photo ID and Liveness Capture: DISABLED
- Approver Chat and Video: DISABLED
- Attestation: DISABLED
Approver assignments
- HYPR Automated Approver Assigned
Appendix B: Affirm Feature Flags
| Feature Flags (set by HYPR deployment team) | |
|---|---|
| Name | Description |
| AFFIRM_PAID | (Required) Enables core Affirm functionality |
| AFFIRM_CC_ADMIN_ONBOARDING | (Optional) Enable the CC Admin workflow Type |
| ENABLE_AFFIRM_CITRIX_OPTIMIZATION | (Optional) Enables Affirm Citrix media redirection optimization |
| AFFIRM_AWS_PINPOINT_SMS_V2_API | (Optional) Moves Affirm from using the v1 Pinpoint SMS APIs to the v2 End User Messaging SMS APIs. This is required for supporting sending SMS messages to international users |
| AFFIRM_HELPDESK_SUPPORT | (Optional) Enables the possibility to allow for helpdesk access & configure helpdesk code to be shown to requestor affirming |
| AFFIRM_WATCHLIST_STANDARD_ENABLED | (Optional) Allows the watchlist standard checks options to be used depending on Affirm configurations a CC admin is eligible to do |