Advanced Setup
This page covers the platform-level wiring HYPR Affirm depends on — the identity-provider integration prerequisites, the user-directory attributes each verification step reads, and the Entra application strategy decisions that affect every Affirm deployment.
For per-workflow configuration (steps, retries, approvers, outcomes, customizations), see Configuring HYPR Affirm. For an end-to-end first-run tutorial, see Get Started.
At least one Okta or Entra ID integration must be enabled on the tenant. See Integrations for setup instructions.
If no qualifying integration is configured, HYPR Affirm displays a No Integrations Configured dialog the first time you click into the Affirm tab — see No Integrations Configured below.
Identity-provider attribute requirements
HYPR Affirm reads user attributes from the configured Okta or Entra ID integration during a verification flow. The set of attributes required depends on which verification steps the workflow uses — only a small core of attributes is required for every flow; the rest become required when the steps that read them are enabled.
Always required
These attributes must be populated on every target user, regardless of workflow configuration:
| Attribute | Entra ID field | Okta field |
|---|---|---|
| Username | UPN | Username |
If the username attribute is missing for a user, that user cannot be the requester in any Affirm verification flow.
Required by step
These attributes are required only when the corresponding verification step is enabled in the workflow:
| Attribute | Required when this step is enabled | Notes |
|---|---|---|
| Email Address | Phone Number / Email Verification, and approver-invitation flows | Used for email OTP delivery and approver-invitation emails. Entra ID: Mail / EmailAddress. Okta: Email. |
| Mobile Phone Number | Phone Number / Email Verification | Used for SMS OTP delivery |
| First Name, Last Name | Document and Biometric Verification | Used for name-comparison against the document |
Manager (manager link / ManagerId) | Approver type is Manager | Entra ID: Manager field. Okta: ManagerId field |
| Street Address | Location step | |
| City | Location step | |
| State | Location step | |
| Postal Code | Location step | Called Zip code in Okta |
| Country Code | Location step |
Before exposing Affirm to a user population, confirm the target users have the attributes required by the workflows they'll be subject to. If a workflow's verification step references an attribute that isn't populated, the step fails at runtime — usually escalating the verification or denying it depending on the configured failure outcome.
EPK app reuse vs. purpose-built Affirm app
When HYPR Enterprise Passkey (EPK) is deployed for authentication, HYPR Affirm can reuse the existing Entra application from that integration to retrieve user profile data. This is convenient — no additional app registration is required — but the EPK app carries Entra permissions (group management, FIDO2 credential management, directory read) that exceed what Affirm alone requires under a least-privilege model.
Keep EPK reuse when:
- EPK is the production authentication method on the tenant
- No regulatory or organizational policy requires per-product app separation
The EPK app's broader permissions are already justified by the EPK authentication use case, and Affirm is simply leveraging the same identity surface.
Create a separate, minimal-permission Affirm app when:
- EPK is not deployed for authentication — there is no existing app to reuse
- A regulatory or organizational policy requires per-product app registrations
- A security review wants the smallest possible permission set per consuming application
For the recommended minimal permission set when Affirm runs without EPK, see Entra ID Application Setup — App Registration Patterns.
No Integrations Configured
When HYPR Affirm cannot find a qualifying Okta or Entra ID integration on the tenant, it blocks workflow operations and displays the No Integrations Configured dialog the first time you enter the Affirm tab:
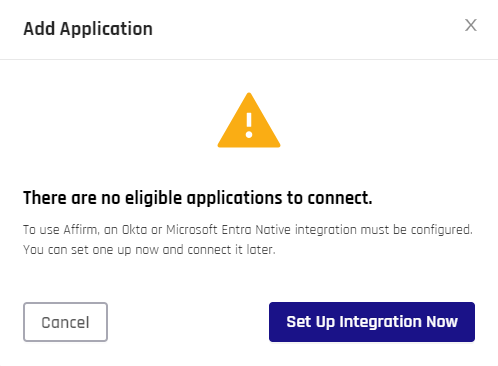
The dialog appears on any attempt to enter Affirm workflow management — viewing the workflow list, opening a workflow, or making a configuration change. It has two actions:
- Set Up Integration Now — opens the Control Center Standard: Integrations options so you can configure an Okta or Entra ID integration
- Cancel — returns to the HYPR Affirm landing tab, where you can read documentation but cannot make changes
After the integration is created, Affirm picks it up automatically — no separate "attach integration to Affirm" step is needed. If the dialog persists after the integration is configured, contact your HYPR representative.
Related
- Integrations — set up the Okta or Entra ID integration Affirm reads from
- Feature Flags Reference — canonical list of Affirm tenant-enablement flags
- Entra ID Application Setup — Entra app permissions for Affirm outcomes
- Audit Trail — administrative event log covering integration, customization, and OIDC changes