Deployment via Intune
Configure and deploy an application, both on Windows and on MacOS, using Intune.
Passwordless for Windows
Configuring Intune for Windows Deployment
Option 1: Windows App (Win32) (Recommended)
HYPR recommends the HYPR Passwordless for Windows application to be packaged as a Windows app (Win32). The Microsoft article Win32 app management in Microsoft Intune describes the steps involved.
-
Download the HYPR Passwordless client
.zippackage to your environment and unzip the package. The decompressed folder will contain the following content:-
HyprPasswordless_x64-XXXX.msi(installer; XXXX represents the version) -
hypr.json(configuration file) -
CustomSkin.zip(optional, if Advanced Branding is in use)
-
-
Convert the
.msiand other installations files into a.intunewinfile using the Microsoft Win32 Content Prep Tool:IntuneWinAppUtil -c "[path to directory containing msi and hypr.json file]" -s "[msi filename]" -o "[path to output directory]"This will produce an output file with a name that looks like
HyprPasswordless_x64-XXXX.intunewin. -
Login to the Microsoft Intune Admin Center and navigate to Apps > All apps.
-
Click Add.
-
Choose Windows app (Win32), then click Select.
-
Click Select app package file.
-
Click the folder icon button and select the
HyprPasswordless_x64-XXXX.intunewinfile that was generated with the content prep tool. -
Click OK.
-
In the Publisher field, enter HYPR Corp.
-
Additional Information can be added at the discretion of the Intune Manager:
- Information URL:
https://hypr.com/company - Privacy URL:
https://hypr.com/privacy
- Information URL:
-
Set the other fields as desired and Click the Next button.
-
Click Next.
-
In the Requirements section, set the desired values for the Operating System architecture and Minimum operating system fields and Click the Next button.
-
In the Detection rules section, set the Rules format field to: Manually configure detection rules
-
Click Add to add a new rule.
-
In the new detection rule, set the Rule type field to: MSI. The MSI Product code field will be automatically filled in with the information from the attached package file.
-
Click OK to create the rule and Click Next.
-
Click Next and fill in the Supersedence section according to your needs.
If you're packaging a newer version of HYPR Passwordless, select the previous deployed version and make sure to choose No on Uinstall previous version. This will prevent the installer to remove previously existing registrations and registered devices.
-
Define the list of assigned Windows computers by either selecting Add all users, Add all devices; or by picking one or more named groups via Add group (HYPR Passwordless will be installed on a computer if either the name of the computer or the computer's principal user are listed in the group).
-
After selecting the appropriate assignments, click Next.
-
Review all of the information and ensure the command-line arguments are entered correctly. When everything looks complete, click Create.
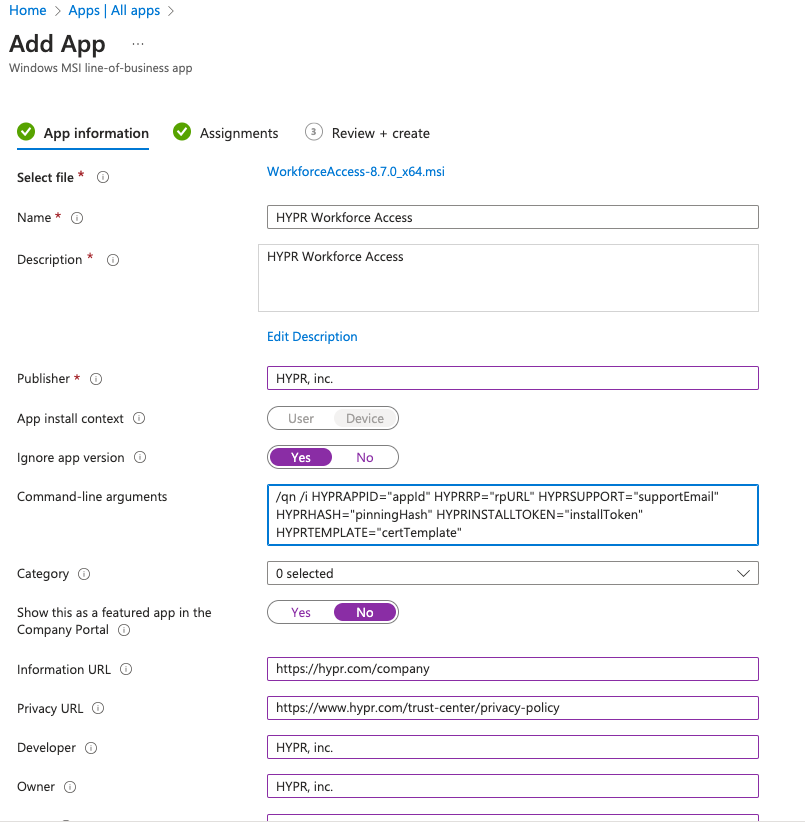
Option 2: Windows Line-of-Business (LOB) App
Packing HYPR Passwordless for Windows as an LOB is possible, but it will limit the configuration that can be set up during the installation. If you've any custom parameter that must be set during installation (e.g., proxy servers) or have an Advanced Branding skin, use the recommended Win32 app approach instead.
-
Download the HYPR Passwordless client
.zippackage to your environment and unzip the package. The decompressed folder will contain the following content:-
HyprPasswordless_x64-XXXX.msi(installer; XXXX represents the version) -
hypr.json(configuration file) -
CustomSkin.zip(optional, if Advanced Branding is in use)
-
-
Login to the Microsoft Intune Admin Center and navigate to Apps > All apps.
-
Click Add.
-
Choose Line-of-business app, then click Select.
-
Click Select app package file.
-
Click the folder icon button and select the
HyprPasswordless_x64-XXXX.msifile that was decompressed from Step 1. -
Click OK.
-
In the Publisher field, enter HYPR Corp.
-
Additional Information can be added at the discretion of the Intune Manager:
-
Information URL:
https://hypr.com/company -
Privacy URL:
https://hypr.com/privacy
-
-
Click Yes on the Ignore app version combobox.
-
Enter the following information into the command-line arguments:
-
Open the
hypr.jsonfile that was decompressed in Step 1 and copy the values into the placeholders below -
/q HYPRAPPID="[appID]" HYPRRP="[rpUrl]" HYPRSUPPORT="[supportEmail]" HYPRHASH="[pinningHash]" HYPRINSTALLTOKEN="[installToken]" HYPRTEMPLATE="[certTemplate]"
If you need additional parameters to be passed to the installer, please use the recommended Win32 app approach instead.
-
-
Click Next.
-
Define the list of assigned Windows computers by either selecting Add all users, Add all devices; or by picking one or more named groups via Add group (HYPR Passwordless will be installed on a computer if either the name of the computer or the computer's principal user are listed in the group).
-
After selecting the appropriate assignments Click Next.
-
Review all of the information and ensure the command-line arguments are entered correctly. When everything looks complete, click Create.
Passwordless for macOS
Prerequisites
Before deploying HYPR Passwordless for macOS via Intune, ensure that:
-
macOS devices are enrolled with Intune: The macOS device must be enrolled with Microsoft Intune before deploying HYPR Passwordless. For detailed enrollment instructions, see Microsoft's documentation: Enroll your device in Intune - macOS.
macOS Enrollment Requirements- A macOS device can only be enrolled with one MDM server at a time
- Enrollment requires installing a Microsoft-provided profile that may fail on VMs created using VirtualBox or VMware; only real macOS machines or VMs created using Apple's Virtualization API can complete enrollment
- The device must be enrolled before HYPR Passwordless can be deployed
-
Configuration file preparation: The
hypr.jsonconfiguration file must be properly prepared with all required settings before deployment. This is critical for Entra-joined macOS devices to prevent registration hangs.
Configuring Intune for macOS Deployment
Unmanaged macOS PKG App (Recommended)
The HYPR Passwordless for Mac application must be installed as an unmanaged application, as it installs components outside of the /Applications folder. The Microsoft article Add an unmanaged macOS PKG app to Microsoft Intune describes the steps involved.
For Entra-joined macOS devices, it is critical that the hypr.json configuration file is properly injected during the Intune deployment process. If the configuration file is missing or incomplete, the registration process may hang while the client attempts to locate the certificate server. Ensure all required configuration parameters are included in the hypr.json file that is embedded in the post-install script.
For Entra-only environments without Active Directory Certificate Services (ADCS), you may need to disable certificate-based authentication by setting CertificateAuthEnabled to false in the HyprOneService.plist file. See Disabling Certificate-Based Authentication for Entra-Only Environments below.
-
Download the HYPR Passwordless for Mac
.zippackage to your environment and unzip the package. -
Extract the
.pkgfile from thedmgdisk image downloaded in Step 1. On a macOS system, you can double click thedmgfile to mount the disk image and obtain the installer.pkgfile from it. -
Login to the Microsoft Intune Admin Center and navigate to Apps > All apps.
-
Click Add.
-
Choose macOS app (PKG), then click Select.
-
Click Select app package file.
-
Click the folder icon button and select the
HyprPasswordless-x.x.x-Installer.pkgfile that was decompressed from Step 2. -
Click OK.
-
In the Publisher field, enter HYPR Corp.
-
Additional Information can be added at the discretion of the Intune Manager:
-
Information URL:
https://hypr.com/company -
Privacy URL:
https://hypr.com/privacy
-
-
Click Next.
-
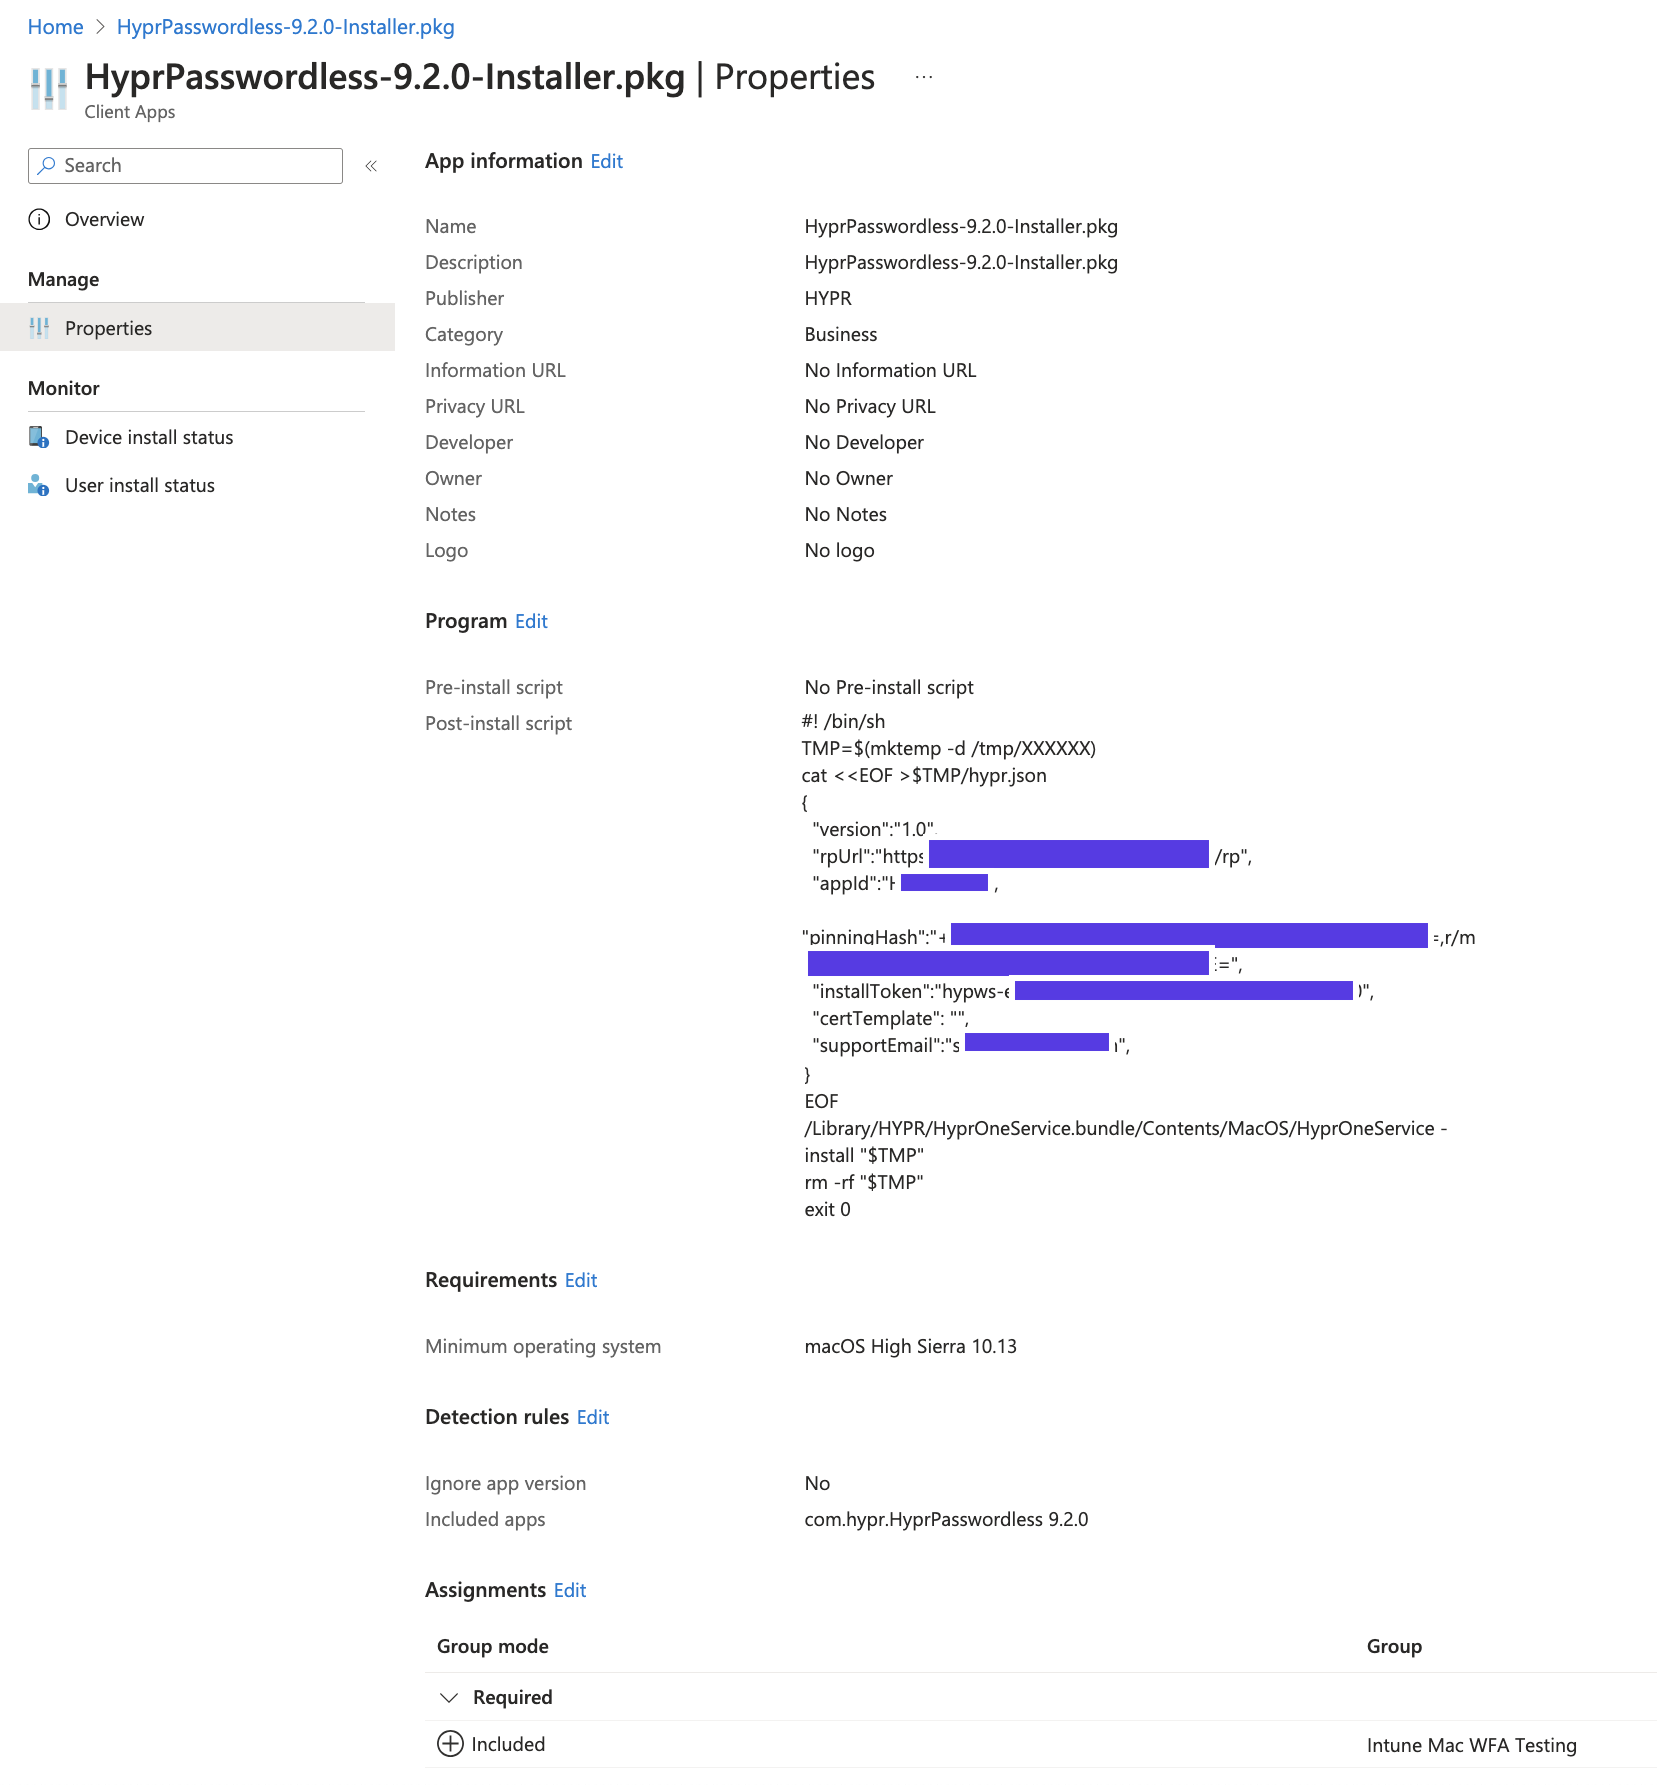
Enter the following text in the post-install script, substituting the content of the
hypr.jsonthat was decompressed from Step 1 where indicated:#!/bin/sh
TMP=$(mktemp -d /tmp/XXXXXX)
cat <<EOF >$TMP/hypr.json
--> CONTENT OF YOUR `hypr.json` CONFIGURATION FILE <--
EOF
/Library/HYPR/HyprOneService.bundle/Contents/MacOS/HyprOneService -install "$TMP"
rm -rf "$TMP"
exit 0Configuration File CompletenessEnsure that the
hypr.jsonconfiguration file includes all required parameters. For Entra-joined macOS devices, missing configuration can cause the registration process to hang while the client searches for certificate authority servers. The configuration file must be complete and properly formatted before embedding it in the post-install script. -
Click Next.
-
Select macOS High Sierra 10.13 as the minimum version.
-
Click Next.
-
Click No on the Ignore app version combo box (HYPR Passwordless for Mac doesn't automatically upgrade, so when a new version is deployed the configuration will have to be updated with the new package and the new version).
-
Click the trash can icon to remove the App bundle ID entries until only the
com.hypr.HyprPasswordlessentry remains in the list (if other entries remain in this list, Intune will keep running the installer). -
Click Next.
-
Define the list of assigned macOS computer by either selecting Add all users, Add all devices; or by picking one or more named groups via Add group (HYPR Passwordless will be installed on a computer if either the name of the computer or the computer's principal user are listed in the group).
-
Click Next.
-
Review the content, and when you are satisfied, click Create.
This configuration will install the HYPR Passwordless client, but it will not force the reboot of the system. The user will have to be instructed to perform a reboot after seeing the HYPR Passwordless client appear on the screen for the first time.
Disabling Certificate-Based Authentication for Entra-Only Environments
For Entra-joined macOS devices in environments without Active Directory Certificate Services (ADCS), certificate-based authentication may not be available or desired. In these cases, you can disable certificate-based authentication to prevent registration hangs and allow the client to use password encryption instead.
On macOS, this setting is controlled only in the HyprOneService.plist. To disable certificate-based authentication:
-
Edit the
HyprOneService.plistfile directly on the macOS device or via your post‑install script:sudo vi /Library/HYPR/HyprOneService.plistAdd or modify the following key:
<key>CertificateAuthEnabled</key>
<false/> -
Restart the HYPR service or reboot the device for the change to take effect.
- Entra-only environments without on-premises Active Directory
- Environments where ADCS is not available or not configured
- Organizations that prefer password encryption over certificate-based authentication
- When registration hangs occur due to the client searching for unavailable certificate servers
When certificate-based authentication is disabled, HYPR Passwordless will encrypt the user's password instead of using certificates for authentication. This provides a secure alternative for environments without certificate infrastructure.
Troubleshooting macOS Registration Issues
Registration Process Hangs on Entra-Joined macOS Devices
Symptom: The registration process appears to hang or become unresponsive on Entra-joined macOS devices, requiring the application to be force-quit.
Root Cause: The HYPR Passwordless client is searching for a certificate authority server to request a certificate, but cannot find one because:
- The device is in an Entra-only environment without Active Directory Certificate Services (ADCS)
- The
hypr.jsonconfiguration file was not properly injected during Intune deployment - Certificate-based authentication is enabled but no certificate infrastructure is available
Solution:
-
Verify configuration file injection: Ensure the
hypr.jsonconfiguration file was properly embedded in the Intune post-install script. Check the Intune deployment logs to confirm the configuration file was processed. -
Disable certificate-based authentication: For Entra-only environments without ADCS, disable certificate-based authentication by setting
CertificateAuthEnabledtofalsein theHyprOneService.plistconfiguration. See Disabling Certificate-Based Authentication for Entra-Only Environments above. -
Check HyprUnlock logs: Review the HYPR Unlock logs on the macOS device to identify what the client is searching for:
tail -f /Library/Logs/HYPR/HyprUnlock.logLook for messages indicating certificate authority discovery attempts, such as:
Requesting certificate from...Denied by Policy Module- Certificate template errors
-
Verify device enrollment: Ensure the macOS device is properly enrolled with Intune before deploying HYPR Passwordless. See Prerequisites above.
-
Manual configuration: If the issue persists, manually edit the
HyprOneService.plistfile after installation to disable certificate-based authentication:sudo vi /Library/HYPR/HyprOneService.plistAdd or modify:
<key>CertificateAuthEnabled</key>
<false/>
Then restart the HYPR service or reboot the device.