Administering HYPR Affirm
Some functionality is limited. This article is subject to change as the feature develops and we make improvements.
At least one Okta or Entra ID integration must be enabled via HYPR. See Integrations for instructions on how to accomplish this step.
If you do not have a qualifying Okta or Entra ID integration, HYPR Affirm will display this message when you try to do anything:
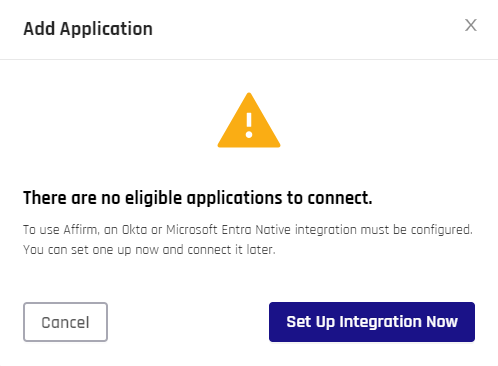
Click Set Up Integration Now to open the Control Center Standard: Integrations options.
Click Cancel to return to HYPR Affirm.
For HYPR Affirm to work with the integration fully, the IdP must include the following attributes for all target users:
-
Username (UPN field for Entra ID and Username field for Okta)
-
Email Address
Depending on the specific verification flow configuration, HYPR Affirm requires the following additional attributes:
-
Mobile Phone Number (Phone Number Verification step)
-
First and Last Name (Document and Biometric Verification step)
-
Manager Information (Required if Approver type of Manager is set. Manager field for Entra ID and ManagerId field for Okta)
-
Street Address (Location step)
-
City (Location step)
-
State (Location step)
-
Postal Code (Location step. This is called Zip code in Okta)
-
Country Code (Location step)
The calls to perform CRUD operations and to test HYPR Affirm IdV flows can be found here in the HYPR Passwordless API collection.
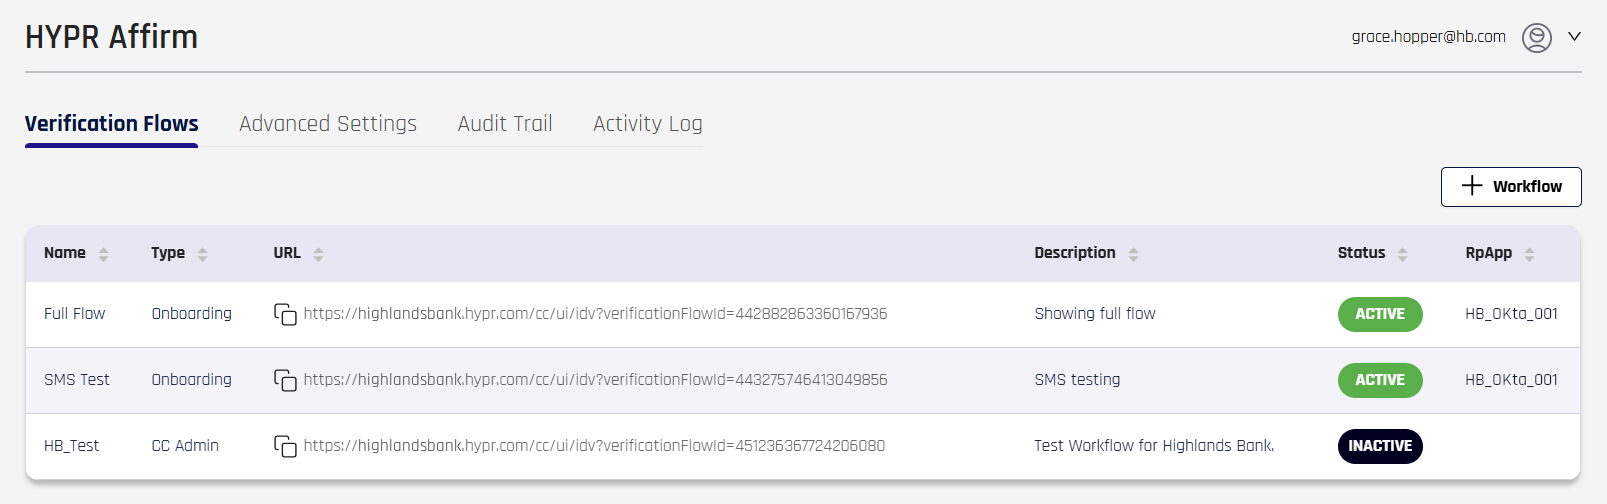
HYPR Affirm administration consists of several tabs:
-
Verification Flows: (Default) Create and manage workflow steps and their behaviors
-
Advanced Settings: Administer and test workflow Customizations and manage OIDC settings for the workflow
-
Audit Trail: Easy access to the HYPR Audit Trail
-
Activity Log: A log of requests and the decisions for each
Verification Flows
Creating a Workflow
-
Click the + Workflow button at the top right. The New Workflow dialog opens.
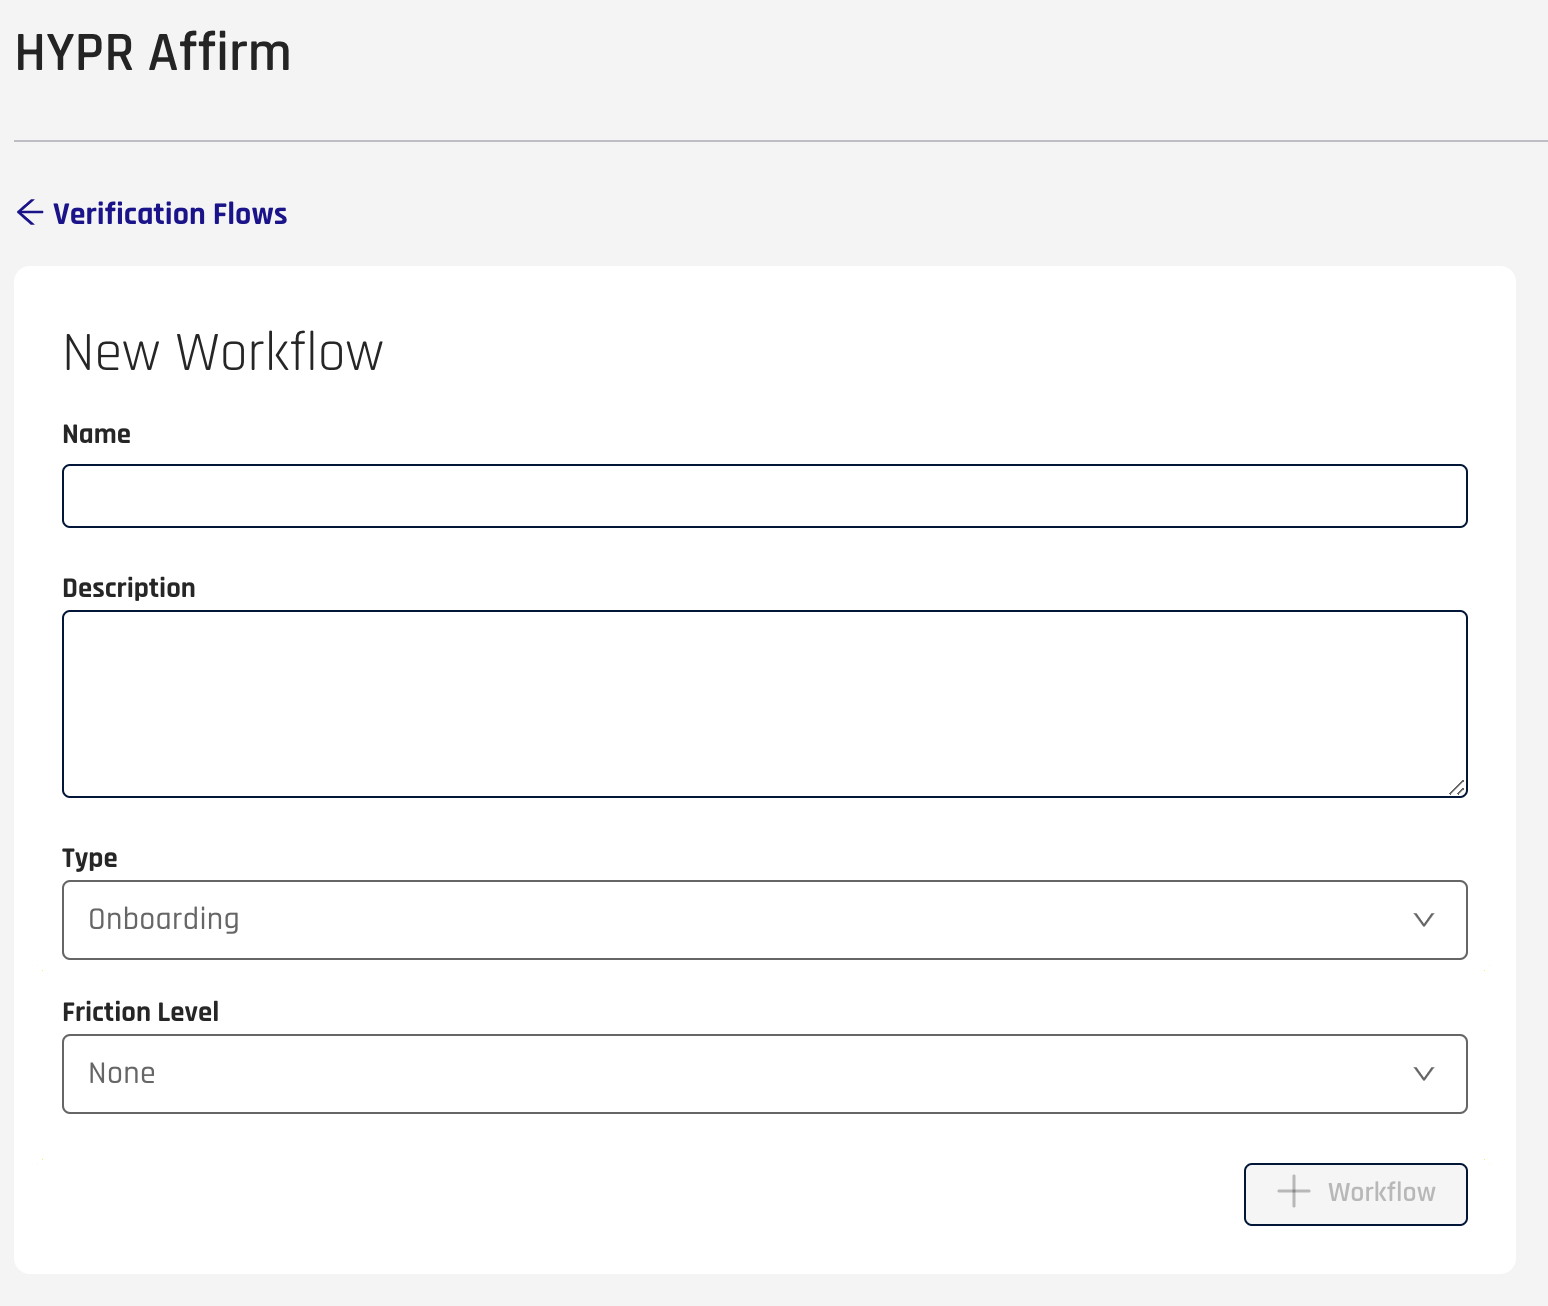
-
Give the workflow a Name and add a Description (optional).
Not Too DescriptiveThe Description field accepts alphanumeric characters and the following special characters: `~!@#$-_+.,
-
Select a workflow Type.
-
Onboarding: New employee verification
-
Recovery Flow: Verify existing employees who have a new device
-
CC Admin: Assign to administrators to Affirm their access to Control Center
-
Only one CC Admin workflow can exist at a time
-
CC Admin must use Redirect to Device Manager to register a new login method as an outcome
-
New members of CC Admins will be forced into an Affirm flow (assuming Affirm is enabled)
-
-
-
Choose a Friction Level.
-
Highest Friction
-
High Friction
-
Medium Friction
-
Low Friction
-
Lowest Friction
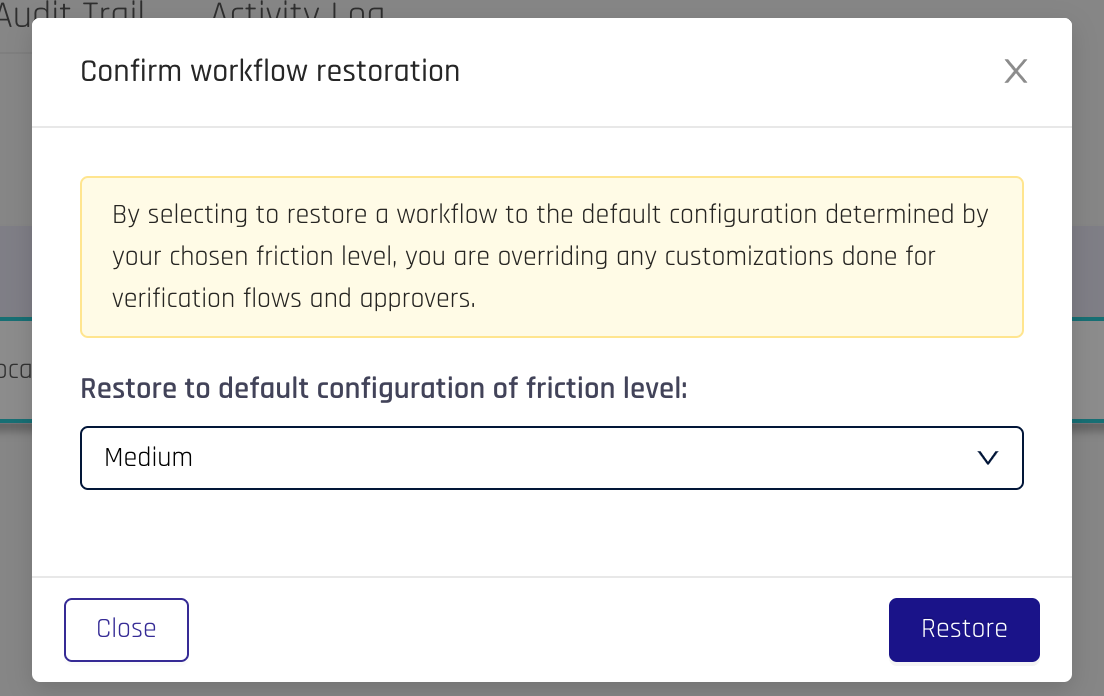
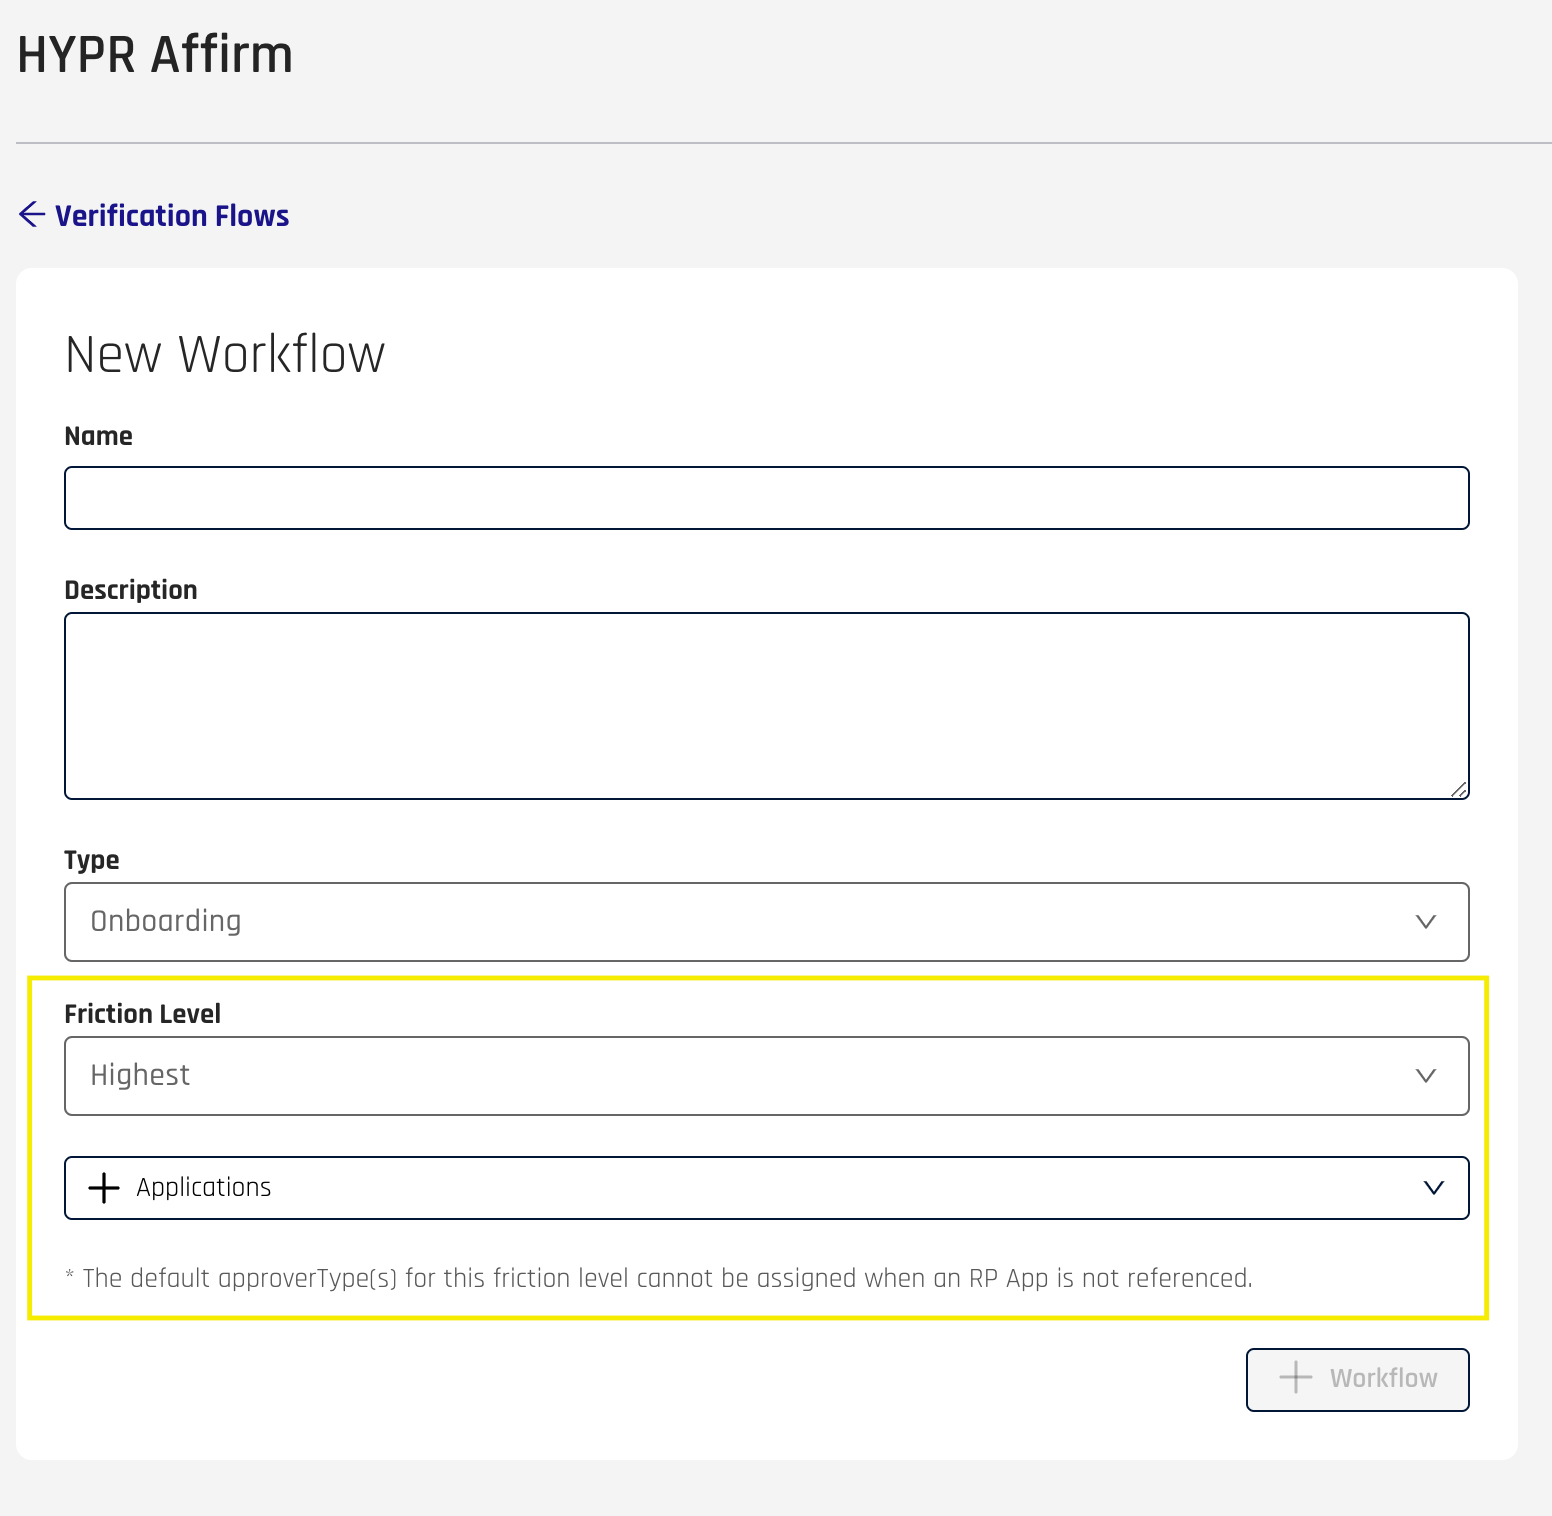 What are friction levels?
Different friction levels require the user to undergo different verification steps, from all possible steps for Highest to the bare minimum for Lowest
High and Highest levelsHigh and Highest friction levels require an RpApp to be initially attached to the workflow, in order for all subsequent validations to pass
Changing friction levelsOnce a verification flow is created, you cannot excplicitly change its friction level; however, you can reset the workflow configuration to the default config dictated by a chosen friction level
-
-
Click + Workflow to save. Control Center returns to the Affirm Verification Flows tab.
Managing Workflows
When one or more workflows exist, they are listed in Verification Flows using the following columns:
| Field | Description |
|---|---|
| Name | The name of the workflow. |
| Type | The type of workflow. [ Onboarding | Recovery | CC Admin ] If CC Admin is chosen, the only acceptable Outcome is Redirect to Device Manager to register a new login method. |
| URL | The link to be given to requesters; typically it is <tenant_URL>/ui/idv/?verificationFlowId=<verificationFlowId>.A handy copy icon helps you grab this URL for distribution. |
| Description | The Description field as entered when the workflow was created. |
| Status | An icon indicating the current status. [ Enabled | Disabled ] |
| RpApp | The HYPR Relying Party Application associated with this policy; typically this is the RP App associated with the integration being used. Only one RP Application can be associated to a policy. |
To manage a workflow's configuration, click the row where it is listed. The Workflow Management drawer opens at right.
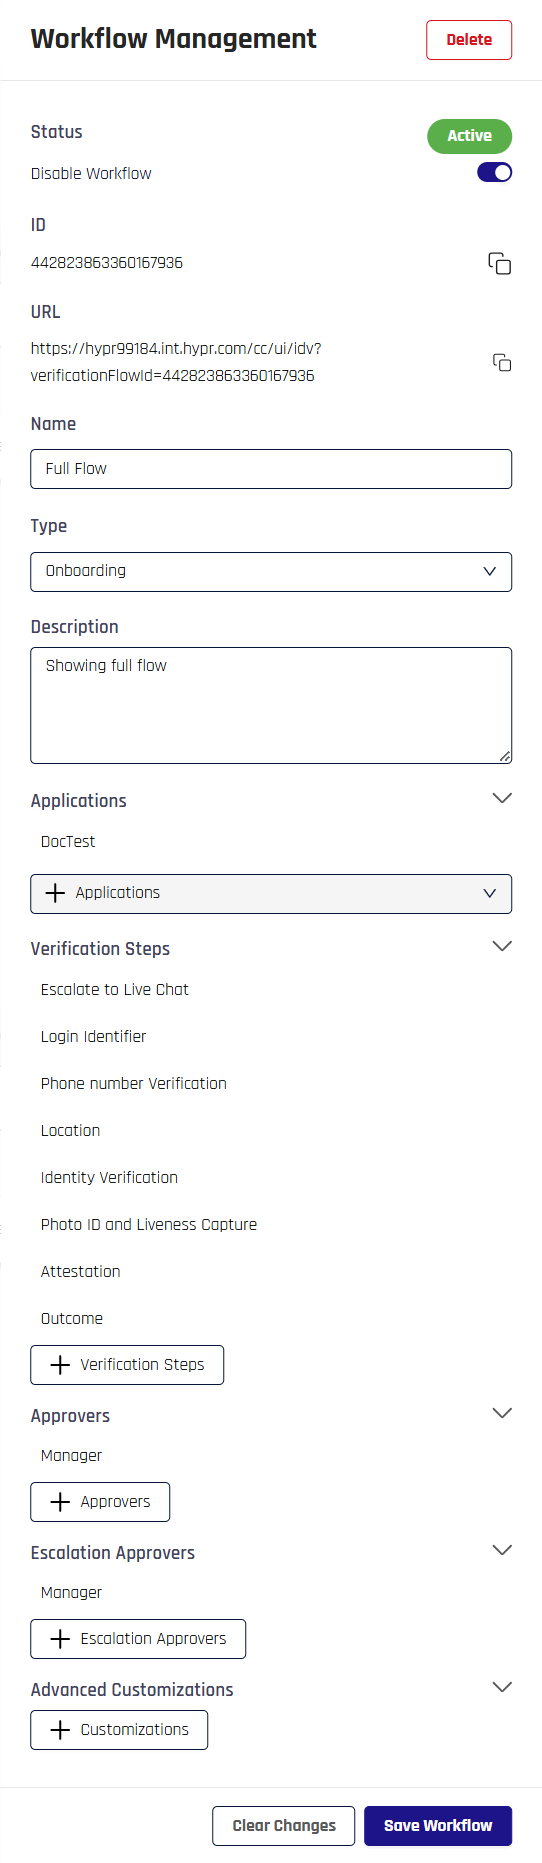
With the exception of the unique identifier for this workflow (the ID column) Workflow Management top-level information reflects the list columns from the main pane. Here, unmutable values can be copied and mutable values can be changed.
Be sure to scroll all the way to the bottom of Workflow Management and click Save Workflow when you are satisfied with the settings.
Applications
This section lists applications to which this workflow applies. When this section is rolled up, it will display the number of applications in parentheses.
-
Add an Application: Click + Application and click the desired application on the drop-down list that appears; once clicked, it will appear under Applications
-
Remove an Application: Hover over the row and click the trash can icon next to the entry
Workflow Retry Limits
Configure overall workflow attempt limits and blocking duration to prevent abuse and protect against repeated failed verification attempts.
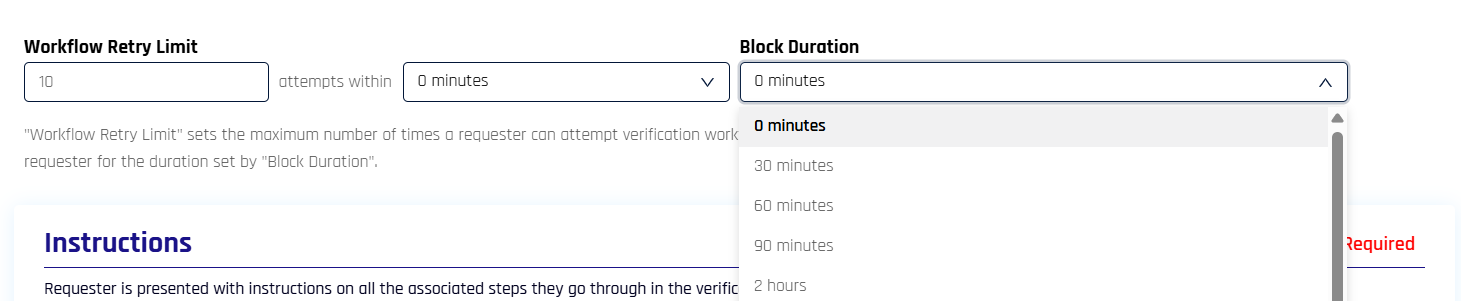
-
Workflow Retry Limit: Set the maximum number of verification attempts a requester can make within a specified time window. Enter the number of attempts and select the time window (in minutes) from the dropdown.
-
Block Duration: Configure how long requesters are blocked from attempting verification after exceeding the retry limit. Select the duration from the dropdown (options include 0 minutes, 30 minutes, 60 minutes, 90 minutes, 2 hours, and longer intervals).
When a requester exceeds the workflow retry limit, they are blocked for the configured block duration and receive a message indicating when they can try again.
Verification Steps
Steps used by this workflow will appear here. When this section is rolled up, it will display the number of steps in parentheses.
When it is expanded, each step is listed below the header. Edit a step by hovering over the row and clicking the pencil icon next to the entry; the Verification Steps window opens.
At the top of the Verification Steps tab that appears are listed the values Name, Type, URL, and Status as described above. Name and Type may be changed here, but URL and Status may not.
Escalate to Live Chat

If this feature is toggled On and the requester fails the IdV flow checks, the requester is immediately placed into a video and chat session with the approver.
Scenarios where escalation will occur include the following:
-
Face match fails between the ID photo and the selfie
-
The OnFIDO government document check does not come back clean
When this feature is On:
-
Escalation Approver Assignment will be visible in the Approver Assignment tab in this dialog
-
Approver Chat and Video must not be a verification step already
Login Identifier

Initiates the HYPR Affirm IdV process. This option will always display Required.
Phone Number/Email Verification
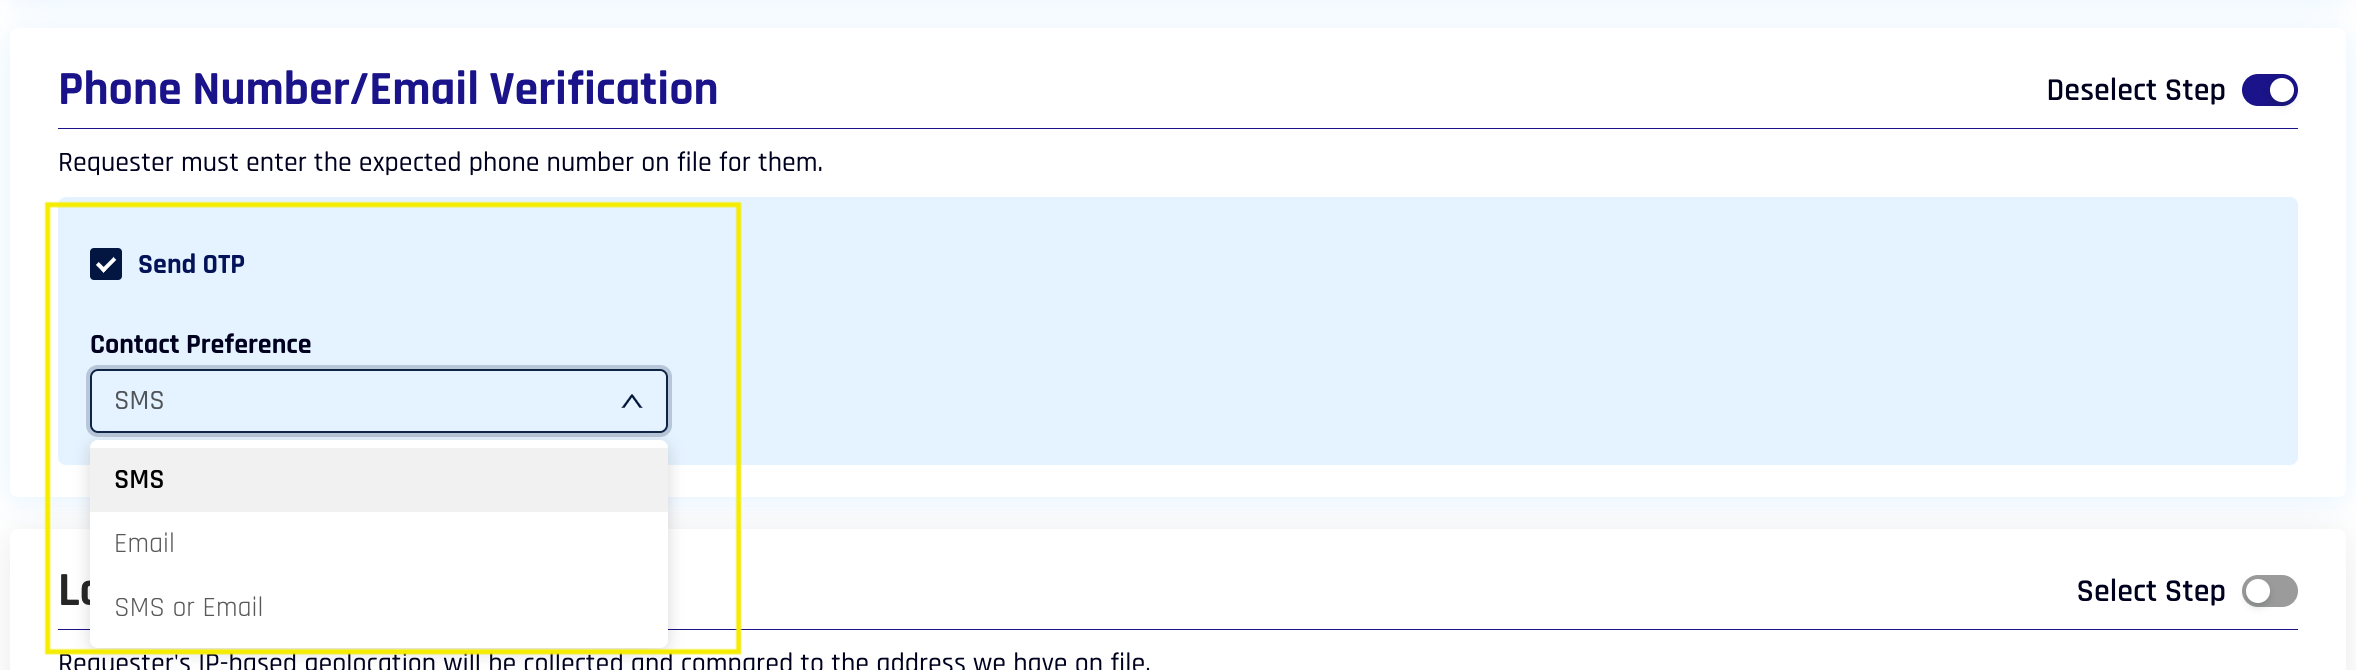
This setting is always On to require the requester to enter a phone number or email address for their device.
In 10.1 and onwards, the requester can choose between SMS and email for receiving their OTP.
Location

A location based upon the requester's IP address will be displayed to the approver. Enabled by default.
Identity Verification via Verified Credentials
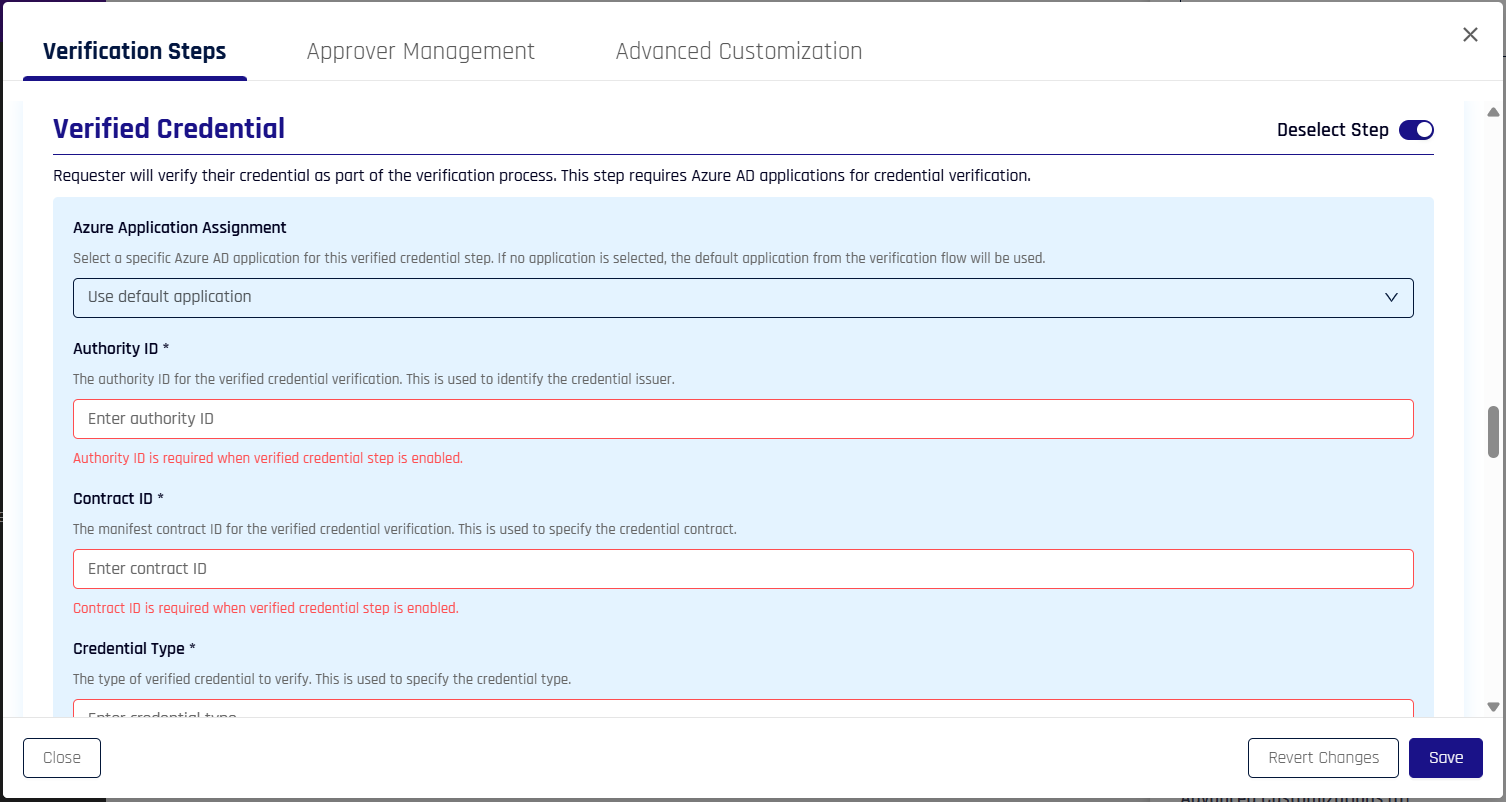
Identity Verification via Verified Credentials is currently in Preview status.
Enable Microsoft Entra Verified ID as a verification step. When enabled, users can present their Verified ID credential stored in Microsoft Authenticator to complete identity verification. Users scan a QR code or use a deep link to present their credential, which is validated for claims, issuer trust, and expiration.
For detailed configuration instructions, see Configuring Identity Verification via Verified Credentials.
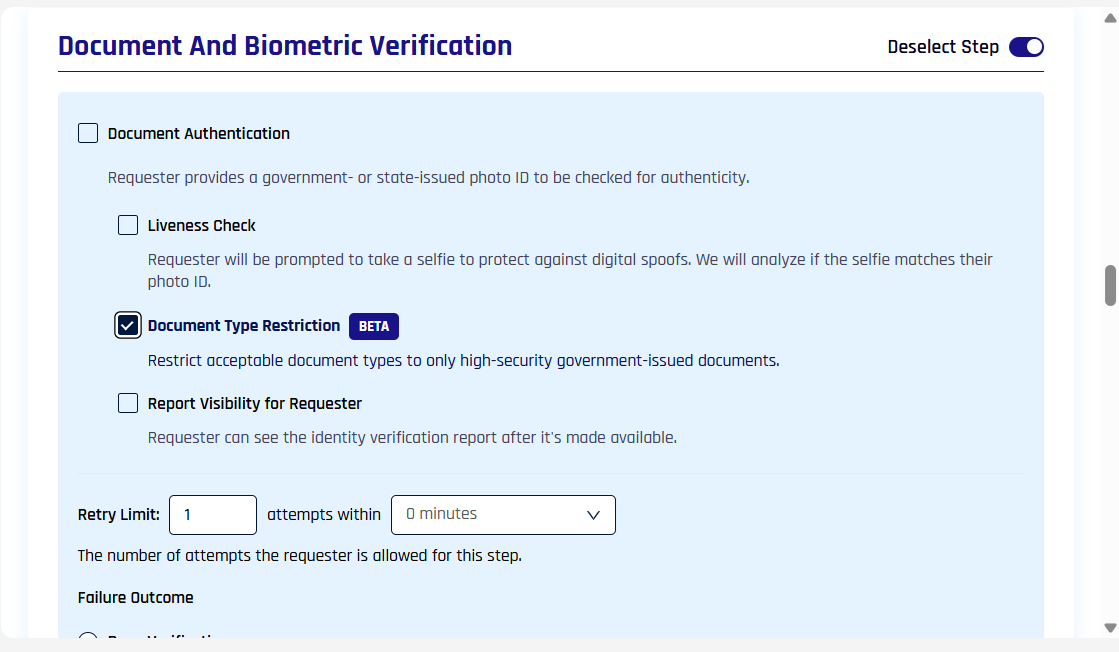
Document and Biometric Verification
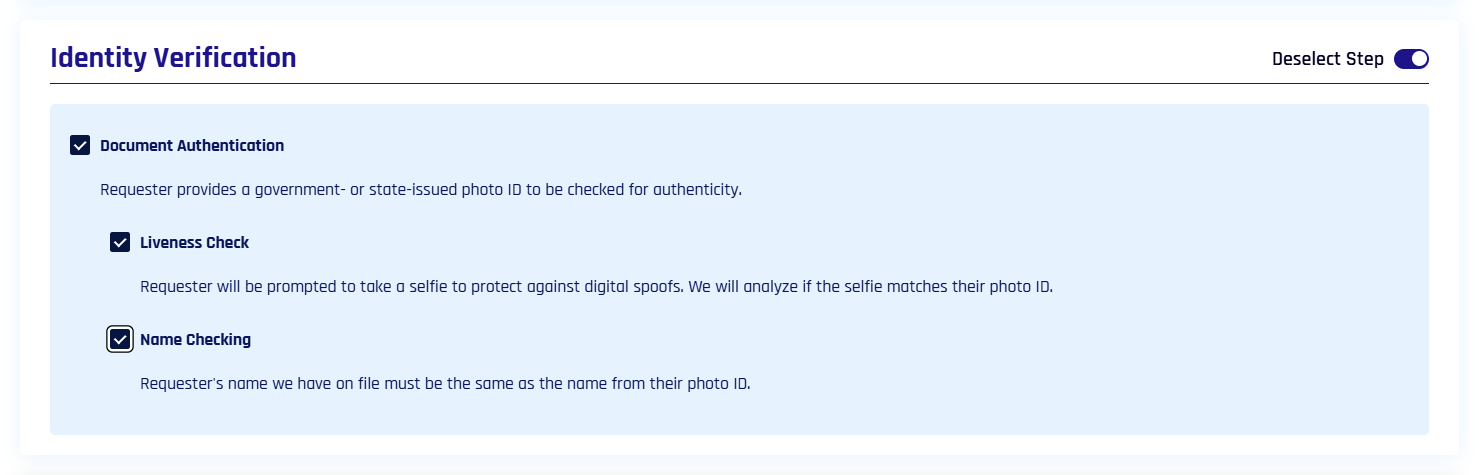
Determine the types of evidence required for affirmation. Disabled by default.
-
Document Authentication: Requester must provide a valid Photo ID for name and image comparisons; Document Authentication mimics the toggle state of Document and Biometric Verification
-
Liveness Check: The requester must take and submit a selfie in real time; it is then compared to the provided photo ID; Liveness Check mimics the toggle state of Document and Biometric Verification
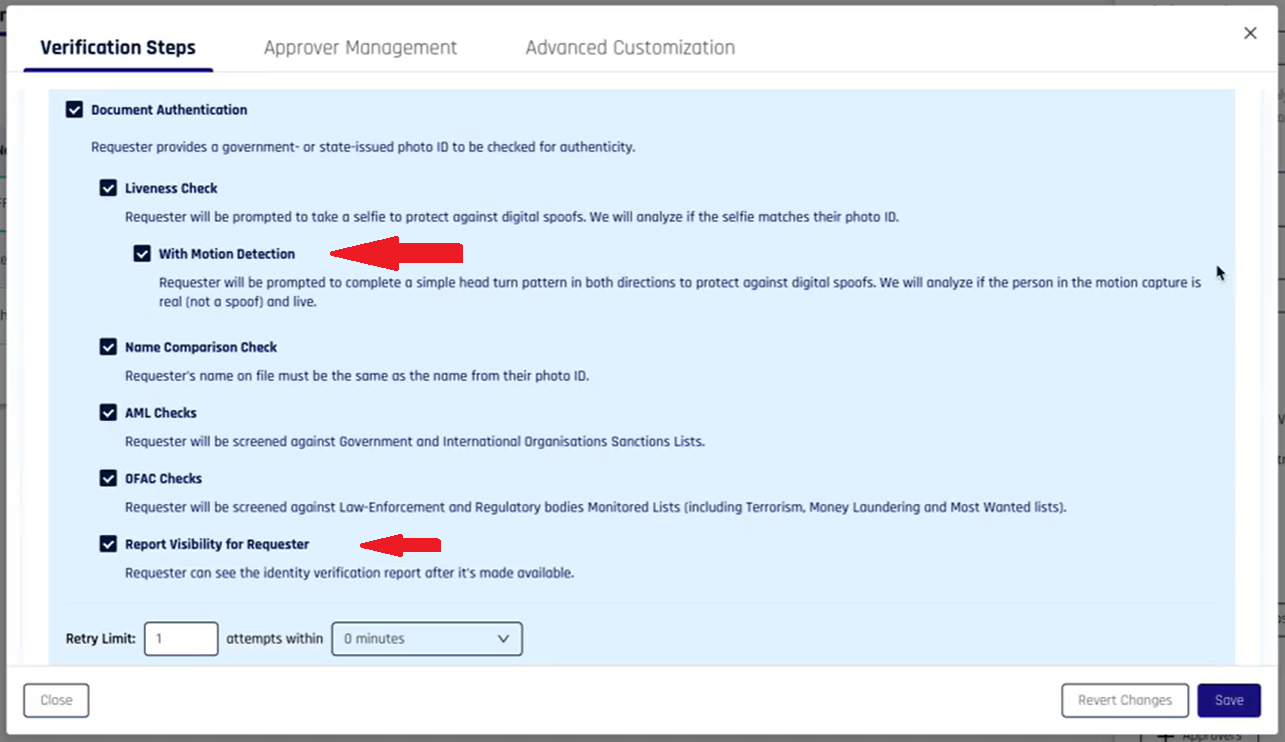
Motion Detection (Beta)
Motion Detection adds a simple head-turn pattern during selfie capture to harden liveness checks against digital spoofs.
- Controlled by the
AFFIRM_MOTION_DETECTION_ENABLEDfeature flag - Enable under Verification Steps → Document and Biometric Verification → Liveness Check → With Motion Detection
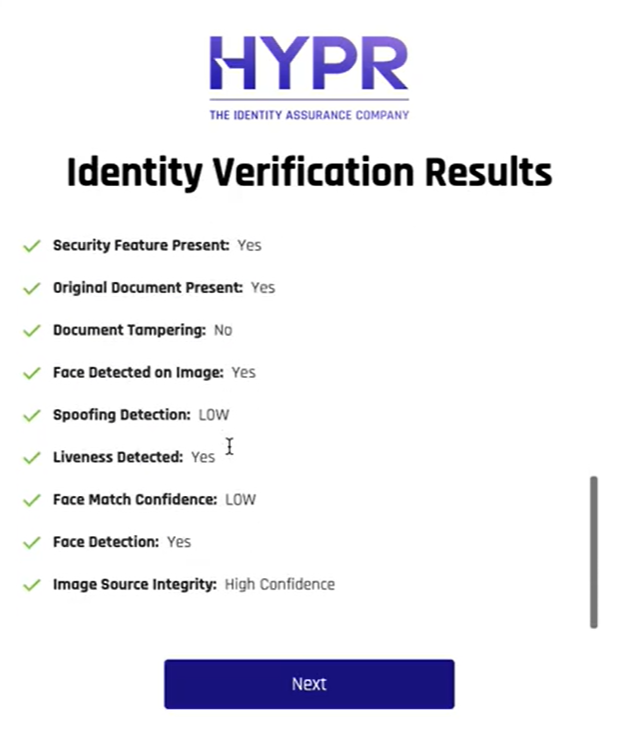
- Motion/liveness results can be surfaced to approvers and optionally to requesters via report visibility settings
Motion Detection toggle in Verification Steps:
Approver Review Results (selected fields):
Requester Results (selected fields):
- Controlled by the
-
Name Checking: Compares the name from the uploaded document to the requester's directory listing
-
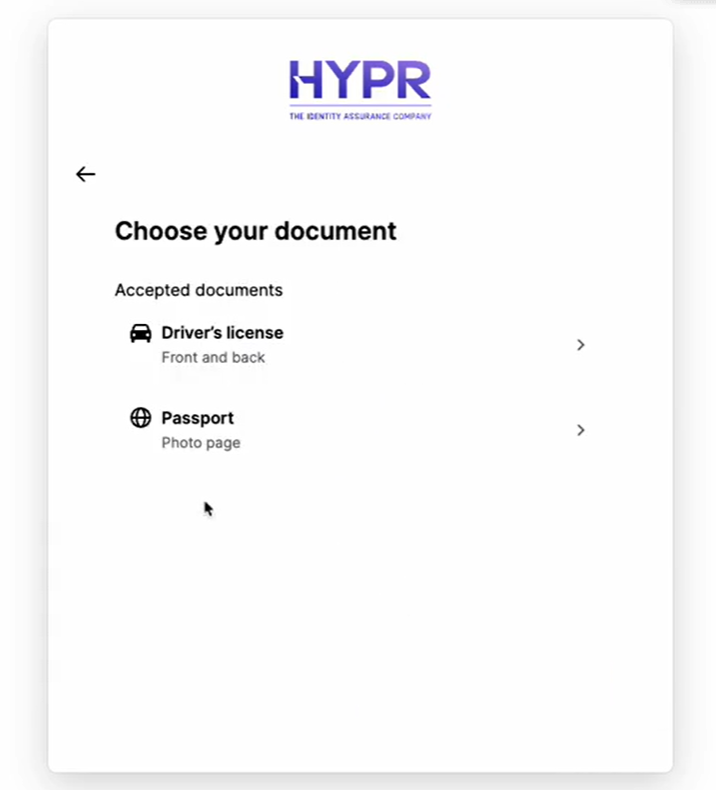
Document Type Restriction: When enabled, restricts the acceptable document types to a curated subset of high‑security government‑issued documents (for example, driver’s license and passport) and uses the configurable list of supported ID‑issuing countries to determine which options are presented.
-
See Supported Documents by Location for a list of documents that are currently supported for authentication.
Photo ID and Liveness Capture

Toggle to require upload of a valid photo ID and a subsequent real-time selfie, both of which will be compared to each other to verify a match.
If your workflow is configured for liveness-only (directory-sourced anchor image) using a custom image directory, the step can use the anchor image for comparison and optionally fall back to document upload depending on your step configuration.
Idntifying documents differ greatly from place to place, both in which ones are considered authentic and in composition and layout. To know which documents are accepted by Affirm, check the Supported Documents by Location page.
Approver Chat and Video

Toggle to enable a chat window between the approver and requester. Enabled by Default.
Attestation

Always Enabled. An approver must review the request before a credential is issued to the requester.
Outcome

What happens to the requester upon success?
-
Redirect to Device Manager to register a new login method
-
Issue a Microsoft Entra ID Temporary Access Pass (TAP)
- To set up Entra ID for this feature, see Configuring Outcome: Entra ID Temporary Access Pass (TAP)
-
Issue a Microsoft Entra ID Verified ID Verifiable Credential (VC)
- To set up Entra ID for this feature, see the Configuring Outcome: Entra ID Verified ID instructions
-
Redirect to a Okta password reset page
- To set up Okta for this feature, see Configuring Outcome: Okta Password Reset
-
Redirect to URL (provide a URL)
- Type the Redirect URL you wish to send the requester to when they are approved
- See API documentation on Create a verification flow for providing a dynamic URL which is useful when embedding an Affirm verification flow in an external application
-
Only display if the requester was approved or denied
For information about enabling liveness-only verification using directory-stored anchor images (without requiring document upload), see Configuring Liveness-Only Verification (Anchor Image).
Save and Revert
Don't forget to Save once you are finished configuring the Verification Flow tab; or, if you want to undo all of your changes, click Revert Changes.
To exit without saving, click Close in the lower left corner.
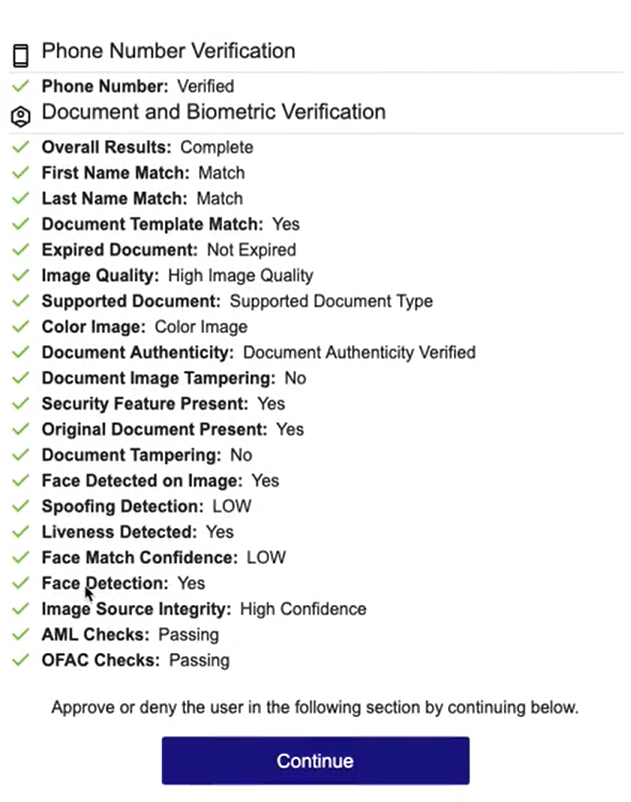
KYC Compliance Checks (AML/OFAC/Watchlists)
Affirm supports optional compliance screening for regulated identity-verification programs. These checks are configured as part of the document/biometric verification flow and can be combined with existing verification logic.
Compliance Check Types
- Document Authentication: Validates authenticity of government- or state-issued photo IDs.
- Liveness Check: Helps protect against digital spoof and deepfake attacks by comparing a real-time selfie to the provided identity evidence.
- Name Comparison Check: Compares directory/profile name values against extracted document name values.
- AML Checks: Screens users against sanctions/watchlist data sources.
- OFAC Checks: Screens users against regulatory and law-enforcement monitored lists.
- Report Visibility for Requester: Optionally exposes relevant verification report outcomes to end users.
Configurability Options
-
Retry Limits:
- Configure maximum retry attempts (default
1) - Configure retry time window in minutes (
0–60, in5-minute increments) - Use this to limit repeat attempts on failed verification steps
- Configure maximum retry attempts (default
-
Failure Outcomes:
- Deny verification
- Escalate to Live Chat
- Continue workflow
- Redirect to URL
Feature Flag and Data Source
KYC compliance checks are controlled by the AFFIRM_WATCHLIST_STANDARD_ENABLED feature flag.
- Enabled: Makes AML/OFAC screening controls available in Affirm
- Onfido Integration: Retrieves Watchlist Standard reports from Onfido services
- Pass/Fail Results: Screening and identity checks are evaluated and recorded per workflow instance
Approvers and Escalation Approvers
Clicking either + Approvers or + Escalation Approvers in Workflow Management, or editing an approver, will open the Approver Management dialog.
Approvers for this workflow appear here. When these two sections are rolled up, they will display the number of approvers in parentheses. When expanded, each approver is listed below the header.
Edit an approver by hovering over the row and clicking the pencil icon next to the entry; the Approver Management window opens. At the top of the Approver Management tab that appears are listed the values Name, Type, URL, and Status as described above. Name and Type may be changed here, but URL and Status may not.
Approver Assignment
Choose whether to send requests using your Integration's defined hierarchy or custom email entries, or a combination of several approvers, with custom time limits for each assignment.
If you are using the Affirm API to create verification flows and user instances, you can provide approvers dynamically on a per-user instance basis. See API documentation for more details
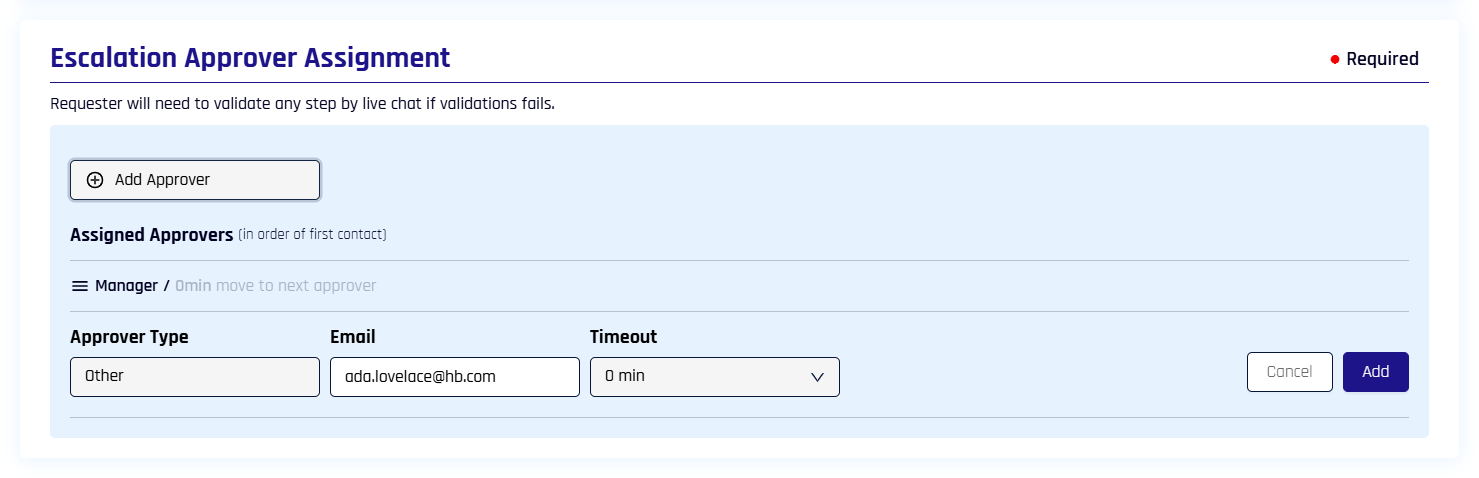
To add a new approver in the Affirm UI:
-
Click + Approvers to open Approver Assignment in the Approver Management dialog.
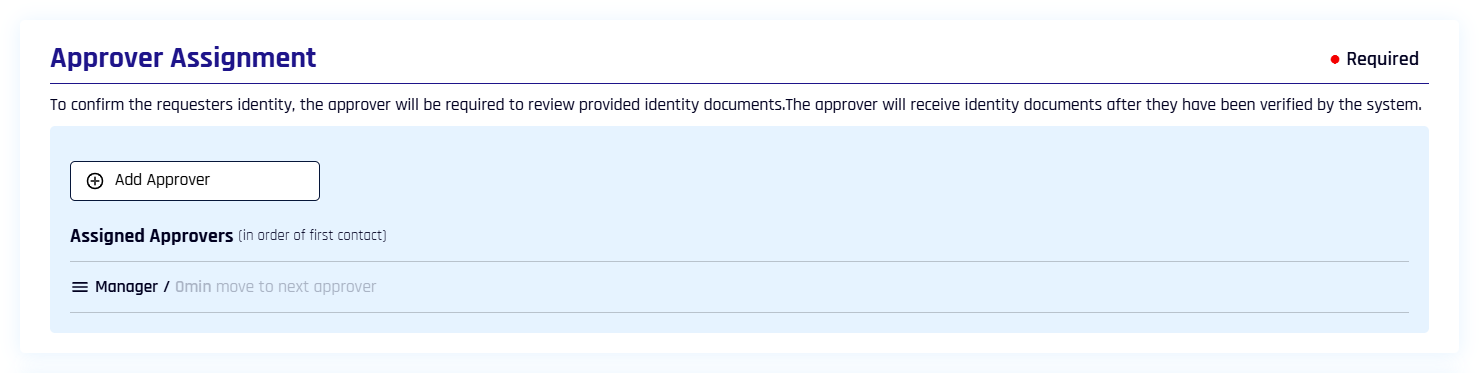
-
Click Add Approver and select the type of approver to create a new assignment from the following options:
-
Manager: When selected, HYPR Affirm automatically uses the IdP Manager assignment to determine who will be the approver
-
Other: Enter a custom email address or a list
-
HYPR (automated approval): Allow HYPR Affirm to automatically approve or deny a requester based on their results; approval is only given if all enabled steps pass
-
-
Select a Timeout in minutes. [
1 min|\2 min|\3 min|\5 min]-
Each new assignment starts as the final approver in the chain, and will be greyed out here with a timeout of 0 min; to change it, move it up the chain and Edit the approver
-
The Timeout for HYPR (automated approval) will be 5 min when it is not last in the chain
-
-
Click Add when you are finished, and you are returned to Approver Assignment.
Multiple Approvers
You can assign multiple approvers for a given flow. When the assigned timeout lapses, the current approver's invite is revoked and the next approver is invited.
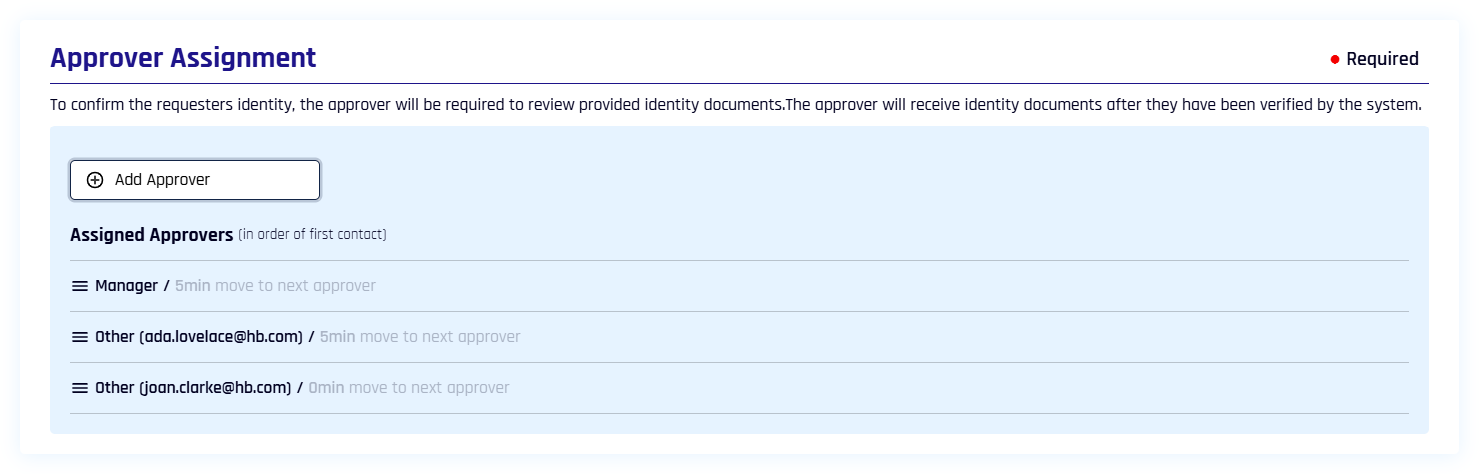
Add as many approvers as you like to the chain of approval.
Managing Approvers
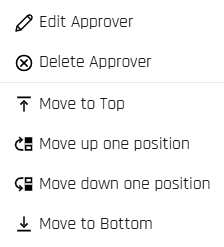
Clicking the three lines to the left of a listed approver offers the following options:
-
Edit Approver: Opens a dialog to change the email address of Other entries and the Timeout for any entry that is not the last one in the chain; click Save when finished editing the approver
-
Delete Approver: Removes the approver from the list instantly
-
Move to Top/Bottom; Move up/down one position: Use these to order the approver chain
Time OutApprovers begin in the final position in the chain with a default Timeout value of 0 min. When multiple approvers are assigned, if an approver is moved from the final position to any other position, the approver's Timeout will reset by default to 5 min. If you want this value to be different thatn 5 min, the timeout for that user will need to be reset to the desired value and Saved.
Likewise, moving any approver to the final position in the chain will result in its Timeout being reset to 0 min.
Escalation Approver Assignment
The Verification Step Escalate to Live Chat must be disabled to use this functionality.
With the exception that in Workflow Management you click + Escalation Approvers to access this pane of the Approver Management dialog, functionality for this section is identical to that of Approver Assignment.
Save and Revert
Don't forget to Save once you are finished configuring the Approver Management tab; or, if you want to undo all of your changes, click Revert Changes.
To exit without saving, click Close in the lower left corner.
Advanced Settings
Customizations
HYPR Affirm allows multiple types of customizations that override the default behavior in key parts of the verification flow. Current customizations include:
Currently, these are only assignable to a verification flow via the API.
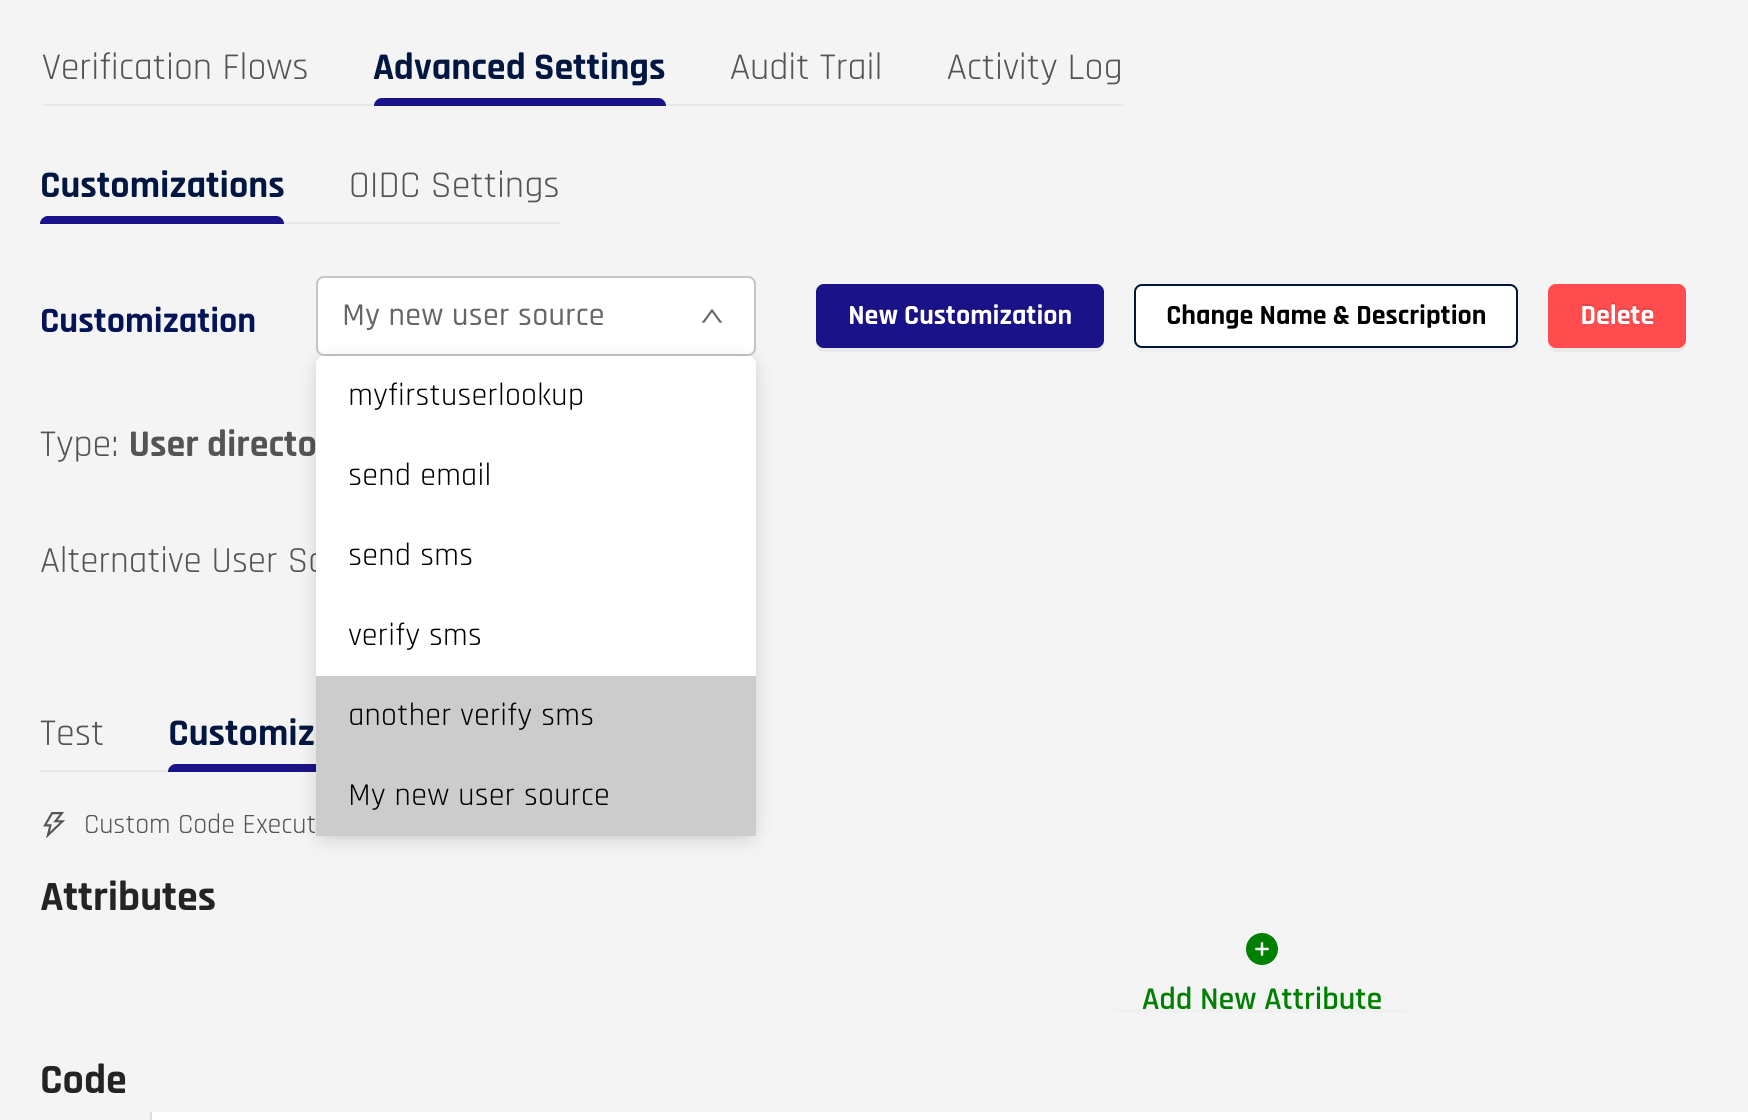
Create a Customization
-
Create a new code customization by selecting New Customization, select the type of customization, enter the details required, and click Continue to save the customization.
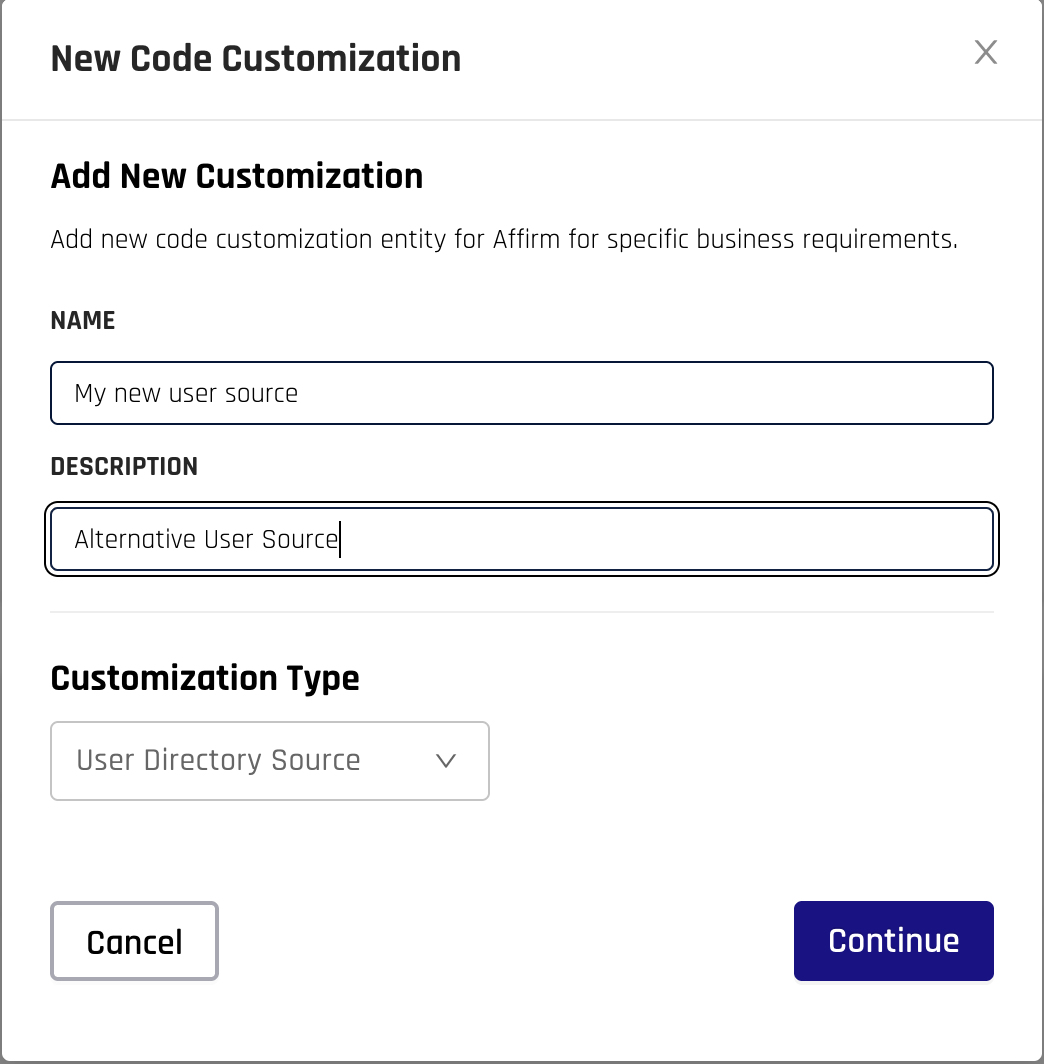
-
Select your new customization in the dropdown menu to edit it.
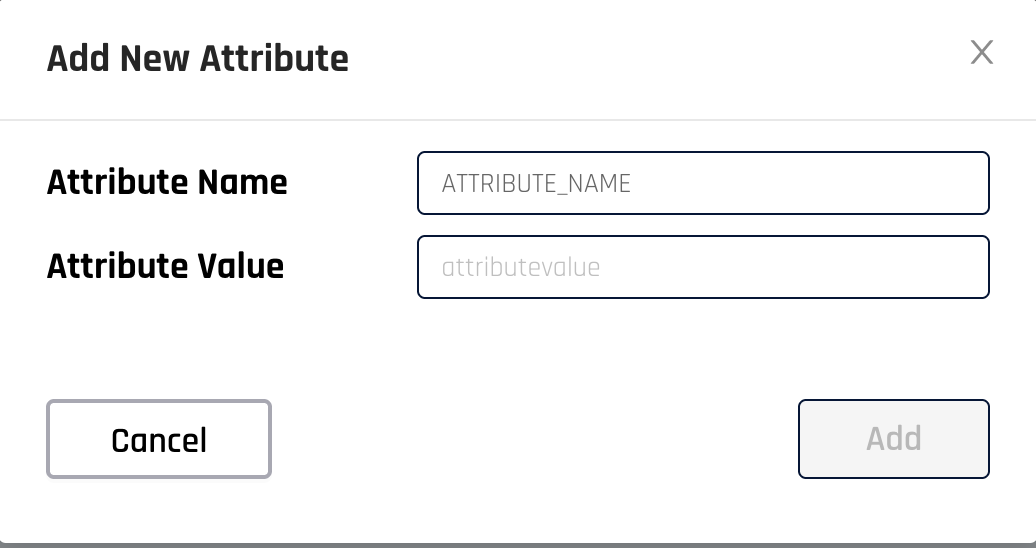
-
Add custom attributes that are protected by encryption to set sensitive values used in your customization.
-
Click Save when you are finished or are ready for testing; or, if you want to undo all of your changes, click Revert Changes.
-
Test your new customization to ensure everything is working correctly.
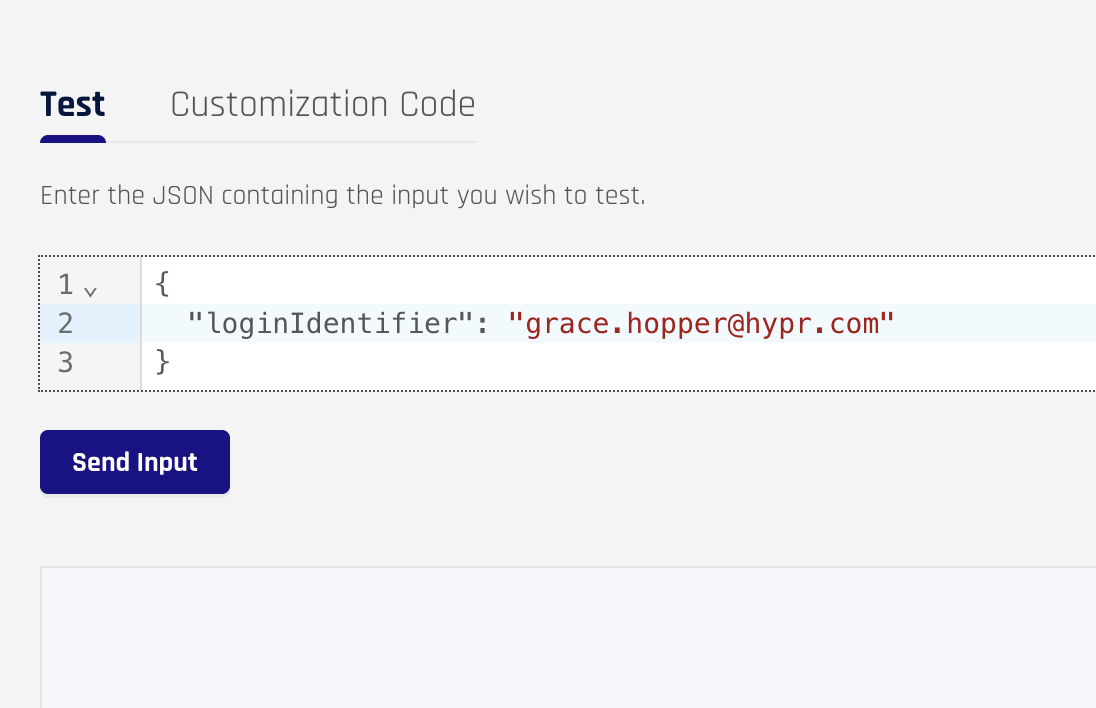
User Directory
This customization allows specification of the user info source. Depending on if the verification flow was created through the UI or API, the usual user info is provided via either:
-
The assigned integration
-
Fully through the API
When you assign a user directory source customization to a verification flow, the user info will be looked up via a REST call instead, which allows much greater flexibility in how user info is provided to HYPR Affirm.
| Input | Description |
|---|---|
| loginIdentifier | The username of the subject |
| isApprover | A boolean indicating if the user is the requester or approver. [ true | false ] |
| Output | Required | Description |
|---|---|---|
| loginIdentifier | Always | The username of the user |
| Always | The email of the user | |
| firstName | Flow-dependent | The first name of the user |
| lastName | Flow-dependent | The last name of the user |
| mobilePhone | Flow-dependent | The mobile phone number of the user. For example, +15555555555 |
| streetAddress | Flow-dependent | The street address of the user. For example, 20 W 34th St |
| city | Flow-dependent | The city of the user. For example, New York |
| state | Flow-dependent | The state of the user. For example, NY |
| postalCode | Flow-dependent | The postal code of the user. For example, 10001 |
| countryCode | Flow-dependent | The country code of the user. For example, US |
| status | Always | The status of the user. [ ACTIVE_FOR_AFFIRM | INACTIVE_FOR_AFFIRM ] |
| managerLoginId | Flow-dependent | The username of the user's manager. This value is used to look up the manager if the verification flow requires it. This value will be used as the loginIdentifier in its own dedicated lookup. |
For fields which are flow-dependent, you may omit the field from the return object or pass null if they aren't relevant for the given verification flow. For example, if the Location step is not part of the given verification flow, you can omit any of the address fields or pass null.
HYPR enables you to return either an empty object {} in cases when the user directory record cannot be obtained, or a custom error { error: "My error message"} to handle whichever errors or conditions you prefer.
SMS Sending
This customization allows sending SMS via a custom REST call instead of HYPR's SMS service.
When isApprover is true, secret is the magiclink to enter the flow as an approver.
When isApprover is false, secret is the SMS code the requester must verify.
| Input | Description |
|---|---|
| loginIdentifier | The username of the user |
| phoneNumber | The mobile phone number of the user |
| isApprover | A boolean string denoting whether the SMS is for a user or approver. [ true | false ] |
| secret | The secret portion of the SMS |
| formattedMsg | The formatted message sent to the user or approver which also contains the secret above |
| Output | Description |
|---|---|
| isSuccess | The result of the REST call. Valid values include: "true" or "false" |
SMS Verifying
This customization allows handling the result of a verified SMS code through a custom REST call instead of HYPR's SMS service.
| Input | Description |
|---|---|
| loginIdentifier | The username of the requester |
| phoneNumber | The mobile phone number of the requester |
| inputCode | The SMS code the requester entered |
| result | A Boolean string denoting if the requester entered the correct SMS code. [ true | false ] |
| Output | Description |
|---|---|
| isSuccess | The result of the REST call. [ true | false ] |
Email
This customization allows sending of emails through a custom REST call instead of HYPR's SMTP servers.
When isApprover is true, the email subject and body will be for inviting the approver to a user's flow for live attestation.
The case of isApprover being false is not currently supported or expected, but may be in future releases.
| Input | Description |
|---|---|
| loginIdentifier | The username of the user. |
| recipient | The email address of the user. |
| isApprover | A Boolean string denoting whether the email is for a user or approver. [ true | false ] |
| subject | The subject title of the email. |
| htmlBody | An HTML representation of the email. |
| textBody | A text-only representation of the email. |
| Output | Description |
|---|---|
| isSuccess | The result of the REST call. [ true | false ] |
Outcome API Call
This customization allows executing custom API calls prior to the user being issued the configured outcome.
When the user is approved and the verified Outcome is set to display the results to the user, custom results can be displayed to the user. Otherwise, the customization will run silently in the background.
In the case of an approved workflow, but a failed outcome API customization, the user can be failed if necessary.
| Input | Description |
|---|---|
| loginIdentifier | The username of the user. |
| The email address of the user. | |
| isApproved | A Boolean denoting whether the user is approved according to the verification flow. [ true | false ] |
| workflowId | The workflowId of the users verification flow instance. |
| Output | Description |
|---|---|
| isSuccess | The result of the custom outcome API call. [ true | false ] |
| outcomeToDisplay | When the user is approved and the verification flow has a verified outcome set to display results to the user, this string will be displayed. Return null otherwise. |
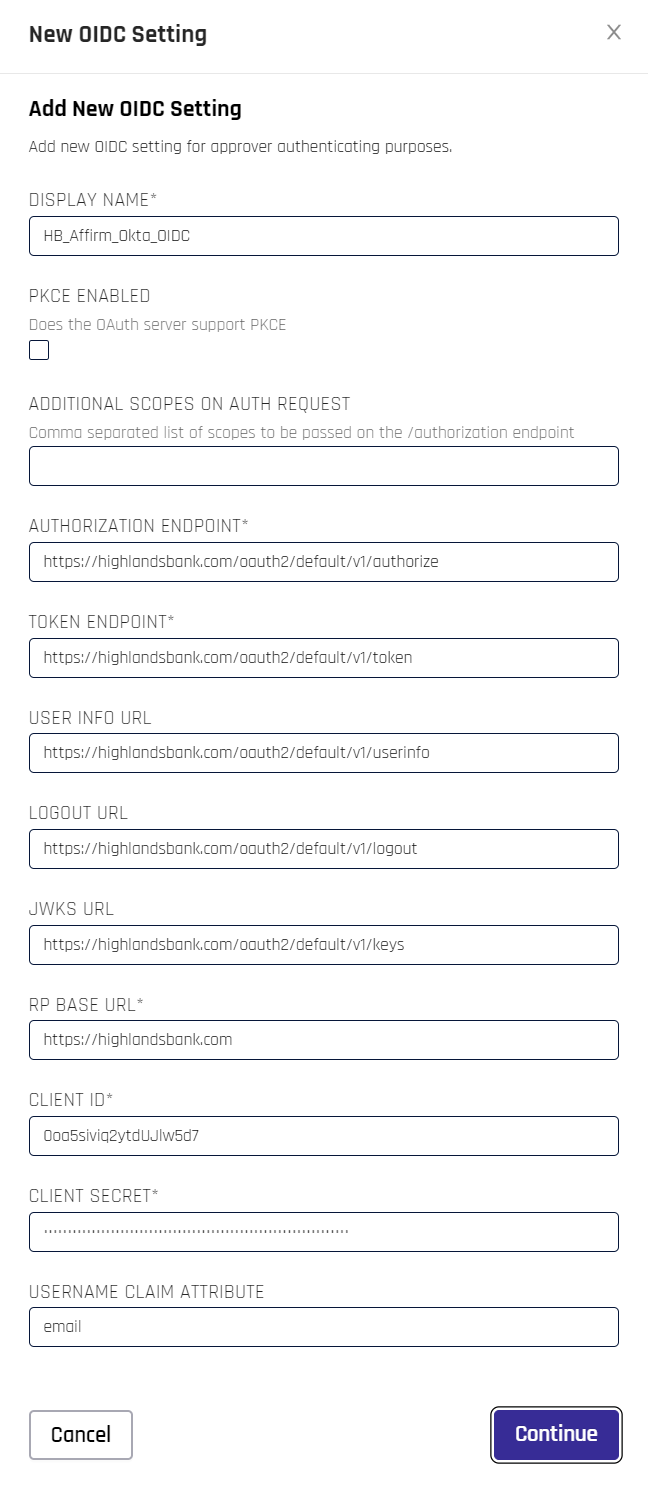
OIDC Settings
OIDC settings can be used to trigger OIDC authentication for the requester or approver.
Currently, these are only assignable to a verification flow via the HYPR Affirm API.
For the requester, this will force an OIDC authentication at the specified part of the flow. It must be assigned to the verification flow, and the setting for the specific step should be enabled to trigger when the authentication should take place.
For the approver, this will force an OIDC authentication before the approver enters a verification flow to which they were invited via email or SMS.
OIDC settings are identical to those defined under Identity Provider (IdP) Management with only a few exceptions, which are listed here:
-
PKCE ENABLED: Check this box if you are using Proof Key of Code Exchange (PKCE)
-
ADDITIONAL SCOPES ON AUTH REQUEST: If you are using non-default Okta API Scopes, list them here separated by commas
-
RP BASE URL: This value is the same as the HYPR URL in IdP Management
OIDC settings enhancements (10.1+)
In HYPR 10.1 and later, Affirm OIDC settings include several enhancements beyond the baseline IdP configuration:
-
Resource field support
Some IdPs require aresourceparameter on authorization or token requests. Affirm OIDC settings support this field so you can supply the correct resource value directly in Control Center. -
Additional name/value parameters
You can configure extra OIDC name/value pairs to be sent with authentication requests when your IdP expects additional parameters. This is intended for advanced scenarios (for example, routing to a specific policy or resource server) and should be configured in coordination with your IdP team. -
Per‑customization OIDC settings
Each Affirm customization can use its own OIDC client configuration. This enables patterns such as:- A Custom User Directory that authenticates against one IdP (for example, Okta) via OIDC, while
- An email‑based flow uses a different IdP (for example, Google Workspace) with its own OIDC settings.
For the core OIDC fields and their semantics, see Identity Provider (IdP) Management. The additional Affirm‑specific options follow the same conventions but are scoped to Affirm verification flows and customizations.
Don't forget to click Continue when you are satisfied with your entries.
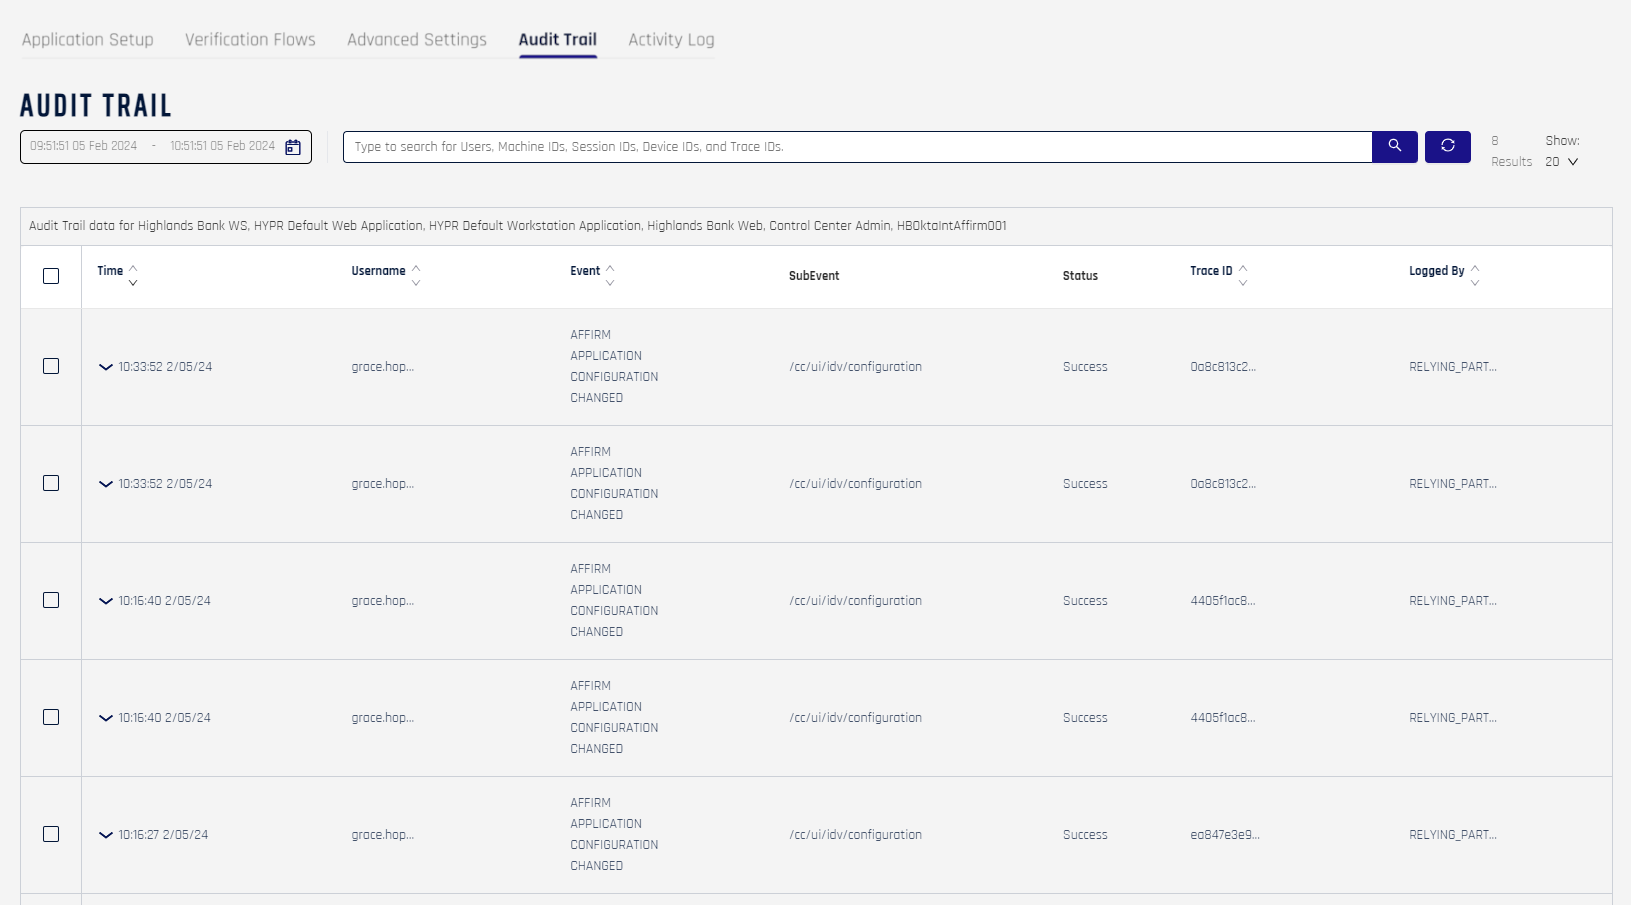
Audit Trail
HYPR Affirm offers an Audit Trail tab for ease of access. It reflects the Audit Trail experience across HYPR, which is described fully here.
Activity Log
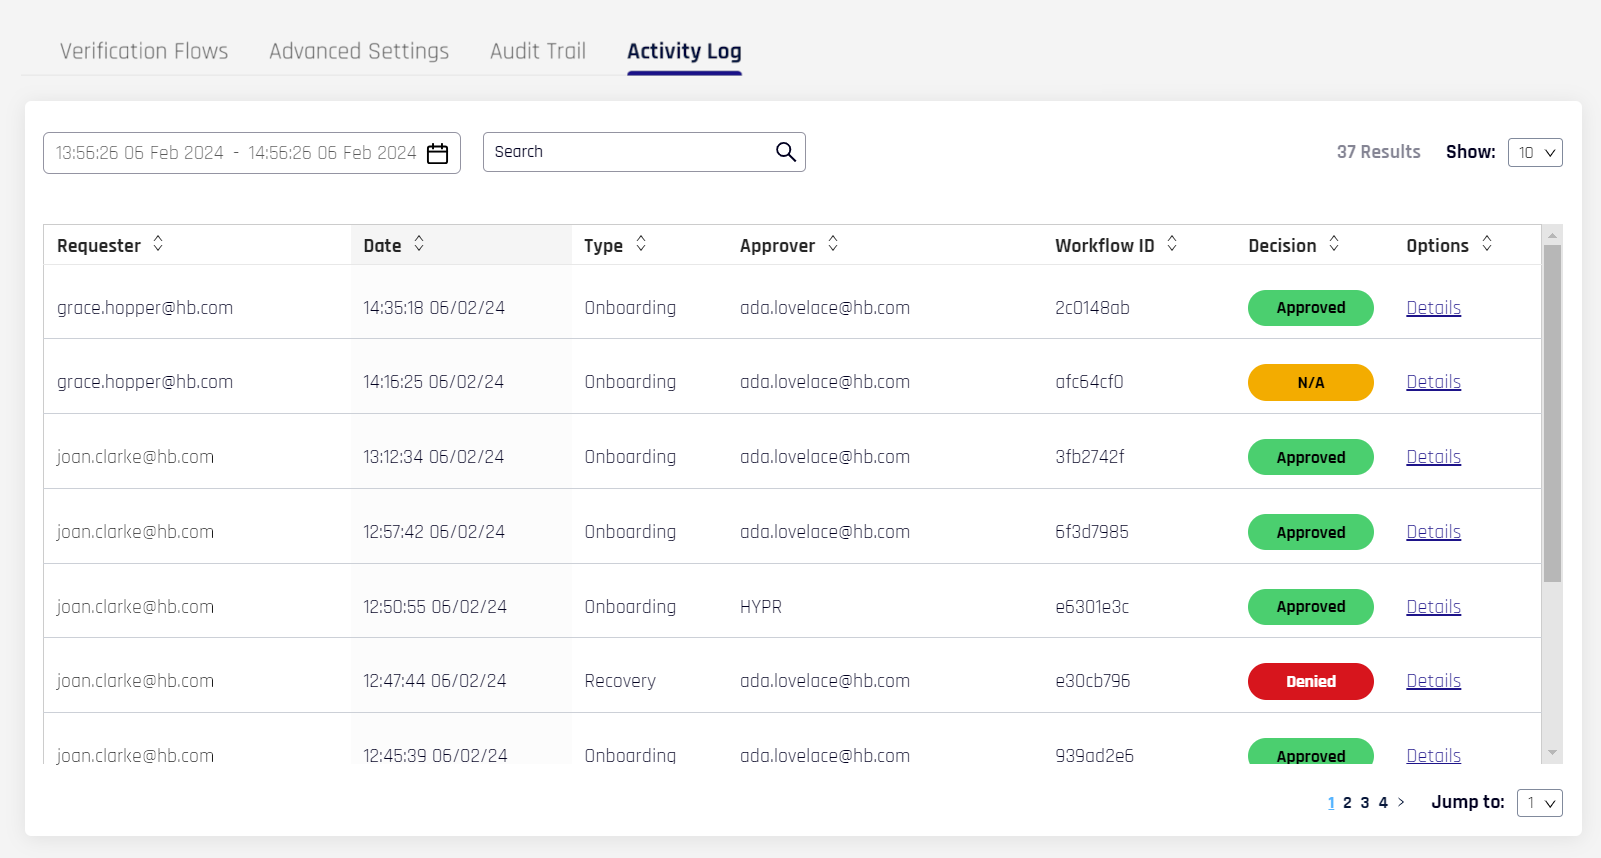
Describe the approved, denied, and aborted attempts to use Affirm. A date selection field and a search bar help filter Activity entries. The Activity Log table uses the following columns:
| Field | Description |
|---|---|
| Requester | The HYPR username making the IdV request. |
| Date | The date and time of the request. |
| Type | The type of IdV Flow. [ Onboarding | Recovery |
| Approver | The HYPR username of the approver. If automatic approval is enabled, the Approver will be HYPR. |
| Workflow ID | A unique identifier for the request. |
| Decision | The decision made by the approver. [ Approved | Denied | N/A ] |
| Options | Click the Details button to display more granular information about the request (see below). |
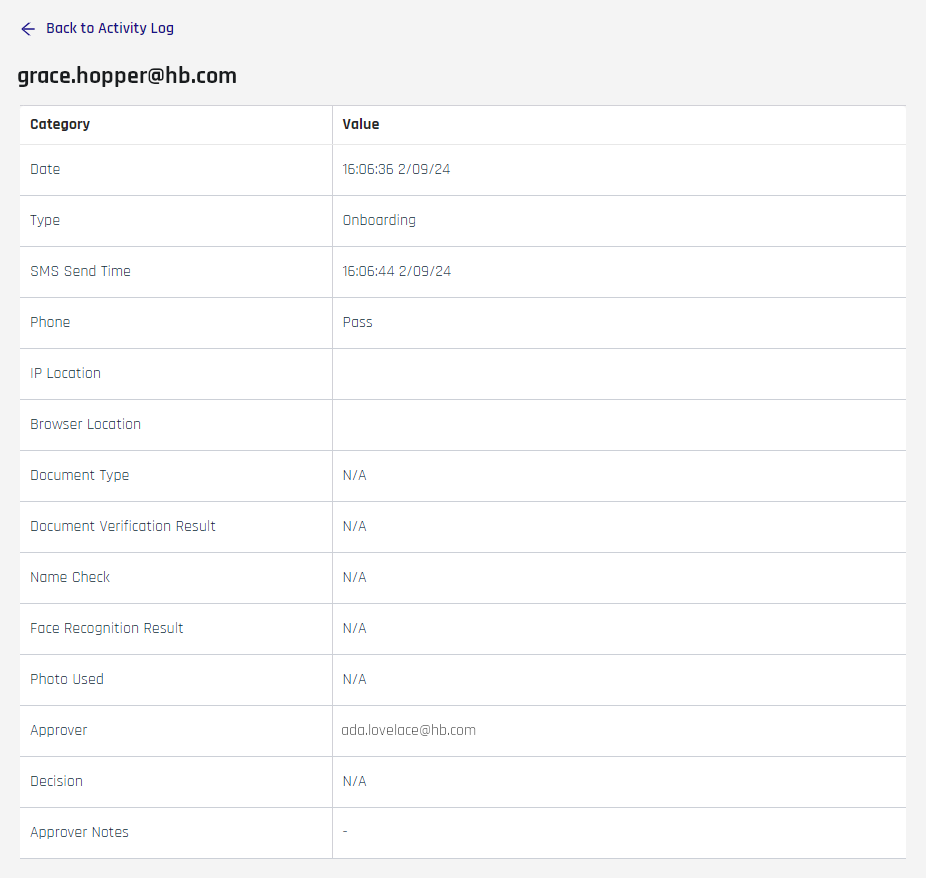
In additional to the main Activity Log fields, the following columns are shown on the Details page:
| Field | Description |
|---|---|
| SMS Send Time | The time the SMS notification for phone verification was sent. |
| Phone | Did the phone check pass? Pass | Fail |
| IP Location | The local IP address location. |
| Browser Location | The browser-based location. |
| Document Type | The type of document uploaded; passport, driver's license, ID card, etc. |
| Document Verification Result | Did the document check pass? Pass | Fail |
| Name Check | Did the name check pass? Pass | Fail |
| Face Recognition Result | Did the face recognition check pass? Pass | Fail |
| Photo Used | Was a photo used for this request? |
| Approver Notes | The comment for Approvals and the reason for Denials. |
From the request Details page, click Back to Activity Log to return to the main page.