Administrator Configuration
This guide covers the common Enterprise Passkey and HYPR integration steps that apply to both Entra-only and Hybrid environments. The core Enterprise Passkey setup process is identical regardless of your device join type.
Before proceeding with this guide, ensure you have completed your environment-specific device join setup:
- Entra-only: Devices are joined directly to Entra ID
- Hybrid: Devices are hybrid-joined (on-prem AD + Entra via Azure AD Connect)
See the Environment Setup guide for details on choosing and setting up your environment type.
Overview
This guide covers the standard Enterprise Passkey/HYPR integration steps:
- Configure Entra ID app registration (for HYPR integration)
- Enable FIDO2/Enterprise Passkey authentication in Entra
- Configure HYPR Control Center™ (feature flags, Entra integration)
- Install HYPR Passwordless for Windows™ on workstations
- Enable FIDO2 security key login on Windows
These steps are identical for both Entra-only and Hybrid environments. The only difference is that hybrid environments must complete hybrid join setup first (see Hybrid Administrator Setup).
If you need to create a new Entra ID tenant or join devices to Entra ID, see the Entra-only Administrator Setup guide for those steps.
Configuring Your Environments
Preparing Entra ID App Registration
This step configures Entra ID to prepare it for HYPR Control Center™ integration. You'll need to create an app registration and configure the necessary API permissions.
You should have an Entra ID tenant that you're an admin on, with some users that you can test with. This builds on the previous steps of creating the tenant and users. Make sure you are logged in to an admin account on your tenant to continue the setup.
-
Create App Registration
-
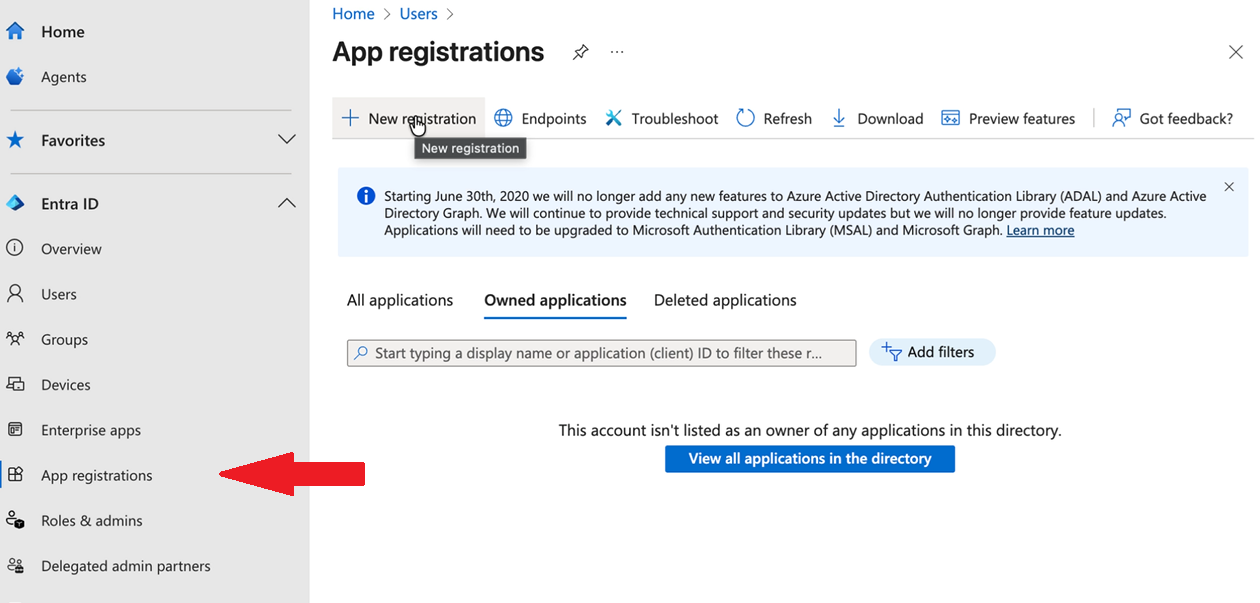
Navigate to App registrations in your Entra ID tenant
-
Click New registration
-
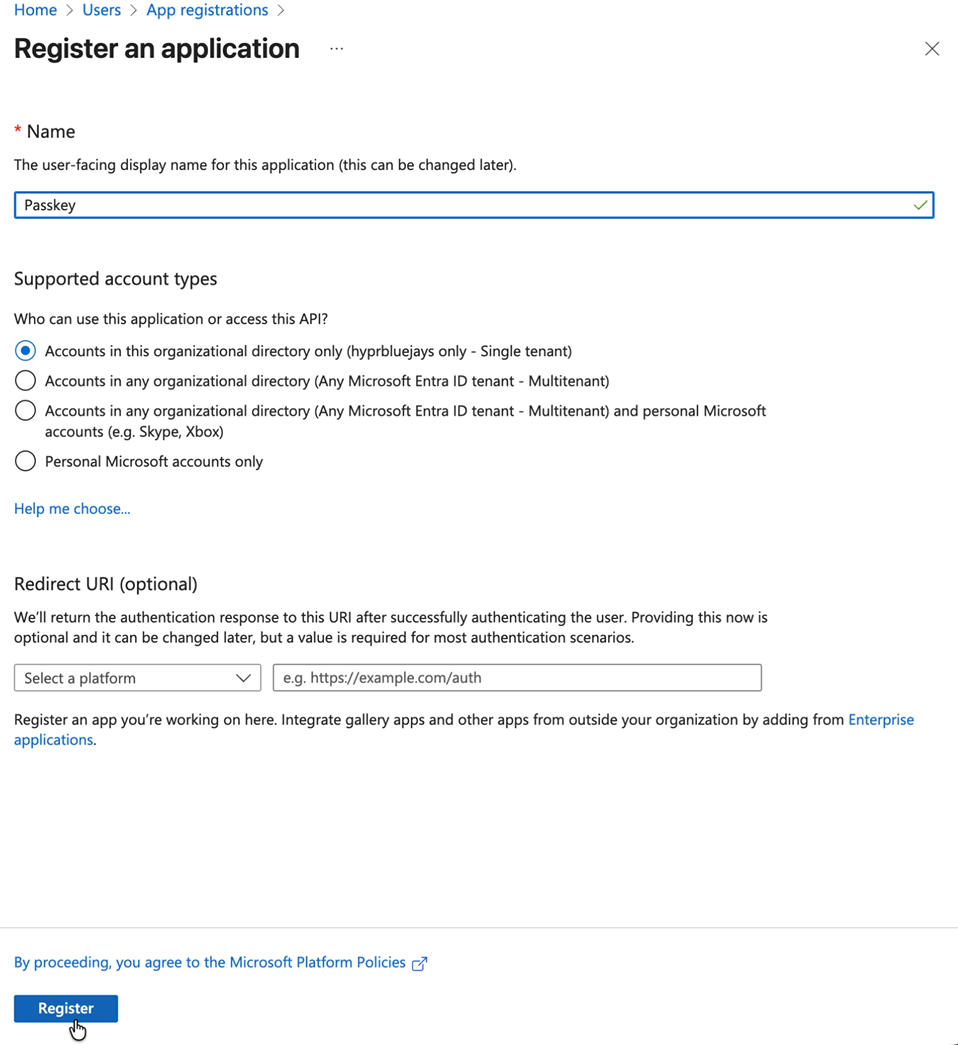
Name: Enter a descriptive name (e.g., "HYPR Integration")
-
Supported account types: Select appropriate option
-
Redirect URI: Leave blank for now (not needed for this integration)
-
Click Register
-
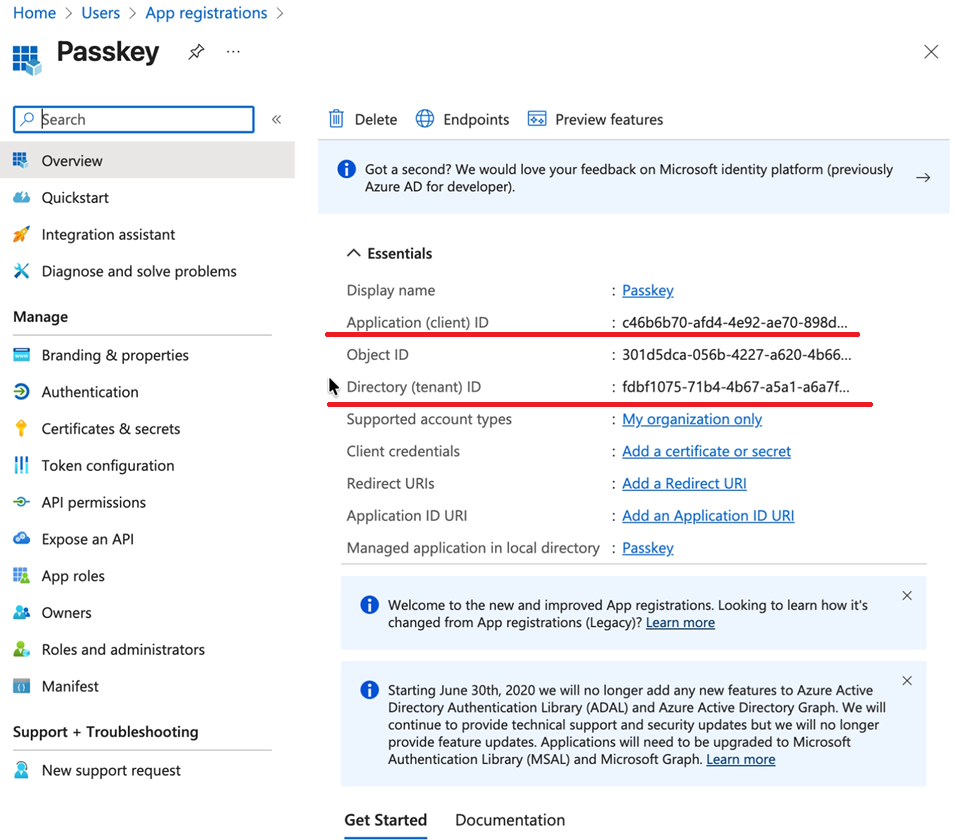
Once you have created your application, take note of its name, application (client) ID, and tenant (directory) ID; these will be required later on to link it to your HYPR tenant.
-
-
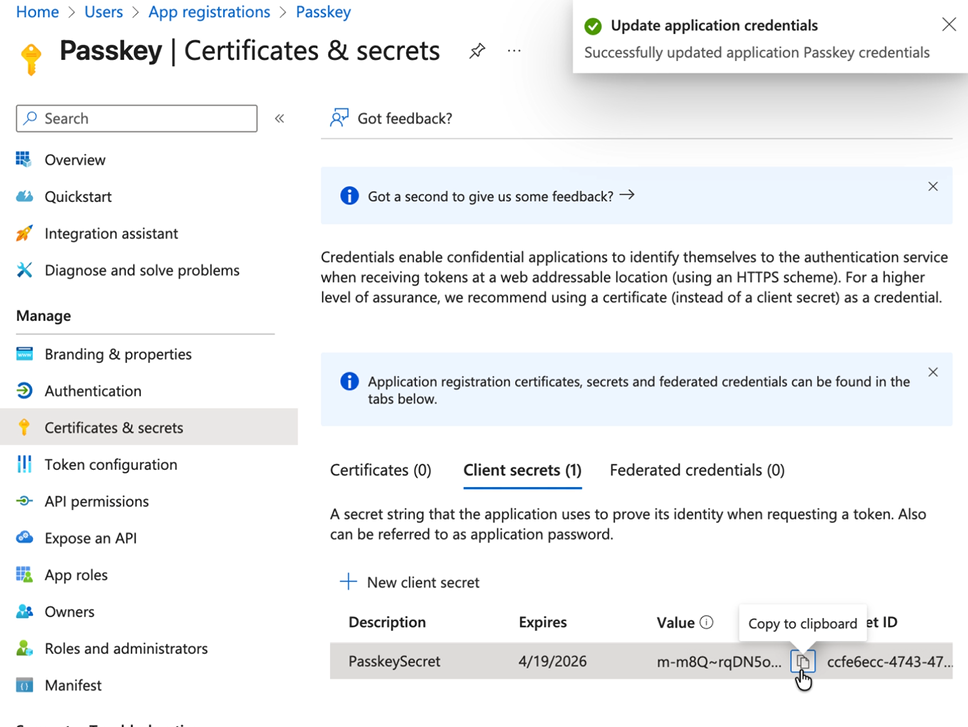
Generate Client Secret
-
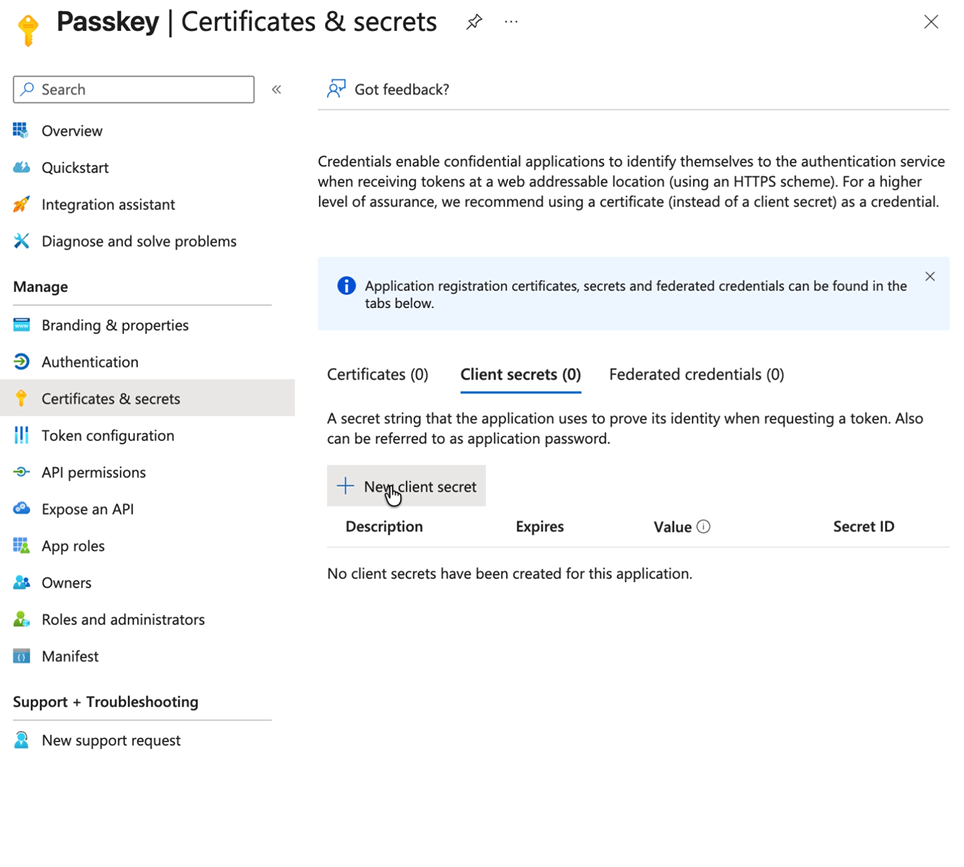
Go to Certificates & secrets
-
Click New client secret
-
Description: Enter a description for the secret
-
Expires: Select a suitable time period for the expiration of the secret
-
Click Add
-
Important: Once your secret has been created, copy and save the secret value immediately (you'll need this along with the other details you saved previously to complete the link to the HYPR tenant)
-
-
Configure Delegated Permissions
-
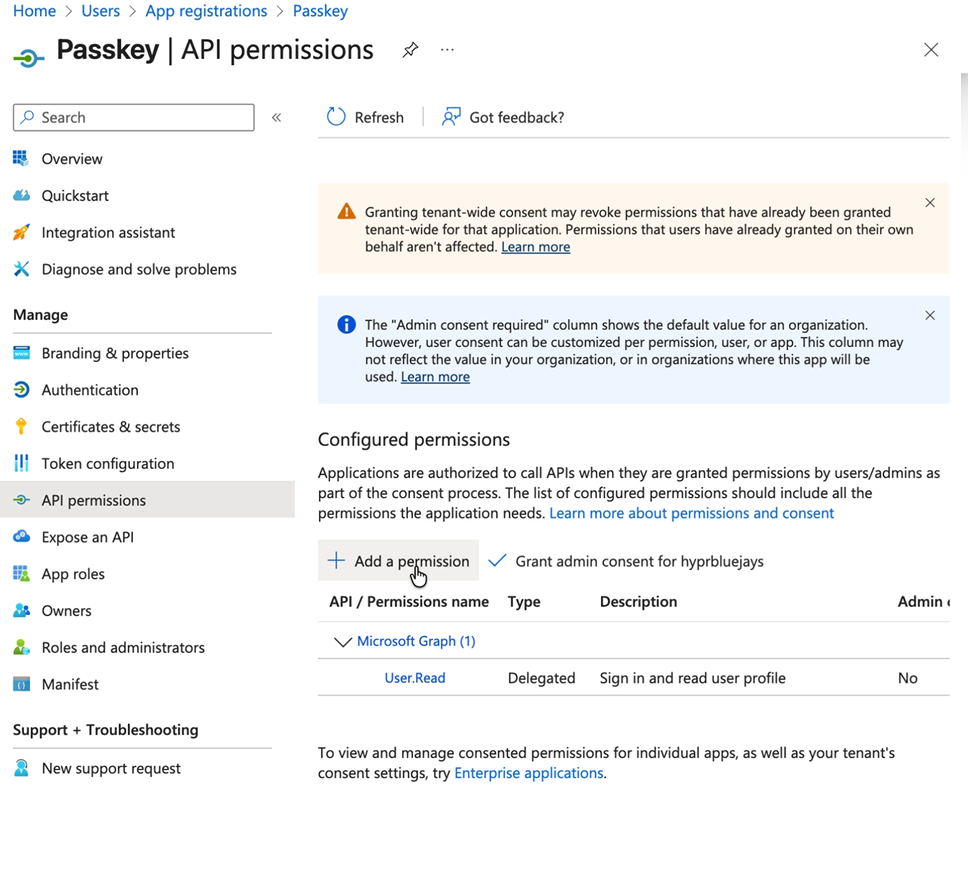
Navigate to API permissions
-
Click Add a permission
-
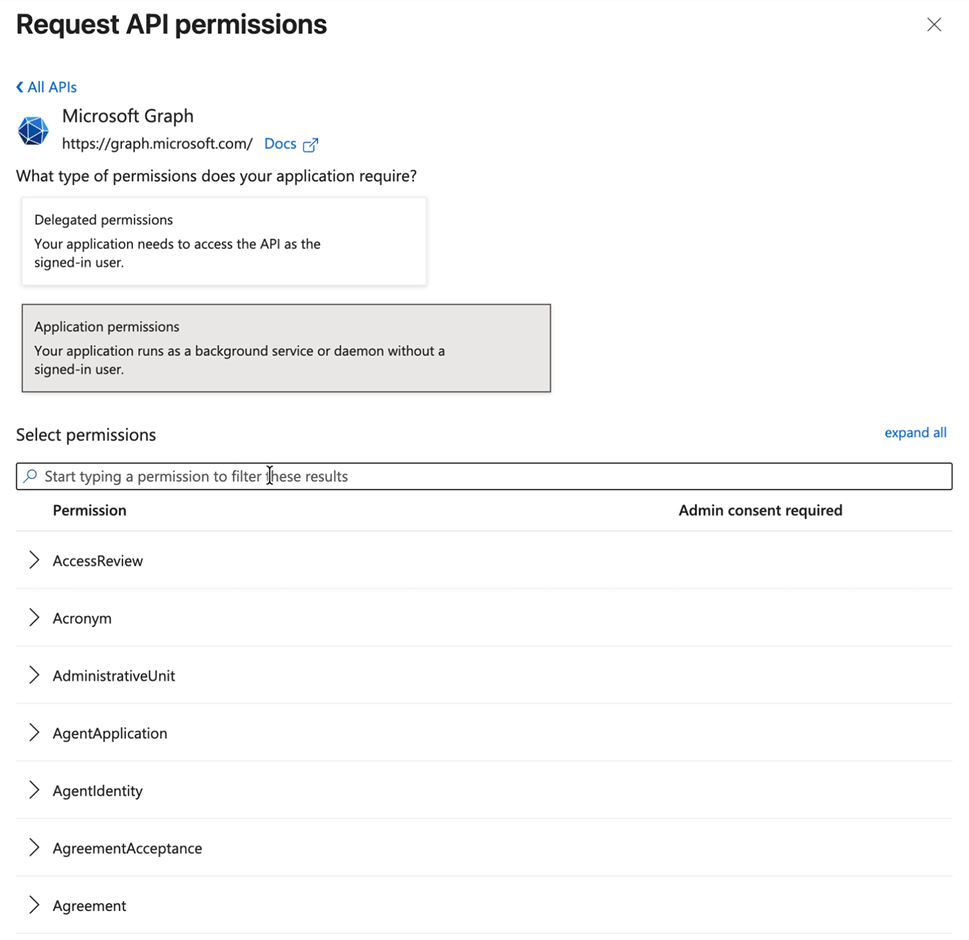
Select Microsoft Graph
-
Choose Delegated permissions
-
Search for and tick the required delegated permission:
- UserAuthenticationMethod.ReadWrite.All
-
Click Add permissions
-
-
Configure Application Permissions
- Click Add a permission again
- Select Microsoft Graph
- Choose Application permissions
- Search for and tick all of the required application permissions:
- Group.ReadWrite.All
- User.ReadWrite.All
- UserAuthenticationMethod.ReadWrite.All
- Click Add permissions
Both Permission Types RequiredBoth Delegated and Application permissions are required for
UserAuthenticationMethod.ReadWrite.All. These are separate permissions that must be selected independently—even though they share the same name, they serve different purposes and both are necessary for Enterprise Passkey to function correctly. Removing either the Delegated or Application permission will break registration and authentication. -
Grant Admin Consent
-
Click Grant admin consent for both Delegated and Application permissions
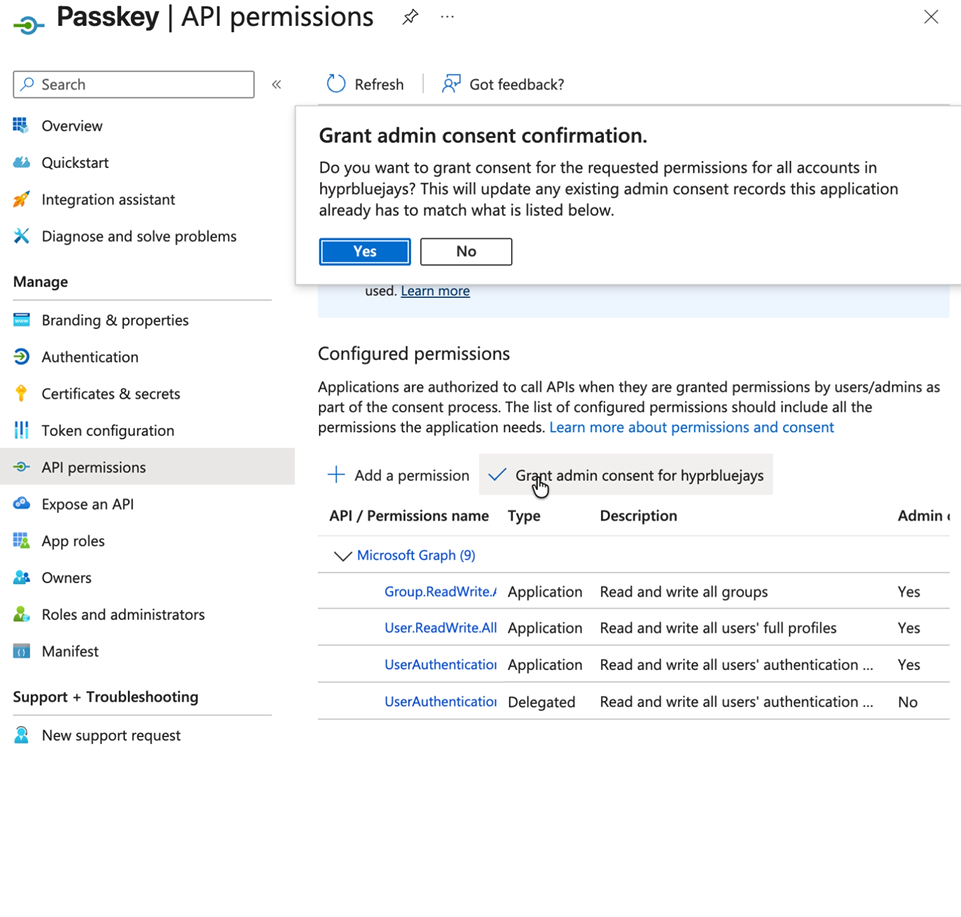
Verify that all four required permissions are granted:
-
Delegated permissions:
UserAuthenticationMethod.ReadWrite.All
-
Application permissions:
Group.ReadWrite.AllUser.ReadWrite.AllUserAuthenticationMethod.ReadWrite.All
-
Make sure to save the Application (client) ID, Directory (tenant) ID, and Client secret as you'll need these for the HYPR Control Center™ configuration. The client secret and the API permissions should enable you to create your HYPR integration.
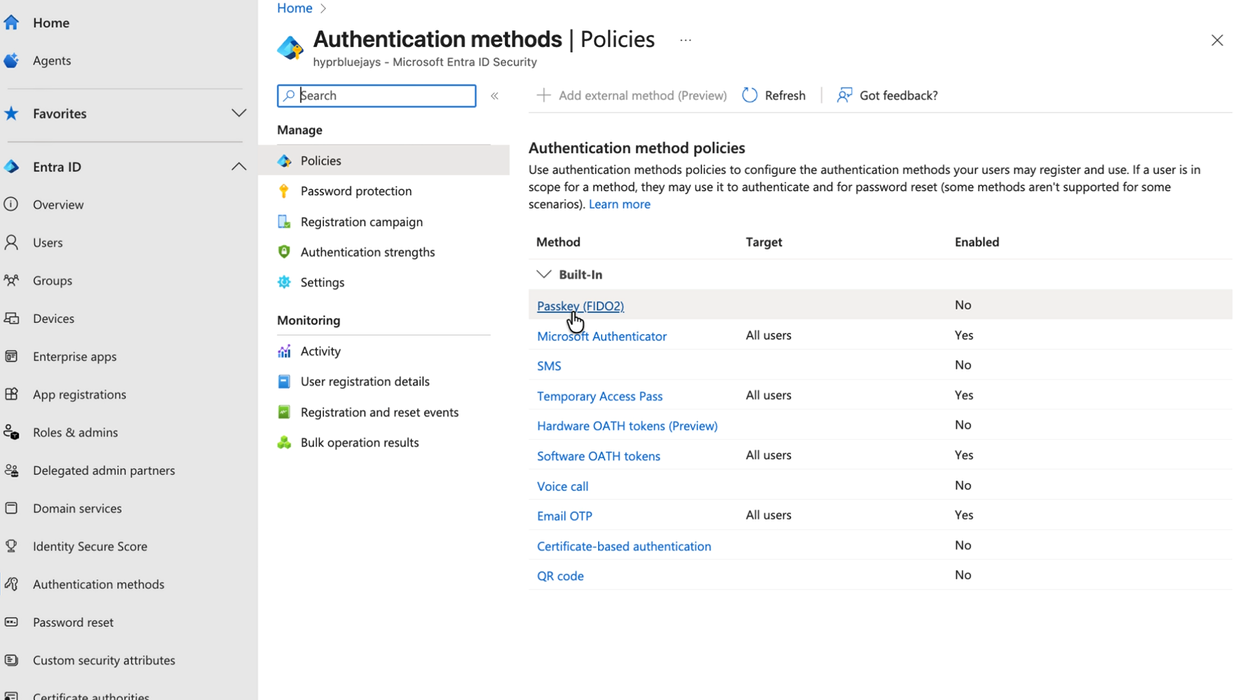
- Enable FIDO2 Authentication Methods
The last step is to enable FIDO2 security keys as an authentication method:
-
Navigate to Authentication methods > Policies
-
Select FIDO2 Security Key
-
Click Enable
-
Click Save
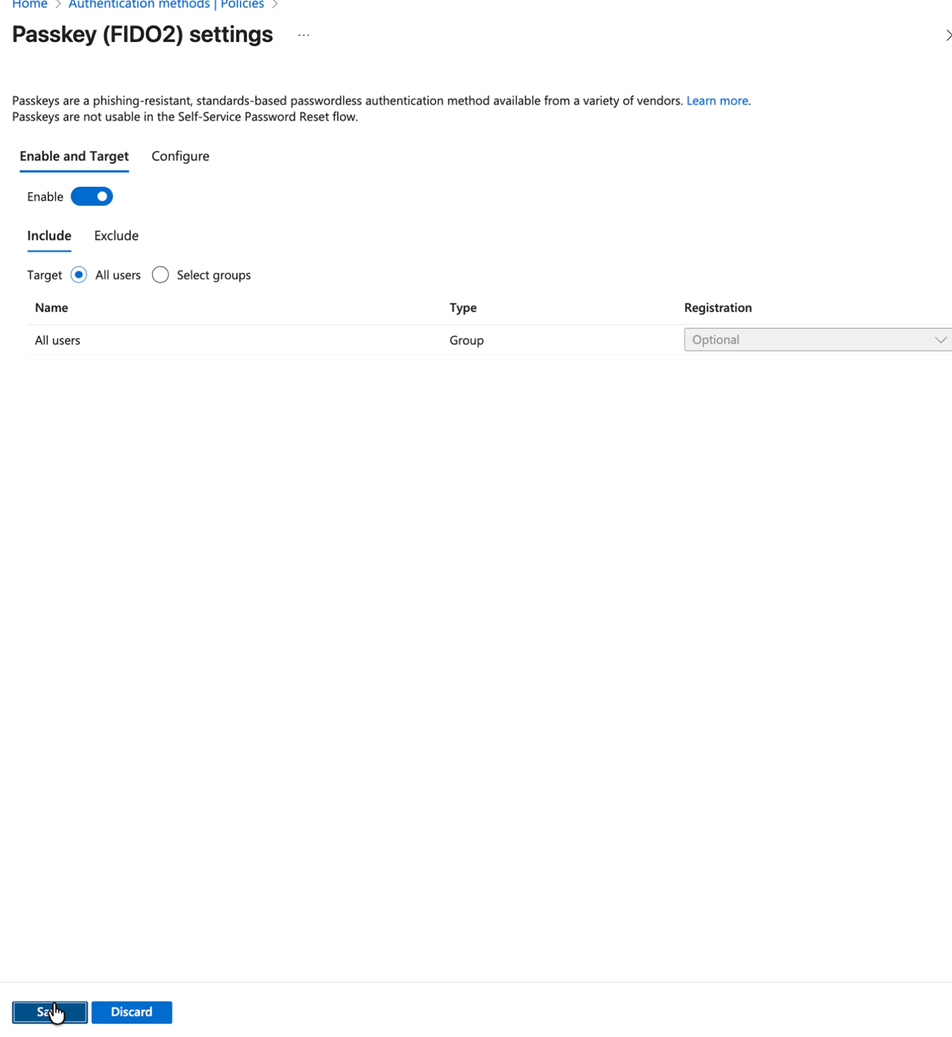
This step enables FIDO2 security keys as an authentication method in your Entra ID tenant, which is required for HYPR Enterprise Passkey functionality. This completes the Entra ID configuration required for HYPR Enterprise Passkey integration.
Configuring HYPR Control Center™
This step configures all the feature flags and settings required for HYPR Enterprise. You'll need your application's client ID, tenant ID, and client secret from the previous step.
Note that in the HYPR Control Center™, "global" and application-specific feature flags are managed using the same screen and interface. These are not different types of flags; "global" simply refers to feature flags that must be enabled for all applications by ticking the higher-level checkbox. Application-specific flags should be enabled on an application-by-application basis.
If you haven't completed the Entra ID app registration step, please do that first and then come back to this step. You need the client ID, tenant ID, and client secret that you saved earlier.
If your HYPR tenant is managed by HYPR, contact HYPR support and ask for the appropriate feature flags to be enabled for your tenant.
-
Access HYPR Control Center™
-
Log in to your HYPR Control Center™
-
Navigate to Feature Flags
-
-
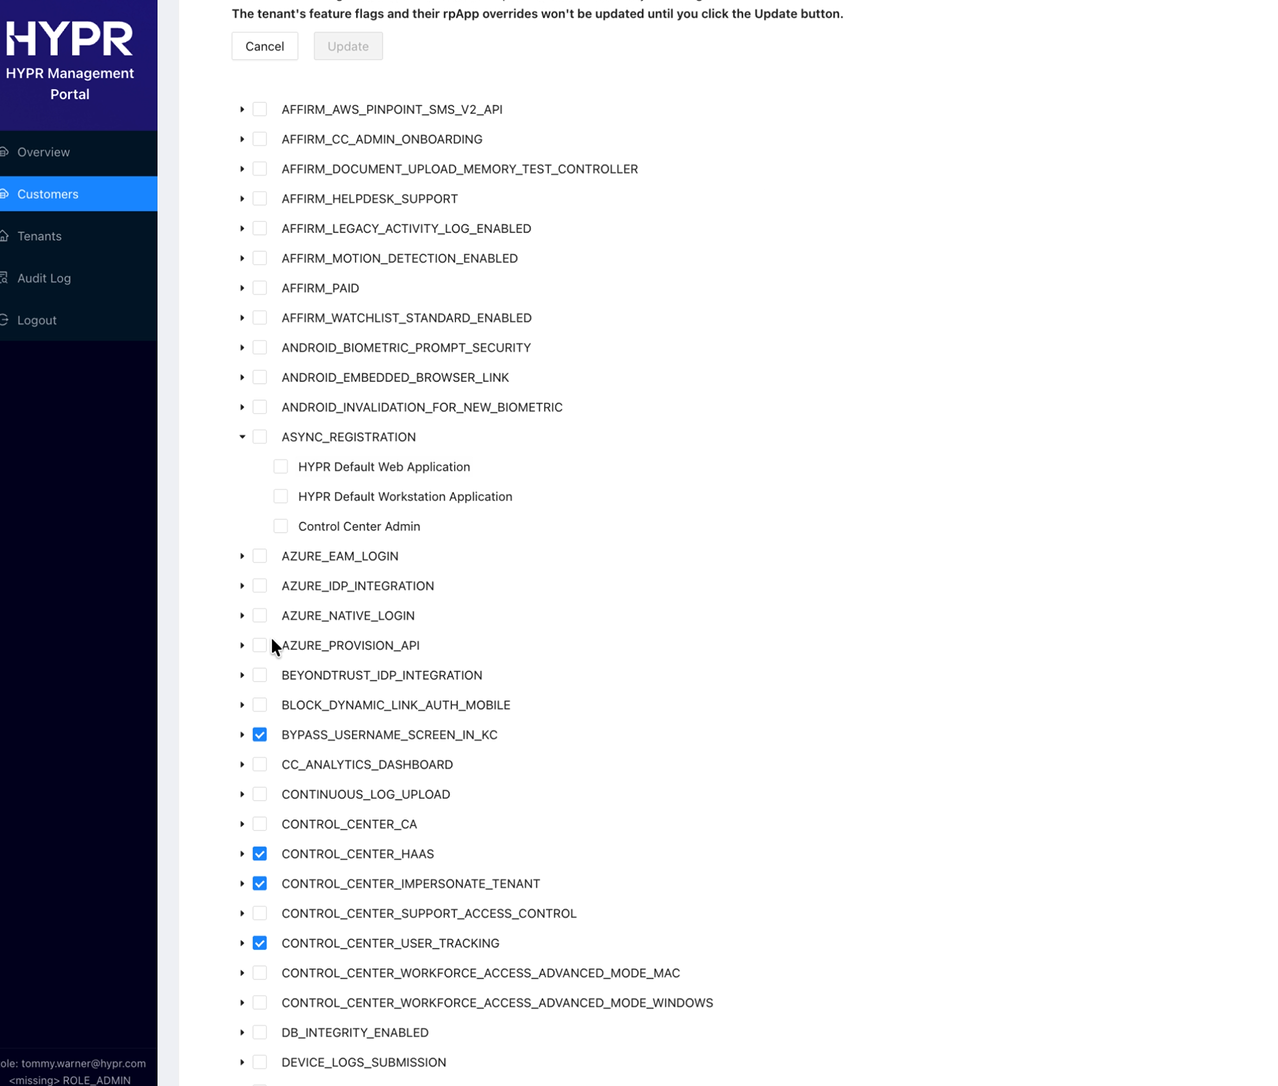
Enable Feature Flags
- Turn on the following required Global Feature Flags:
- AZURE_IDP_INTEGRATION
- AZURE_NATIVE_LOGIN
- AZURE_PROVISION_API
- FIDO2_MOBILE_3PPP_ENABLED
- FIDO2_MOBILE_AUTHENTICATOR
- HYPR_LINKS
- QR_DYNAMIC_LINK
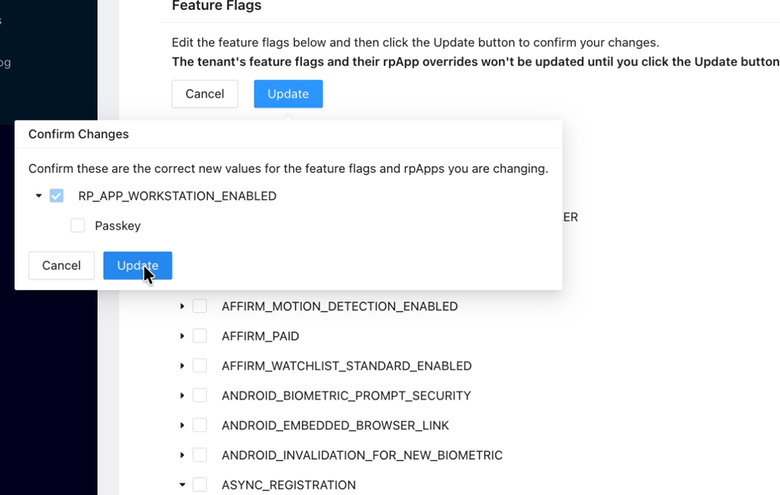
- RP_APP_WORKSTATION_ENABLED
- VIRTUAL_DESKTOP_INFRASTRUCTURE — Optional - Required if you want roaming logins to be enabled
- WEB_LOGIN_WITH_WFA_REGISTRATION
- WINDOWS_WEB_ENROLLMENT
- ANDROID_BIOMETRIC_PROMPT_SECURITY
- ENDPOINT_API_SECURITY_TOKEN_DEVICE — Required for device security token operations
- ENDPOINT_API_SECURITY_TOKEN_WORKSTATION — Required for workstation security token operations
- Click Update at the top and confirm the changes
- These feature flags are required to actually be able to create the Azure integration or the Entra ID integration in Control Center
- Turn on the following required Global Feature Flags:
-
Configure RP App Feature Flags
- Navigate to Feature Flags for your tenant in HYPR Control Center™
- For each Enterprise Passkey RP app, configure the following feature flags (i.e., tick them only for your app and not globally):
- AZURE_IDP_INTEGRATION
- AZURE_NATIVE_LOGIN
- AZURE_PROVISION_API
- ENDPOINT_API_SECURITY_TOKEN_DEVICE
- ENDPOINT_API_SECURITY_TOKEN_WORKSTATION
- FIDO2_MOBILE_AUTHENTICATOR
- FIDO2_MOBILE_3PPP_ENABLED
- ANDROID_BIOMETRIC_PROMPT_SECURITY
- RP_APP_WORKSTATION_ENABLED
- VIRTUAL_DESKTOP_INFRASTRUCTURE — Optional - Enable (checked) for this RP app if you want roaming logins to be enabled
- Click Update at the top and confirm the changes
- These feature flags must be configured per Enterprise Passkey RP app in Control Center
These flags must be enabled for the RP app to function properly without Wi‑Fi or Bluetooth Low Energy (BLE) connectivity. :::
The FIDO2_MOBILE_3PPP_ENABLED flag enables the HYPR Passkey feature (formerly known as Third-Party Passkey Provider or 3PPP), which is a new capability that differs from regular Enterprise Passkey in several key ways:
What the HYPR Passkey Feature Offers:
- HYPR One™ mobile app acts as a native passkey provider on iOS and Android
- Enables Windows OS and browser sign-in with synced, end-to-end encrypted passkeys
- HYPR automatically creates the Entra passkey during setup based on your signed-in Windows/Entra identity
- No separate registration in the Entra portal is required
Key Differences from Regular Enterprise Passkey:
- Simplified Setup: Previously, pairing a workstation to a HYPR Enterprise Passkey required additional steps involving Entra. With HYPR Passkey, HYPR creates the Entra passkey during setup automatically.
- Session Passkey SSO: Provides session passkey SSO after desktop login and QR-based fallback when proximity cannot be established
- One Passkey Per Device: Supports only one Entra passkey per device (other FIDO2 passkeys may coexist)
- Identity Alignment: The Windows account/Entra tenant you use during pairing determines which Entra identity the passkey is created for
Prerequisites for HYPR Passkey:
- HYPR One™ mobile app (current version) with device biometrics enabled for users
- HYPR Passwordless for Windows™ 10.5.0+ on the user's Entra-joined or hybrid-joined workstation
- Network connectivity and Bluetooth/proximity; mobile camera permission enabled for QR
Important HYPR Passkey Considerations:
- One Entra Passkey Limit: The HYPR One™ mobile app supports only one Entra passkey credential per device
- Credential Provider: Users may be prompted to enable the mobile Credential Provider during first-time setup
- Biometrics Required: Using a HYPR Enterprise Passkey requires mobile device biometrics to be enabled
- Identity Verification: Confirm the Windows user and Entra tenant are correct before pairing (check
whoami /upn) - Managed Devices: Ensure MDM policies don't block passkey providers, Bluetooth proximity, camera access, or associated domains
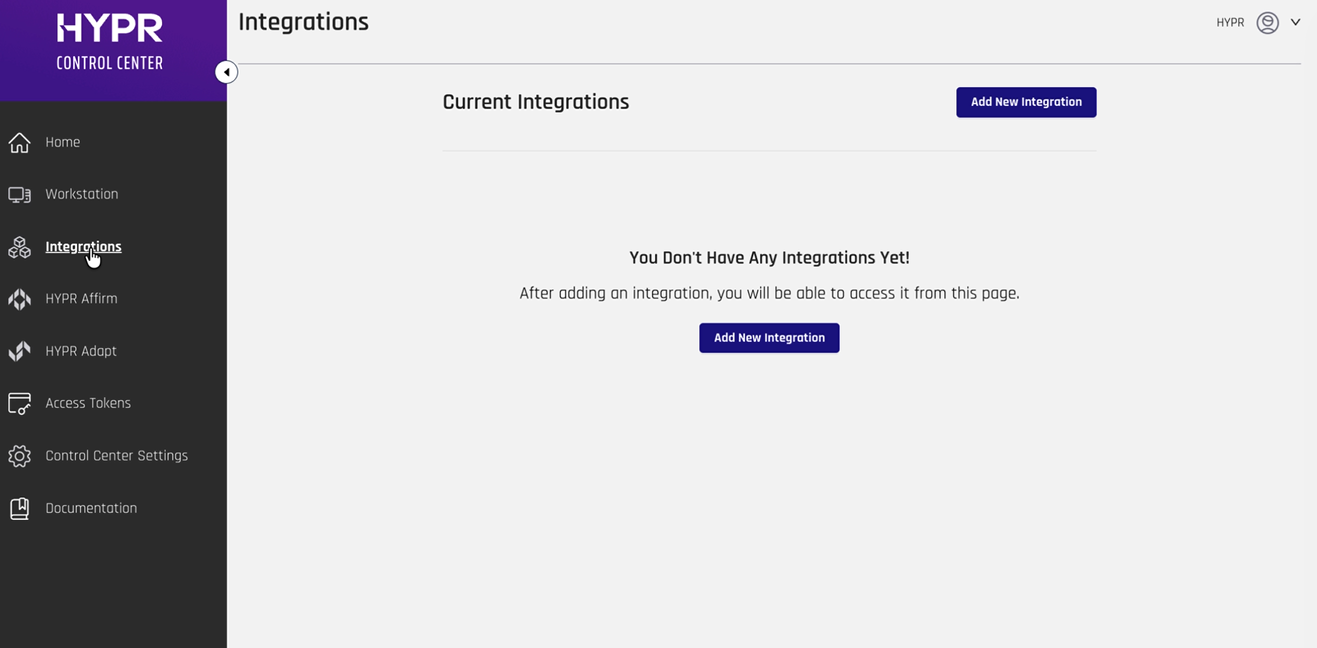
- Create Entra ID Integration
-
Once the feature flags have been updated for your HYPR tenant, navigate to Integrations in the menu on the left and click Add New Integration
-
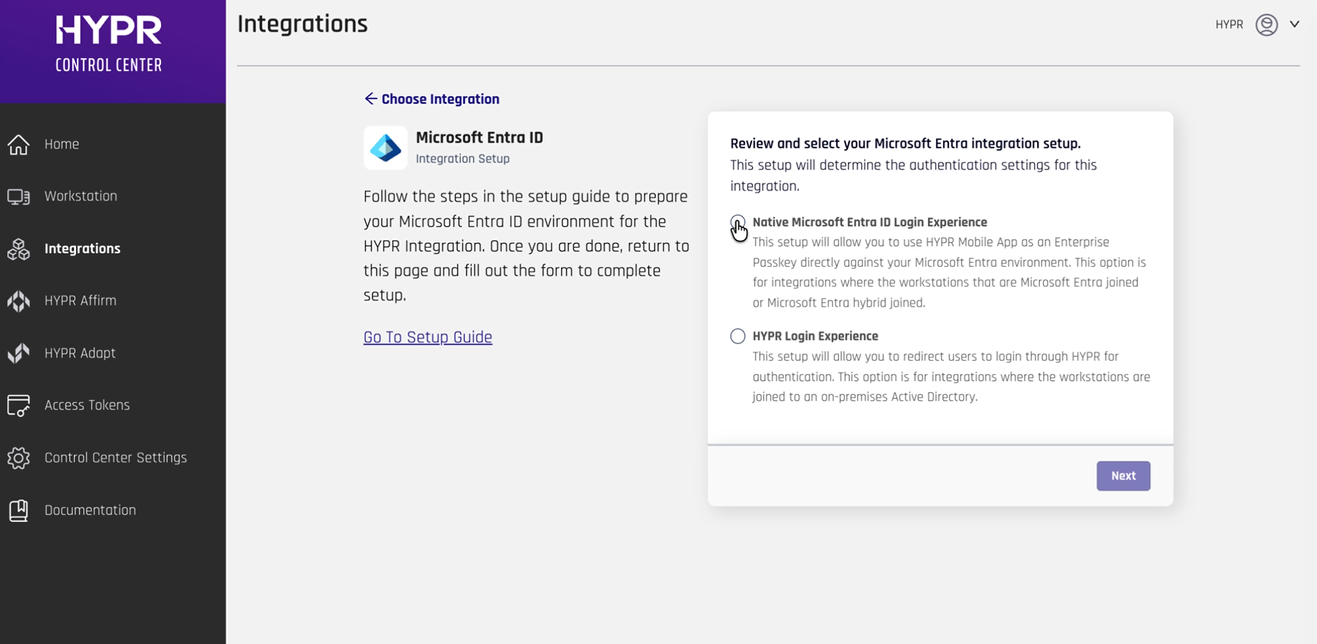
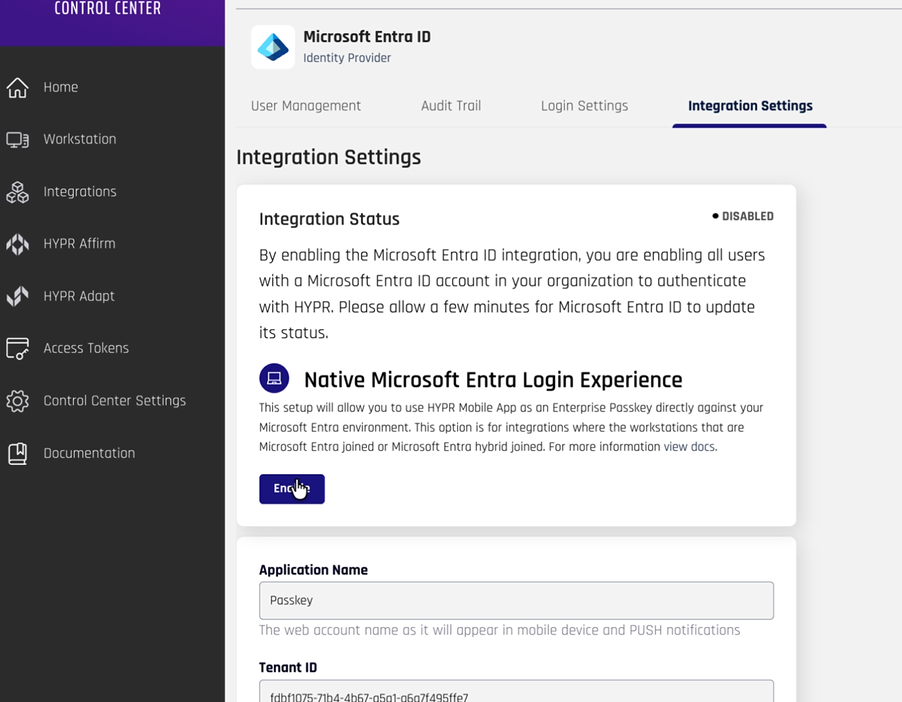
Select Microsoft Entra ID
-
Choose Native Microsoft Android Login Experience and click Next
-
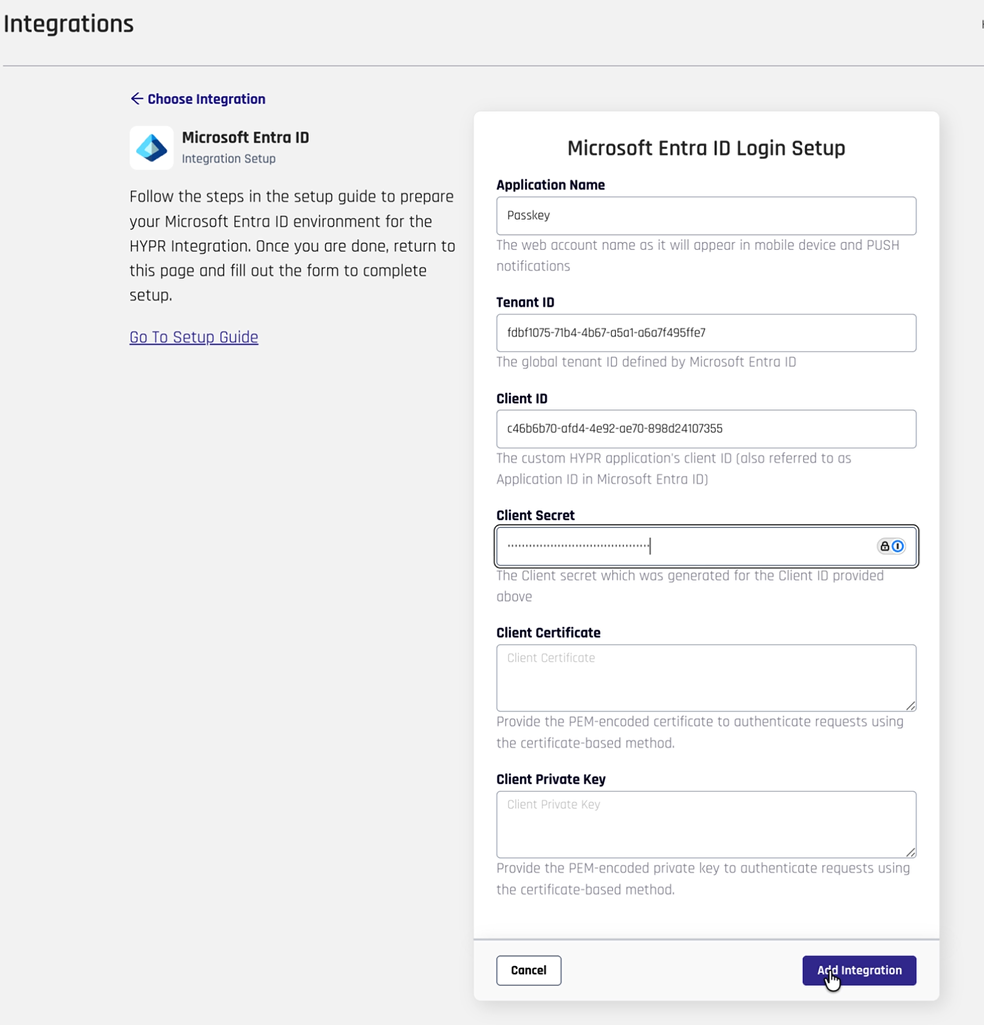
Specify the credentials and client secret of your Entra ID application that you saved earlier in the following:
- Application Name
- Client ID
- Client Secret
-
Click Add Integration
-
If your credentials have been specified correctly, you will be notified that the integration has been added successfully.
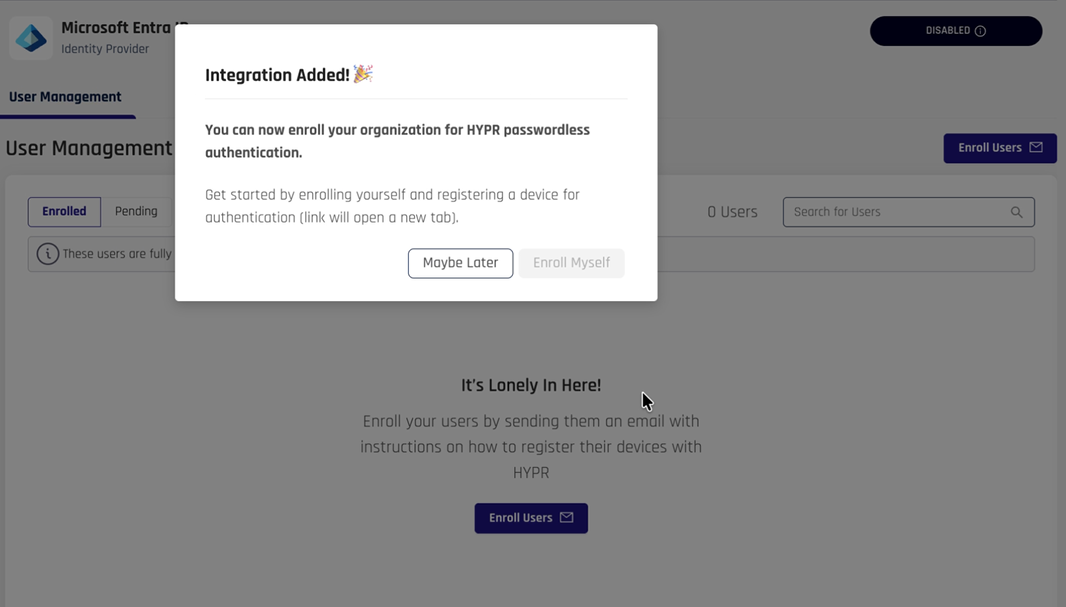
Click Maybe Later to close the dialog box.
- Configure Web RP App Feature Flags
-
Navigate back to Feature Flags for your tenant in HYPR Control Center™
-
Note: Currently, enabling the
ASYNC_REGISTRATIONfeature flag for your integration's webRpApp requires you to disable the RP_APP_WORKSTATION_ENABLED flag beforehand. -
So, for the Web RP App only, disable RP_APP_WORKSTATION_ENABLED.
-
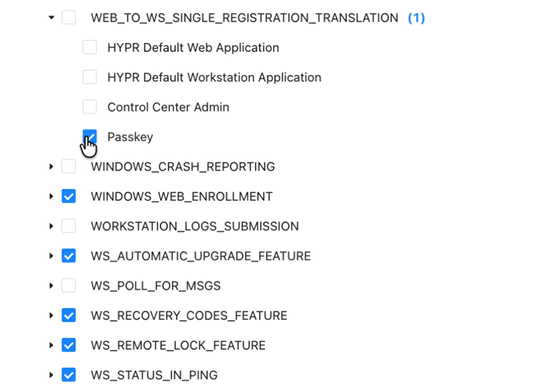
Enable the following feature flags for your Web RP App only (i.e., tick them only for your app and not globally):
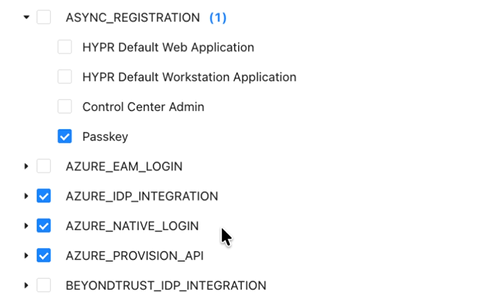
- ASYNC_REGISTRATION
- WEB_TO_WS_SINGLE_REGISTRATION_TRANSLATION
-
Re-enable RP_APP_WORKSTATION_ENABLED after enabling ASYNC_REGISTRATION
-
Make sure that you have successfully enabled both ASYNC_REGISTRATION and RP_APP_WORKSTATION_ENABLED for your application.
The feature flags control various aspects of the HYPR integration. Make sure to enable all required flags before proceeding with user enrollment.
Once you have completed the steps above, in the HYPR Control Center™, select your integration in Integrations and click Enable.
Additional Configuration
Enabling Windows FIDO2 Security Key Login
This step configures Windows to enable FIDO2 security key login via a registry key.
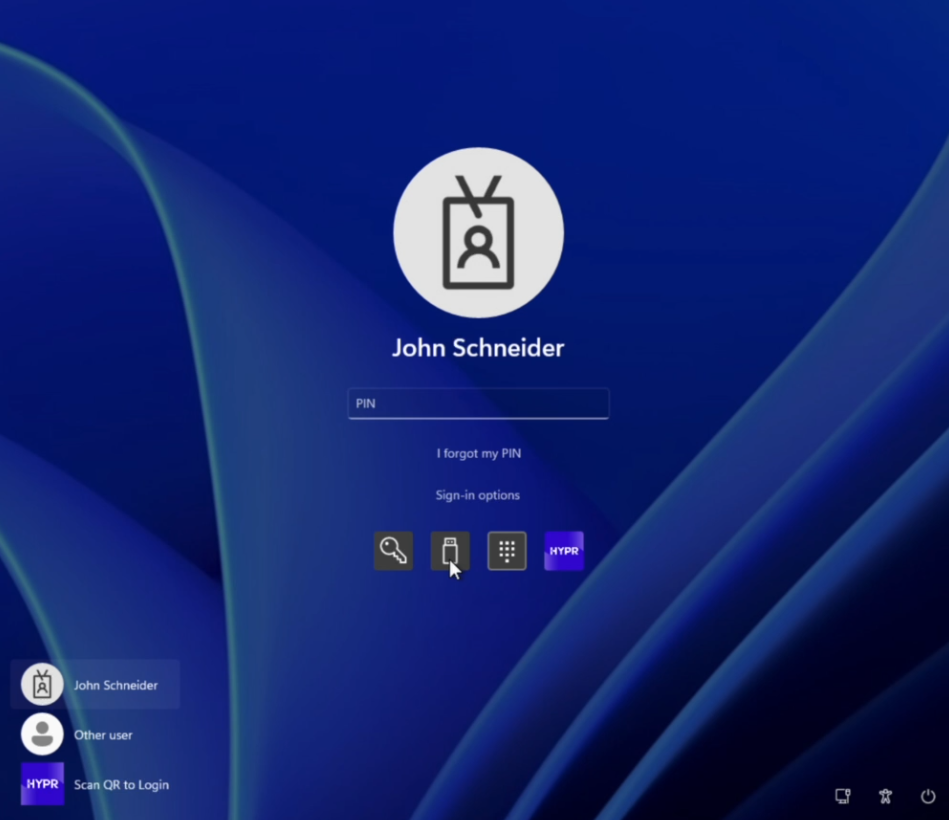
You should be signed in to your Entra ID tenant with your account. Prior to this change, you'll only see the password tile and Windows Hello tile on the Windows login screen. As part of this step, we will enable a third, security key tile to be added to this selection, which will be used for the HYPR Enterprise Passkey login.
-
Access Registry Editor
- Open Registry Editor as Administrator
- Navigate to:
HKEY_LOCAL_MACHINE\SOFTWARE\Policies\Microsoft - In this folder, create a new folder called "FIDO" and navigate to it.
-
Create Registry Key
- In
HKEY_LOCAL_MACHINE\SOFTWARE\Policies\Microsoft\FIDO, right-click in the right pane - Select New > DWORD (32-bit) Value
- Name:
EnableFIDODeviceLogon - Set value to
1
- In
-
Alternative: Command Line Method
- Open Command Prompt as Administrator
- Run:
REG ADD "HKLM\SOFTWARE\Policies\Microsoft\FIDO" /v EnableFIDODeviceLogon /t REG_DWORD /d 1 /f
-
Restart Computer
- Restart the Windows machine to apply the registry changes
- After restart, you should see the FIDO2 Security Key tile at the login screen
Installing HYPR Passwordless for Windows™
This step installs HYPR Passwordless for Windows™ on your Windows machine that has been joined to your Entra ID domain.
You should have previously joined your Windows machine to your Entra ID domain, configured your HYPR Control Center™ tenant, and installed the HYPR One™ mobile app on your mobile device. On your workstation, you should be signed in as a regular user on your Entra domain.
- Download HYPR Passwordless for Windows™
-
Log in to HYPR Control Center™ (in standard mode)
-
Navigate to Workstation > Desktop Clients
-
Click Download for Windows
-
Download the zip file containing both the MSI installer and
hypr.jsonconfiguration file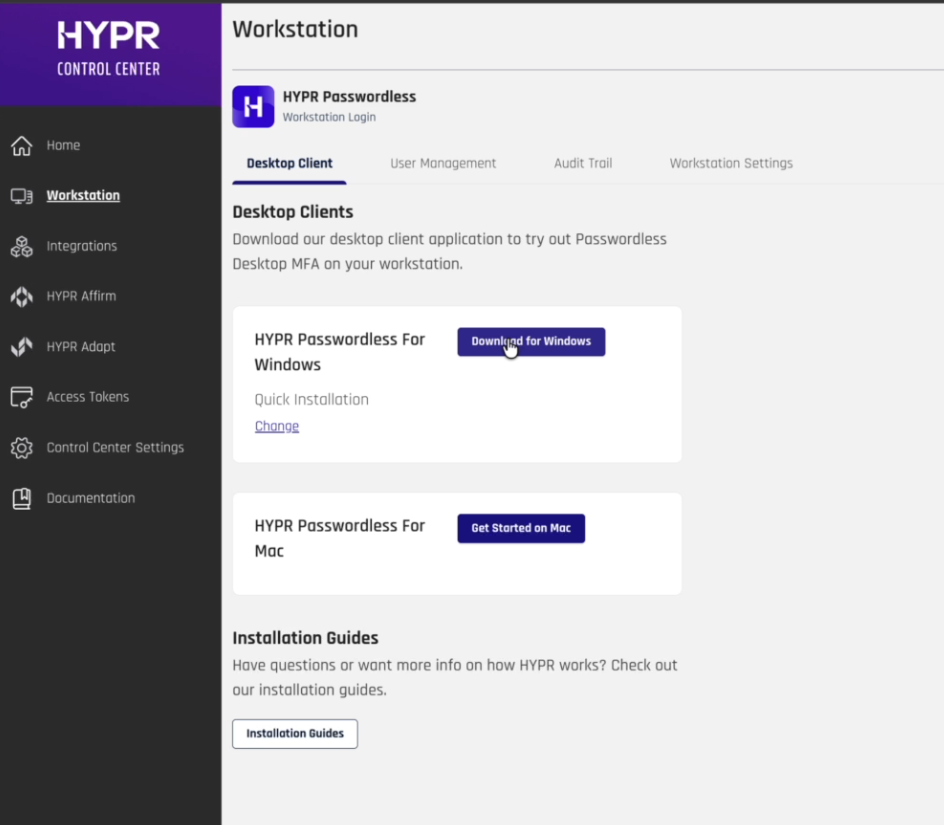
-
Make sure that you only install HYPR using the downloaded files from this particular page. Using any other installation JSON file may break your setup, as your HYPR installation may ingest incorrect client and tenant IDs for your Entra ID application, among others.
-
Prepare Installation
- Unzip the downloaded installation folder
- Ensure both of the unzipped files (the MSI file and
hypr.json) are in the same directory - Verify that the MSI file is at least version 10.5.0 (10.5.2 or later recommended)
- The
hypr.jsonfile contains all the configuration needed to deploy to your specific tenant
-
Install HYPR Passwordless for Windows™
- Right-click the MSI installer
- Select Install (requires administrator privileges)
- Accept the terms and conditions
- Enter local administrator credentials when prompted
- Complete the installation
-
Restart and Verify Installation
-
After installation, restart the computer
-
At the Windows login screen, you should now see:
- Password tile (existing)
- Windows Hello tile (existing)
- FIDO2 Security Key tile (new)
- HYPR credential provider (new)
-
-
Test User Experience
-
Users can now scan the QR code with their HYPR One™ mobile app to log in
-
The Start Pairing button allows new users to register their devices
-
You can create a new HYPR registration from within the HYPR One™ mobile app by clicking Start Pairing and scanning the QR code with your phone
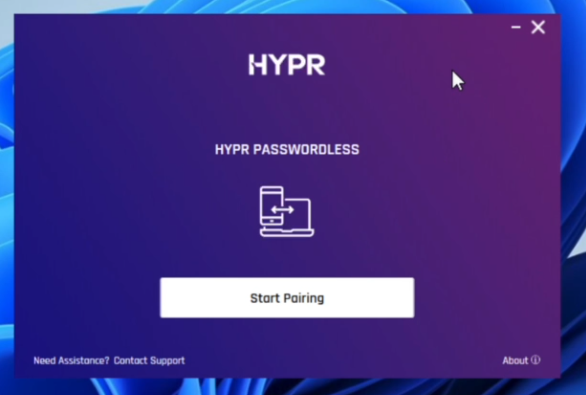
-
After pairing, HYPR Passwordless for Windows™ enables passwordless login to Windows workstations using the HYPR One™ mobile app as a FIDO2 security key. This completes the HYPR passwordless setup.
See Also
For more information about HYPR Passwordless for Windows™ functionality, see: