Affirm to Enterprise Passkey Seamless Integration Guide
This guide walks you through setting up a seamless integration between HYPR Affirm identity verification and Enterprise Passkey provisioning. This integration allows users to automatically receive a Magic Link for passkey creation immediately after successful identity verification in Affirm.
Overview
The Affirm to Enterprise Passkey seamless integration enables a streamlined user experience where:
- User completes identity verification in HYPR Affirm
- Admin configures a customization to trigger Magic Link creation via outgoing API call upon successful verification
- Magic Link is automatically generated and sent to the user
- User receives Magic Link as a custom result button in the Affirm verification end screen
- User opens Magic Link on their mobile device
- Passkey is automatically provisioned using the web-to-workstation flow
This integration eliminates the need for manual Magic Link generation and provides a completely passwordless onboarding experience.
Prerequisites
Before setting up this integration, ensure you have:
HYPR Affirm Configuration
- HYPR Affirm tenant configured and operational
- Verification flows set up and tested (see Administering HYPR Affirm)
- Injectable Outcomes configured for custom results (see Configuring Injectable Outcomes & Retry Limits)
- Admin access to HYPR Control Center™
HYPR Enterprise Passkey Configuration
- Enterprise Passkey and HYPR Passkey setup completed (see Enterprise Passkey and HYPR Passkey Setup Guide)
- Magic Link functionality enabled in HYPR Control Center™ (see Magic Link Configuration)
- Web-to-workstation flow configured and tested (see Enterprise Passkey User Experience Guide)
- Mobile app requirements met (HYPR One™ 10.5.0+)
Technical Requirements
- API access to HYPR Control Center™ Magic Link creation endpoint
- Network connectivity between Affirm and Enterprise Passkey services
- User email addresses available for Magic Link delivery
- Mobile devices with HYPR One™ app installed
Architecture Overview
The seamless integration consists of several key components:
- HYPR Affirm: Identity verification platform (see HYPR Affirm Overview)
- Injectable Outcomes: Custom result configuration for API calls (see Configuring Injectable Outcomes & Retry Limits)
- Magic Link API: HYPR Control Center™ endpoint for Magic Link creation (see Magic Link Configuration)
- HYPR One™ Mobile App: Passkey provisioning and management
- Enterprise Passkey: FIDO2 passkey creation and synchronization (see Enterprise Passkey and HYPR Passkey Setup Guide)
Configuration Steps
Configure Affirm Injectable Outcomes
-
Access HYPR Control Center™ as an Administrator
- Navigate to HYPR Affirm > Advanced Settings > Customizations
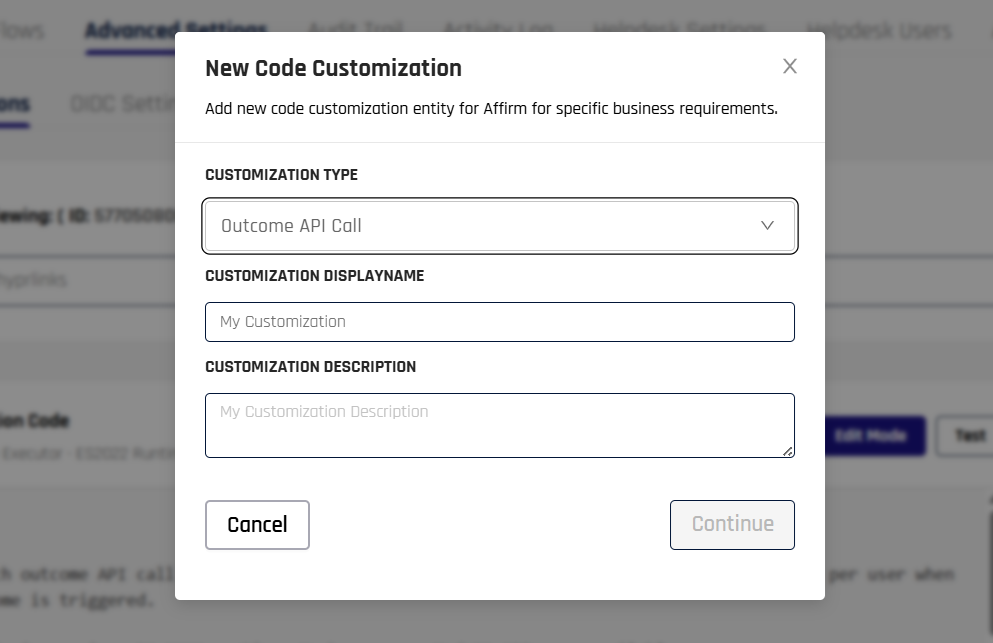
- Select New Customization
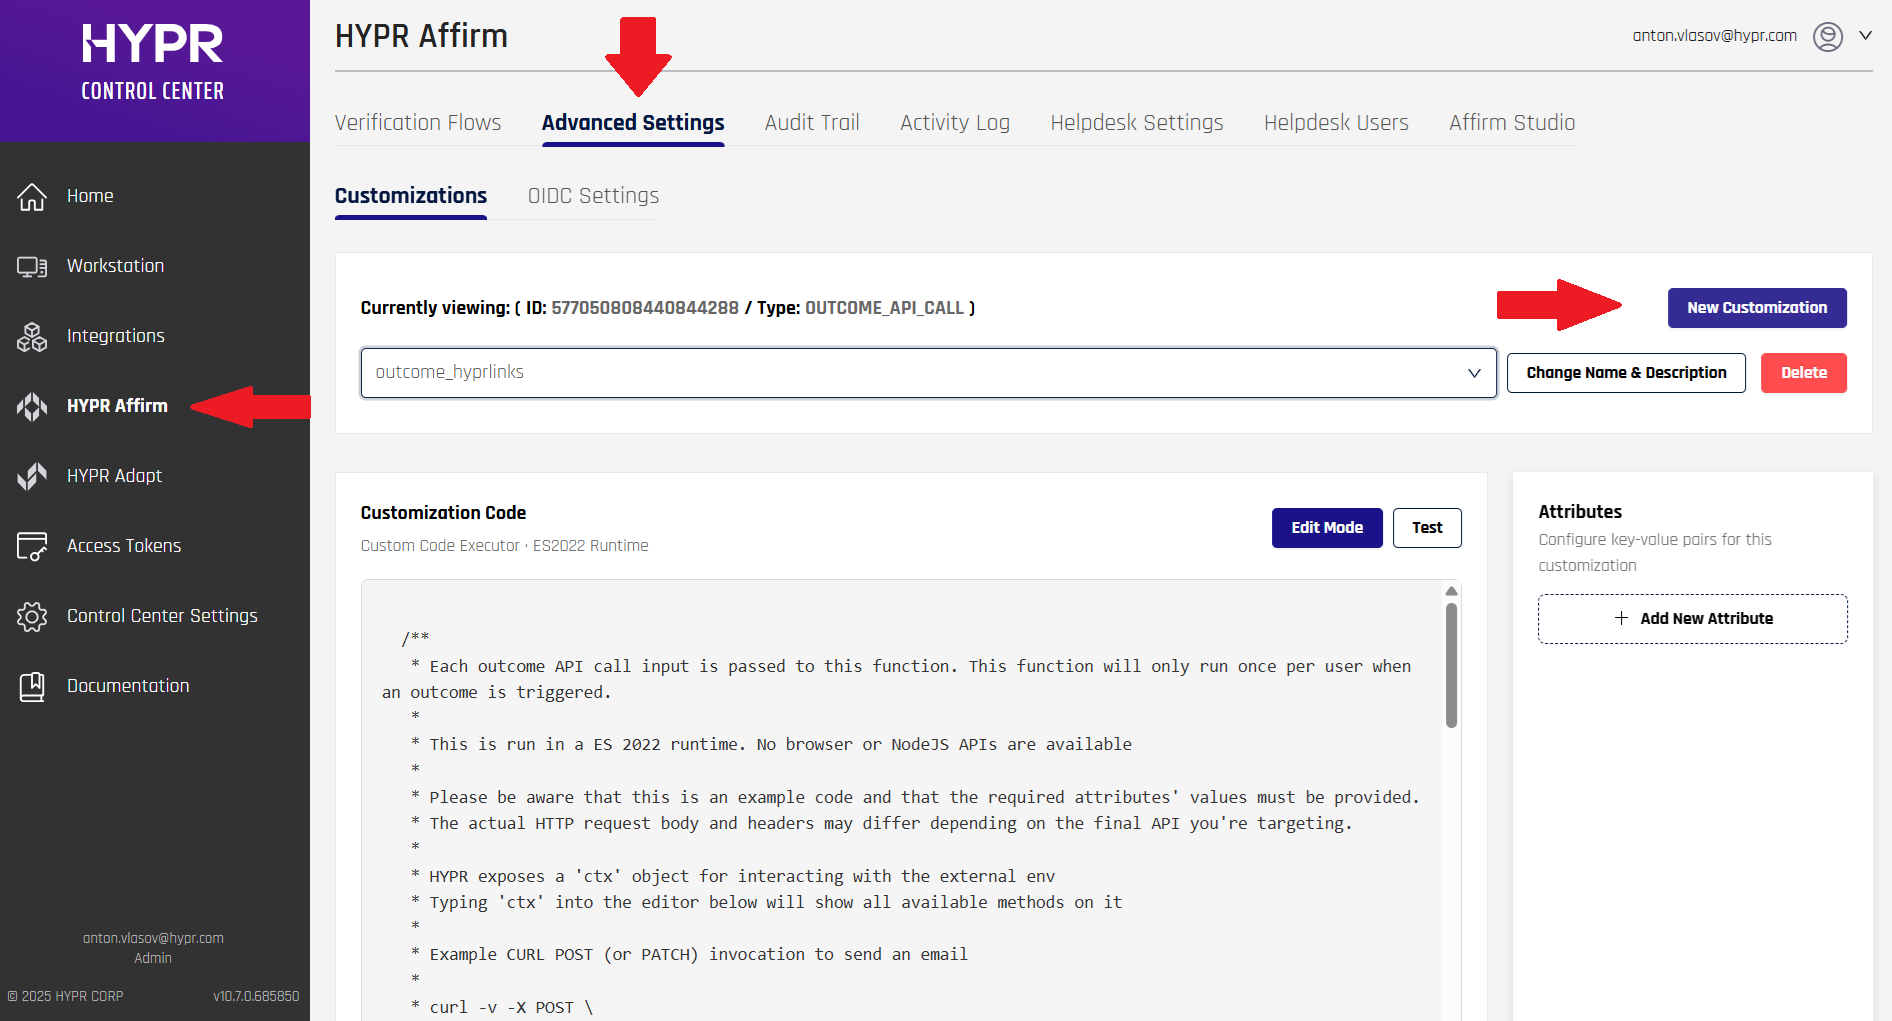
- Choose Outcome API Call as the Customization Type
- Specify a name and description for your customization
- Click Continue when done
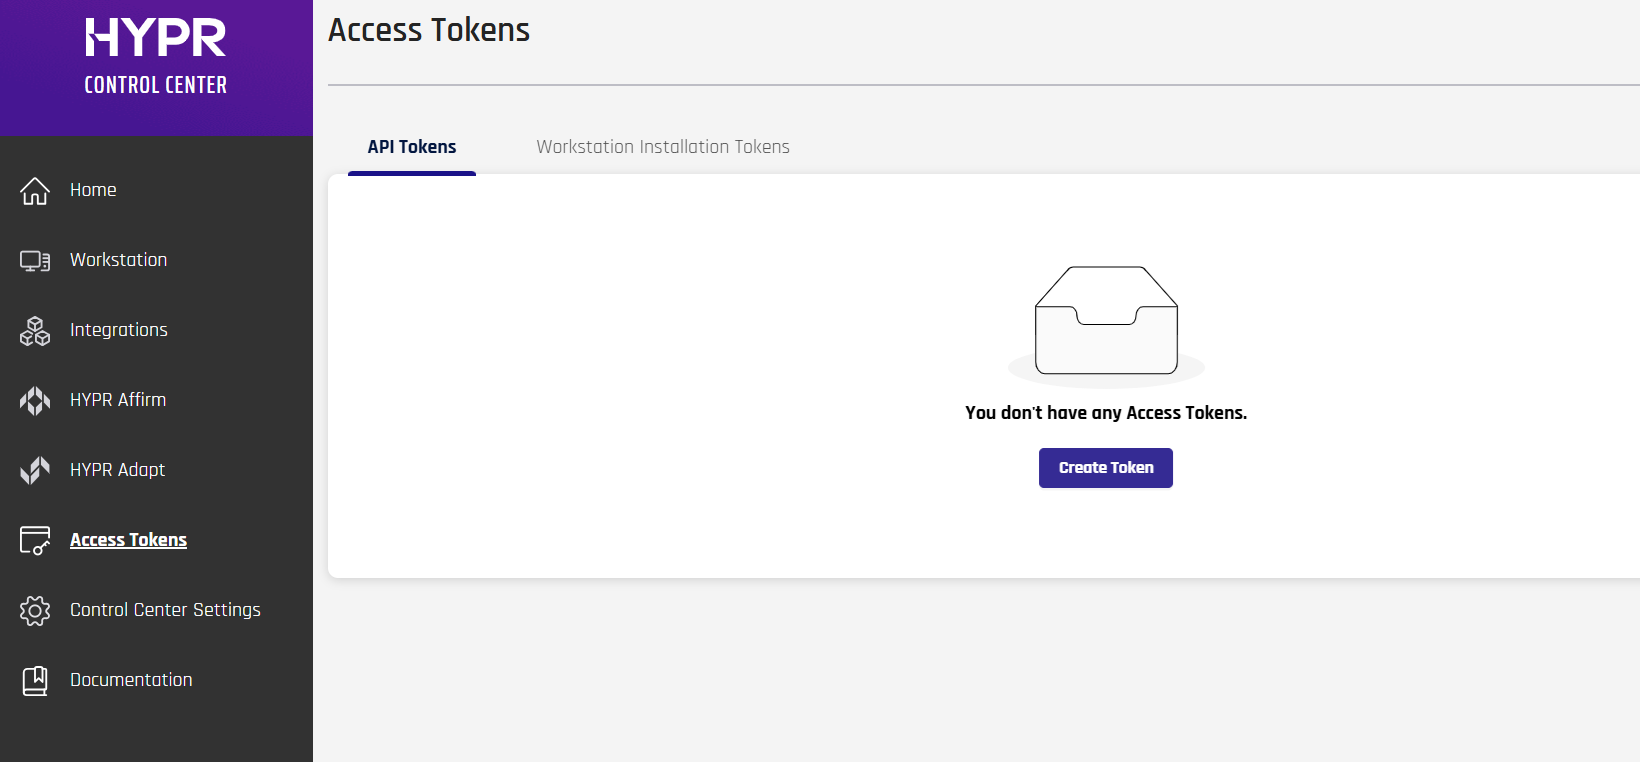
- Navigate to Access Tokens in the menu pane on the left
- Click Create Token
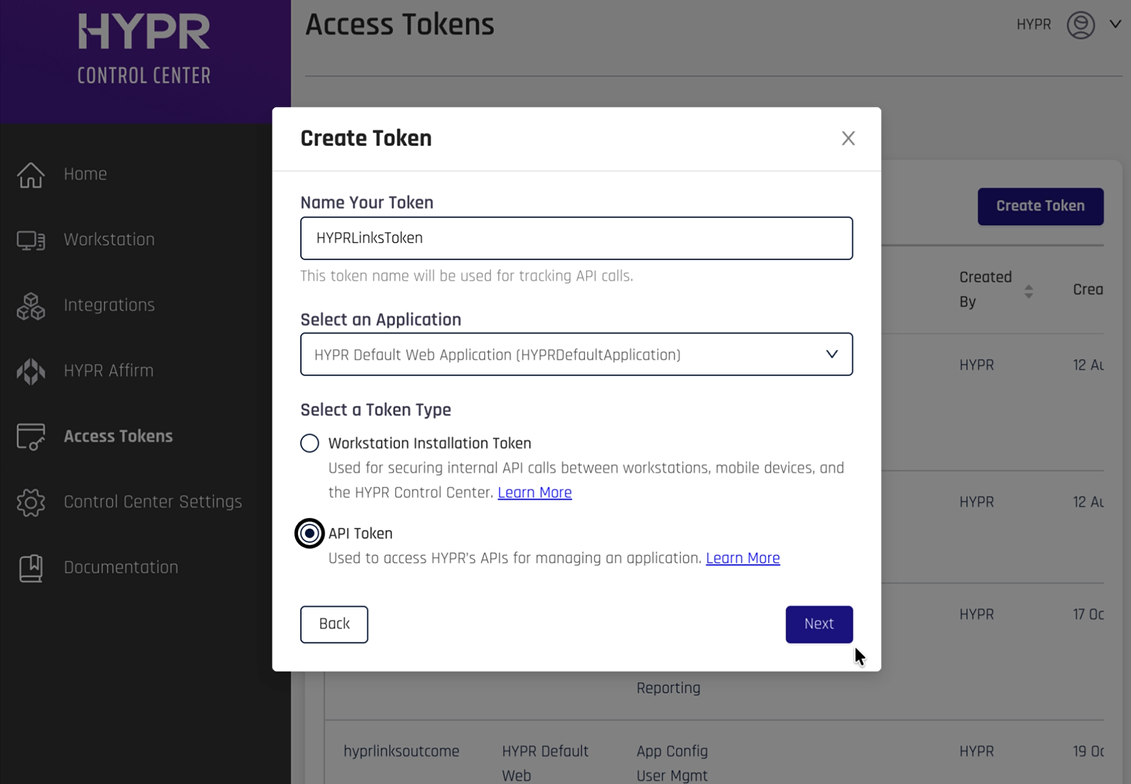
- Specify a name for your token and select your application in the drop-down menu
- Select API Token and click Next
- On the next screen, select Bearer Token in the Token Type drop-down menu
- Select the Control Center and Application permission types
- Click Next

- On the next screen, copy the provided HYPR Access Token and store it for later use

- To begin configuring the script you are going to be using, navigate to HYPR Affirm in the menu pane on the left
- Select the Advanced Settings tab
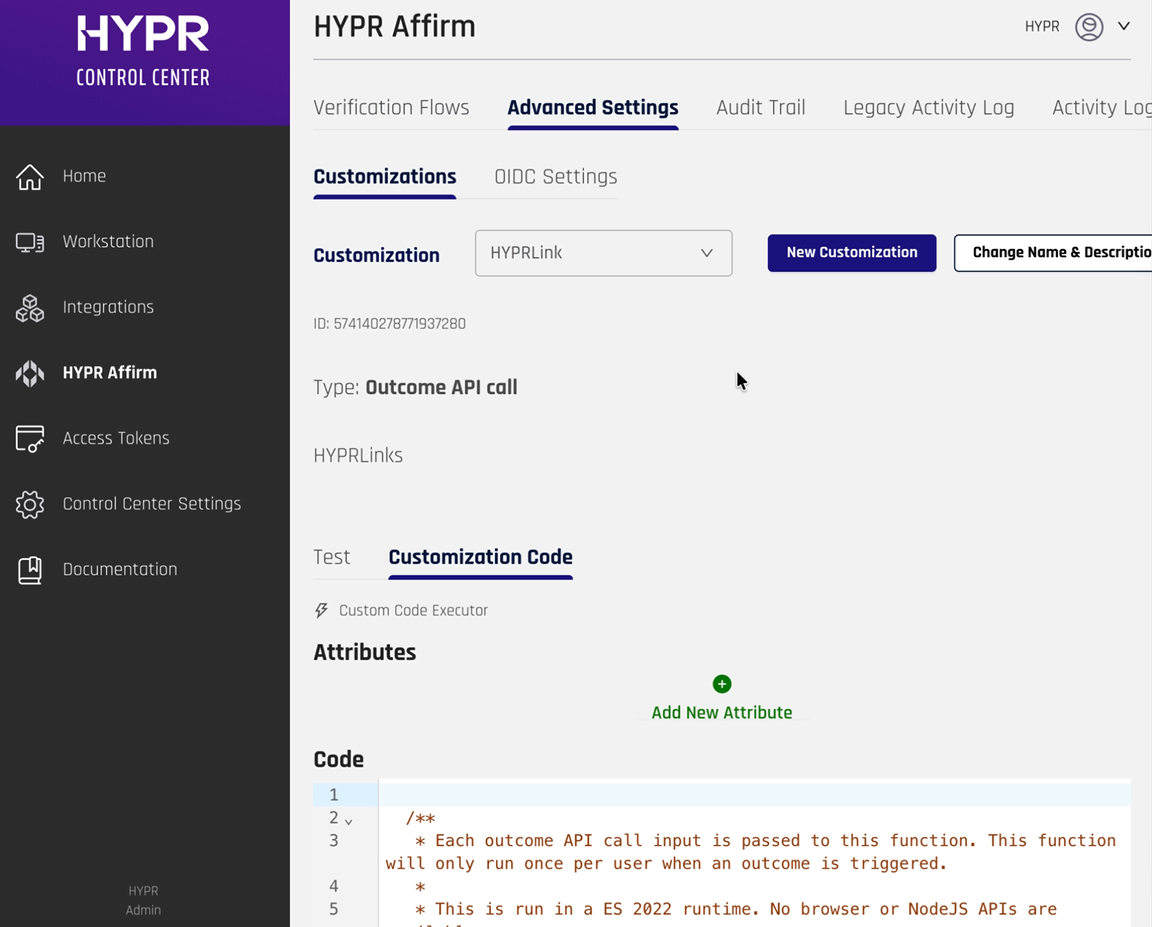
- On the Add New Attribute screen, specify
HYPR_ACCESS_TOKENas the Attribute Name and the HYPR Access Token value you saved previously as the Attribute Value - Click Add
Custom Attribute NamesYou can name the attribute something else, but make sure to replace all mentions of the token name in the script accordingly.
-
Similarly, add another attribute called
HYPR_TENANT_URLand specify the URL for your HYPR tenant as the value -
Below the Attributes section on the right side of the screen, in the Code section, enter the following code:
function handle(inputJson) {
let input = JSON.parse(inputJson);
const hyprTenantUrl = ctx.getAttribute("HYPR_TENANT_URL");
const hyprAccessToken = ctx.getAttribute("HYPR_ACCESS_TOKEN");
const hyprApiPayload = {
   username: input.loginIdentifier,
   hyprServerUrl: hyprTenantUrl,
};
const httpHeaders = {
   Accept: "application/json",
   "Cache-Control": "no-cache",
   Authorization: `Bearer ${hyprAccessToken}`,
};

ctx.log("FINE", "Custom handler input=" + JSON.stringify(input));
// ctx.log("FINE", "DEBUG hyprApiPayload = " + JSON.stringify(hyprApiPayload));

// Only proceed if user is approved
if (!input.isApproved) {
   ctx.log("FINE", "User not approved, skipping magic link retrieval");
   return {
      isSuccess: true,
      outcomeToDisplay: "Verification not approved",
   };
}

try {
   // Make API call to retrieve dynamic HYPR link
   const magiclinkUrl = hyprTenantUrl + "/rp/api/versioned/magiclink";
   const res = ctx.httpPost(
      magiclinkUrl,
      httpHeaders,
      JSON.stringify(hyprApiPayload)
   );

   const response = JSON.parse(res);
   ctx.log("FINE", "httpPost response =" + JSON.stringify(response));

   if (response.statusCode === 200) {
      const magiclinkResponse = JSON.parse(response.body);
      const hyprLink = magiclinkResponse.firebaseDynamicLinkForHyprApp;
      const linkText = "Register HYPR App";
      const outcomeMessage = `<a class="idv-primary-btn" href="${hyprLink}">${linkText}</a>`;
      return {
      isSuccess: true,
      outcomeToDisplay: outcomeMessage,
      };
   } else if (response.statusCode === 404) {
      // No PIN found for this email
      return {
      isSuccess: true,
      outcomeToDisplay:
         "Received 404 response. Please contact your administrator.",
      };
   } else {
      // API error
      ctx.log("WARNING", "API call failed with status: " + response.statusCode);
      return {
      isSuccess: false,
      outcomeToDisplay:
         "Unable to retrieve magic link. Please try again or contact support.",
      };
   }
} catch (error) {
   ctx.log("WARNING", "Exception HYPR link retrieval: " + error.message);
   return {
      isSuccess: false,
      outcomeToDisplay:
      "Error retrieving magic link. Please contact support.",
   };
}
}

handle(ctx.getInputAsJson());-
Click Save and then click Save again
-
Once your customization has been saved, use the Test section to verify that the customization works correctly. Test with a valid email address to confirm the Magic Link is provisioned successfully
-
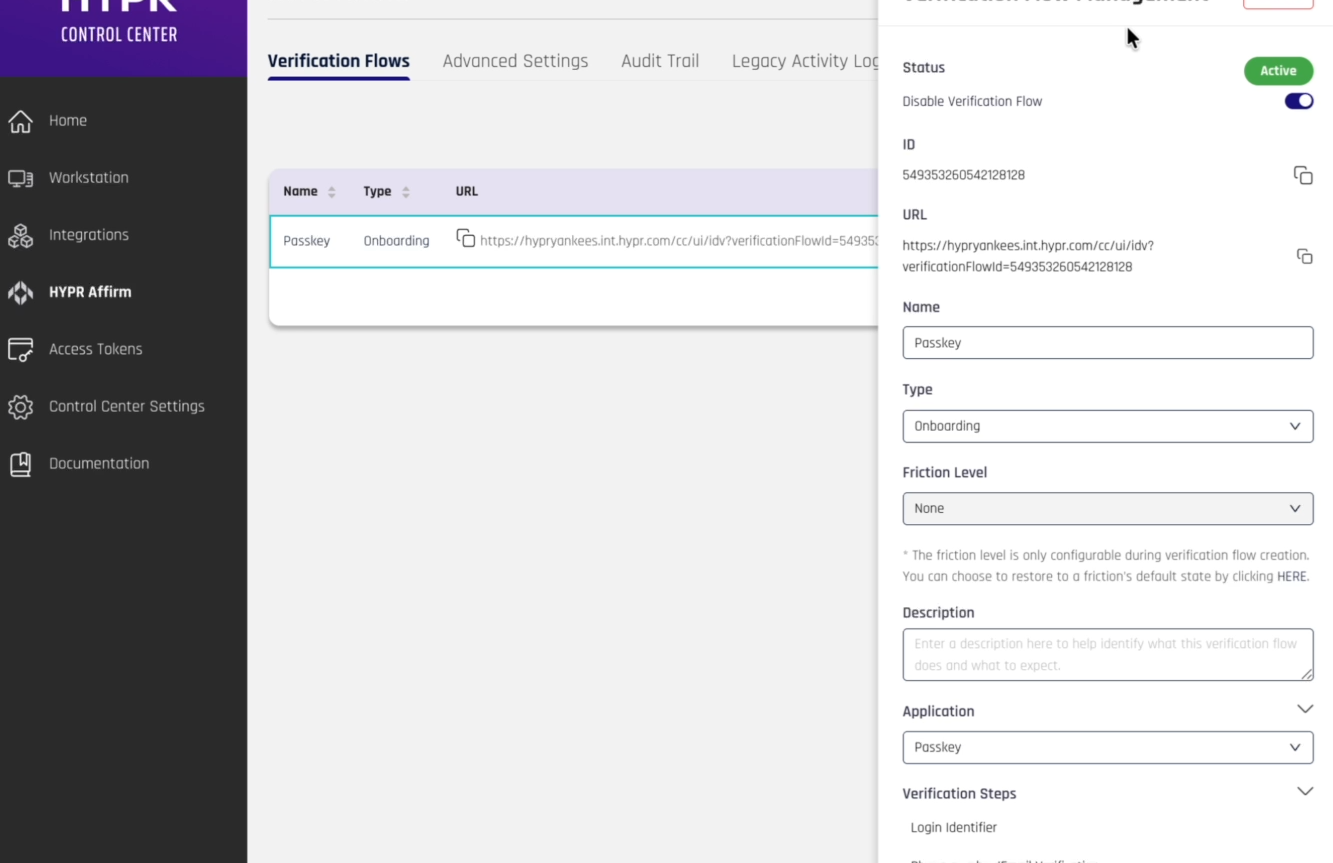
Navigate to HYPR Affirm in the menu pane on the left and select the Verification Flows tab
-
Click the flow you are using to onboard your users (see Administering HYPR Affirm for more information about verification flows)
-
In the menu tab on the right, scroll to Advanced Customizations at the bottom
-
Click + Customizations
-
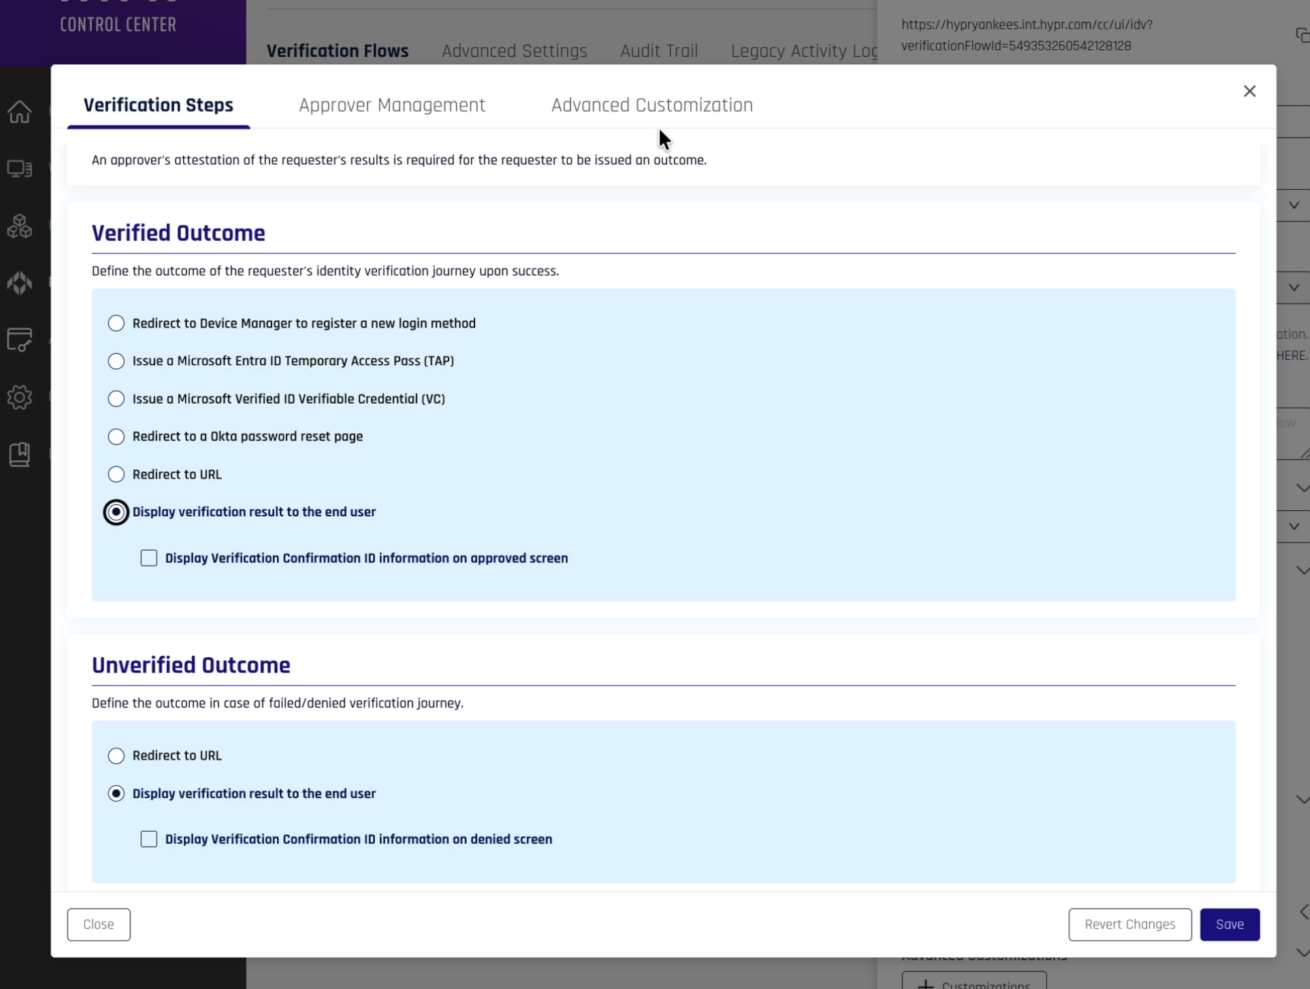
On the Verification Steps screen, scroll down to Verified Outcome
-
Select Display verification result to the end user
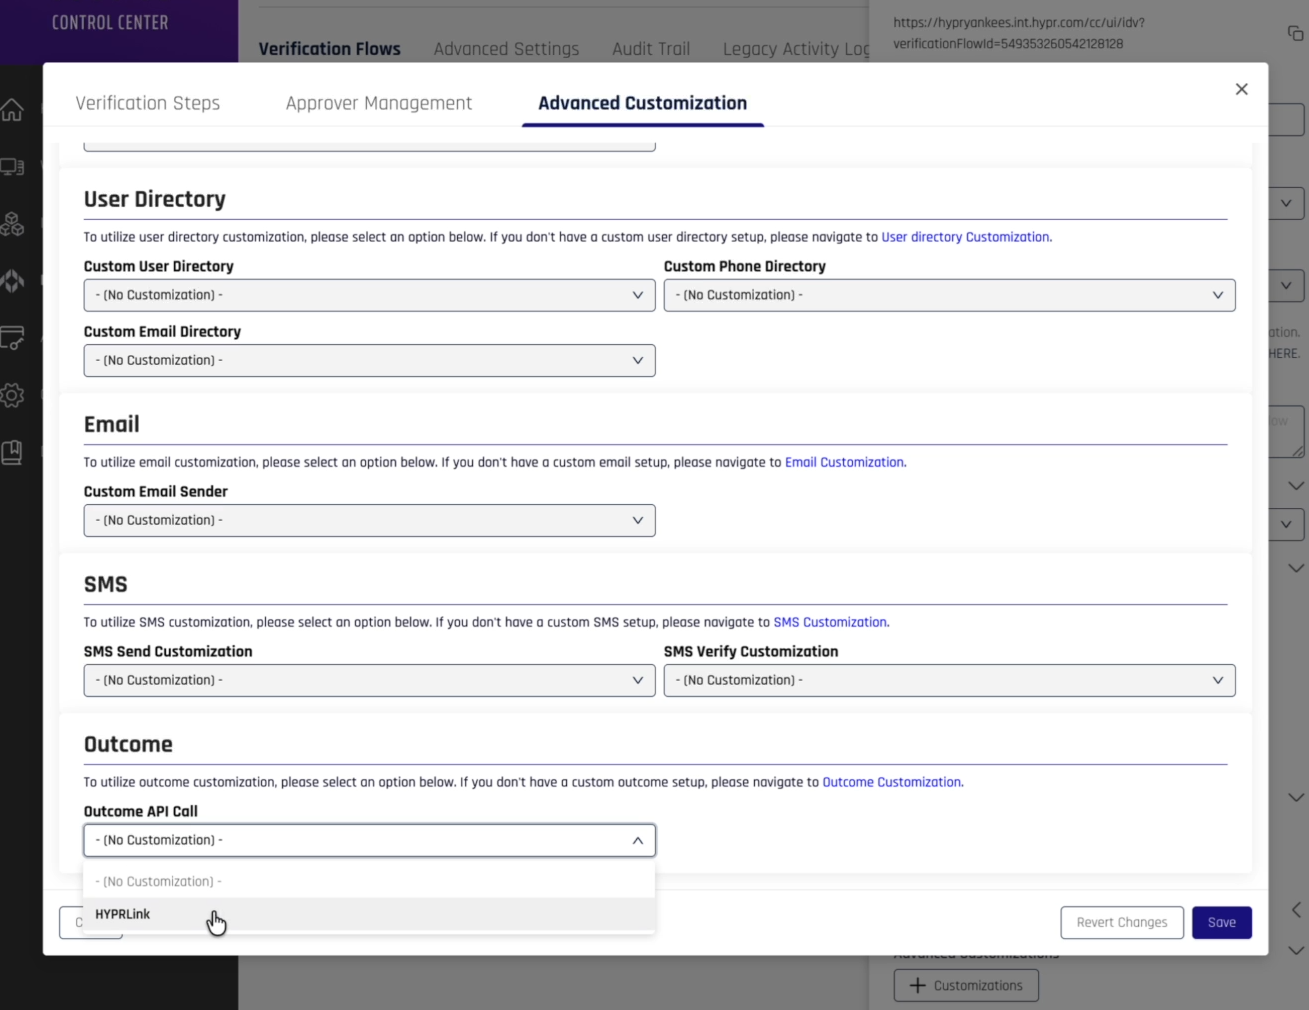
- Switch to the Advanced Customization tab
- In the Outcome section, select the outcome customization you set up earlier in the Outcome API Call drop-down menu field
- Click Save to update your workflow
- Click Save in the menu on the right
-
Now, when a user goes through the Affirm flow for an appropriate email on your HYPR tenant, the user will see a button with the text specified in the script, e.g., "Register HYPR App".
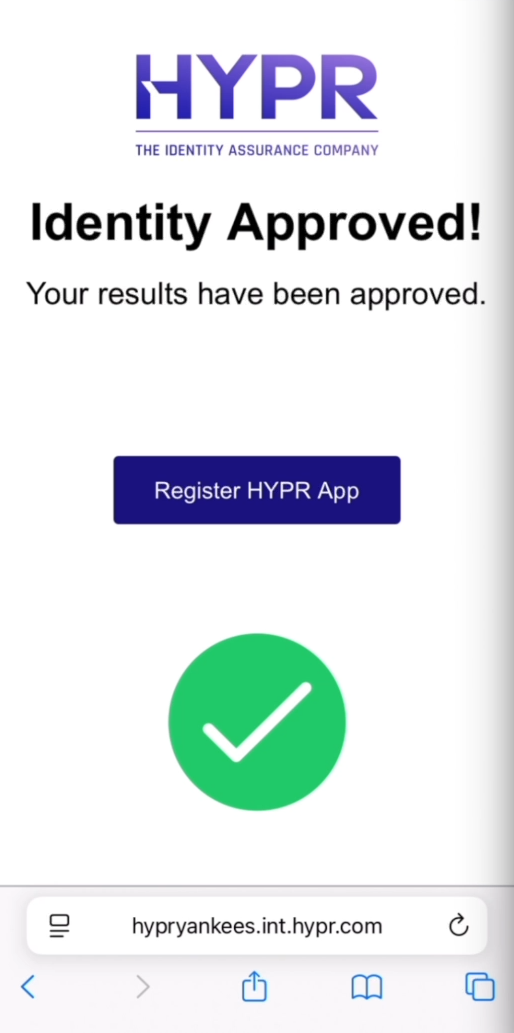
Tapping the button kicks off the registration and pairing process for that user. When the pairing process is complete, a passkey is provisioned to the user and becomes visible in the My Passkeys tab in the HYPR One™ mobile app (see Enterprise Passkey User Experience Guide for details about the pairing process).
For more information on Affirm and going through an Affirm flow, see HYPR Affirm Overview. For more information about Enterprise Passkeys and pairing, see Enterprise Passkey User Experience Guide.
Related Documentation
- Enterprise Passkey and HYPR Passkey Setup Guide - Complete administrator setup guide for Enterprise Passkey and HYPR Passkey
- Enterprise Passkey User Experience Guide - Detailed user experience workflows and technical implementation
- End User Guide: Setting Up Passwordless Login - User-friendly guide with step-by-step instructions for all passwordless login flows
- HYPR Affirm Overview
- HYPR Affirm Injectable Outcomes
- HYPR Affirm Content Customization API
- Magic Link Configuration
Support
For additional assistance with this integration:
- HYPR Support: support@hypr.com
This guide provides the foundation for implementing the Affirm to Enterprise Passkey seamless integration. Follow the configuration steps and refer to the related documentation for detailed implementation guidance.