Risk-based Authentication Strategies Playbook
Requirements and Specifications for Risk-based Authentication Strategies Deployment
This playbook describes how to design, implement and roll out risk-based authentication using HYPR Adapt, including signal ingestion, policy authoring and safe deployment practices.

Introduction
HYPR Adapt provides real-time risk assessment and adaptive policy-based security controls that protect your users, systems, and business.
It enables organizations to proactively identify and mitigate identity-related risks, all while enhancing the user experience and reducing friction.
HYPR’s presence on mobile, endpoint, and web interfaces provides a comprehensive set of data points. In addition to the signals coming from the HYPR clients, you may also ingest signals from third-party services, such as Crowdstrike, using web hooks. The data from third-party services can then be used to construct risk policies that take action based on the business requirements.
This playbook describes what to consider when you deploy HYPR Adapt into your environment.
What will be the end result of this solution playbook?
The goal of this playbook is to aid you in planning and deploying HYPR to mitigate risk in your IT services. HYPR Adapt, in conjunction with HYPR Authenticate and HYPR Affirm, provide a holistic approach to reducing risk. This playbook concentrates on HYPR Adapt and covers the following topics:
- Translating business requirements into risk policies
- Preparing your HYPR tenant for your deployment
- Understanding HYPR Adapt signals
- Understanding the HYPR Adapt built-in policies
- Developing custom policies
- Production roll-out strategies
While each organization has unique needs, there are common scenarios addressed by the built-in policies. For everything else, you have the option to develop your own policies to meet specific requirements.
Preparing for the solution deployment
Feature flags govern behavior of the HYPR cloud-based tenants. HYPR Adapt related feature flags are disabled by default and you will need to work with the HYPR Deployment Team to enable the flags appropriate to your solution. The following table lists the available Adapt feature flags and their purposes.
Feature flags (set by HYPR deployment team)
| Name | Description |
|---|---|
| ENABLE_ADAPT_POLICIES | (Required) Enables Adapt functionality |
| ENABLE_SEND_CONTINUOUS_SIGNALS | (Optional) Not recommended to start with |
| SEND_DEVICE_SIGNAL_DURING_AUTHENTICATION | (Optional) Enables sending mobile signal to CC, inline with the auth request. This avoids timing issues with the mobile signal arriving after the auth decision |
| SEND_WORKSTATION_SIGNAL_DURING_UNLOCK | (Optional) As opposed to the SEND_WORKSTATION_SIGNALS flag, this one asks the WS to send the signal inline with the auth request. This ensures that we always have the latest signal while executing the policy and avoids any timing issues between the latest signal and auth request. |
| SEND_WORKSTATION_SIGNALS | (Optional) Enable workstation signals, request Location and System details will be collected, cached and sent to CC |
| ENABLE_ADAPT_UNAUTHENTICATED_WEBHOOK | (Optional) Allows for the web hook streaming of event data |
| CC_ANALYTICS_DASHBOARD | (Optional) Enables Adapt dashboard |
Work with your HYPR account representative to determine which feature flags are needed to meet your business requirements.
Requirements analysis
This solution touches on various aspects of end-user experience, business expectations and IT administration. Take the time to gather detailed requirements from the stakeholders, before going too far down the deployment path.
This section is a placeholder for the recording of requirements gathered from the stakeholders. Record a concise statement of the requirement and then provide the interpretation in the context of this HYPR solution.
Requirement Example
Statement: Our company needs to verify the identity of existing employees on a regular basis to prevent identity-based fraud.
Interpretation: Coordinated fraud rings increasingly target remote-work hiring processes to obtain employment using stolen or fabricated identities. Periodic identity re-verification reduces the window in which fraudulent identities remain attached to active accounts, and mitigates a class of insider-fraud risks that single-point-in-time onboarding checks do not address.
| Question | Answer |
|---|---|
| How frequently do you need to perform an IDV check? | |
| Are you performing IDV as part of the onboarding process? | |
| Do you have any employees that would be exempt from this policy? |
Requirement Template
Statement: [Add concise statement of the requirement]
Interpretation: [Add a discussion of the requirement and how the solution addresses it].
[Review the requirement with the stakeholders and record any questions/answers in the below table]
| Question | Answer |
|---|---|
User experience flowchart
Formulating business requirements often starts with how the solution impacts the end-user experience. The below flowchart shows an example of such a flowchart in the context of HYPR Adapt using the Crowdstrike and Login Limits policies as examples.
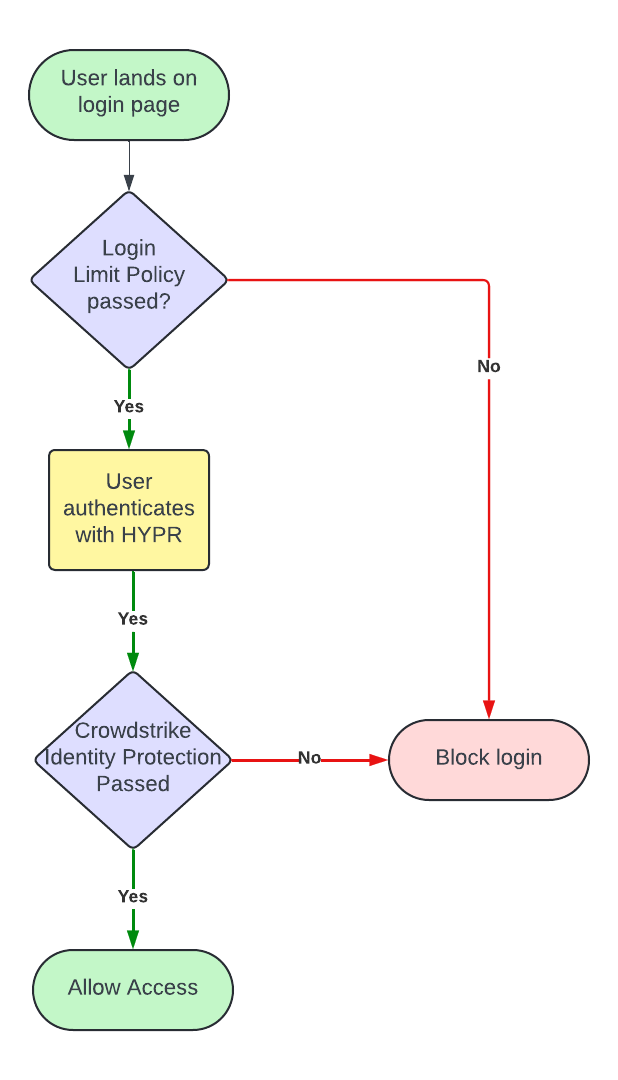
Your flowchart may differ, but creating a UX flowchart serves as a tangible talking point when determining requirements with your stakeholders.
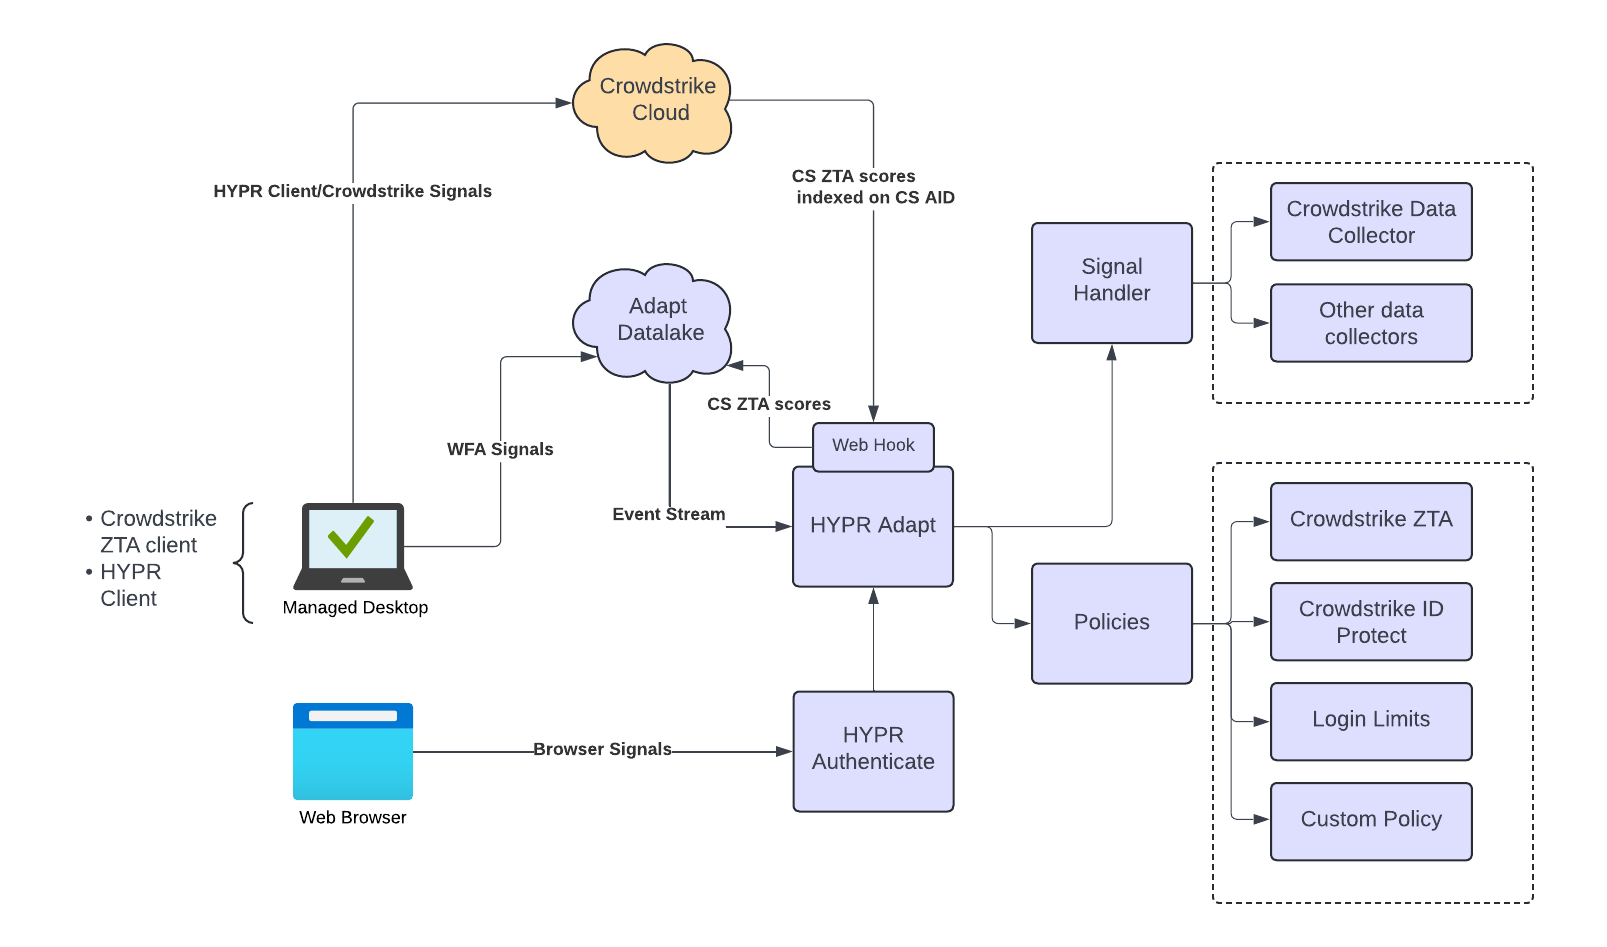
Solution diagram
In addition to the UX flowchart, a component diagram aids in determining the IT components and networking requirements. A solution diagram can depict the flow of data that occurs during user operations. The following example diagram depicts the various components involved in the solution.
Solution design
When designing a solution with HYPR Adapt, we recommend the following approach:
- Determine what policy or policies are needed to meet the business requirements. If the built-in policies do not match your business requirements, you will need to develop a custom risk policy. See the Appendix for more information on developing a custom policy.
- Consider what signals (i.e. data) is needed to evaluate your policy. HYPR components, such as the HYPR desktop client, the mobile app and passwordless authentication, generate signals out of the box. Adapt also has some built-in signal handlers to ingest data from third-party systems. If the signals required by your policies are not available out of the box, then you will need to develop a custom signal handler. See the Appendix for more information on developing a custom signal handler.
- Determine where in the flow you need the policy evaluation to take place. The HYPR Control Center allows you to assign a policy to one of a number of evaluation points.
- Validate the design against the UX flowchart described earlier in this playbook and ensure each of the business requirements have been addressed.
The design process will likely require some iteration, balancing requirements with potential limitations of existing systems.
Signal handlers and risk policies
HYPR Adapt evaluates signals through a sequential pipeline of signal handlers. Many HYPR-generated events (such as FIDO2_WEBAUTHN_COMPLETE) flow into Adapt automatically when the corresponding feature flag is enabled; signals from third-party sources require a configured signal handler.
Signal handlers
HYPR ships out-of-the-box signal handler templates for common third-party integrations (Slack action executor, CrowdStrike / Okta inbound webhooks, TOR data collector and enricher). Custom signal handlers run in an isolated ECMAScript runtime and can be authored from any built-in template as a starting point.
- See How Signal Handlers Work for the runtime model.
- See Signal Handler Management for the configuration walkthrough (templates, custom JSON parameters, testing).
- See Signal Handlers Structure for the code contract when writing a custom handler.
- See Signal Handler Templates for the full template list and per-template configuration.
Risk policies
Adapt risk policies are written in Rego. The Control Center provides a Built-in tab for parameter-only configuration of canned policies and a Custom tab that exposes the Rego source for inspection and modification.
- See Risk Policies for the policy editor, configuration, and assignment walkthrough.
- See Risk Policy Templates and its siblings for the canned policy reference (Affirm escalation, CrowdStrike-based ZTA / IdP gating, Login Limits, Monitor Authentications, Workstation Unlock).
- See Writing Custom Risk Policies for the Rego authoring guide.
Deployment-relevant nuances
- Plan the signal-to-policy mapping before authoring custom signal handlers — every policy needs the signals it evaluates to be flowing into Adapt at evaluation time.
- For policies that depend on third-party signals (CrowdStrike, Okta), validate end-to-end first with the Test feature on each handler and policy before assigning the policy to an evaluation point in production.
- HYPR-generated signals flow automatically once the corresponding feature flag is enabled; third-party signals require both the signal handler (data path) and any provider-side configuration (webhooks, scheduled jobs, API tokens).
Creating and testing risk policies
The policy editor lets you choose a template, configure parameters, and test the policy against retrieved signals before assigning it to an evaluation point. The full walkthrough — Built-in vs Custom tabs, the policy Test screen with date-range signal retrieval, the Evaluate button output (allowed attribute and reasoning), and the difference between testing a parameter-only Built-in policy and a Rego-editable Custom policy — lives in Risk Policies.
Deployment-relevant nuances
- Built-in vs Custom: choose Built-in for parameter-only policies that ship with HYPR; choose Custom when you need to inspect or modify the Rego source. Custom policies can also start from a Built-in template, giving you a working example to learn from.
- Test data must exist: the policy can only evaluate against signals that have actually been generated for the test user in the selected time window. If a policy depends on signals from a third-party (e.g., CrowdStrike) and those signals haven't arrived, the test will return
allowed: falsebecause of missing input, not because of policy logic. Generate the signals first by running the relevant auth flow. - Rego literacy: writing a custom policy from scratch is a steeper learning curve than modifying a Built-in template. Start by viewing and tweaking a Built-in template's Rego code to understand the data shape before authoring a custom policy.
Assigning policies to evaluation points
Each Adapt risk policy is attached to one or more evaluation points — places in the auth flow where the policy runs (for example, the IDV outcome, workstation unlock, web sign-in, mobile pairing, or Affirm escalation). The set of evaluation points available depends on which authentication flow you are targeting:
| Authentication Flow | Use Case |
|---|---|
| Workstation Unlock Flow | HYPR Passwordless client is used in conjunction with the HYPR Mobile App to unlock a workstation. |
| Web Integration Flow (FIDO2) | A HYPR integration (e.g. Entra) is configured for SSO and the user has a registered passkey. |
| Web Integration Flow (HYPR Mobile App) | A HYPR integration (e.g. Entra) is configured for SSO and the user has a registered UAF credential with the HYPR Mobile App. |
| Basic FIDO2 Flow | A custom web application that uses the HYPR API; also applies to the HYPR ADFS plugin and the PingFederate plugin. The user has a registered passkey. |
| Basic Mobile Flow | A custom web application that uses the HYPR API; also applies to the HYPR ADFS plugin and the PingFederate plugin. The user has a registered UAF credential with the HYPR Mobile App. |
For per-flow diagrams and the full set of evaluation points and their API values, see Risk Policy Management → Evaluation Points.
The assignment screen exposes:
- The list of available evaluation points per RP application.
- The currently assigned policy (or
None). - A Test action that runs the policy against recent signals before activation.
See Risk Policies → Policy Assignments for the canonical assignment walkthrough, and Action Events for the action-emission model (what happens when an allowed: false decision fires).
Deployment-relevant nuances
- Per-RP application scope: policy assignments are configured per relying-party application. A policy attached to Workstation Unlock for RP A is not automatically applied to RP B.
- Test before activate: use the Test feature on the assignment screen to confirm the policy returns the expected outcome under realistic signals before flipping it to active.
- Affirm escalation flow: when an Adapt policy targets Affirm's escalation evaluation point, the policy result drives the Affirm verification flow's escalation behavior (e.g., redirect to live chat, deny). Coordinate the policy outcome semantics with the Affirm verification flow design.
Deployment strategy and risk mitigation
The most important aspect of policy deployment is understanding the impact on the end-user population. This can be done before involving end-users by assigning the policy in the logging-only mode and monitoring the policy evaluation results.
A successful deployment is built on the following process:
- Follow the guidance provided in the Solution Design section of this document to ensure the policy meets the business objectives
- Create and test the policy
- Assign the policy to an evaluation point in logging-only mode
- Let the policy soak in production for several weeks in logging-only mode and monitor the policy impact using the Adapt Dashboard.
- When ready, disable logging-only mode and carefully monitor the solution for several weeks as users start experiencing the impact of the policy.
As always, any issues encountered during a deployment can be reported to support@hypr.com.
Monitoring the solution
Once you have assigned a policy and you have disabled logging-only mode, then you’ll want to keep track of how the policy is settling into your environment. This is particularly important in the first couple of weeks after the policy has been deployed. For this activity, use the Adapt Dashboard found under the Analytics link in the left navigation pane. The dashboard can also be used to drill down into individual policy evaluations when troubleshooting.
Appendix 1: How to configure CrowdStrike for HYPR Adapt
CrowdStrike integrates with Adapt via the CrowdStrike Inbound Webhook signal handler template. The HYPR-side configuration consists of:
- Creating a CrowdStrike API client with the required scopes for streaming detections / device-trust events.
- Configuring the CrowdStrike Inbound Webhook signal handler in HYPR Control Center with the API client credentials and the destination endpoint.
- Authoring or selecting a Risk Policy that consumes the CrowdStrike signals (e.g., CrowdStrike ZTA / IdP gating templates).
- Assigning the policy to the relevant evaluation point.
For the canonical step-by-step (including the CrowdStrike-side webhook setup and the HYPR-side signal-handler configuration JSON), see Signal Handler Management — CrowdStrike Inbound Webhook and the CrowdStrike-related Risk Policy templates.