Quick Start: Administering HYPR AgentPass
Who this is for: the Admin who rolls out HYPR AgentPass™, from the first sign-in to running it day to day. For a one-page summary of the role, see Get Started as an Administrator.
Purpose
This playbook takes you through a complete rollout, in order. When you finish:
- Your team signs in to the console with single sign-on (SSO), and each person gets the role your directory groups map to.
- Agents reach their models and tools only through the gateway, with an owner for each.
- Supervisors approve held requests on their phones, with a passkey.
- Policies observe first, and enforce once you have checked what they catch.
In the console, the Set up AgentPass guide on Home tracks the first steps of this rollout, and ticks each one when it is done. See The Setup Guide.
The sections after Validate are for reference once agents are live: day-to-day operation, incidents and offboarding.
Architecture
AgentPass is a gateway between your organization's AI agents and the models, tools and systems they reach. It attributes each request to an agent and a person, and checks it against your policies. A policy can block the request or hold it for a person's approval. AgentPass also limits each agent to the MCP tools its supervisor's roles allow, and records what happened.
It governs these kinds of agent.
| Kind of agent | Examples | How its traffic reaches the gateway |
|---|---|---|
| Local, on a person's workstation | Claude Code, Codex CLI, Cursor | The agent points at the gateway, or Endpoint Guard routes it there |
| Cloud, hosted by a provider | Microsoft 365 Copilot, Anthropic managed agents, AWS Bedrock AgentCore | A connector. People reach them in the Agent Portal or Slack |
| Workload, with nobody at the keyboard | Automations and pipelines | A credential AgentPass issues, with a role of its own |
For the request path, see Architecture: The Request Path.
Prerequisites
- Role: Admin. Your first sign-in uses the recovery administrator, which works as Admin.
- The gateway's public origin, reachable from outside your network. Your identity provider, connectors and agents are configured against it. The console is served from that origin at
/admin/ui/, and the Agent Portal at/portal/. - An identity provider that supports OpenID Connect (OIDC), where you can register an application, and the names of the directory groups that should get each role
- Your HYPR tenant, with Control Center admin access. For phone approvals, create an application for the gateway in HYPR Control Center, turn on FIDO2 for it, and generate an API access token scoped to it. Control Center shows the token only once.
- An account with each AI provider or service you plan to connect
For the full list, see Prerequisites.
Decide Who Gets Which Role
Every person who signs in holds a role. The console shows these system roles.
| Role | What it can do | Give it to |
|---|---|---|
| Admin | Everything, including settings, connectors, roles, data management and offboarding. Locked, so it can't be edited | The people who set up and change AgentPass |
| Operator | Reads everything. Turns any agent off and on, decides approvals and writes its own policies. Can't change settings, connectors or roles | The people who run AgentPass day to day |
| Security analyst | Reads everything an investigation needs. Triages guardrail alerts, contains agents, and turns any agent off and on. Changes no configuration | Your security operations team |
| Auditor | Reads configuration and records, and exports guardrail evidence. Changes nothing | Internal audit and compliance |
| Model governance owner | Registers and governs the judge models guardrails use | Your model-risk or AI platform owner |
| Supervisor | Manages the person's own agents, approvals, conversations and policies. Sees every policy, and changes only their own. The default for anyone with no mapped role | Each person who owns an agent |
Each role has a startup guide to hand to the people who hold it:
- Get Started as an Operator
- Get Started as a Security Analyst
- Get Started as an Auditor
- Get Started as a Model Governance Owner
- Get Started as a Supervisor
For every permission, see Permissions by Role.
Procedure
Complete these tasks in order. Map roles before you turn on SSO: a new tenant has no role mappings, so anyone who signs in with SSO before then gets the Supervisor role, including you.
Sign In With the Recovery Administrator
Your first sign-in uses the recovery administrator, a break-glass account held by the gateway. Its credentials come from the invitation that set up your tenant. Sign in to the console with them.
See Sign In for the First Time.
Configure Console Sign-In
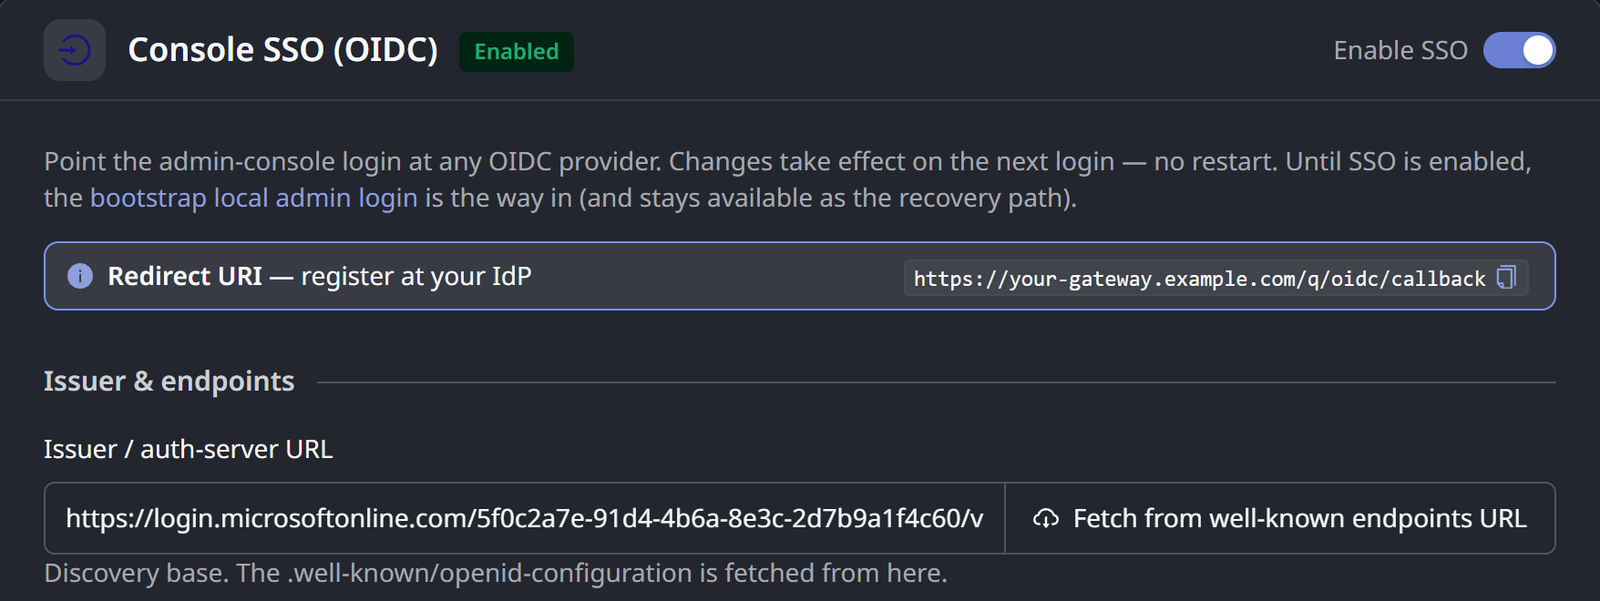
- Open Settings → Gateway settings, and click the Authentication tab.
- Under Console SSO (OIDC), copy the Redirect URI, and register it with your identity provider.
- Enter the Issuer / auth-server URL. AgentPass reads your provider's endpoints from it.
- Enter the Client ID. If your application has a client secret, enter it in Client secret, and click Save secret.
- Set the claims described in the following table.
- Click Save settings. Leave Enable SSO off for now.
| Claim | Set it to |
|---|---|
| Principal claim | A unique, stable value per person, such as an employee ID or sub |
| Display name claims | The claims that make up the name shown in the console |
| Email claim | The claim that holds the email address |
| Role claim | The claim that carries each person's roles or groups, such as groups |
Changing the principal claim later strands the role assignments keyed to the old identifier.
See Connect the Console to Your Identity Provider.
Map Roles From Your Identity Provider
Grant roles from your directory groups, so AgentPass access follows your existing joiner, mover and leaver process. Start with Admin, so your own SSO sign-in keeps the Admin role.
- Open People, and click the Roles tab.
- Click View on AgentPassAdmin, the tab's name for Admin, or Edit on another role.
- Under Identity provider, type each value of your role claim that grants the role, such as a group name, and press Enter.
- Click Save in that section.
- Repeat for each role you use.
Matching is exact and case-sensitive. Only a mapped value grants a role, and a person whose values map to no role gets Supervisor.
For a one-off exception, open the person's actions menu (⋮) on the Users tab, and choose Change role. Those roles replace the roles from sign-in until you click Use identity provider roles in the person's details.
See Map Identity Provider Values to a Role.
Turn On Single Sign-On
- Open Settings → Gateway settings, and click the Authentication tab.
- Turn on Enable SSO. AgentPass checks your provider before it turns SSO on.
- Sign out, and sign back in with SSO.
- Confirm the account button at the top right shows your role as Admin.
Once SSO works, keep the recovery administrator credentials in a protected break-glass location. The recovery administrator sign-in stays available if SSO fails. See Recover Access After SSO.
Connect the Tools Your Organization Uses
A connector brings one target under the gateway: an AI provider, an MCP server, a REST API, a cloud agent or a chat channel. Set up the target's side first, because the form asks for its values.
- In the console, open Connectors → Add connector.
- Click the kind of connector, then the target's card, such as Anthropic.
- Complete the form, and click Create Connector.
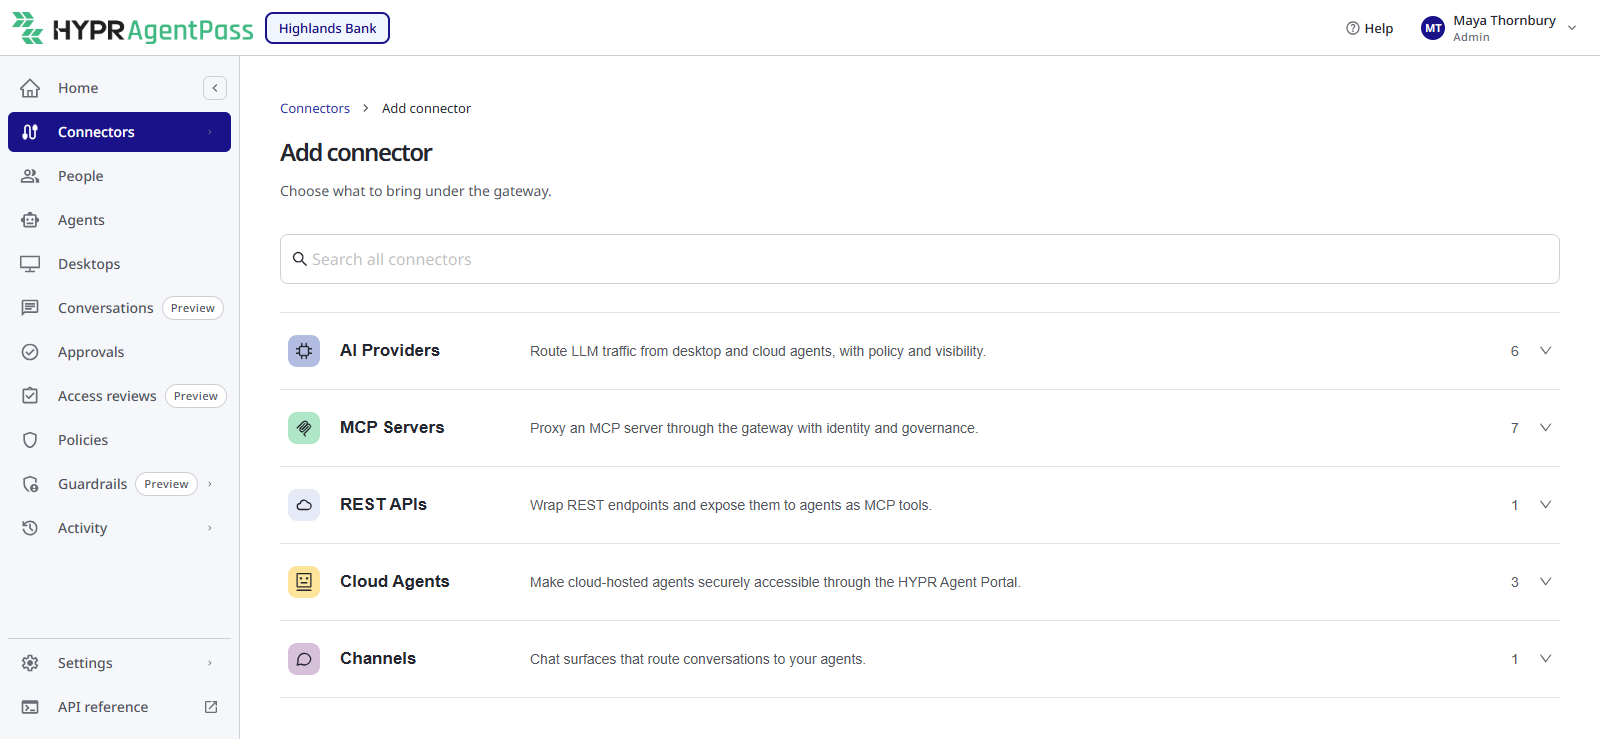
The following table lists what common targets ask for.
| Target | Have ready |
|---|---|
| Anthropic or OpenAI | A provider account. An admin API key lets the gateway sync its agents. OpenAI also needs the project ID |
| AWS Bedrock | The AWS account and region, and two IAM policies in that account |
| MCP server | The server's URL and how it authenticates. The connector then gives agents a gateway address for the server |
| Microsoft 365 Copilot | An Entra tenant with Copilot licenses, and two Entra app registrations. Consent needs Global Administrator, or Application Administrator plus Cloud Application Administrator |
| Slack Agent | A Slack workspace where you can install an app, the app's signing secret and bot token, and a cloud agent to answer |
The Microsoft 365 Copilot connector also runs the Agent Portal, where employees chat with Copilot and your Copilot Studio agents. Once its portal sign-in details are set, its Overview tab shows the Portal URL to send your users.
See Connectors.
Choose How New Agents Are Onboarded
An AI provider connector's onboarding mode decides what happens to a new agent's first request. You choose it on the form's last step, and can change it on the connector's Overview tab.
| Mode | What happens to a new agent's first request |
|---|---|
| Require Approval | Held until the agent's supervisor approves it |
| Observe only | Recorded and forwarded. Nothing is blocked or onboarded |
| Disabled | Not held or onboarded |
AWS Bedrock and AWS Bedrock Mantle offer Observe only, Disabled and, with identity enrichment, Require Approval. Identity enrichment is an IAM role or an access key on the connector.
Start a workstation rollout in Observe only to see what's running, then move to Require Approval. How long a held request waits, and how long an approval lasts, are set under Settings → Gateway settings → Approvals. See Onboarding Mode.
Limit Which Tools Each Role Can Use
New MCP tools arrive with no access. An agent is offered only the tools that one of its supervisor's roles may call.
- On the Roles tab of People, click Edit on the role.
- Go to Agent tools permission.
- Expand a connector, and select each tool the role needs.
- Click Save changes. The change applies on each agent's next request.
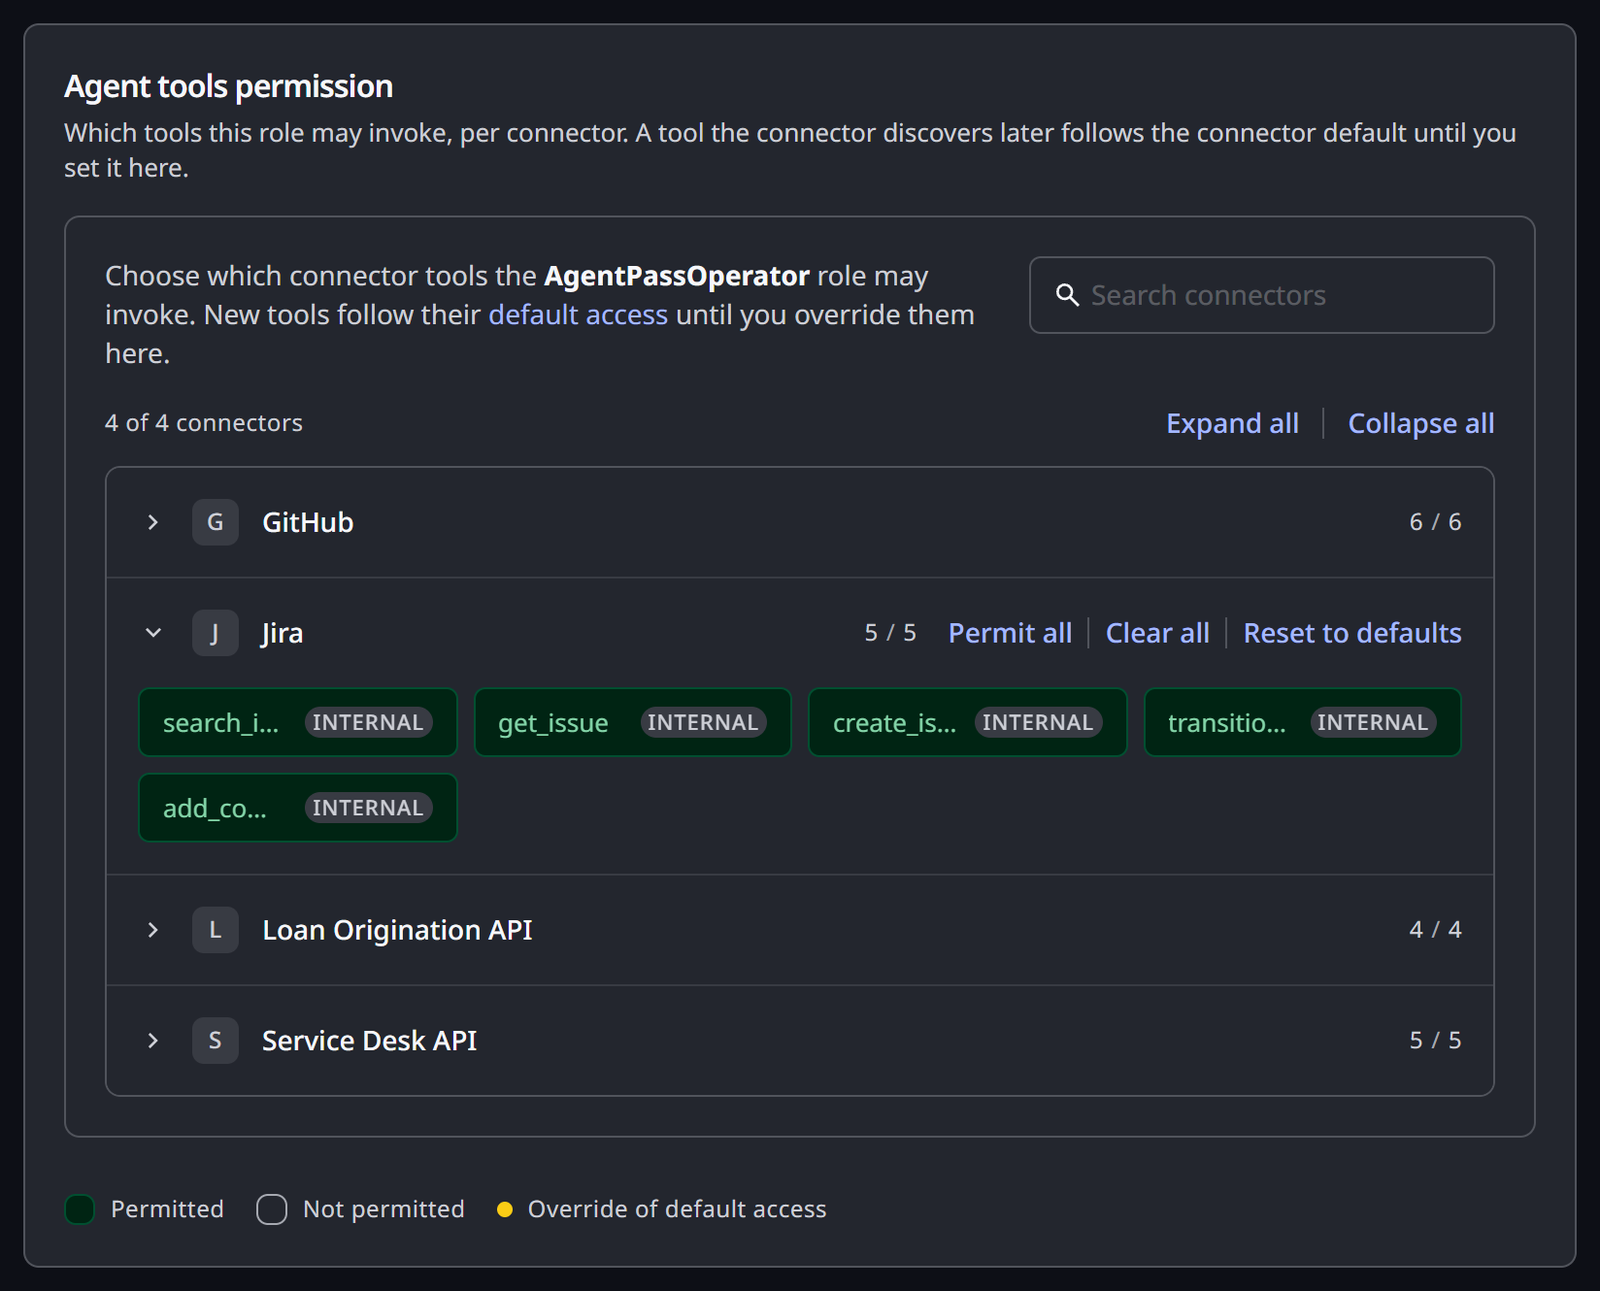
Admin always has every tool. Review this section whenever you add a connector, or an MCP server gains tools. See Controlling MCP Tool Access by Role.
Set Up Approvals on Phones
Supervisors approve held requests in the HYPR app, with a passkey. Connect the gateway to your HYPR tenant, then turn on push delivery.
- Open Settings → Gateway settings, and click the Passkeys (FIDO2) tab.
- Under HYPR FIDO2 Integration, enter your HYPR tenant base URL, the RP API access token, the RP Application ID and the gateway public origin. Click Save beside each.
- Once the base URL, token and application ID are set, the card reads Ready. Click Check connection to confirm the gateway reaches your tenant.
- Under Mobile App Associations, enter the HYPR app identifiers your HYPR representative gives you.
- Under Passkey approval policy, enter the HYPR Mobile AAGUIDs your HYPR representative gives you in HYPR Mobile AAGUIDs.
- Open Settings → Notifications.
- In the Firebase Cloud Messaging card, turn on Enable Firebase channel, enter the Project ID, and paste the Service Account JSON.
- Click Save FCM settings.
The Project ID and service account come from the Firebase project that delivers pushes to your supervisors' app. The Project ID is the project_id value in the service-account JSON file. If HYPR builds an AgentPass app for your organization, use your own Firebase project. See Send Pushes Through Your Firebase Project. If your supervisors use the HYPR app, confirm the Firebase details with your HYPR representative.
Then invite each supervisor to enroll a passkey. On the Users tab of People, open the person's actions menu (⋮), and choose Send invite (or Send reminder) or Copy invite link. The supervisor installs the HYPR app, signs in to the console, and enrolls from My passkeys in the account menu at the top right. Under Test Push on Settings → Notifications, send them a test, and confirm their phone receives it.
See Connecting to Your HYPR Tenant and Notifications.
Decide When Approvals Must Be Signed
Require signed approvals, on the Passkeys (FIDO2) tab, decides whether each approval must carry the supervisor's passkey signature.
| Setting | Effect | Use it |
|---|---|---|
| Optional (soak) | An approval without a passkey is recorded, and flagged as unsigned | While supervisors enroll. A new organization starts here |
| Required (production) | Approve works only with an enrolled passkey | Once every supervisor is enrolled |
Passkey approval policy, on the same tab, decides which passkeys count. Strict (HYPR Mobile only) accepts only passkeys enrolled from the HYPR app. This is the default. Until HYPR Mobile AAGUIDs has an entry, no passkey can approve.
Bring Agents Under the Gateway
Each agent gets an identity with an owner, so every request is attributed to an agent and a person. Agents are synced from your providers, created when a local agent onboards, or created in the console. All of them are listed on Agents. Use the Runs filter to show Local or Cloud agents, and Acts as to show agents that act for A person or run as a Workload.
- Local agents. The agent's provider base URL is set to the gateway's public origin, such as
ANTHROPIC_BASE_URLfor Claude Code. An Anthropic connector's Overview tab shows the settings to give your developers, in its Connect AI tools card. To route workstations centrally, use Endpoint Guard. Open Desktops, create an enrollment token on the Installation tab, and deploy the desktop client with it. Then, on Desktop configuration → Configuration, turn on Configure agents from AgentPass, and select the tools. Some capabilities differ between macOS and Windows. See See and Govern the AI Tools Already on Your Workstations. - Cloud agents. Anthropic and AWS Bedrock AgentCore agents appear on Agents once their connector syncs. To choose who may use one, open its actions menu (⋮), click Manage, and open the Assignments tab. Copilot Studio agents are added on the Microsoft 365 Copilot connector's Copilot Studio agents tab.
- Workload agents. On Agents, click New agent, and choose New workload agent. Under Runs, choose On a machine or In the cloud. AgentPass issues its credential, and shows it once. See Creating a Workload Agent.
- Provider keys. On Agents, click Import agents, and click the sync button beside the connector. Each key becomes an agent that acts for the person it belongs to.
With Require Approval, a new agent's first request waits under Needs your attention on Approvals, and on its supervisor's phone. Approving it onboards the agent.

Roll Out Policies the Safe Way
A policy pairs a condition with an action: deny, require approval or allow. A new policy is published in Observe by default. It records what it would have done, and changes nothing until you promote it.
To write a policy:
- Open Policies, and click New policy.
- Choose a starting point. Start from scratch to write the condition yourself, pick a common guardrail, or Describe it in your own words to have AI draft it. Describing needs AI drafting set up under Settings → Gateway settings, on the Policies tab.
- In Details, choose the connectors it watches, and its Action. Leave Enforcement mode at Observe. Leave the connectors empty to watch every connector.
- In Logic, write or check the condition.
- In Back test, see what it would have caught in the last 7 days.
- In Review & publish, click Create policy.
To check and promote it:
- On Policies, click Details on the policy's row, and open its Decisions tab.
- Read the Would deny or Would wait rows. Confirm it catches what you meant, and nothing else.
- Click the policy's State badge, and choose Enforcing.
- Click Set to Enforcing. The action applies from the next matching request.
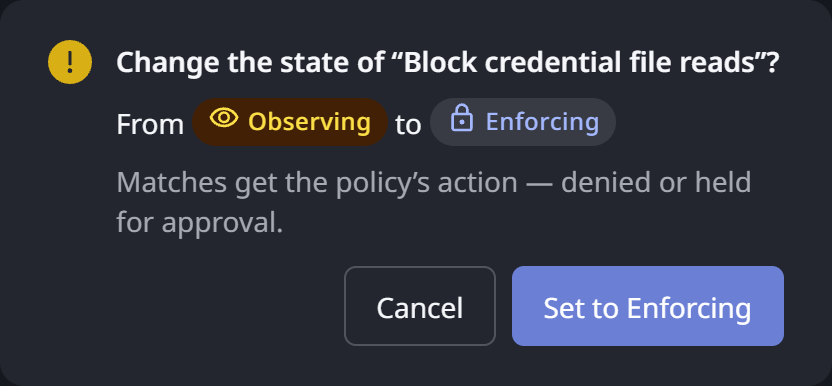
To roll back, choose Observing from the same badge. Narrow the rule while it observes, then promote it again.
In the Agent Portal, chats and file uploads have no approval step. A matching Require approval rule blocks the message there, and shows the rule's message.
A Require approval policy needs a supervisor to answer. A request from a workload agent has no supervisor, so it doesn't complete.
To find gaps, open the Coverage tab on Policies. It shows which connector and tool pairs no rule reaches. See Creating a Policy and Promoting a Policy to Enforce.
What to Tell Your Users
Point your employees to Using AI Tools with HYPR AgentPass, the guide written for them. Then send each group what it needs.
- Agent Portal users: the Portal URL. They sign in with their Microsoft work account, and need no console role.
- People running local agents: the gateway's public origin, unless Endpoint Guard routes their tools.
- Supervisors: a passkey invitation, and a note that approval requests arrive in the HYPR app.
- Everyone: who to contact when AgentPass blocks a message, holds a request or turns an agent off.
Validate
Check the following:
- You sign in with SSO, and the account button at the top right shows your role as Admin. A colleague in a mapped group gets the role you mapped.
- A test push reaches a supervisor's phone.
- One agent's first request is held, and approving it on the phone onboards the agent.
- On Activity → Request log, that request is attributed to the agent and its supervisor.
- A policy promoted to Enforcing shows its decisions on its Decisions tab.
Run AgentPass Day to Day
These pages cover routine operation.
| Page | Use it to |
|---|---|
| Home | See connectors, cloud agents, policy blocks and approval outcomes at a glance |
| Approvals | Answer, revoke and review approval requests |
| Activity → Request log | Find any request from the last seven days, filtered by supervisor or type |
| Activity → Policy decisions | See every time a policy matched a request, and what it decided |
| Guardrails → Alerts | Triage guardrail alerts, and contain the agent behind one |
| Access reviews | Have named reviewers confirm each agent still needs its access |
| Settings → Data management | Decide where AgentPass's records go, and in what form |
The console tags Guardrails and Access reviews Preview.
Approvals
Supervisors answer requests for their own agents. Admin and Operator can deny any request, and approve another supervisor's onboarding request. A request with no answer before its timeout expires, and an expired request isn't an approval.
To withdraw an agent's standing access, find its approved onboarding request under Resolved requests, and click Revoke. The agent must onboard again. See Approvals in the Console.
Access Reviews
Schedule reviews, so access is confirmed regularly.
- Open Access reviews, click Manage reviews, and click Schedules.
- On the Production agents card, turn on Review automatically.
- Set how often reviews open, and how long reviewers have. The defaults are every 90 days, with 14 days to finish.
- Name the Reviewers, and optionally a Fallback reviewer.
- Click Save. The first review opens within the hour.
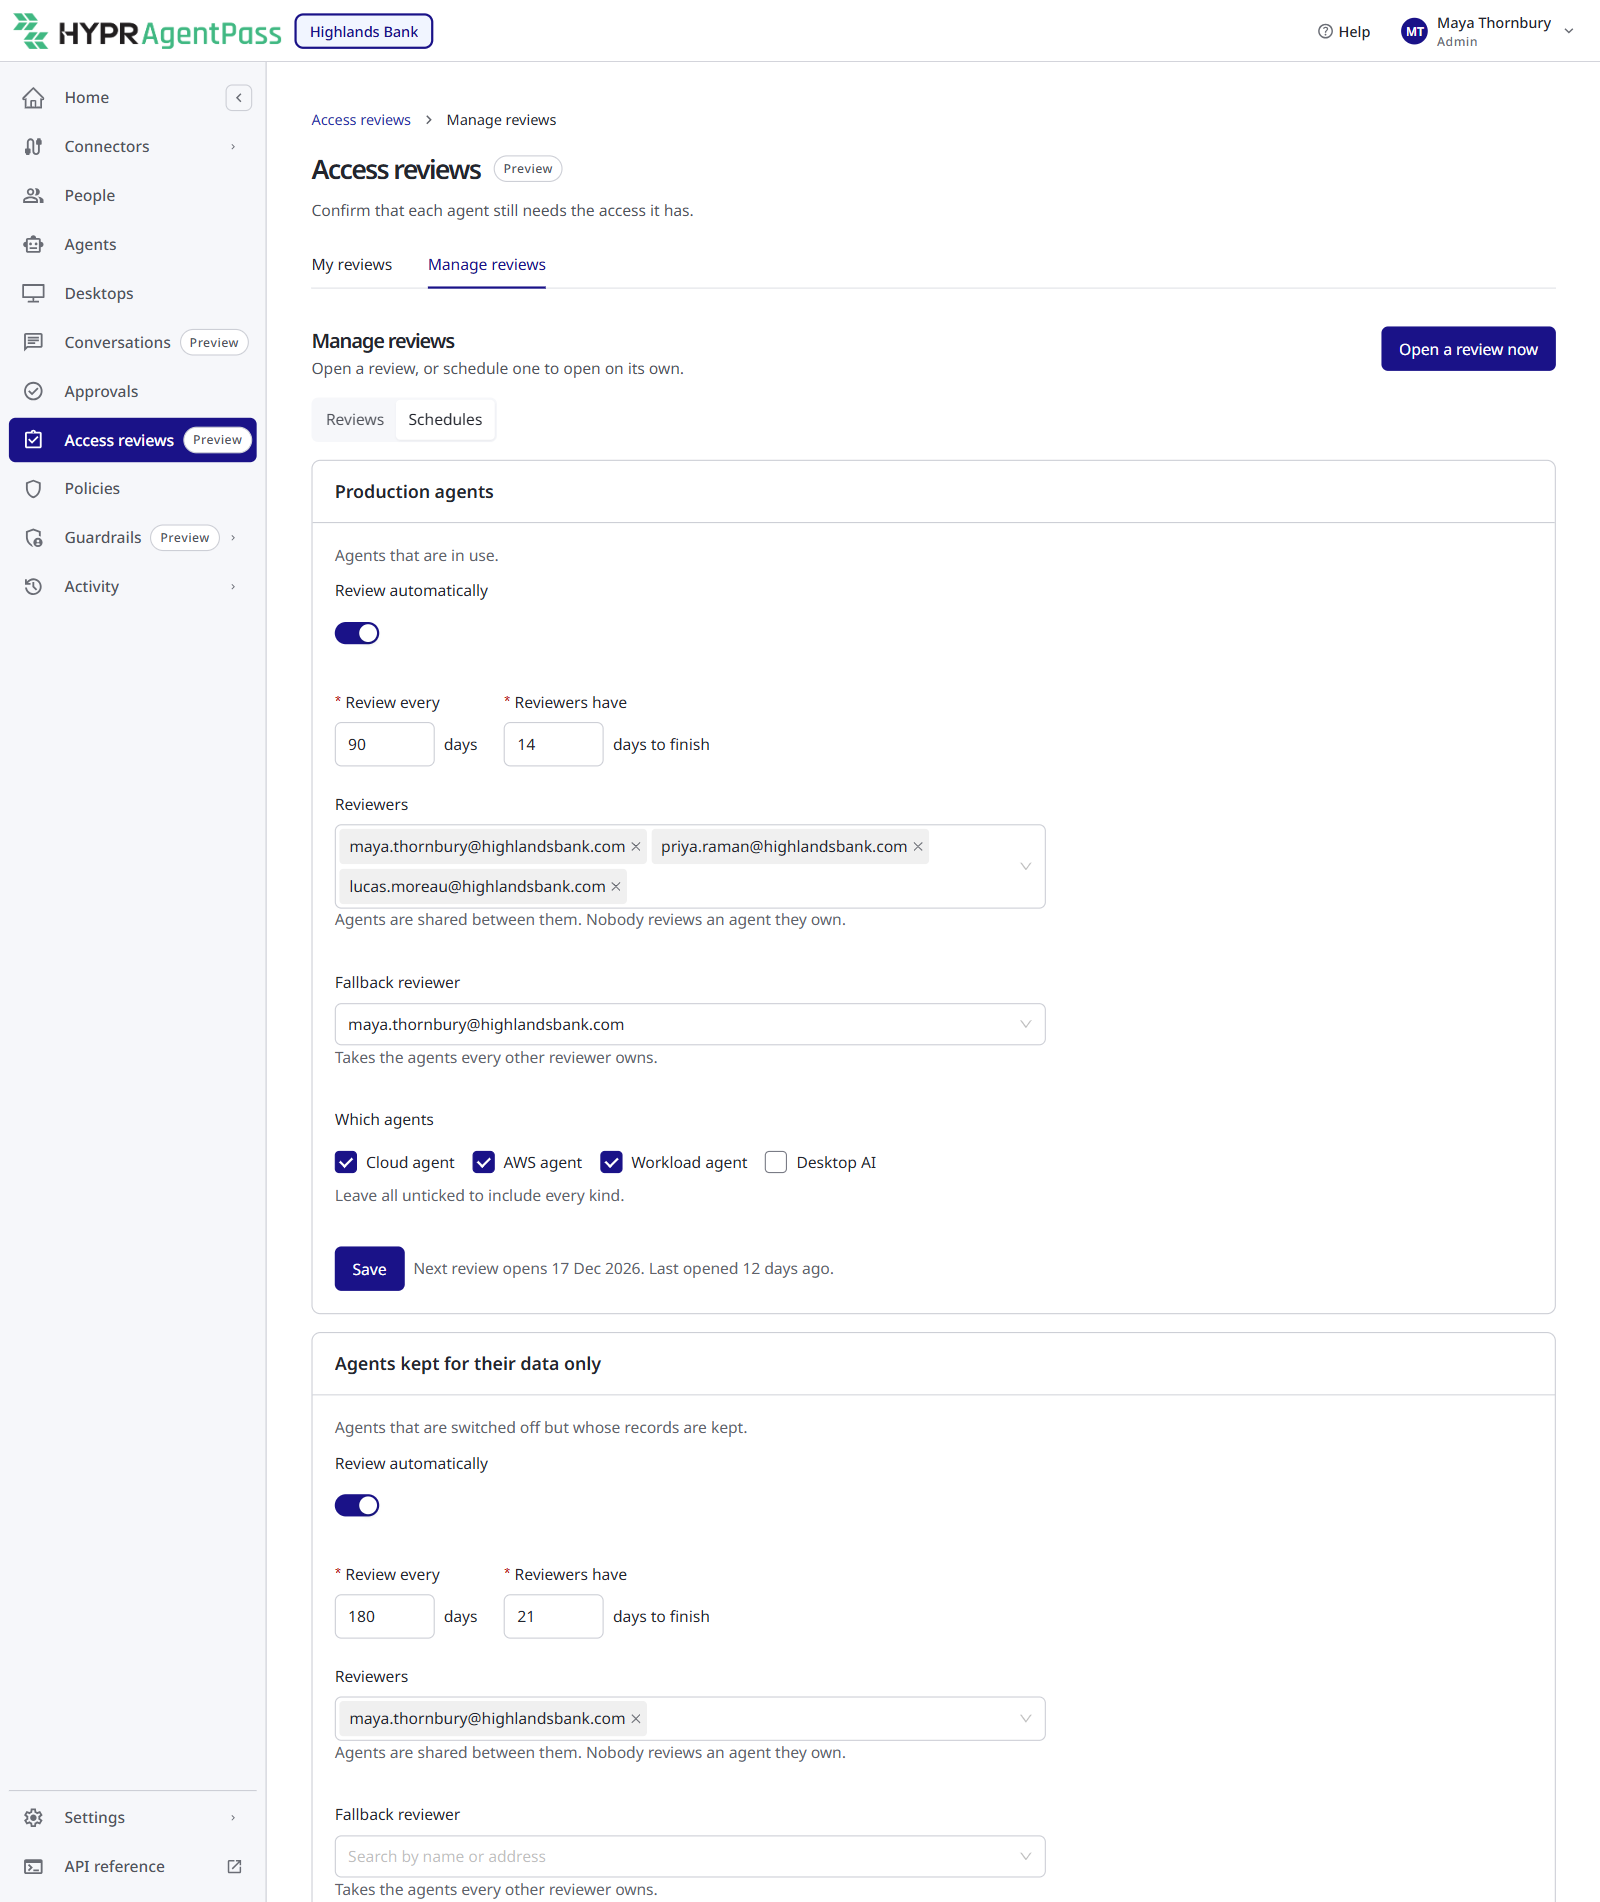
Nobody reviews an agent they own, and a reviewer's removal takes effect straight away. Before an audit, click Open a review now on the Reviews tab. See Running Agent Access Reviews.
Respond to an Incident
Turn an agent off when it must stop now. It's reversible, and AgentPass records who did it and when. For the full investigation, from alert to evidence, see Respond to an Agent Incident.
To turn off any agent, local, cloud or workload:
- Open Agents, and find the agent.
- Open the agent's actions menu (⋮), and choose Turn off.
- Optional: Enter a Reason. AgentPass records it with your name.
- Click Turn off.
To turn it back on, choose Turn on from the same menu. For a Copilot Studio agent, click Disable on its row in the Microsoft 365 Copilot connector's Copilot Studio agents tab. From a guardrail alert, Contain turns the agent off and revokes its sessions.
The gateway refuses the agent's next request, and messages to it are refused. A cloud agent's running sessions at the provider end, and so do its automation runs in progress. To stop all traffic to one target, turn off the connector's switch on its Overview tab.
A request already in progress finishes. On a connector in Observe only mode, except AWS Bedrock, a turned-off local agent's traffic is still forwarded. To keep a workstation tool from reaching its provider directly, select Block direct traffic for the tool under Desktops → Desktop configuration → Configuration.
Who Can Turn an Agent Back On
One rule applies in the console and in the HYPR app.
| Your role reaches | You can turn off | You can turn back on |
|---|---|---|
| All agents, as Admin, Operator and Security analyst do | Any agent | Any agent |
| Only your own agents, as Supervisor does | An agent you own | Only an agent you turned off yourself |
So an agent that an Admin, Operator or Security analyst turns off stays off until a role that reaches all agents turns it back on. Signing in again doesn't turn it on.
Offboard a Person
Offboard someone who leaves, or who must lose access now.
- Open People, and click the Users tab.
- Open the person's actions menu (⋮), and choose Offboard.
- Read what the dialog says will be affected.
- Click Yes, offboard user.
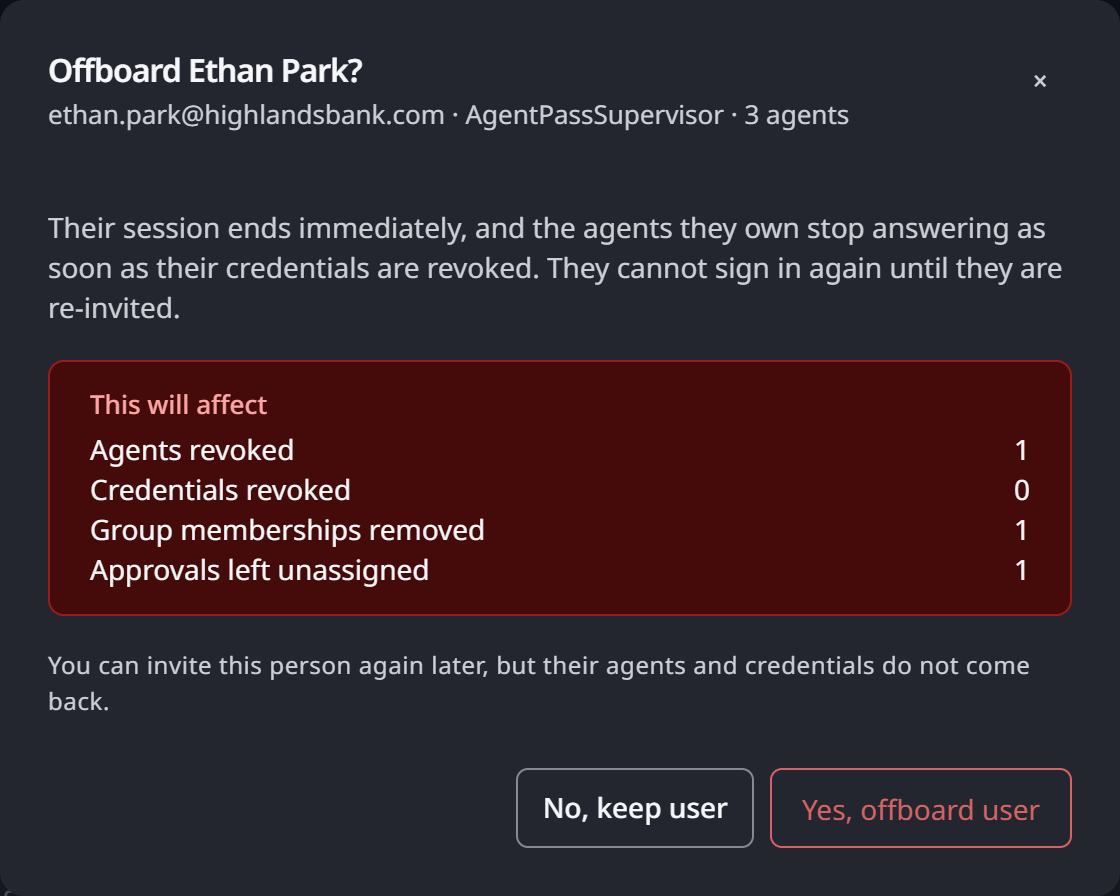
Their session ends, and their agent access, tool connections, roles and group memberships are removed. They can't sign in until someone invites them again, and their audit trail is kept. Deprovisioning them in your directory over SCIM has the same effect.
The dialog counts the pending approvals left unassigned. Deny any that no longer apply on Approvals.
A workload agent uses its own credential, so it keeps working after its owner is offboarded. Reassign or turn off each workload agent the person owned.
To decommission an agent, open its actions menu (⋮) on Agents, click Manage, and click Change stage. Choose Retired, and enter a Reason. Click Yes, move and turn off, or Change stage for an agent not in Production. A retired agent is switched off, and access reviews skip it.
Logs and Audit Trail
AgentPass records each request, each policy decision and each administrative change.
Records and the Forensics Store
Settings → Data management shows where those records go.
| Destination | What it is | By default |
|---|---|---|
| Database | The store behind the Request Log | Always on |
| Export files | Files on each gateway node, for your own compliance or analytics systems | Off |
| Log stream | One line per event in the gateway's logs | Off |
| Forensics Store | Long-term storage, when your deployment has one connected | Receives every category |
Export files and the log stream hash personal details, and leave out request and response content, unless you change that. Admin, Operator and Auditor can read this page, and only Admin can change it.
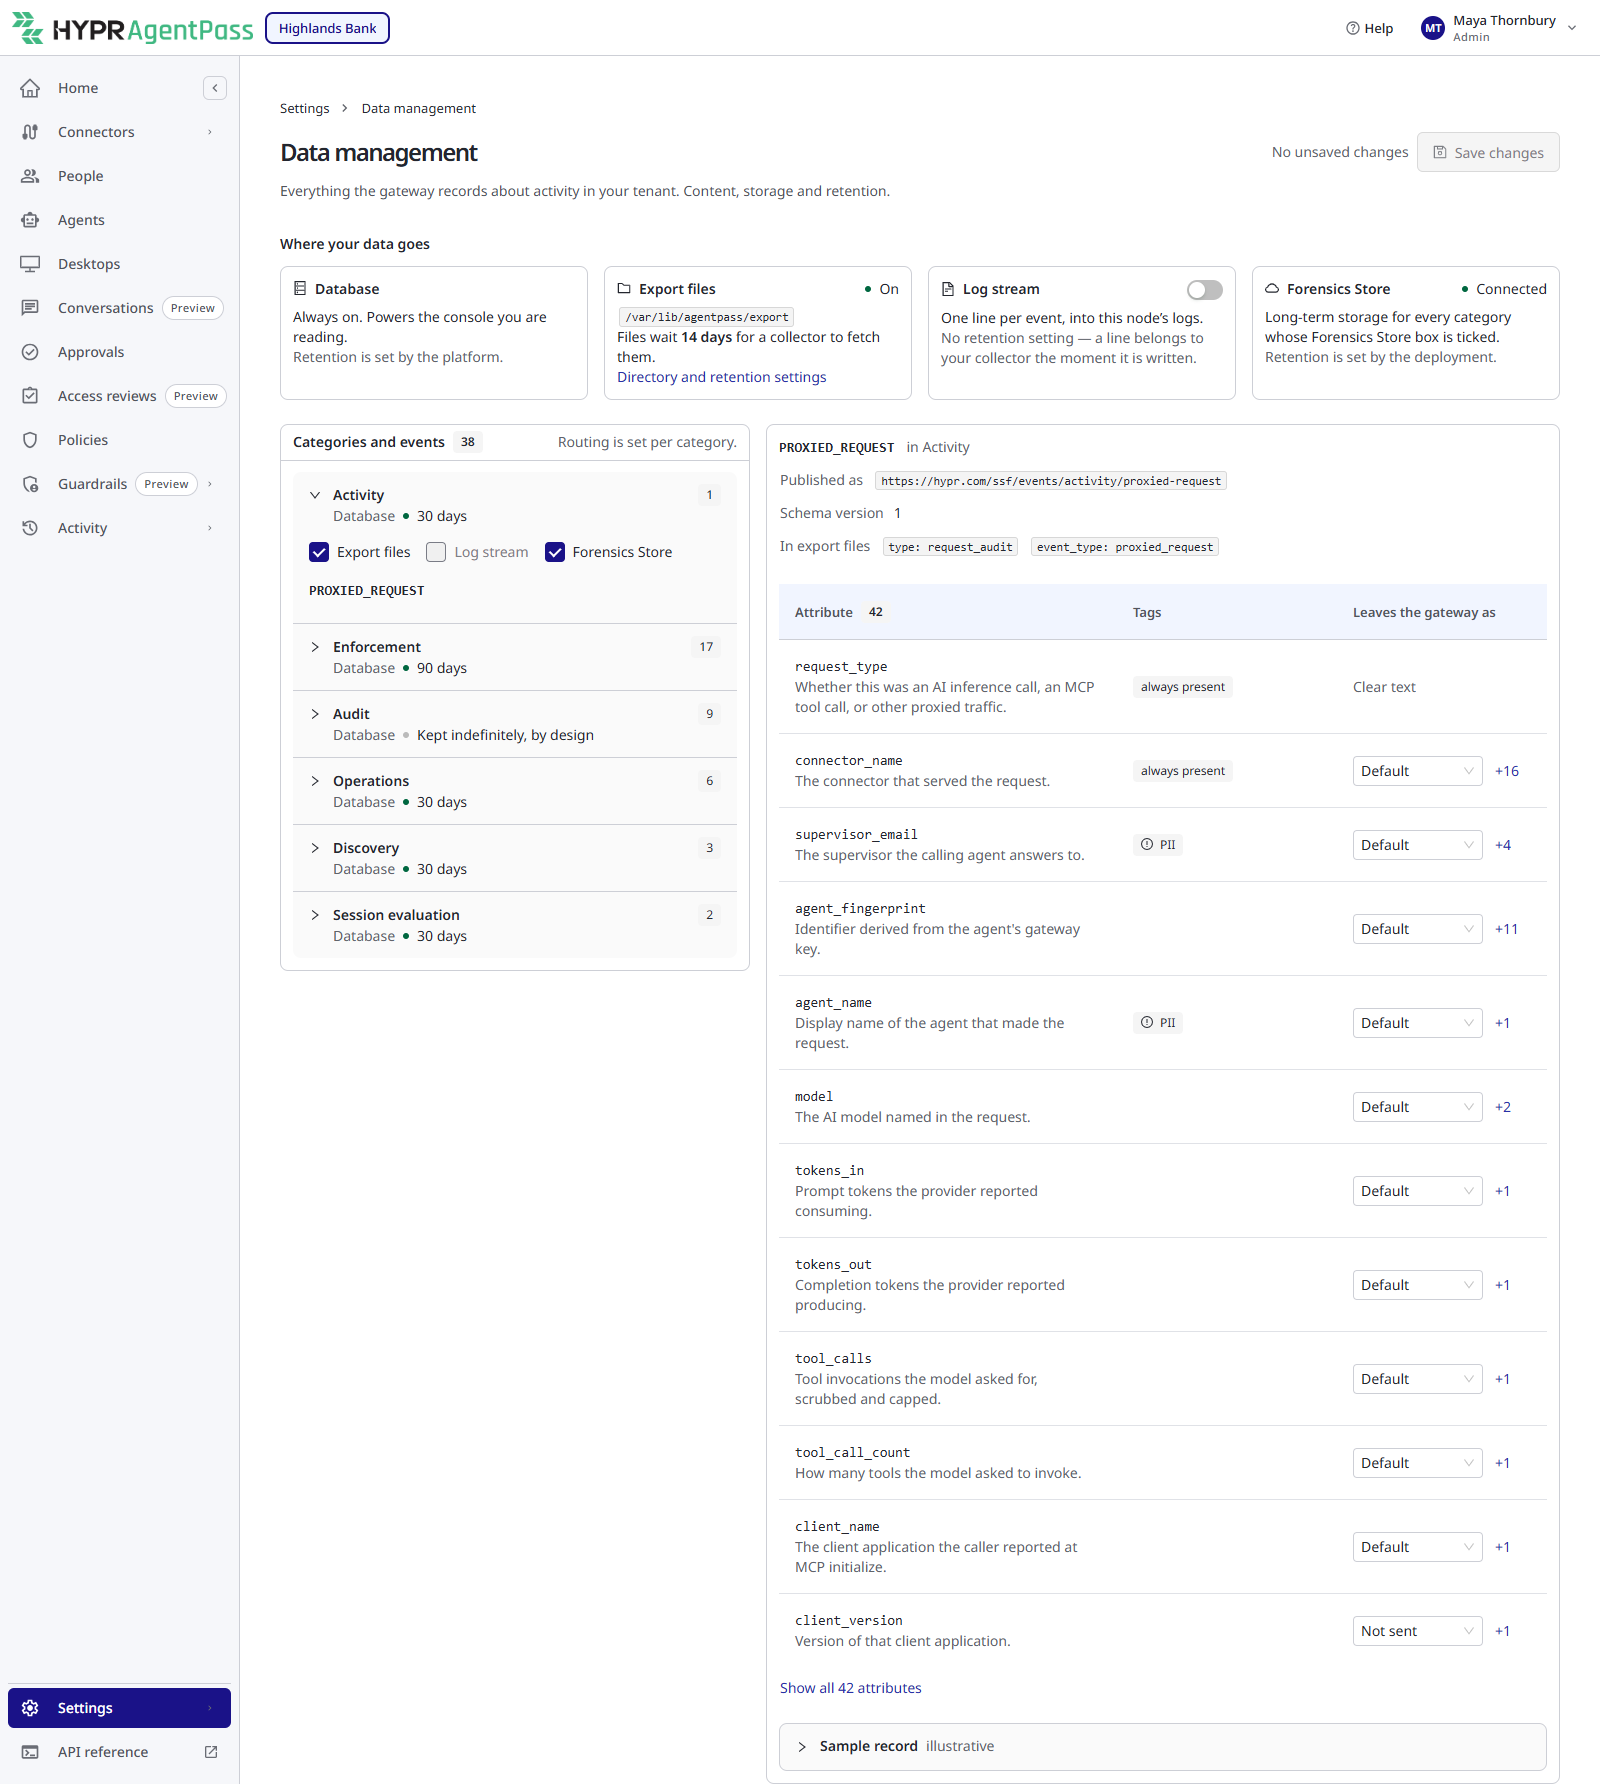
See Data Management.
Troubleshooting
| Symptom | What to check |
|---|---|
| The identity provider refuses SSO sign-in | The registered redirect URI matches the console's Redirect URI exactly, and the provider permits the requested scopes |
| You signed in with SSO and have no Settings or Roles | No mapping grants you Admin, so you got Supervisor. Sign in as the recovery administrator, and map your group to Admin |
| Someone gets Supervisor instead of their mapped role | The claim value matches the mapping exactly, including capitalization, and Role claim names the right claim |
| Someone with several roles sees fewer pages than expected | The console opens in their least privileged role. They switch from Role in the account menu |
| A supervisor gets no approval on their phone | Push delivery is on, the test push reaches their device, and they haven't muted approval requests |
| Approve is unavailable | Signed approvals are Required (production), and the approver hasn't enrolled a passkey |
| An agent can't see an MCP tool | The tool is selected under Agent tools permission on one of the supervisor's roles |
| A new agent's requests pass without approval | The connector's onboarding mode is Require Approval |
| Offboard is refused for your own account | Another Admin must offboard you |
Related
- Get Started as an Administrator — the short version of this playbook
- Your First Governed Agent — the shortest path to a first governed agent
- Respond to an Agent Incident — the security analyst's path from alert to evidence
- Using AI Tools with HYPR AgentPass — the guide to hand to your employees