Entra ID: External MFA
Please note, this integration is in a beta phase. Please provide any feedback or enhancement requests to your HYPR Account Manager and these will be worked into our next release.
Integrating HYPR with Entra ID via external MFA lets you access your organization's Entra ID-based applications (such as Office 365) using HYPR passwordless authentication as a phishing resistant multi-factor authentication method.
Microsoft now calls this capability external MFA; it was previously named external authentication methods (EAM), and you may still see the earlier name in HYPR Control Center, in older release notes, and in some Microsoft material. Both names refer to the same integration.
HYPR was part of the initial group of identity and authentication vendors supported by Entra as an external method provider. For Microsoft's current reference, see How to manage external MFA in Microsoft Entra ID and the external MFA provider reference.
Getting the HYPR Entra ID external MFA integration up and running requires the following basic steps:
-
Understand how the Entra ID login process changes for end users after you integrate with HYPR. See What Will Happen in Entra ID?.
-
Configure the Entra ID side of the integration. See Setting Up Entra ID.
-
Configure the HYPR side of the integration. See Connecting Entra to HYPR.
The following HYPR Integration common tasks are explained on the Integrations main page.
-
Choose the methods you want people to be able to use for passwordless authentication; see Allowing the Use of FIDO2 Authenticators
-
Configure the optional [Affirm] authenticator in Integration Login Settings: Using Affirm as an Authenticator
-
Monitor integration-specific user activity with the Audit Trail
External MFA requires at least a Microsoft Entra ID P1 subscription. Please check your Microsoft subscription before proceeding with configuring the integration.
What Will Happen in Entra ID?
Login Flow
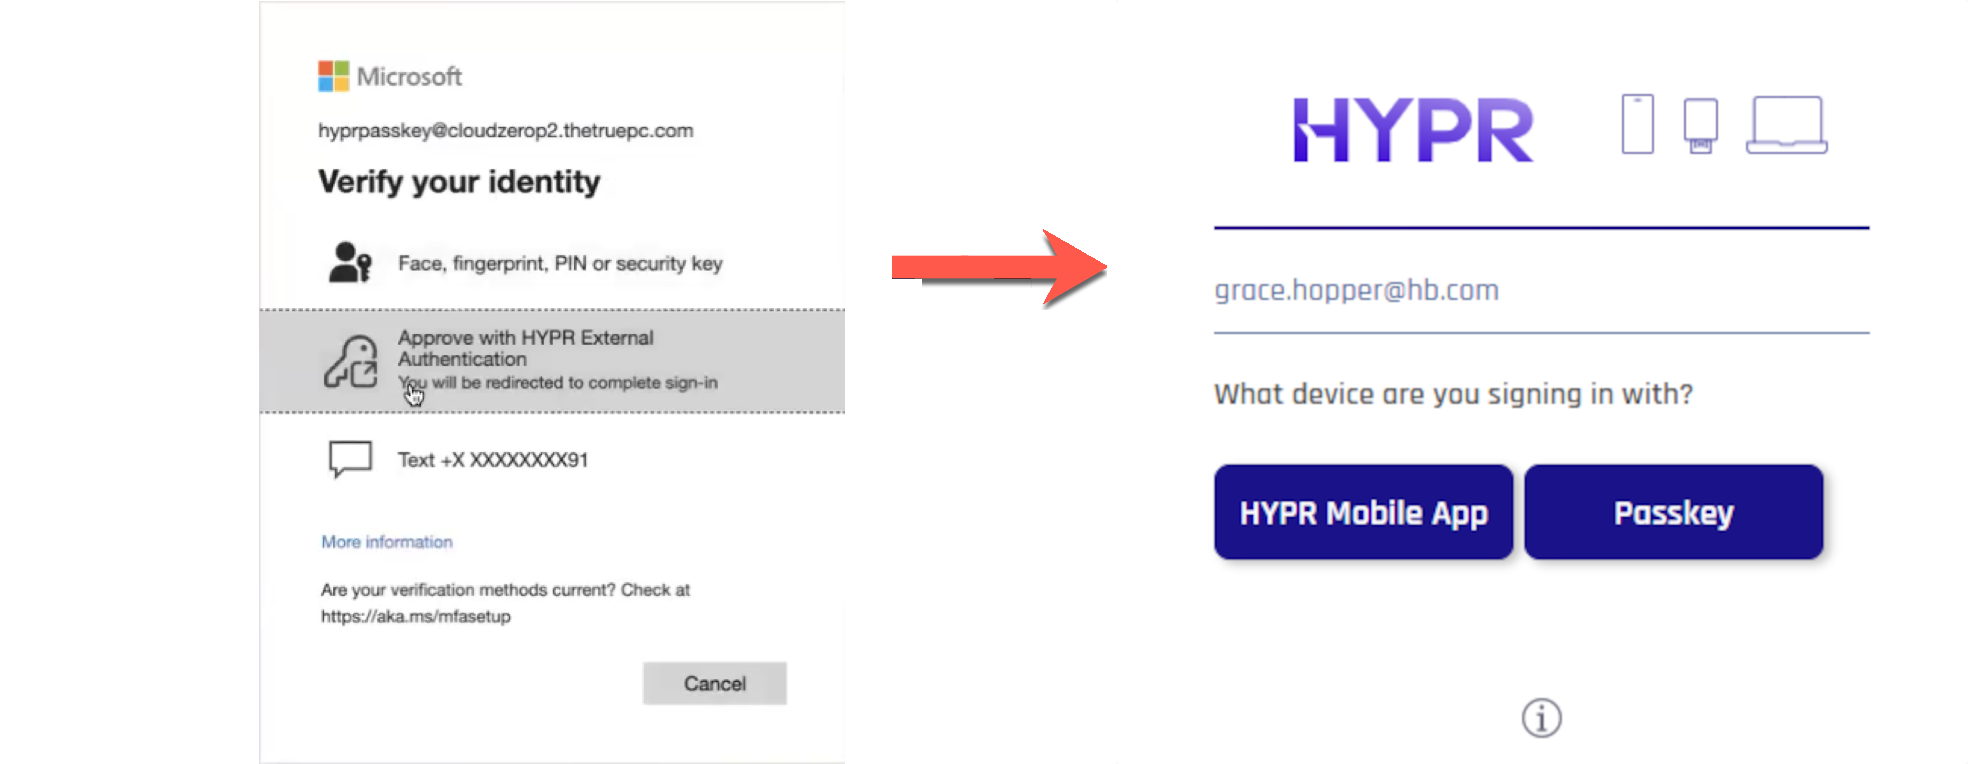
Once you activate the HYPR Entra ID external MFA integration, users will experience a different Entra ID login flow.
Enrolled Users
Users who have been successfully enrolled via the HYPR Device Manager can fulfill multi-factor authentication requirements through HYPR. After providing their username on the Entra ID sign in screen and authenticating with their password, they'll be redirected to the HYPR passwordless authorization flow. Then they can use their registered HYPR authenticator to complete the login process and get back to Entra ID.
Behind the Scenes
Once you create the integration, HYPR will handle as much of the back-end configuration in Entra ID as possible.
Enrolled Group Membership
During setup, HYPR creates a single Entra ID security group named HYPR Group (Users Enrolled with HYPR EAM). Users are added to this group once they enroll with HYPR, so its membership is the set of users who can satisfy MFA through HYPR.
This is the group to target when you scope the external method and your Conditional Access policy in the steps below.
The HYPR (federation) and Enterprise Passkey login experiences create a different set of groups, including a Users Not Yet Enrolled group that users are removed from as they enroll. This integration does not create that group, and its group works the opposite way — membership grows as users enroll. If you are moving from another Entra integration type, do not carry the earlier group logic over.
What You'll Need
-
Since you're setting up the HYPR Entra ID external MFA integration through the HYPR Control Center, you should have already registered for an account, paired your mobile device with HYPR, and used your new passwordless login to access the Control Center; if this isn't the case, please contact HYPR Support and we'll help you out
-
Make sure you have the Entra tenant available and an account that exists on the
*.onmicrosoft.comdomain with administrative privileges. -
Make sure you have the Entra licenses (P1) assigned to the test accounts
Setting Up Entra ID
Registering the HYPR Entra ID Application
-
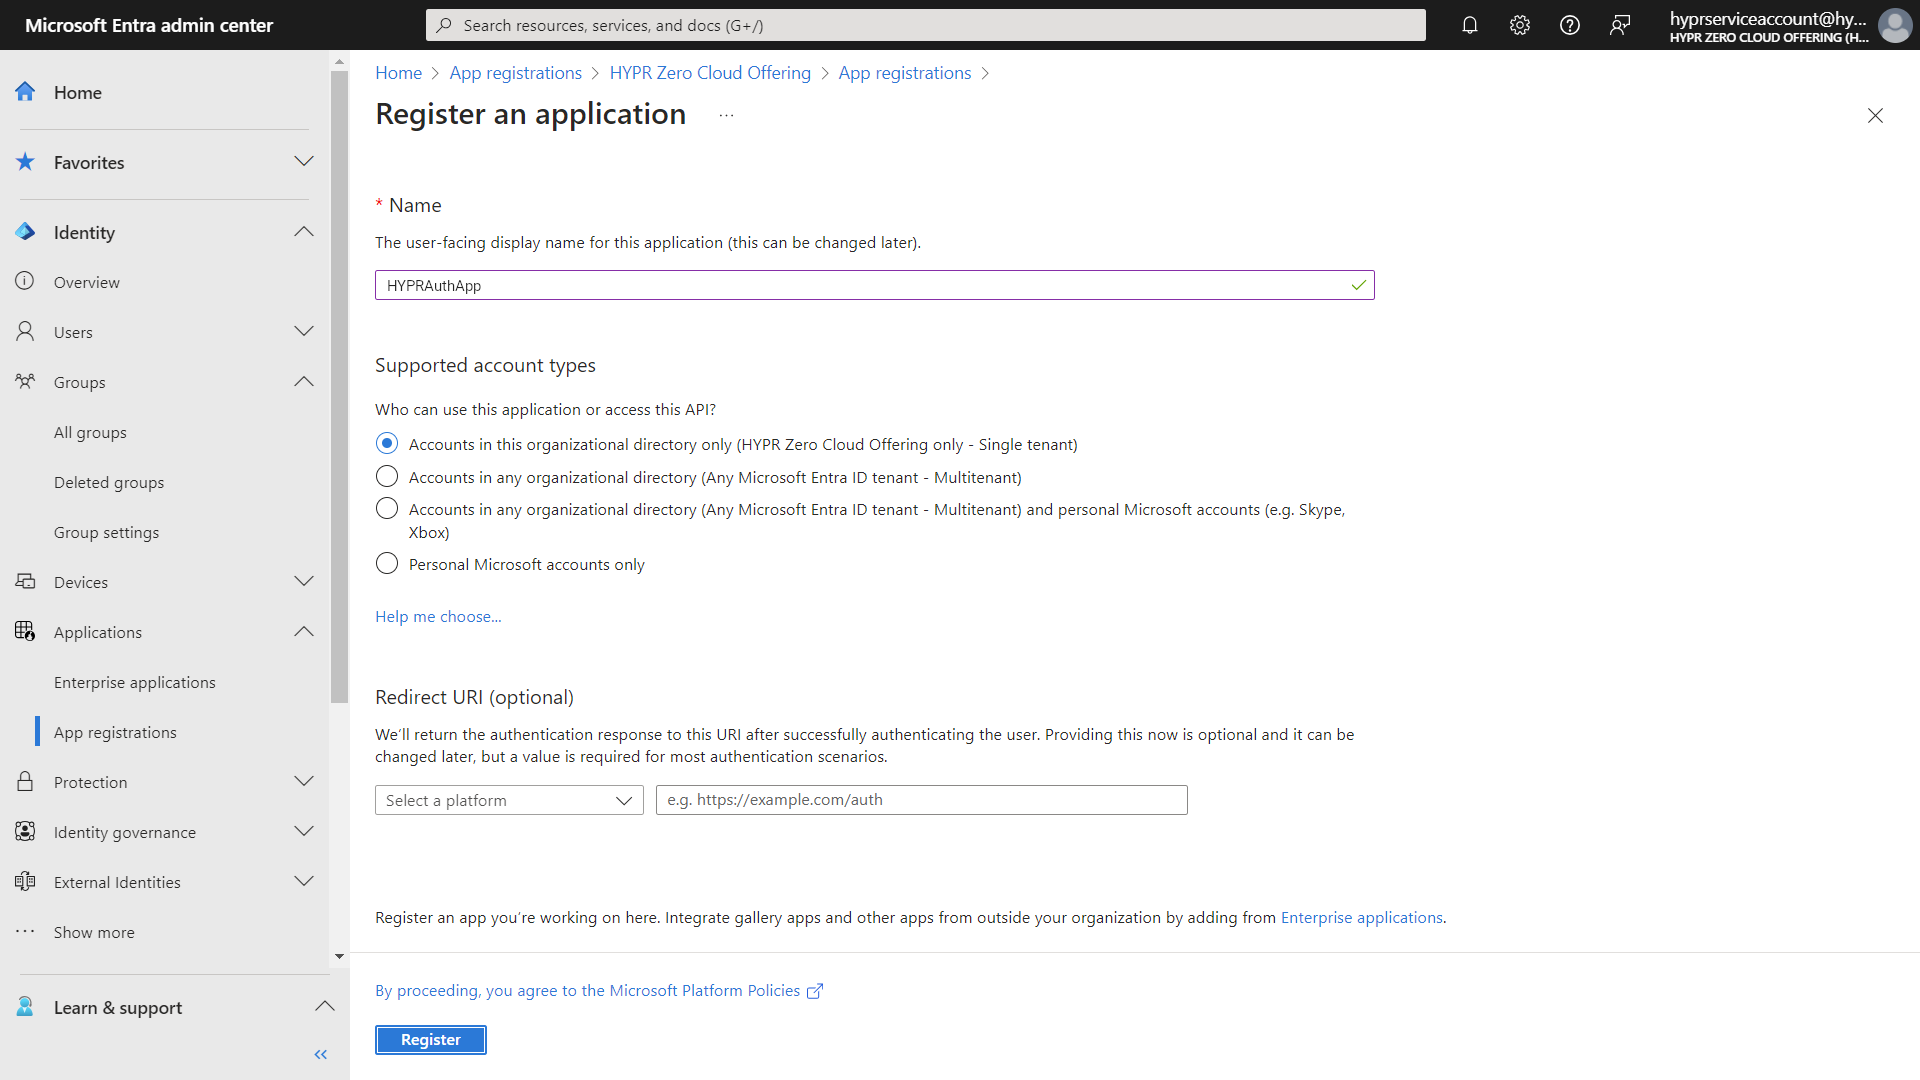
From the Entra ID portal home screen, select Entra ID > App registrations > New registration.
-
Enter the application name HYPRAuthApp and select Accounts in this organizational directory only.
-
Click Register when done.
-
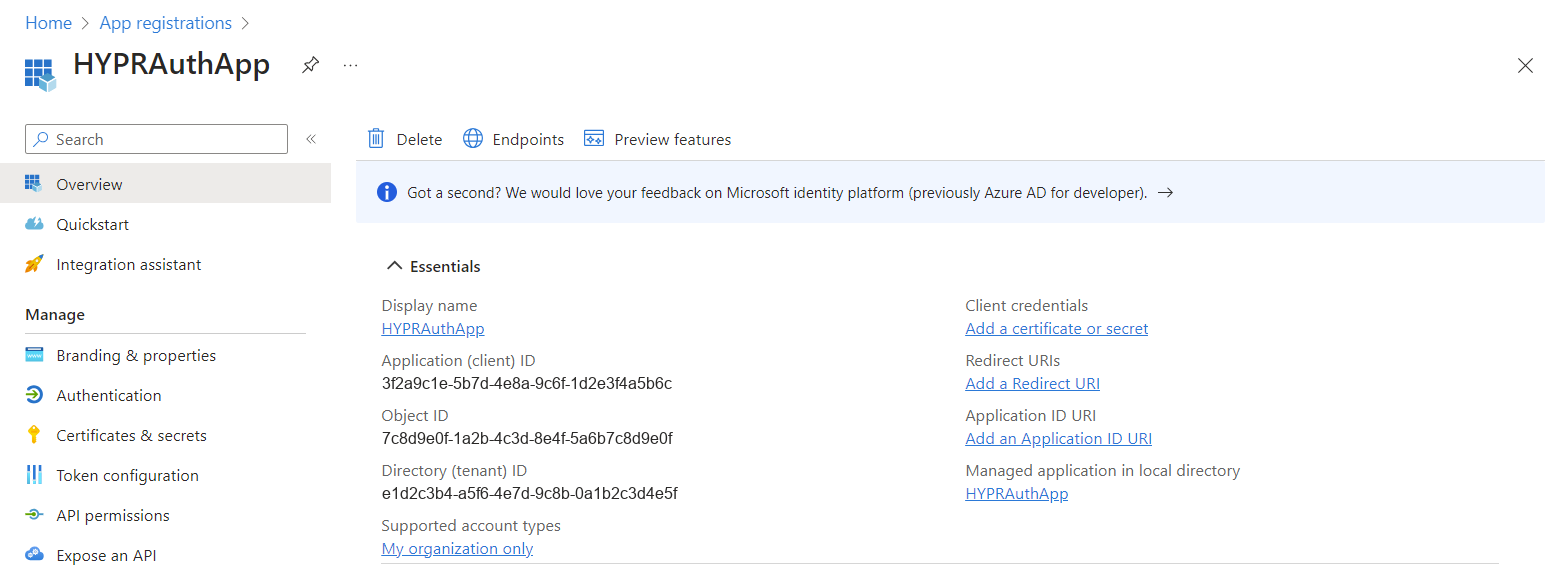
On the Overview page, make a note of the following values which you'll need later when configuring the integration in the HYPR Control Center:
-
Application (client) ID
-
Directory (tenant) ID
-
Granting Required API Permissions
-
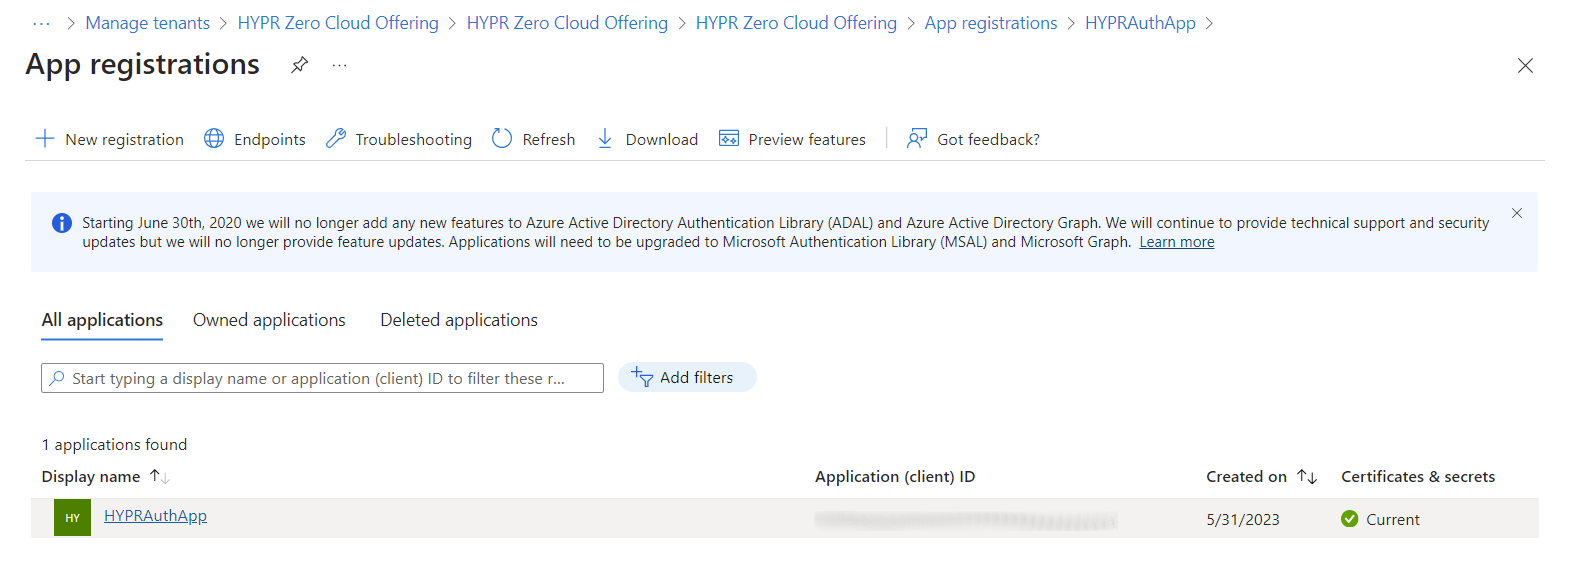
From the Entra ID screen, select App registrations and select the app you just made.
-
Select API permissions.
-
By default, the application will already have Microsoft Graph's User.Read permission. This isn't required, so remove it by clicking the ... icon and choosing Remove permission. Click Yes, remove to confirm when prompted.
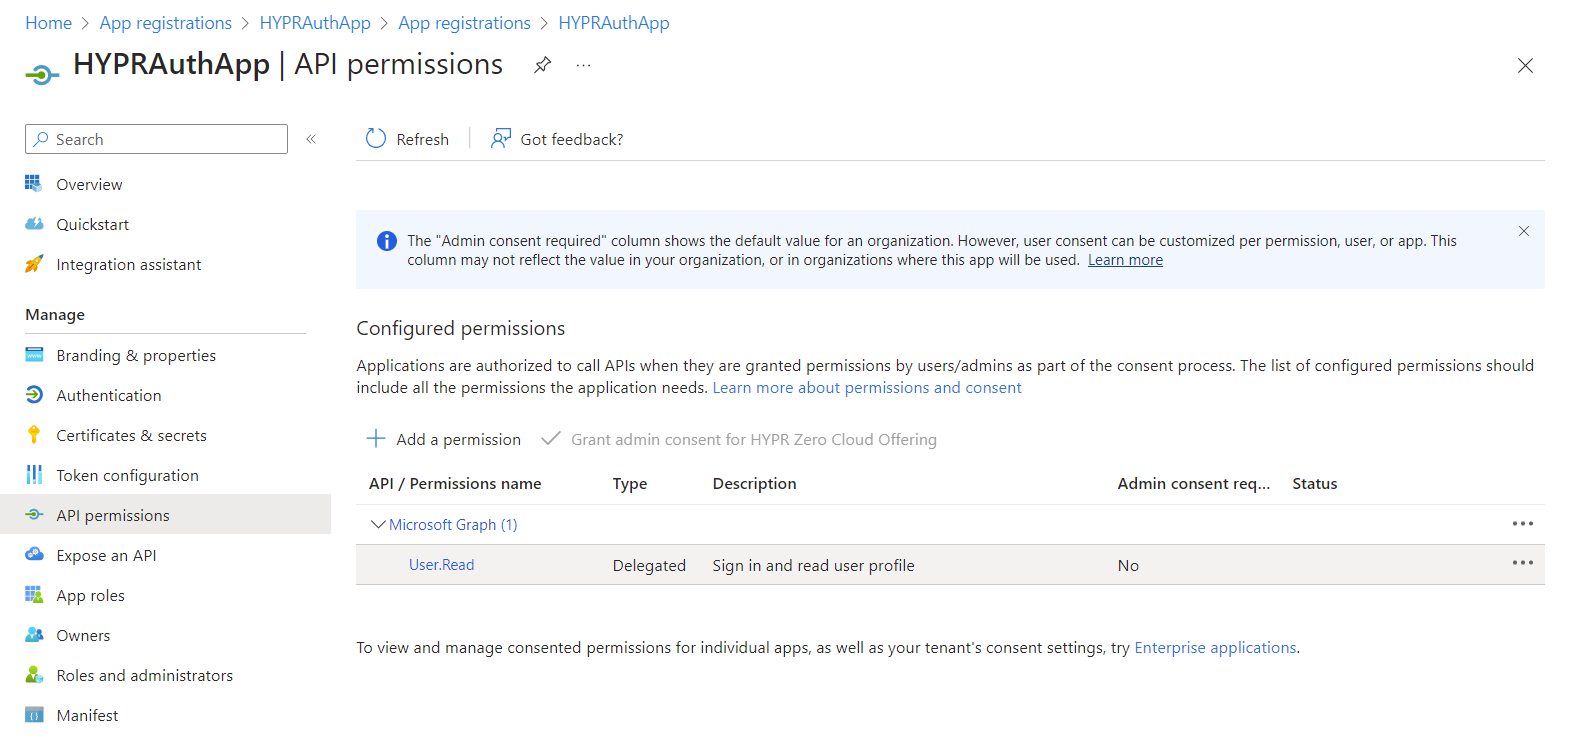
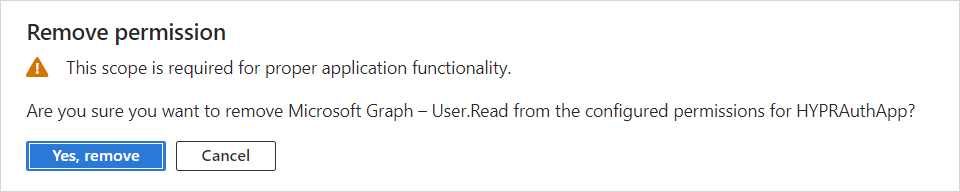
-
Click Add a permission, and on the tiled choices, select Microsoft Graph.
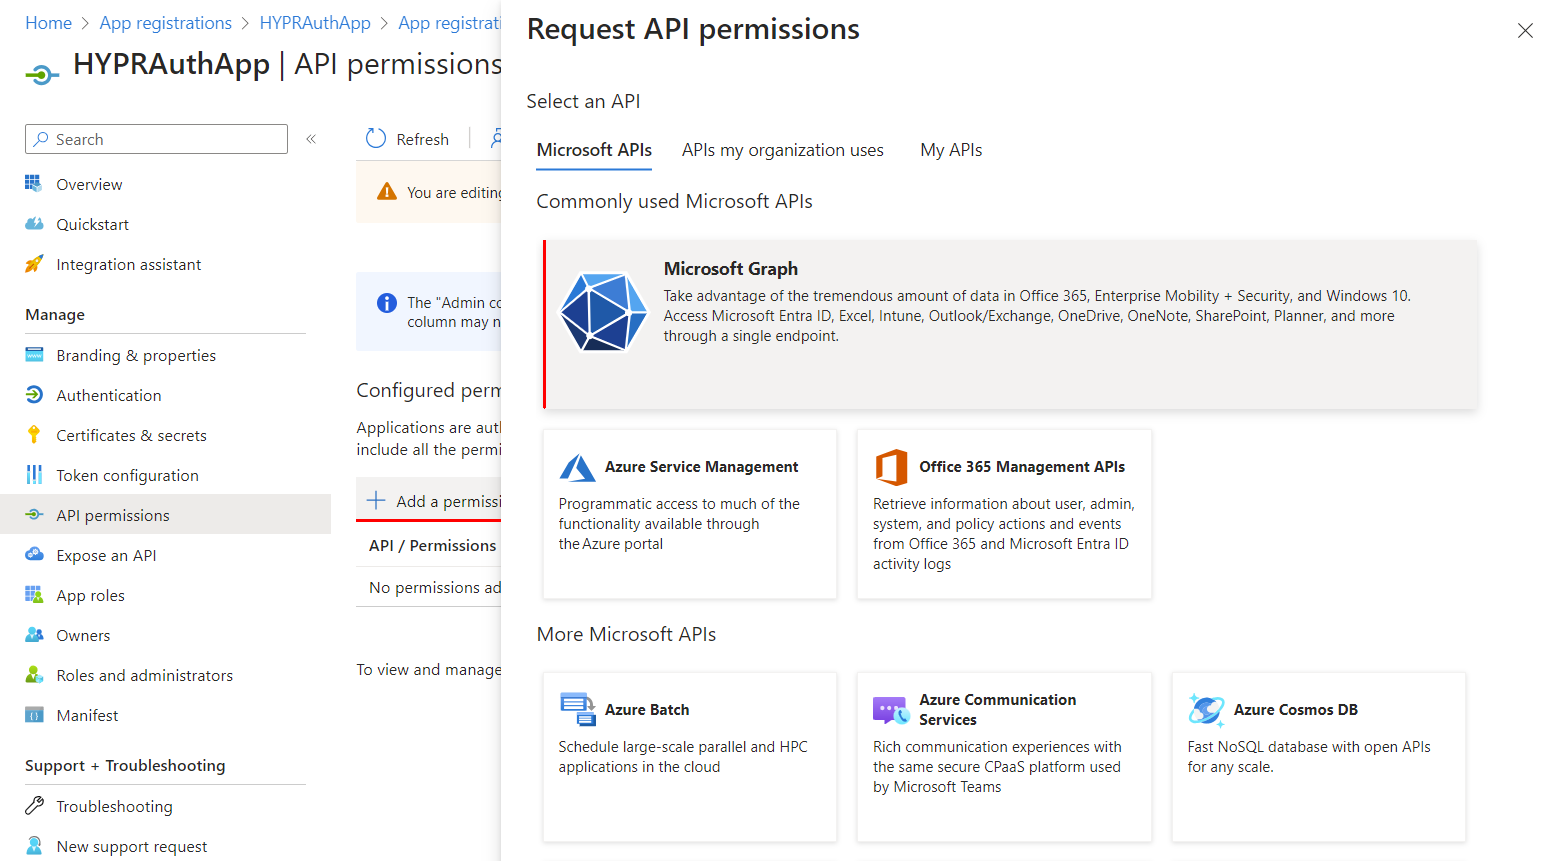
-
Select Delegated permissions.
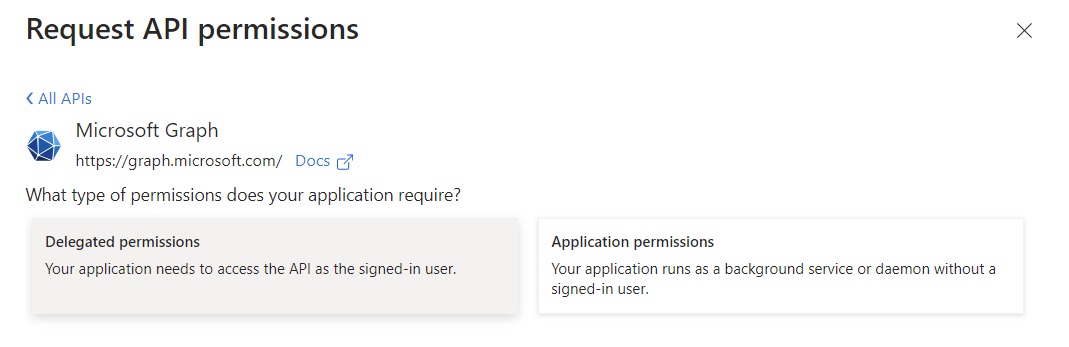
Delegated by DefaultSometimes Entra ID will not display the option for Delegated or Application permissions, and will immediately assume Delegated as the choice. After you grant Admin Consent later in the process, you will be able to verify the permission type.
-
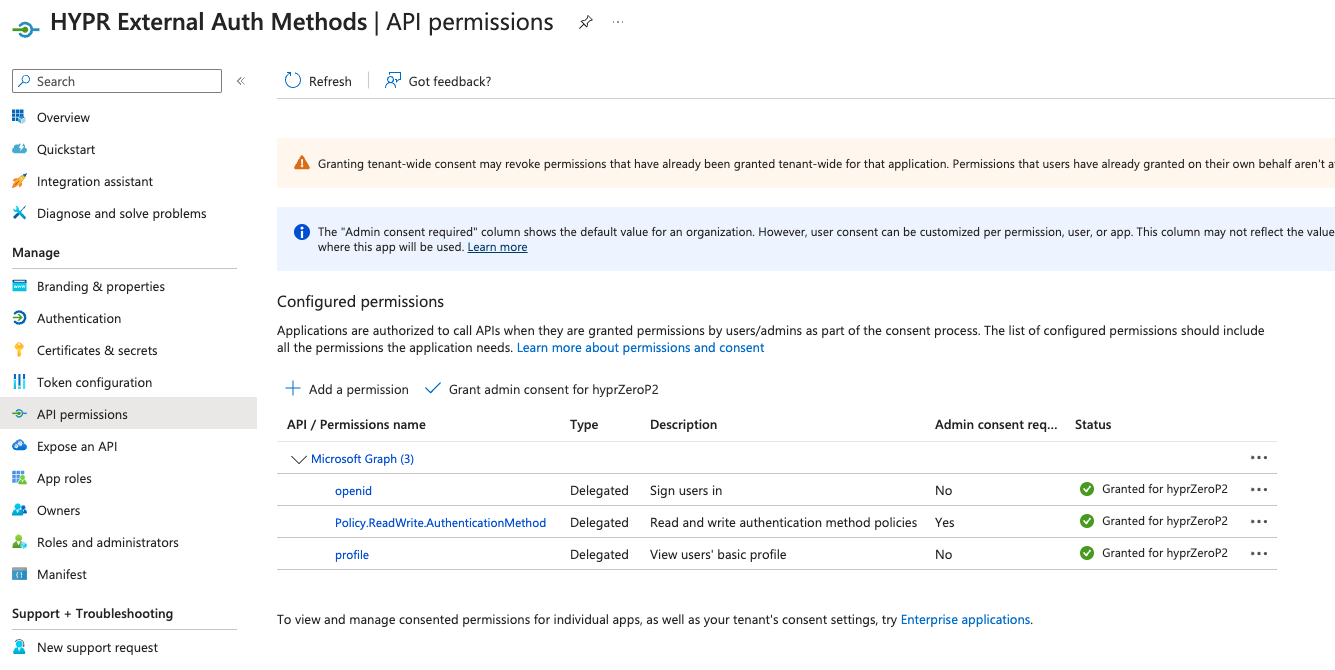
Locate and select the following:
-
openid -
Policy.ReadWrite.AuthenticationMethod -
profile
The API Permissions page now displays the new Delegated permissions.
-
-
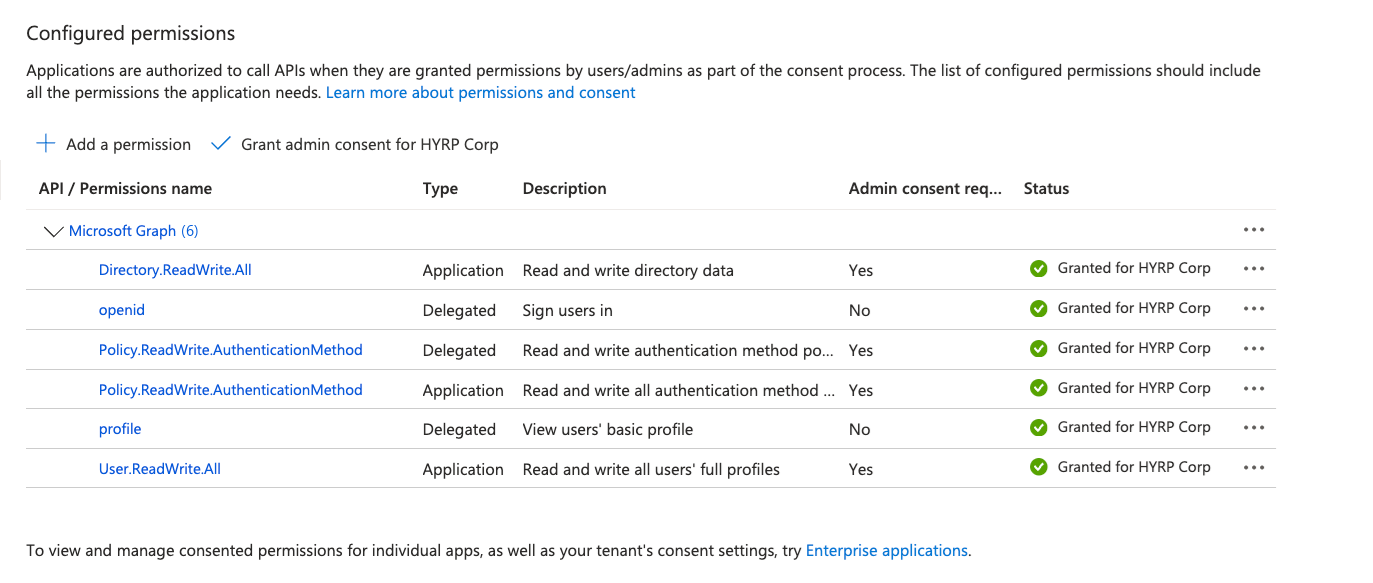
Now select Application permissions, locate and select the following permissions, then click Add Permissions:
-
User.ReadWrite.All -
Directory.ReadWrite.All -
Policy.ReadWrite.AuthenticationMethod
-
-
Verify admin consent has been granted (beside + Add a permission). If not, click Grant admin consent to apply the permissions and click Yes to confirm when prompted.
Creating an application credential
You'll need to provide a credential when you set up the integration in the HYPR Control Center, which is going to be used to interact with the Entra resources via the Graph API. You can use a client secret or a client certificate as this credential.
The Entra ID external MFA integration uses the OAuth 2.0 Client Credentials Grant flow to authenticate to Entra's Graph API.
Using a client secret
If you choose to use a client secret, you can generate it in Entra ID as follows:
-
From the Entra ID screen, select App registrations and choose your app.
-
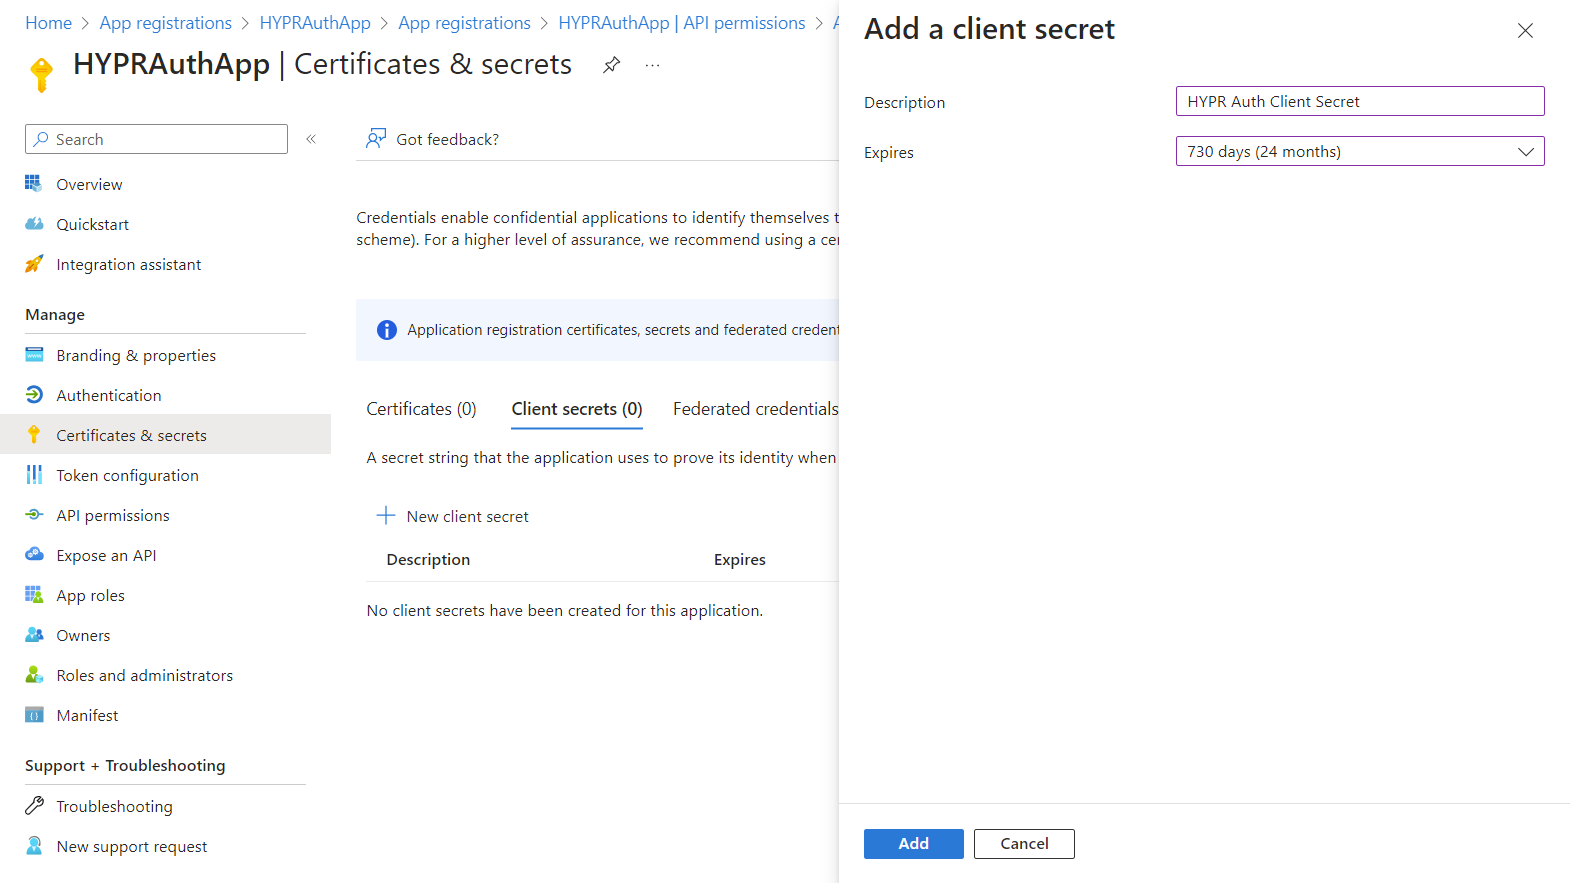
Select Certificates & secrets, then select Client secrets and click New client secret.
-
Enter a Description and an Expires date. Click Add when finished. Entra ID returns to the Certificates and Secrets list.
-
Make a note of the client secret value now so you can use it later.
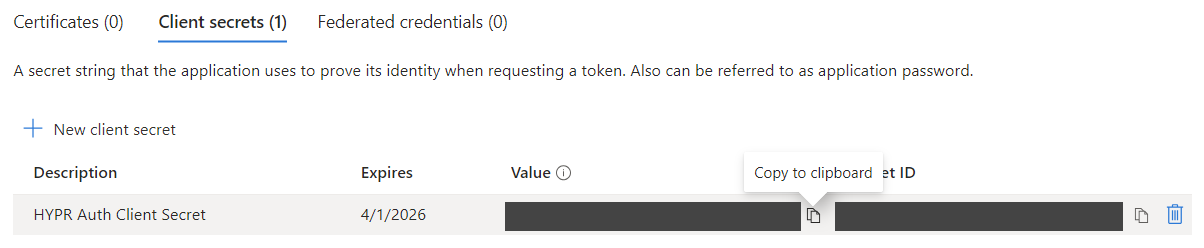
One Time OnlyIf you return to this screen later, Entra ID will mask the value and you won't be able to copy it.
Using a client certificate
If you choose to use a client certificate, you can upload it in Entra ID as follows:
-
From the Entra ID screen, select App registrations and choose your app.
-
Select Certificates & secrets, then select Certificates and click Upload certificate.
-
Enter a Description and click Add when finished. Entra ID returns to the Certificates and Secrets list.
You will need to have an X.509 certificate and its corresponding private key available if you decide to use client certificate-based authentication. The certificate can be a self-signed or signed by a Certificate Authority trusted by your organization.
For more information about the use of X.509 certificates in Entra ID applications refer to the corresponding guide.
For guidance on creating your own client certificate, see Microsoft's guidance on creating self-signed certificates.
HYPR Control Center - Connecting Entra ID to HYPR
Once Entra ID is set up, you can add the integration to HYPR.
-
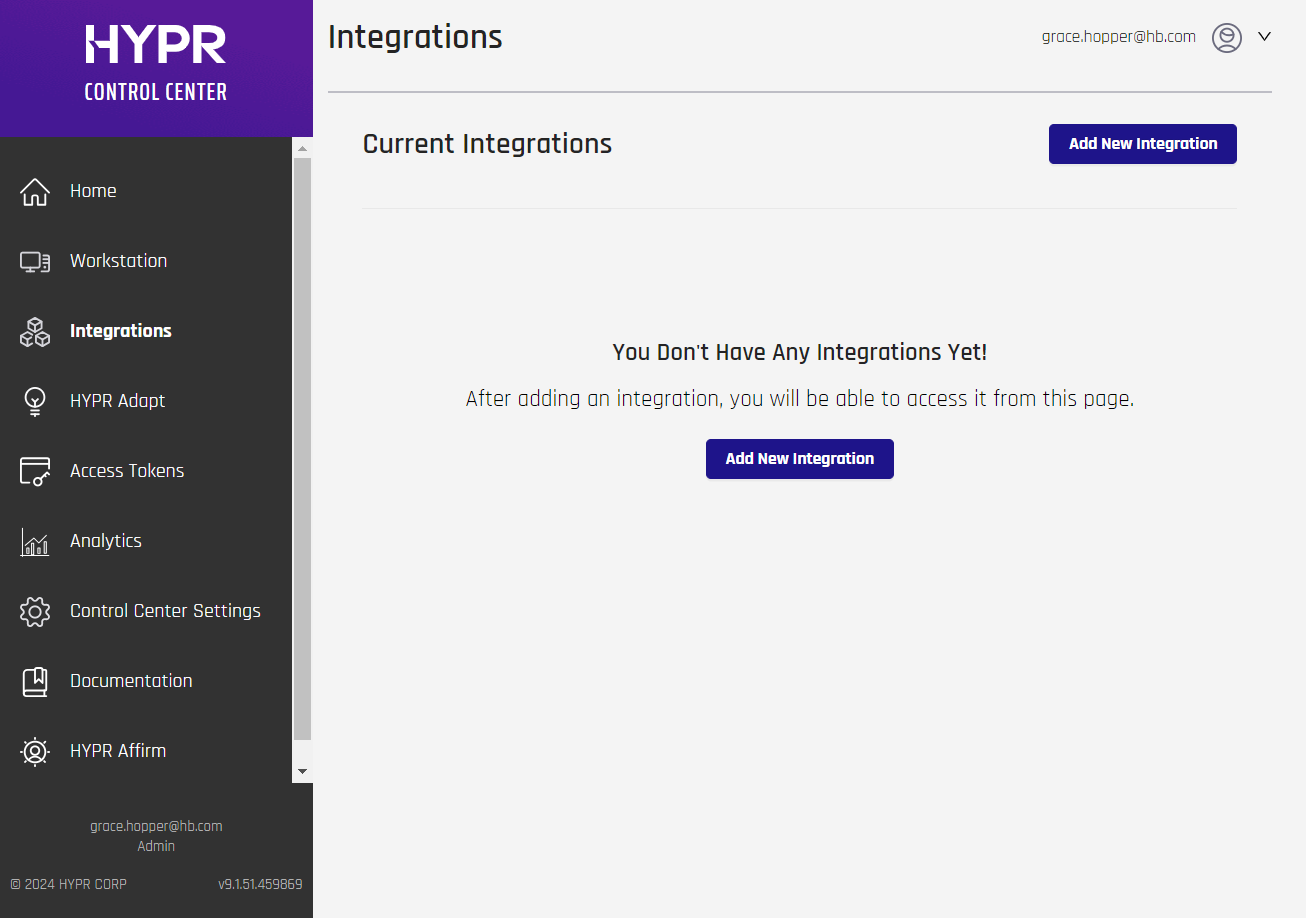
Go to the Integrations screen in the HYPR Control Center and click Add New Integration to show a list of available integration types.
-
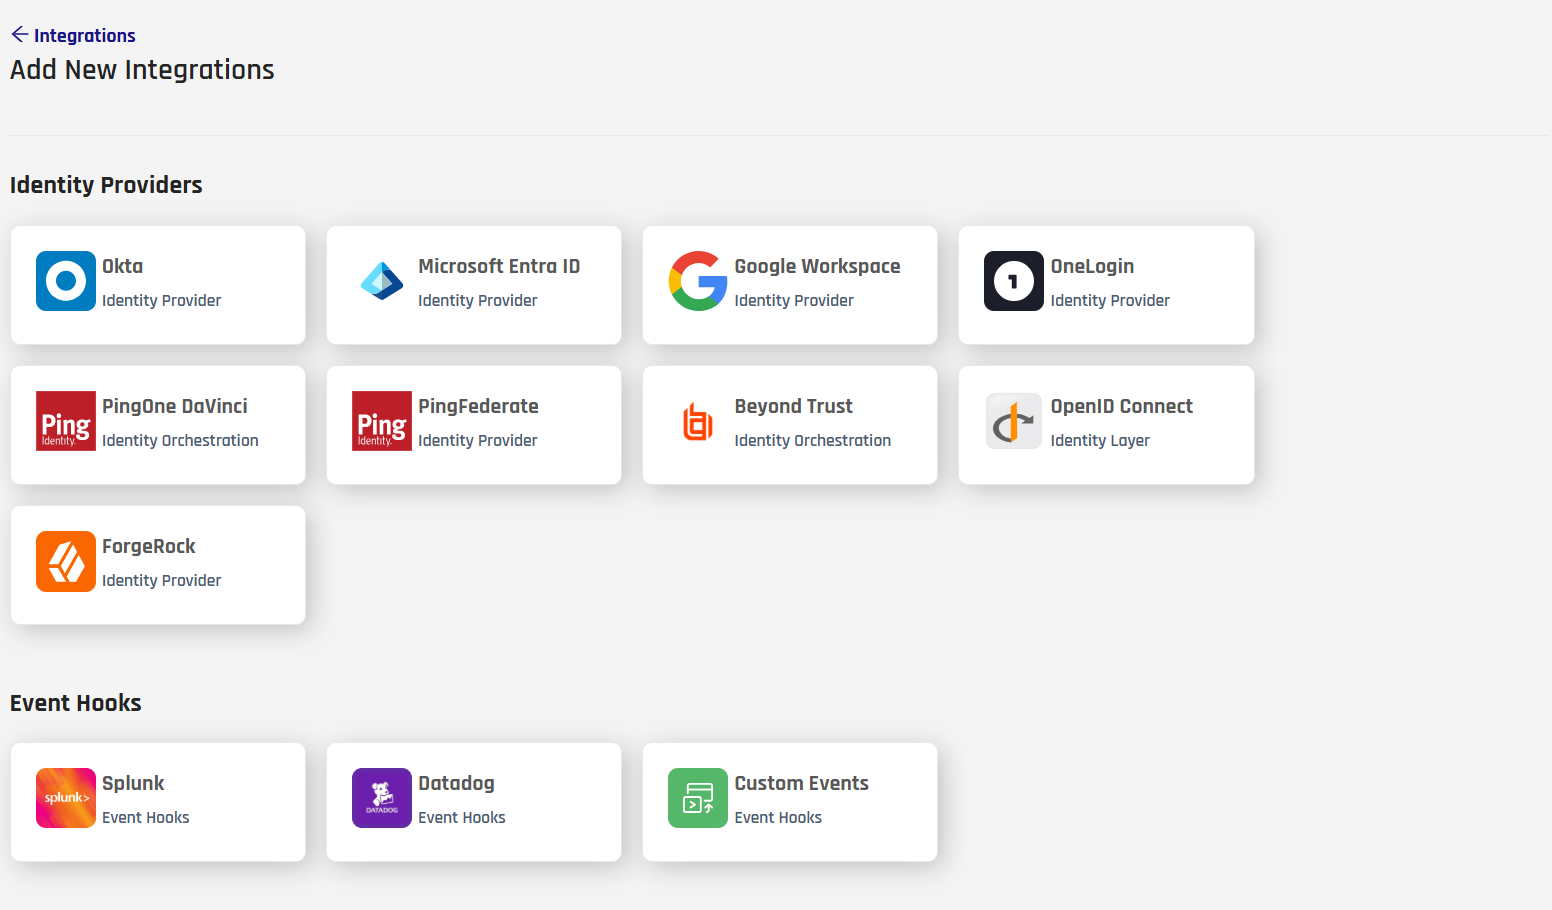
Select the Microsoft Entra ID integration.
-
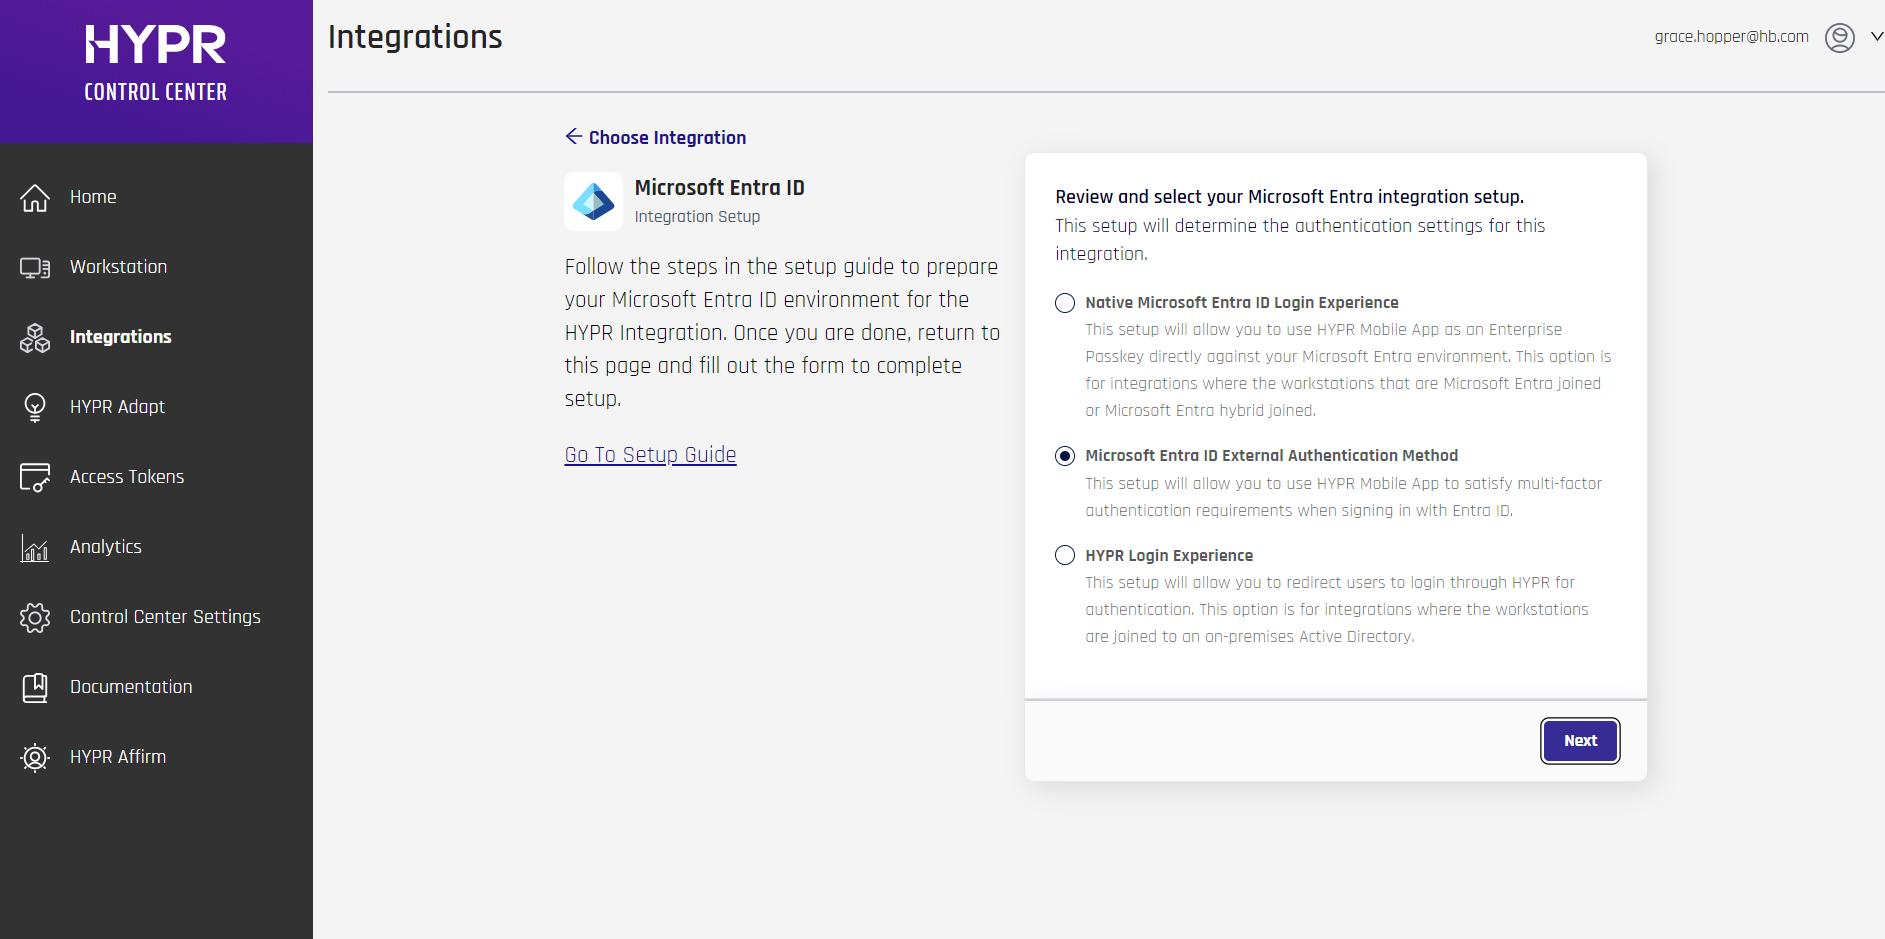
HYPR will present you with a choice; select Microsoft Entra ID External Authentication Method.
-
To integrate HYPR and Entra ID, you just need to provide some information on the HYPR Login Setup screen.
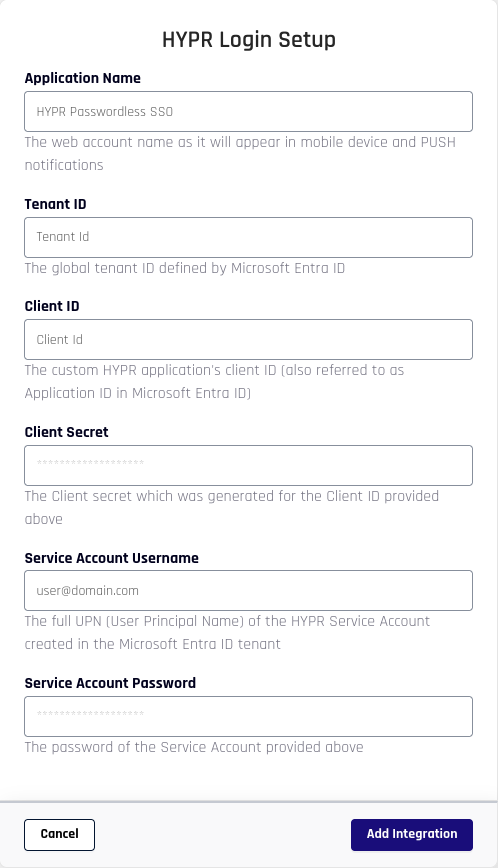
Field Value Application Name The name you provide here will be used in three places:
- For the web account name that users will see in the HYPR Mobile App
- For the HYPR Device Manager page where users register their devices
- For internal identification of this integration within the HYPR platform
You can use any name you like, but it's best to go with something that indicates the purpose of the application. For example:
passwordlessClientEntraSSO
You can type numbers, spaces, hyphens, and underscores in the name, but every character that is not a letter or a digit is removed from the name used internally — soentra-eamandentra eamboth becomeentraeam. Letter case is preserved. The namespace is limited to 23 characters.
This is the application name you'll also use when taking the last configuration steps in Entra ID.
Once set, the only way to change the Application Name is to delete and re-add the integration.Tenant ID The Directory (tenant) ID from Entra ID.
If you didn't make a note of this earlier, you can retrieve it from the Overview page for the application in Entra ID (see Registering the HYPR Entra ID Application).
Once set, the only way to change the Tenant ID is to delete and re-add the integration.Client ID The Application (client) ID from Entra ID.
If you didn't make a note of this earlier, you can retrieve it from the Overview page for the application in Entra ID (see Registering the HYPR Entra ID Application).
Once set, the only way to change the Client ID is to delete and re-add the integration.Client Secret The client secret value for the Entra ID application
If you didn't make a note of this earlier, you'll need to go back and generate a new one in Entra ID (see Using a Client Secret).Client Certificate The X.509 certificate uploaded to the Entra ID application, if you decided to use a client certificate.
You'll need to provide the certificate in PEM-encoded format.Client Private Key The private key of the client certificate uploaded to the Entra ID application, if you decided to use a client certificate.
You'll need to provide the private key in PEM-encoded format. -
Click Add Integration to begin.
-
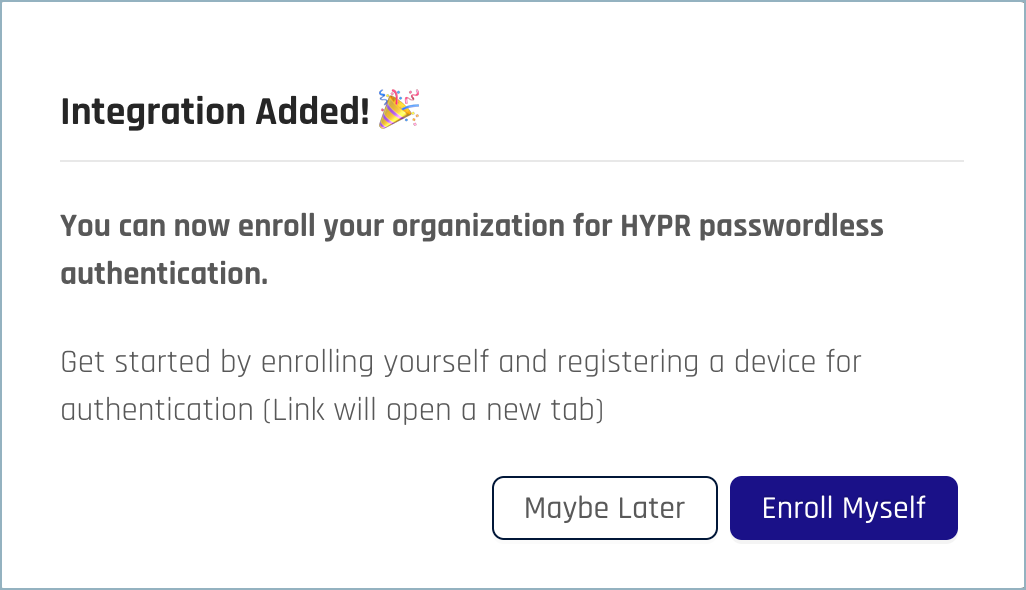
If the setup succeeds, you'll see the Integration Added! confirmation dialog.
-
You can optionally now register to use HYPR Entra ID logins yourself by clicking Enroll Myself. You'll be taken to the HYPR Device Manager where you can register your mobile device.
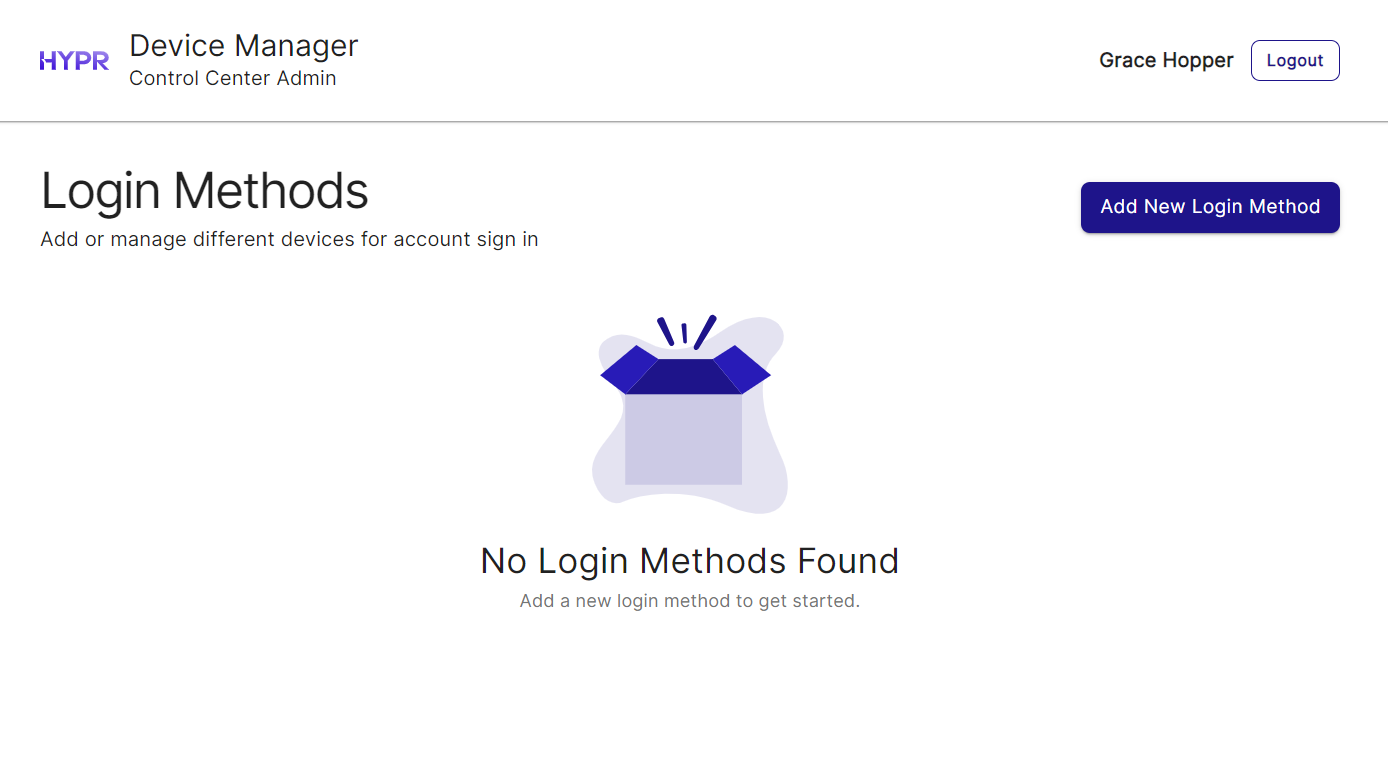
Self-enrollmentThe Enroll Myself option is only available if your Entra ID username is the same as your HYPR Control Center username. If they are not the same, you can add yourself to the Integration as a regular user later (see Enrolling Users).
-
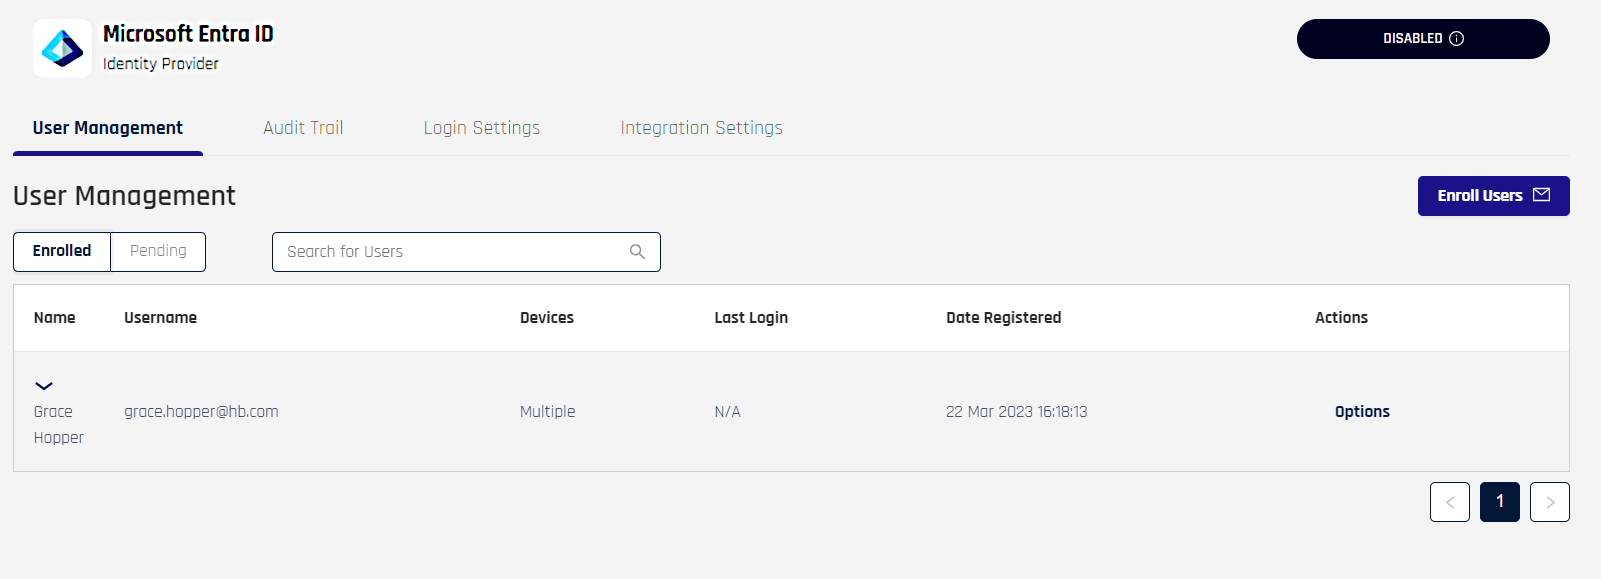
Once you've registered a device, you'll see your username in the list of enrolled users.
Back to Entra ID
Now for the final configuration steps, you'll need to complete the configuration on Entra ID
Application Authentication
-
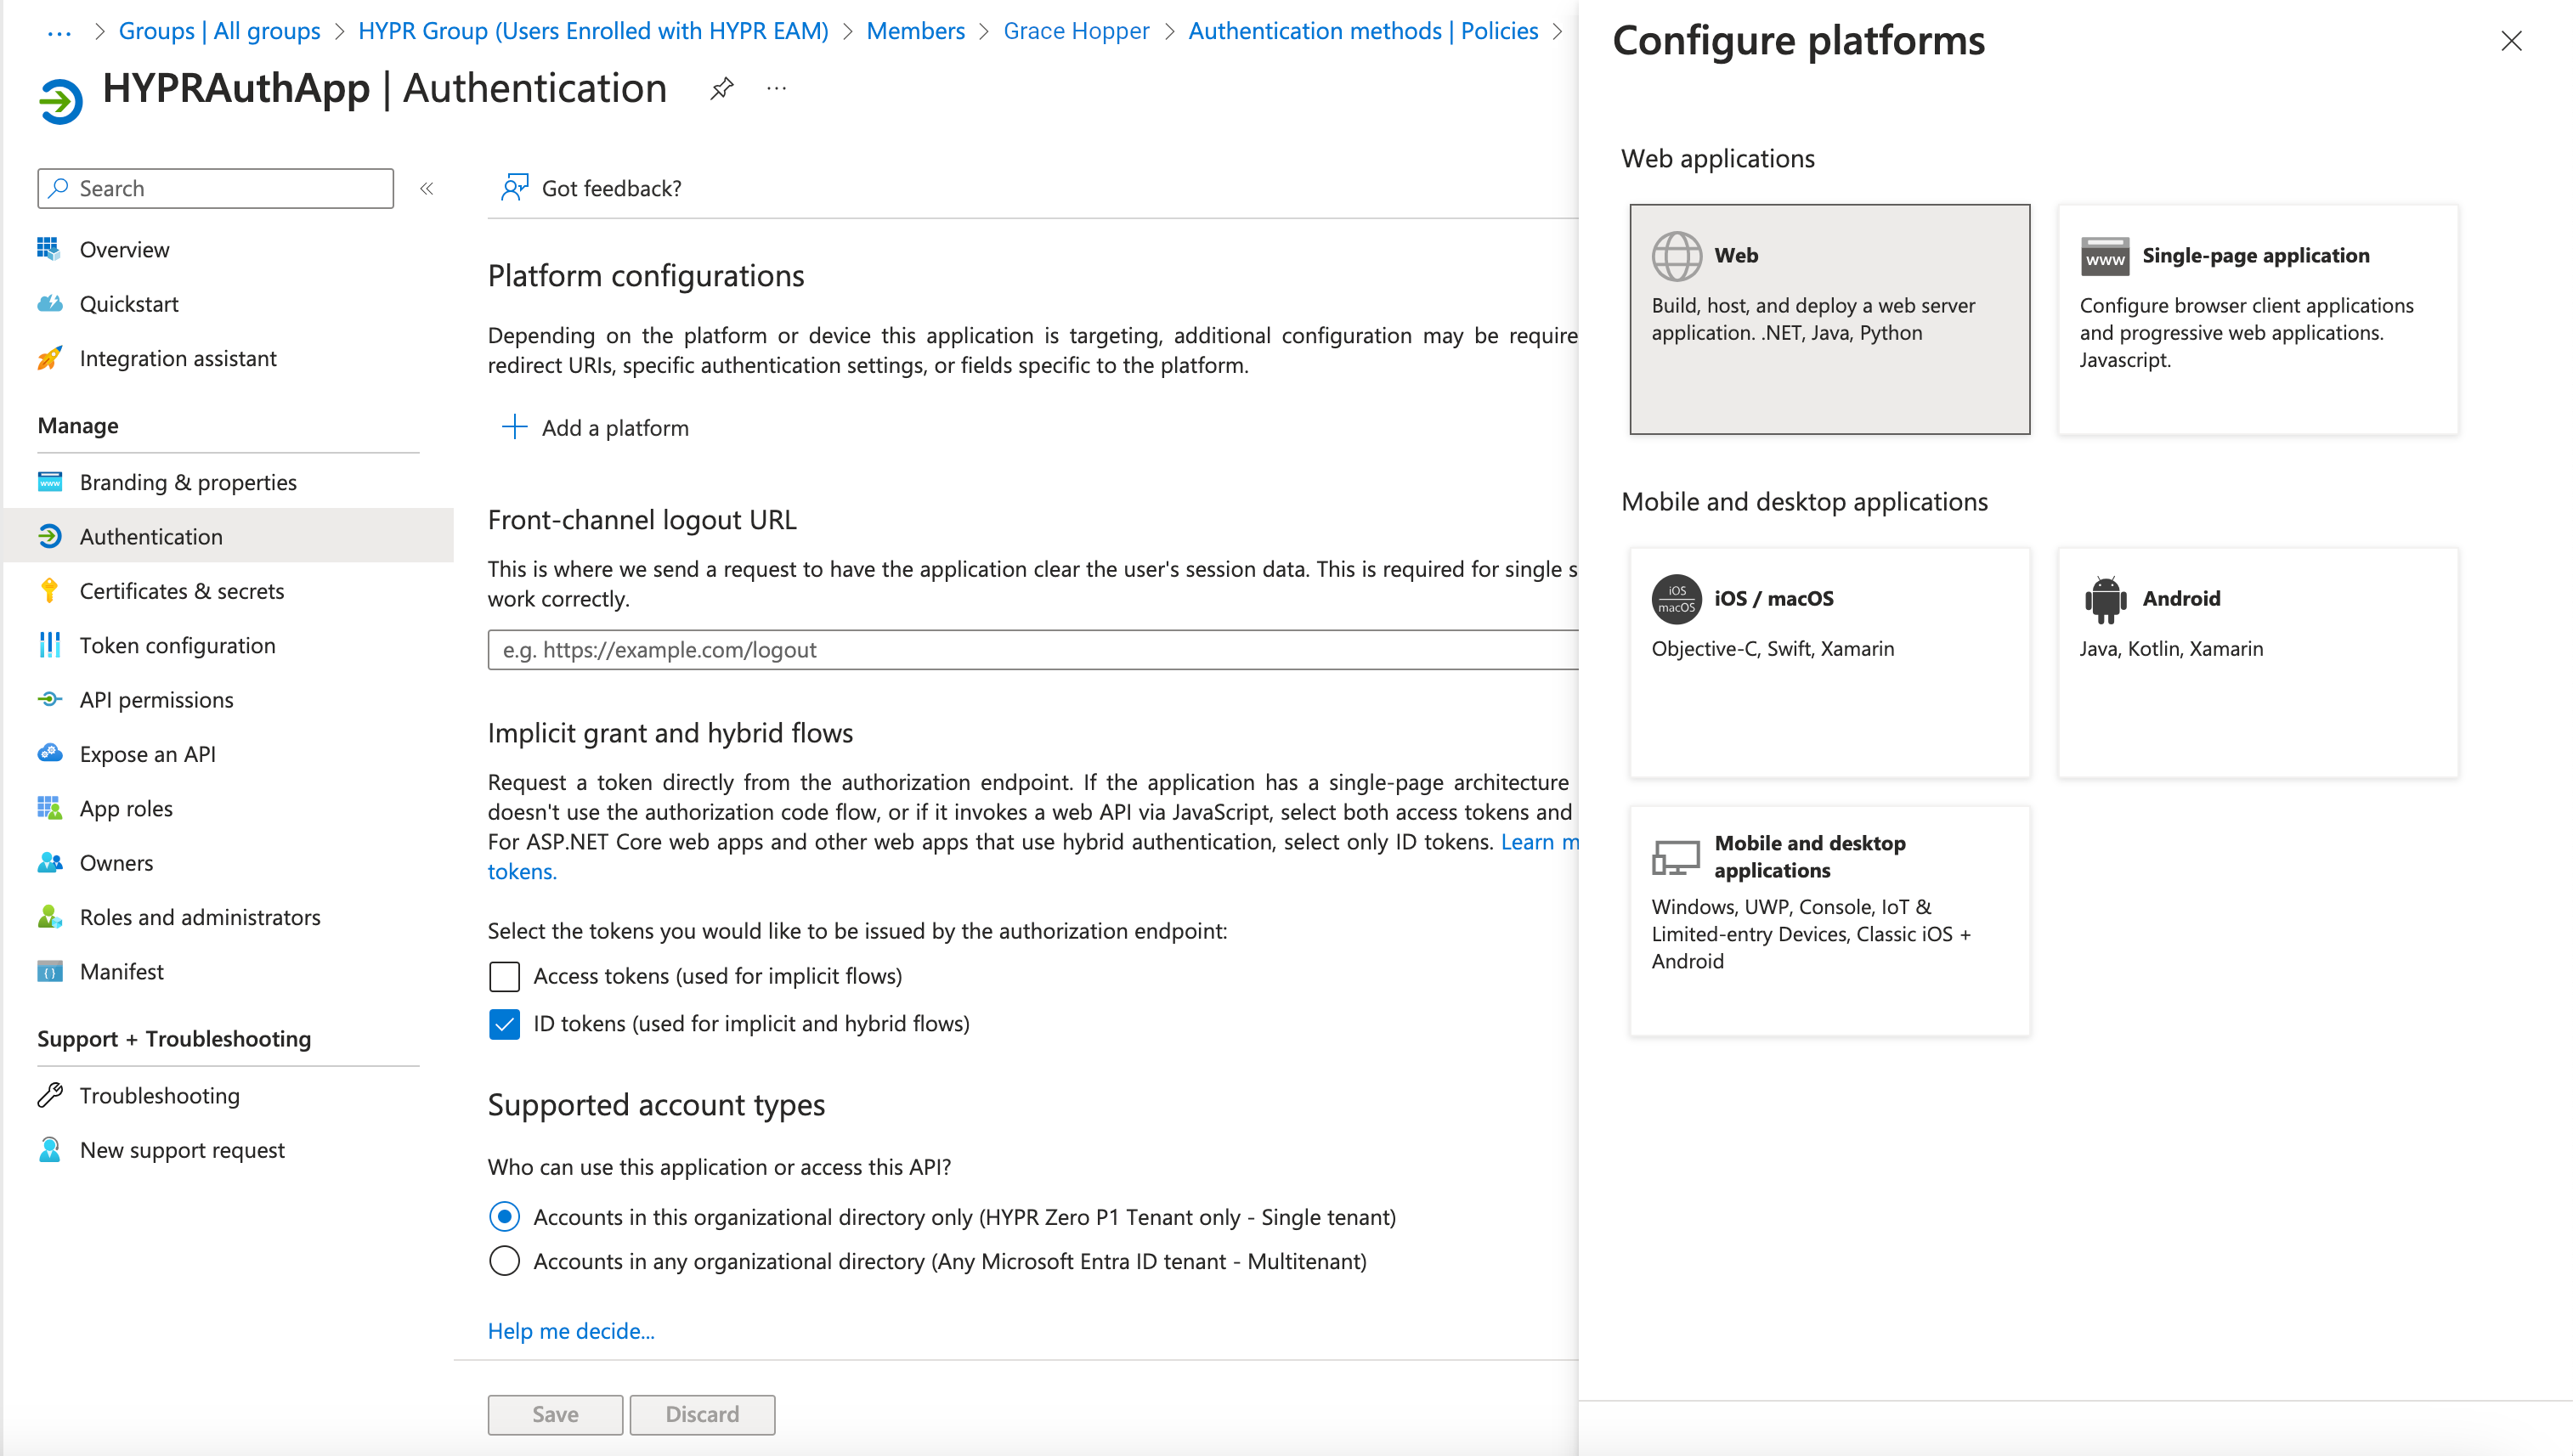
Open the application you're using for the HYPR Entra ID external MFA integration; then open Authentication.
-
Click Add a platform. A panel opens to the right. Click Web
-
Type the redirect URL to which you will send external MFA users; use the following format:
https://<HYPR Tenant ID>/auth/realms/externalauthmethods_<HYPR Application Name>/protocol/openid-connect/auth
<HYPR Tenant ID>is the base URL of your HYPR tenant, in this case highlandsbank.hypr.com<HYPR Application Name>is the name of the Application you created on HYPR Control Center, with every non-alphanumeric character removed and its letter case preserved (see the Application Name row above)The value must match exactlyThis URL is HYPR's OpenID Connect authorization endpoint, and Entra ID requires it to be registered as a reply URL on the application. If it does not match, sign-in fails with
ENTRA IDSTS50161: Failed to validate authorization url of external claims provider.A mistyped application name is the usual cause — check that hyphens, underscores, and spaces have been removed and that the capitalization matches what you entered in Control Center.
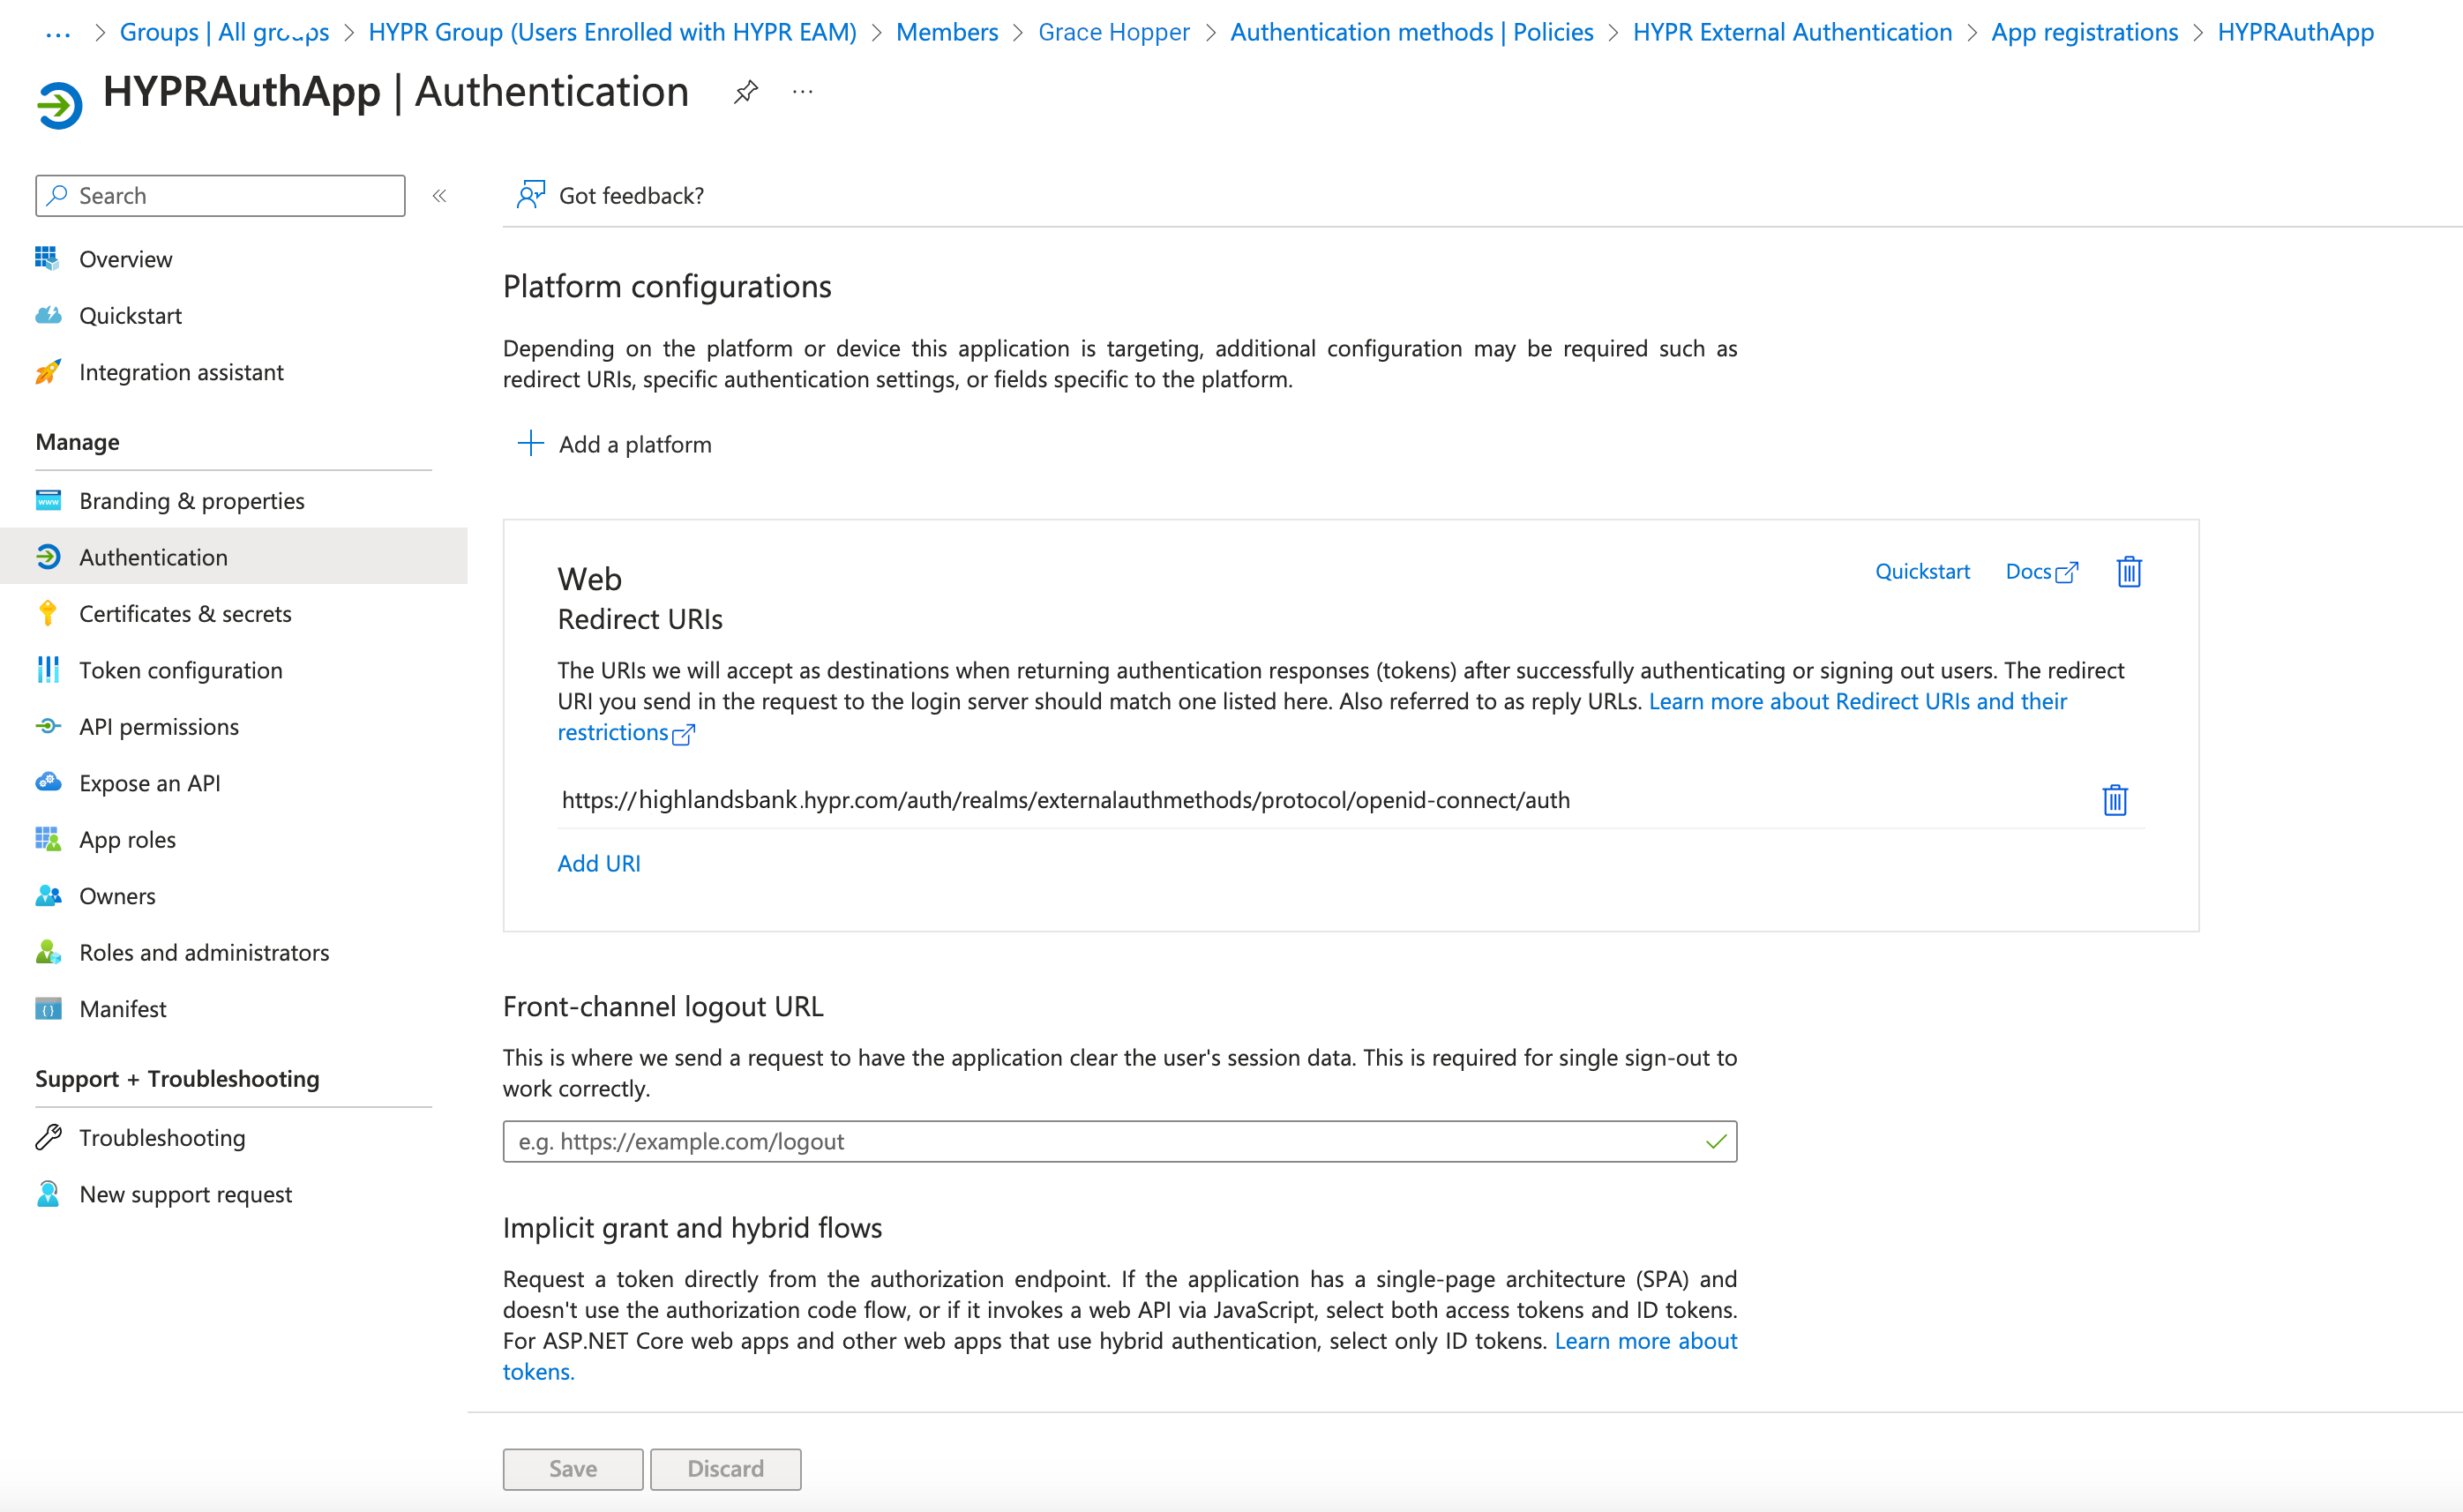
No action needed for the return URLEntra ID sends its response to
https://login.microsoftonline.com/common/federation/externalauthprovider. HYPR registers that address for you when it creates the integration, so you do not need to configure it.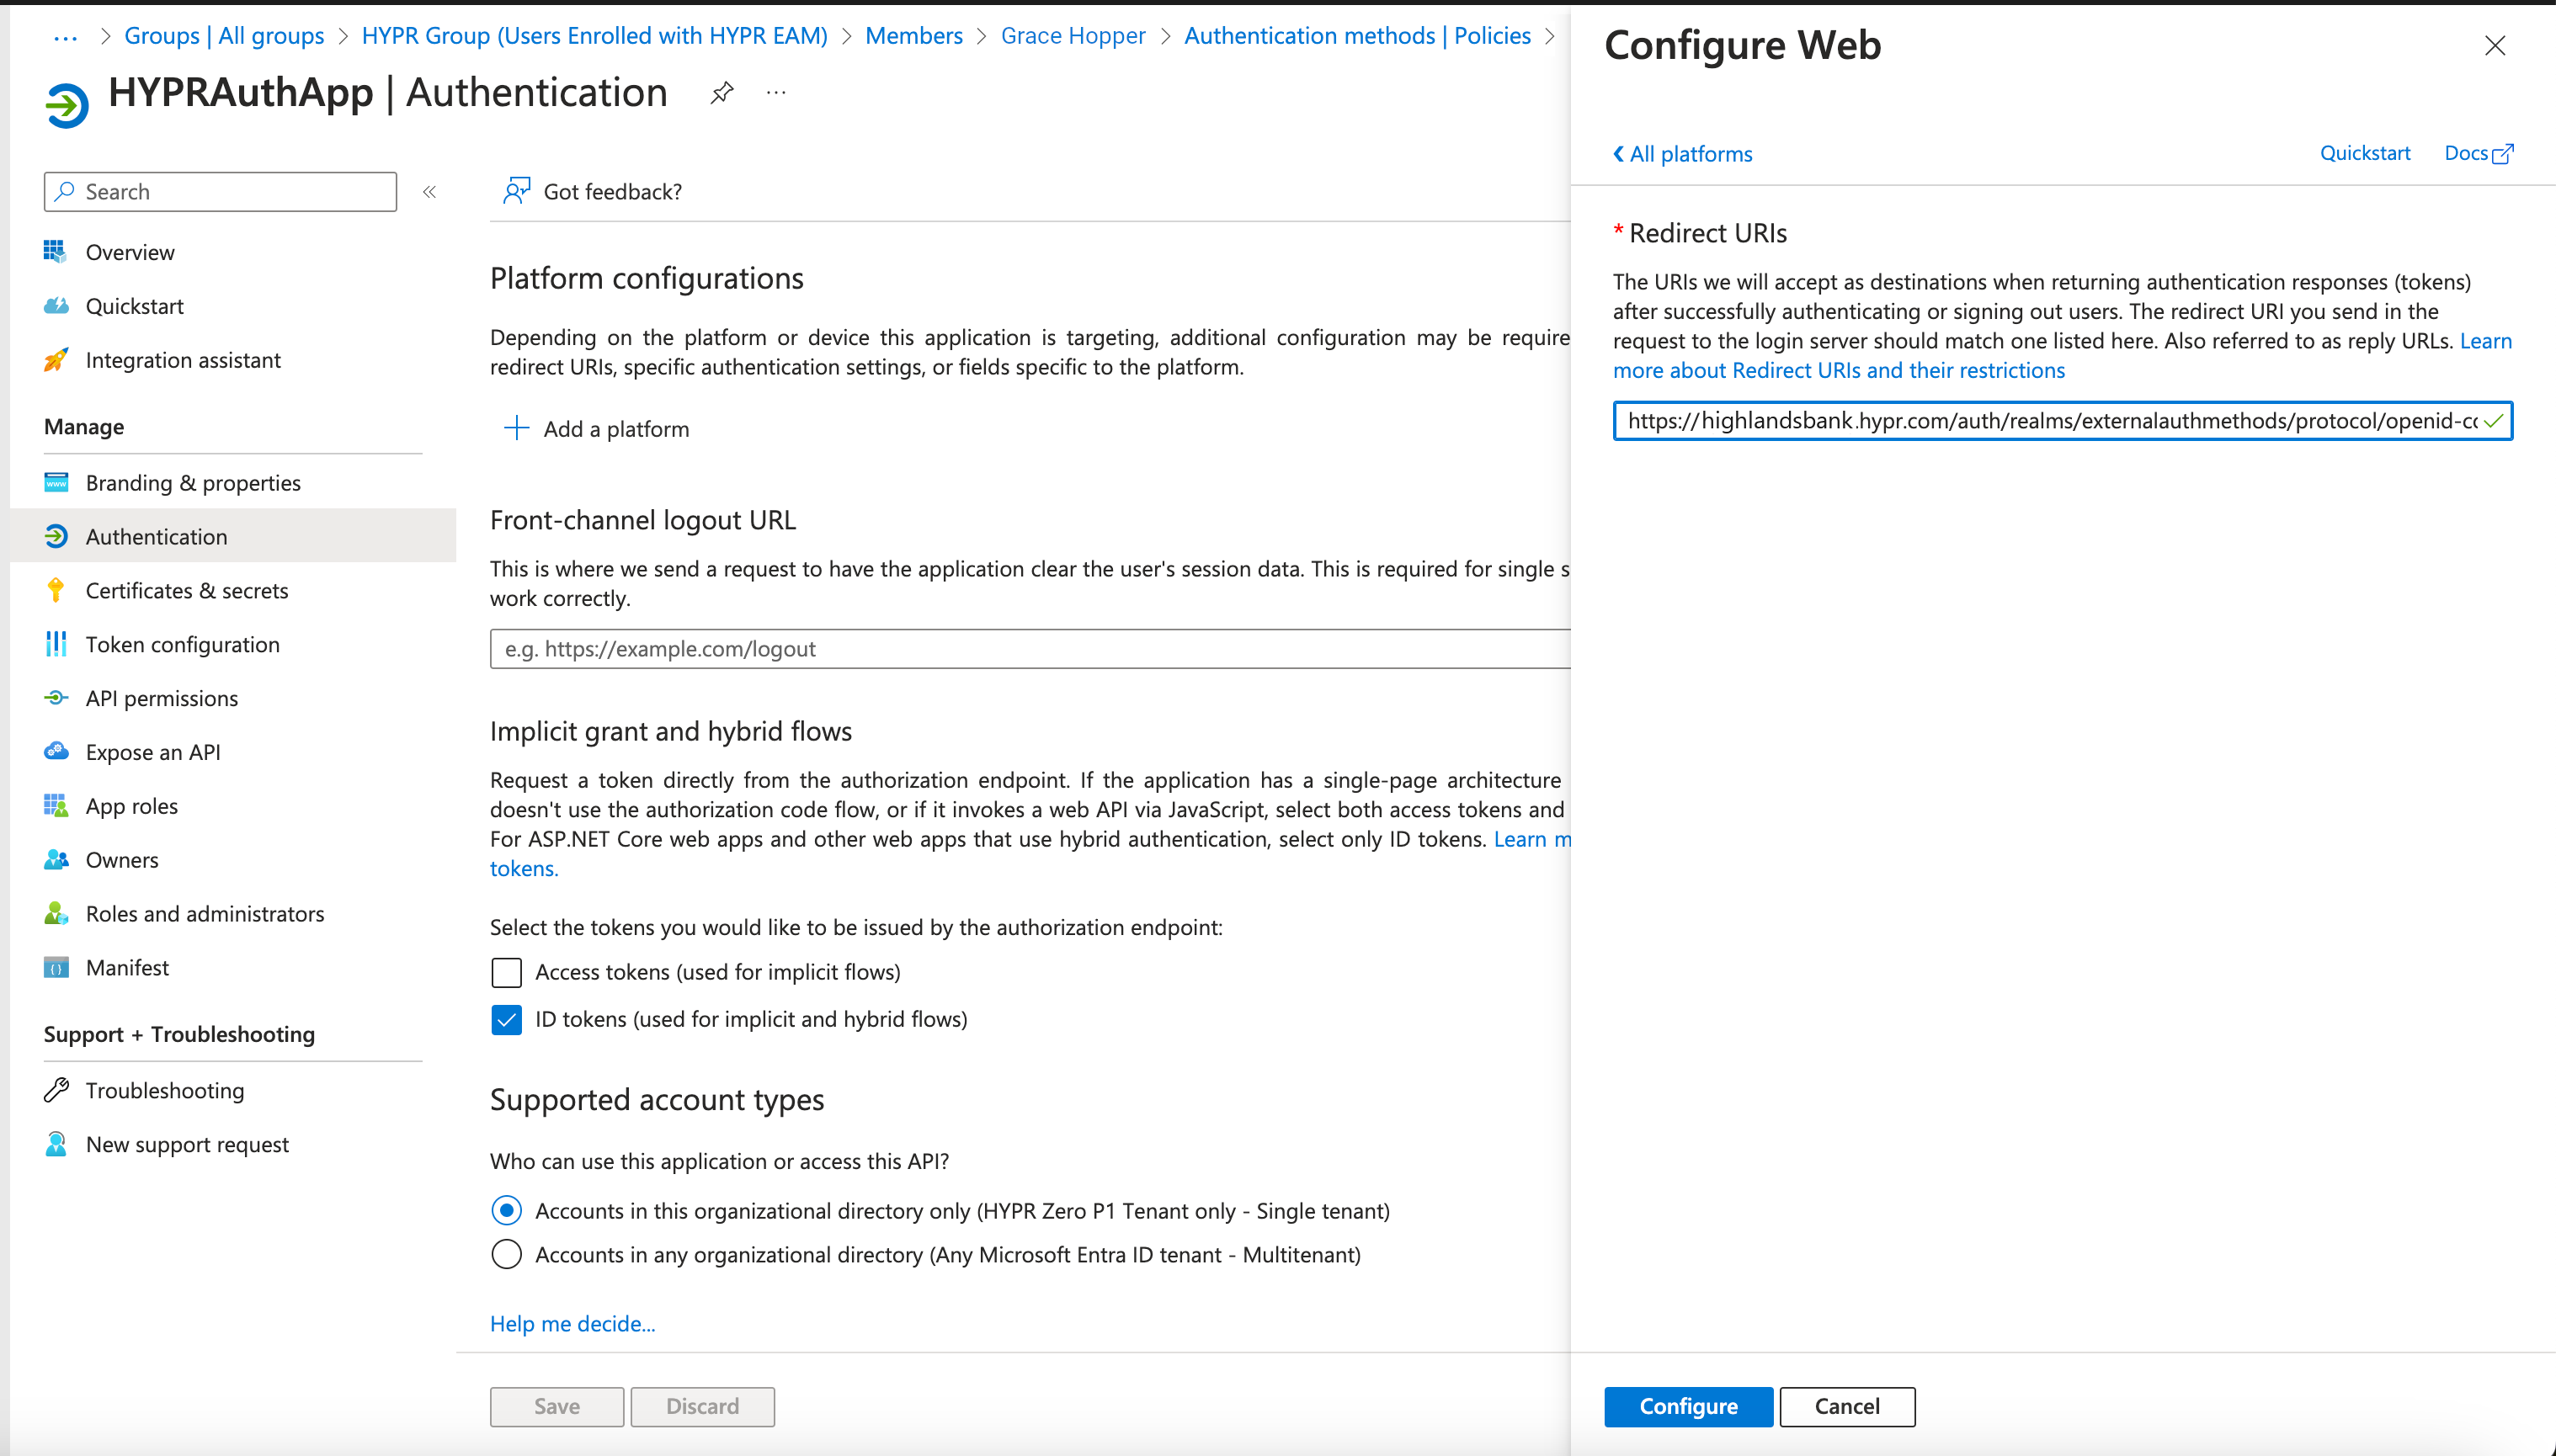
-
Click Configure when you are finished. Your platform configuration displays in the Authentication main pane.
Create the External MFA Method
-
In the Microsoft Entra admin center, open Entra ID > Authentication methods.
If the menu looks differentMicrosoft has moved and renamed this control. Earlier guidance pointed to Protection > Authentication methods > Policies and an + Add external method (Preview) button; the current path is Entra ID > Authentication methods and the button is Add external MFA.
-
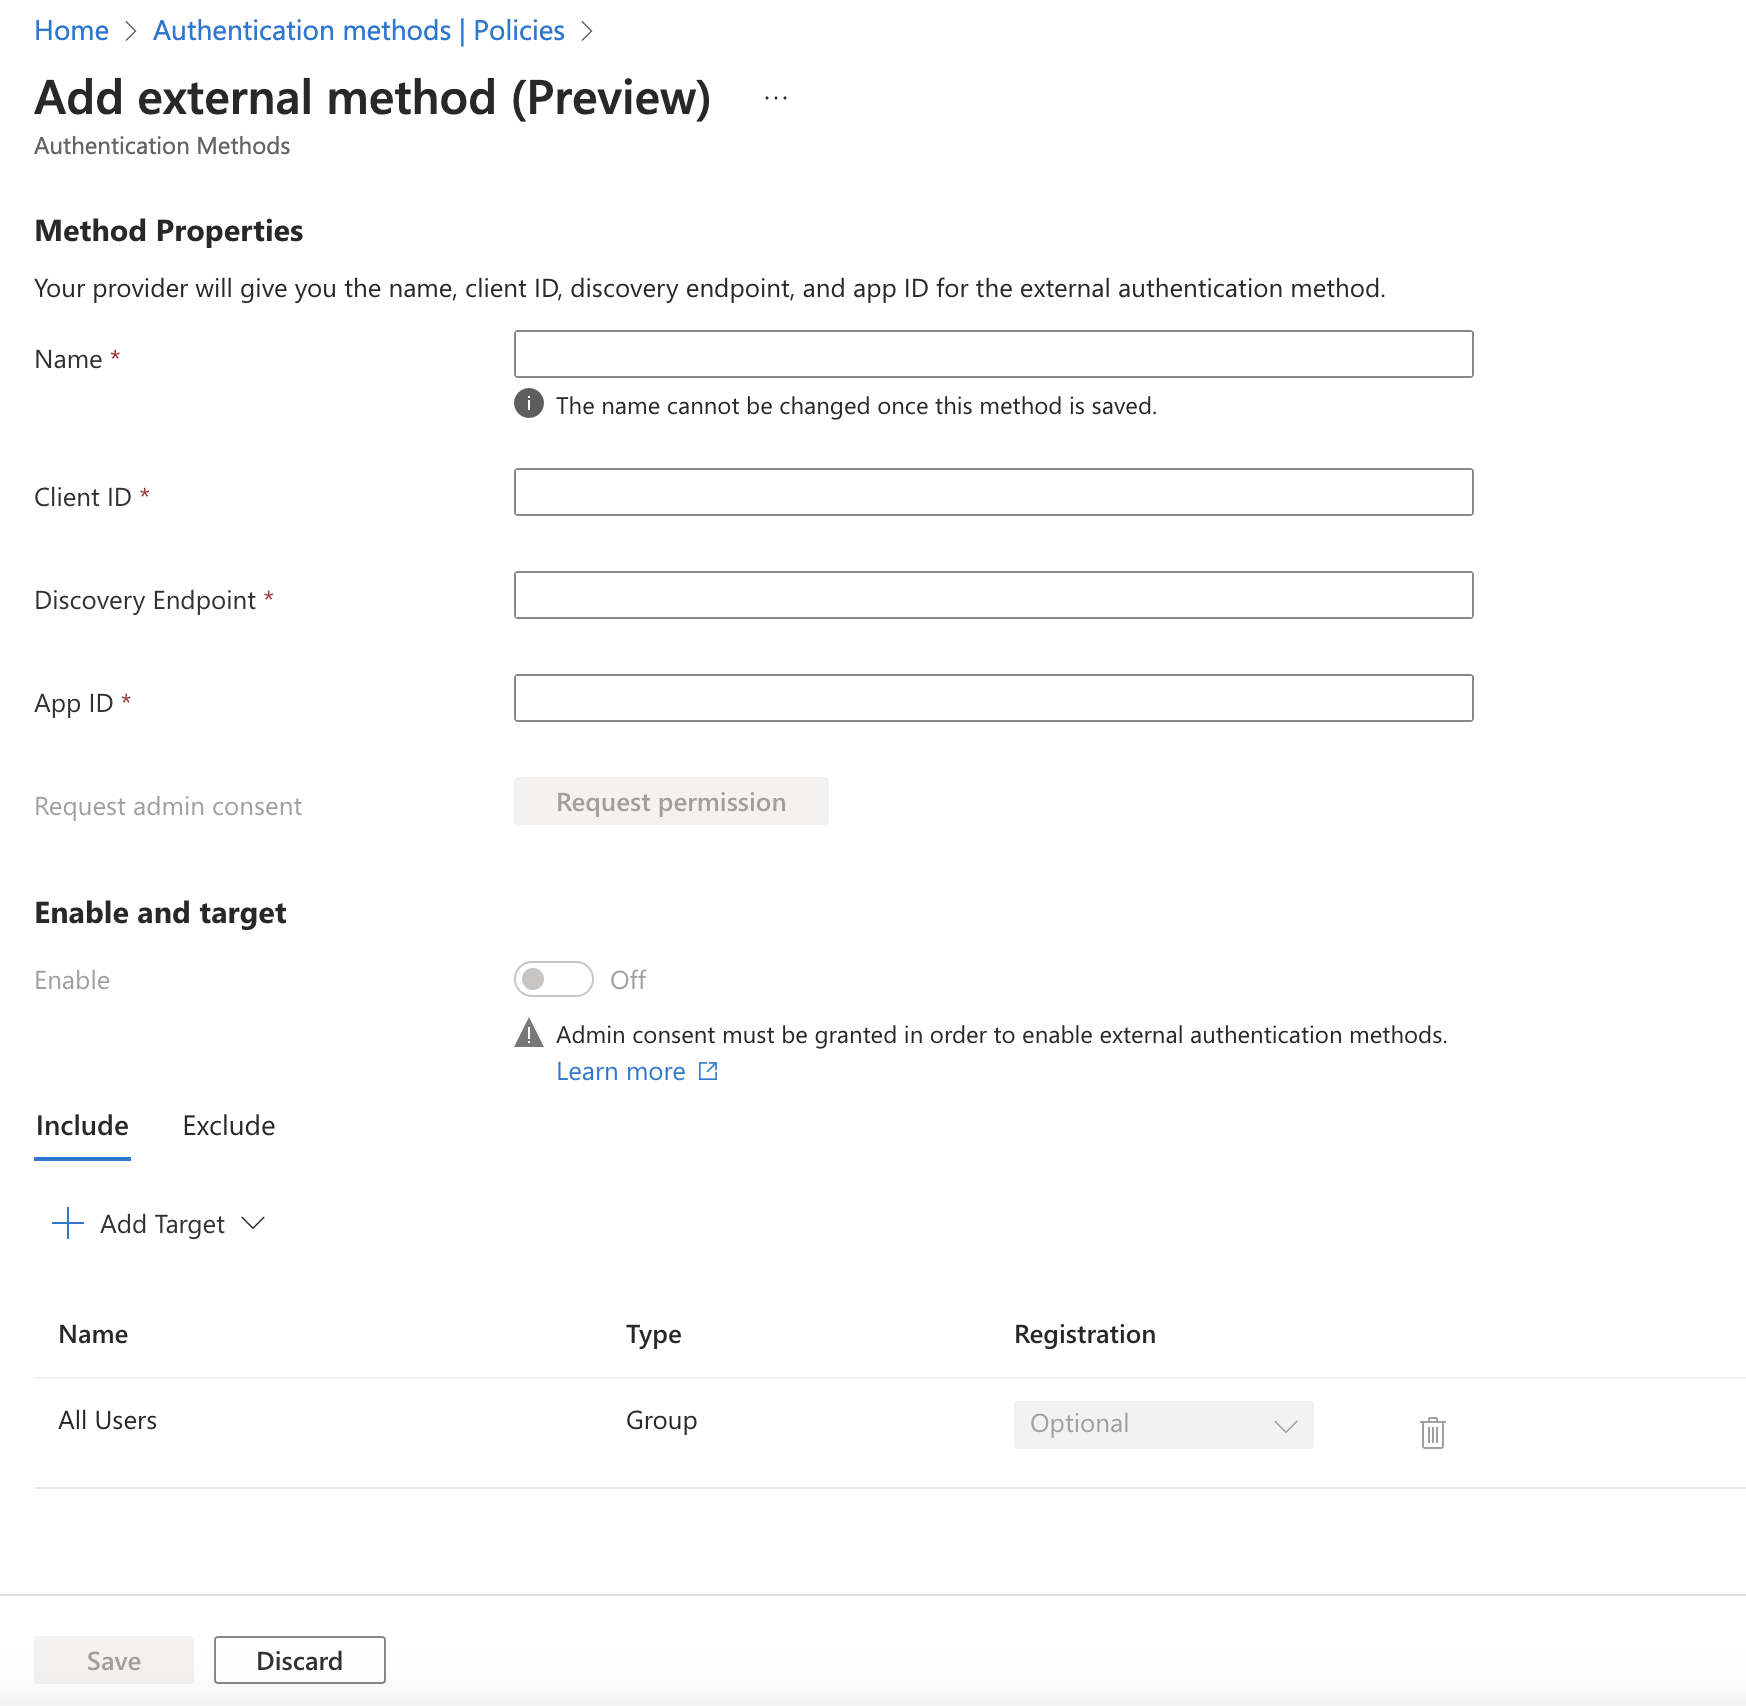
Click Add external MFA. Complete the fields as follows:
-
Method Properties
Field Value Name HYPR External Authentication. Users see this name in the method picker, it must be unique, and it cannot be changed after the method is created. Client ID externalauthmethodsDiscovery Endpoint https://<HYPR Tenant ID>/auth/realms/externalauthmethods_<HYPR Application Name>/.well-known/openid-configurationApp ID The Application (client) ID value from the Entra ID application you registered above. <HYPR Tenant ID>is the base URL of your HYPR tenant, in this case highlandsbank.hypr.com<HYPR Application Name>is the name of the Application you created on HYPR Control Center, with every non-alphanumeric character removed and its letter case preservedThe discovery endpoint must use
https, must end with/.well-known/openid-configuration, and must not carry a query string or fragment. -
Enable and target
Field Value Enable Off for now; you enable the method after the application has admin consent Include Click + Add Target and select HYPR Group (Users Enrolled with HYPR EAM), or another group you want to scope the method to.
-
-
Click Save when you are finished.
The application needs admin consent in the tenant before the method can be enabled. If you granted consent while registering the application (see Granting Required API Permissions), that requirement is already met.
Entra ID can also request consent from this panel: after entering the values, use the consent prompt and sign in with an account that holds the Privileged Role Administrator role. You can always save the method in a disabled state and enable it once consent has been granted.
Without consent, sign-in with the method fails.
Set the Preferred Method Order
This step configures system-preferred multifactor authentication, which governs the order in which Entra ID offers a user's available methods. It does not itself require MFA — that is what the Conditional Access policy in the next section does.
Where users have more than one method available, system-preferred MFA determines which one is presented first; users can still choose a different method from the picker.
-
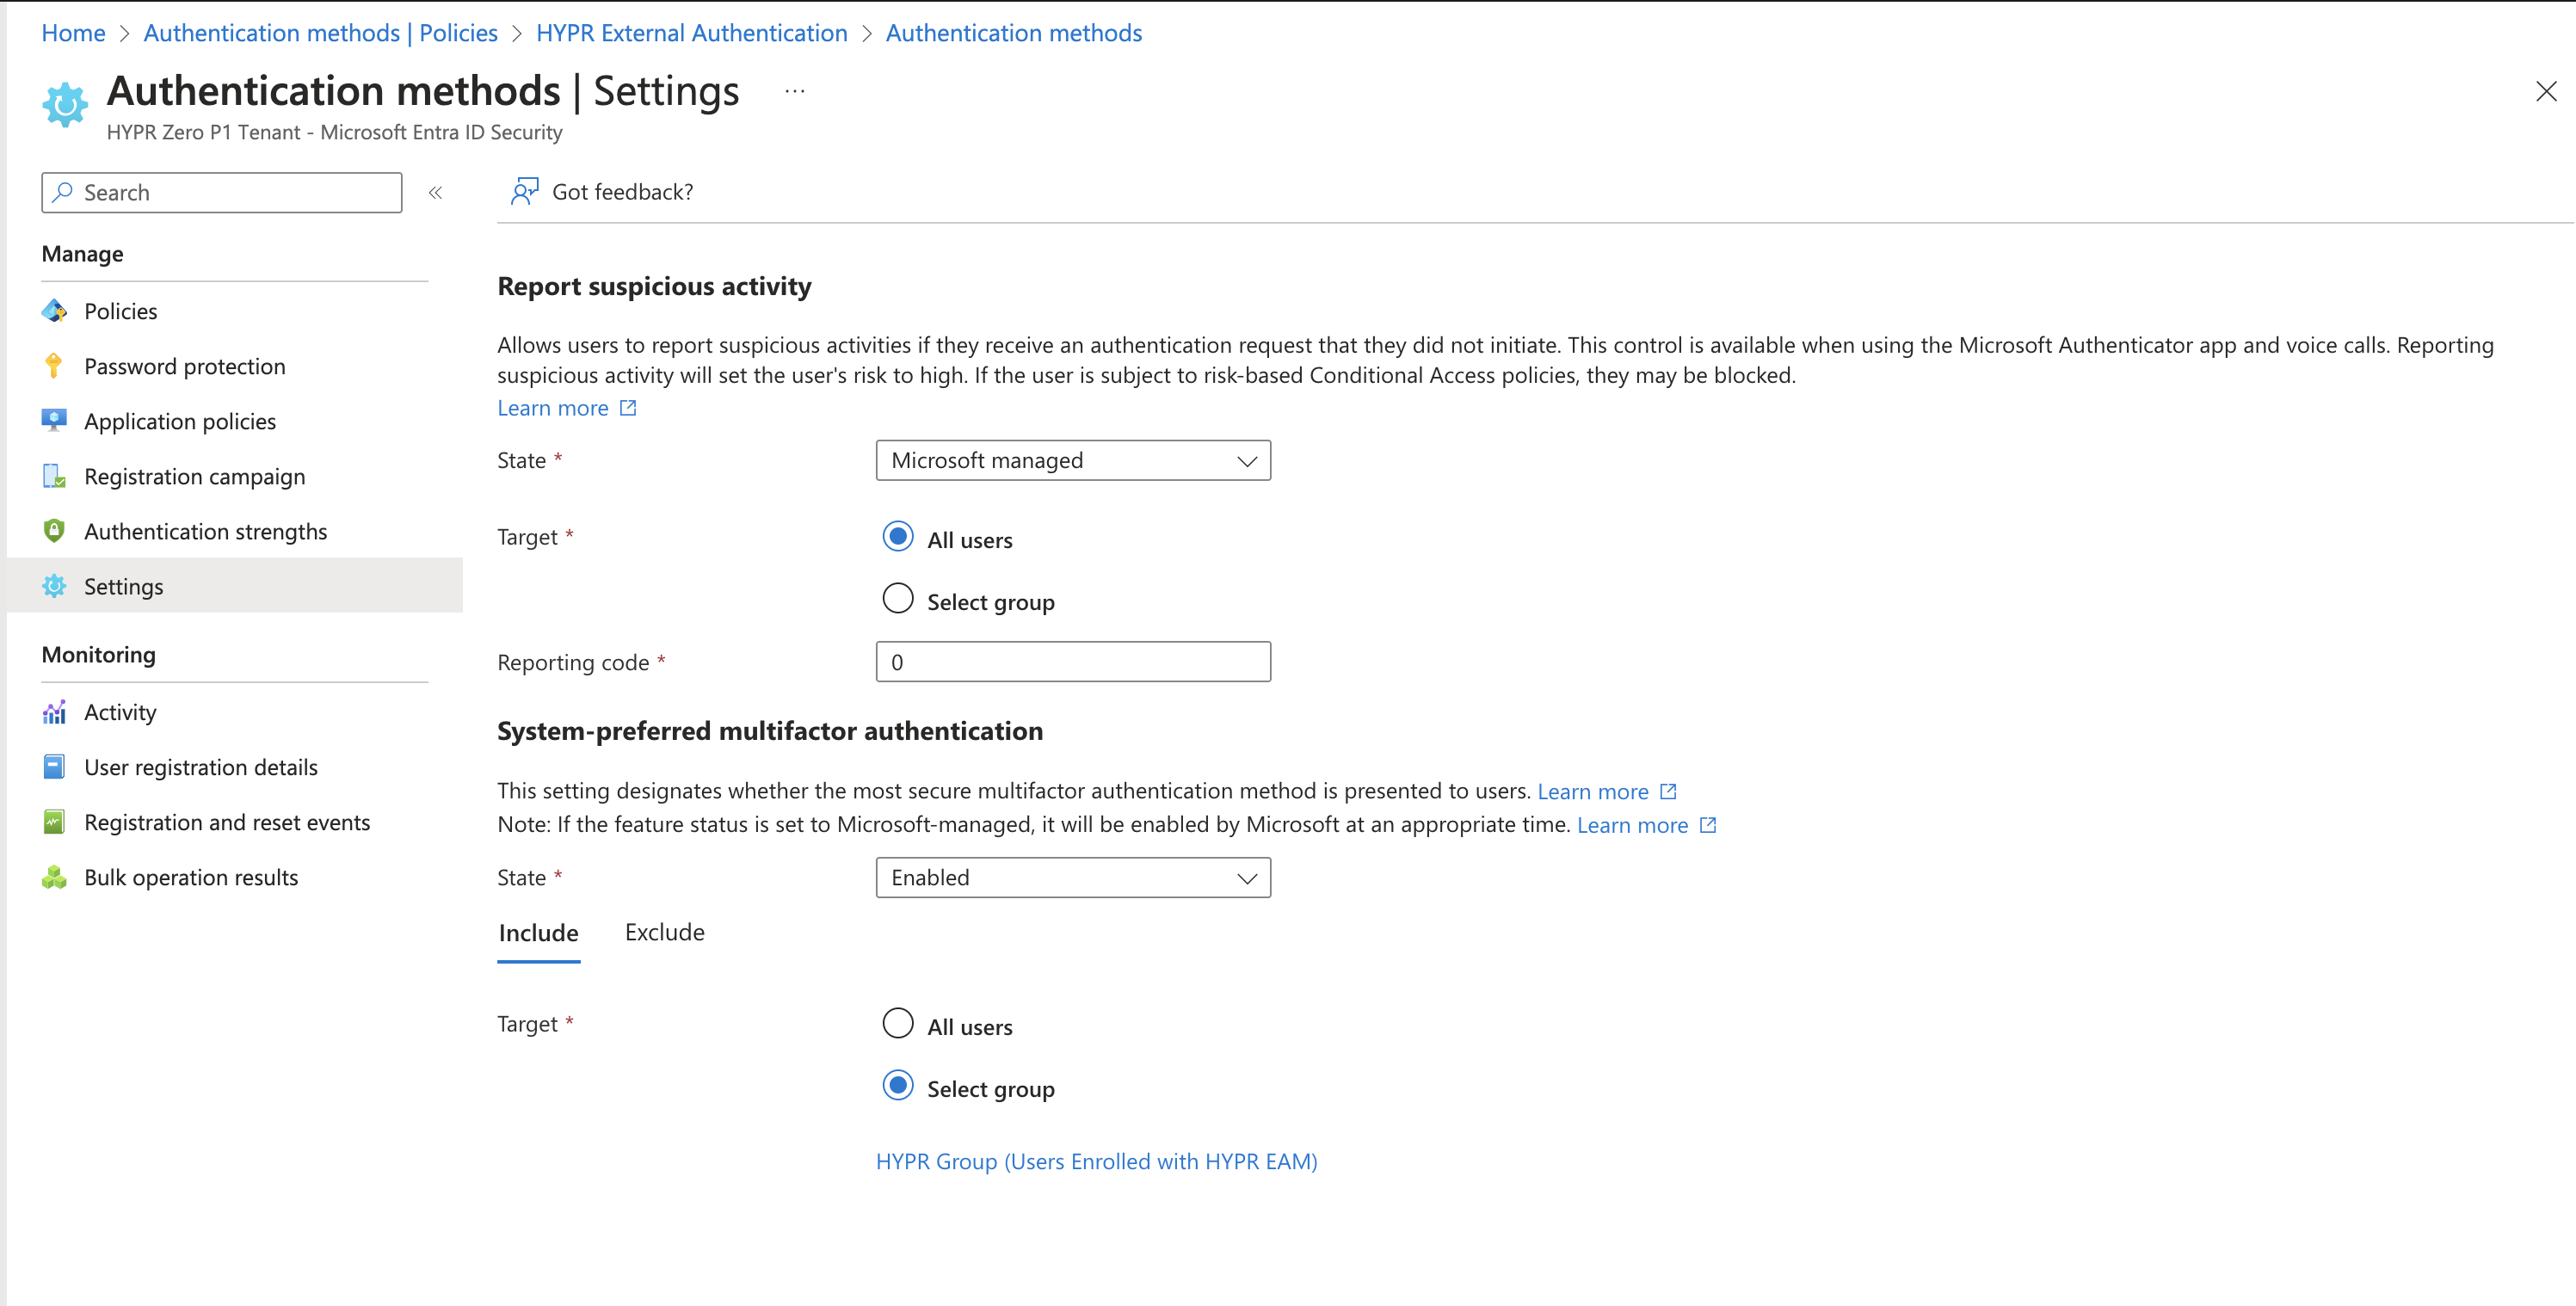
From the Microsoft Entra admin center, select Entra ID > Authentication methods > Settings.
-
Configure the fields as follows:
-
System-preferred multifactor authentication
Field Value State Enabled Include: Target Select group: HYPR Group (Users Enrolled with HYPR EAM), or the group you scoped the method to
-
-
Click Save when you are finished.
Set Conditional Access Policies
-
Open Microsoft Entra ID > Protection > Conditional access > Policies.
-
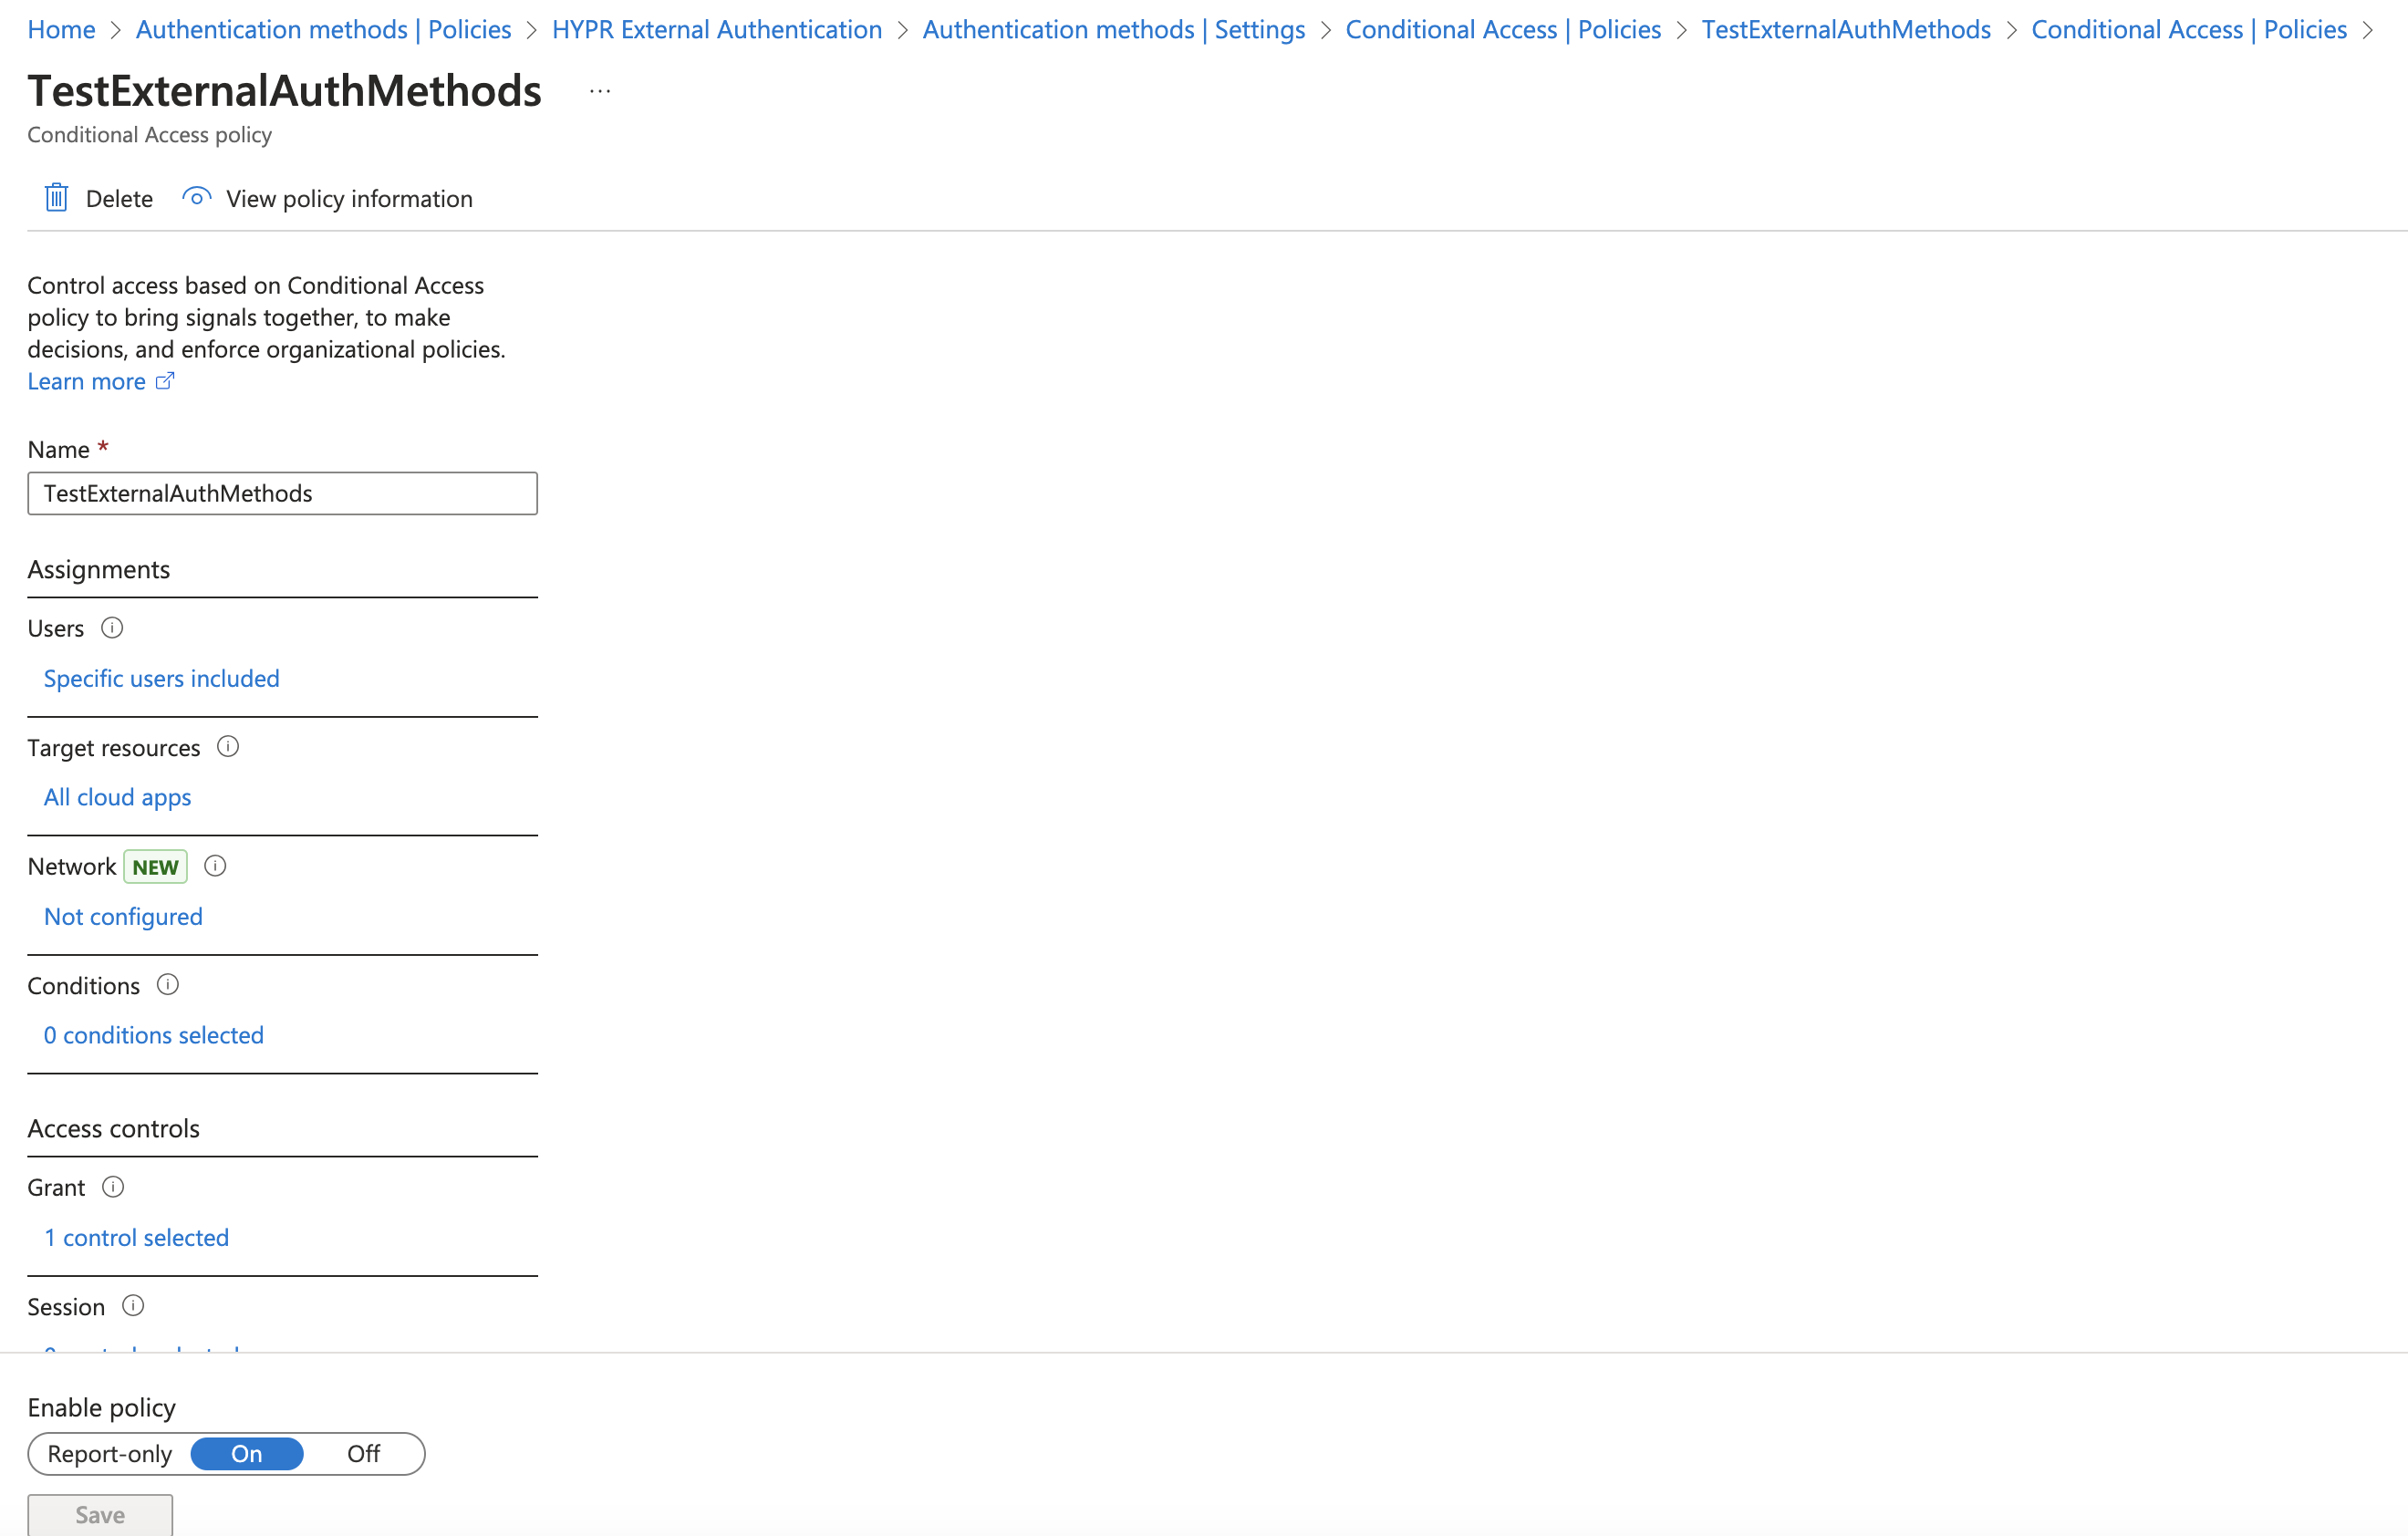
Click + New policy; assign the following values:
-
Give the policy a Name.
-
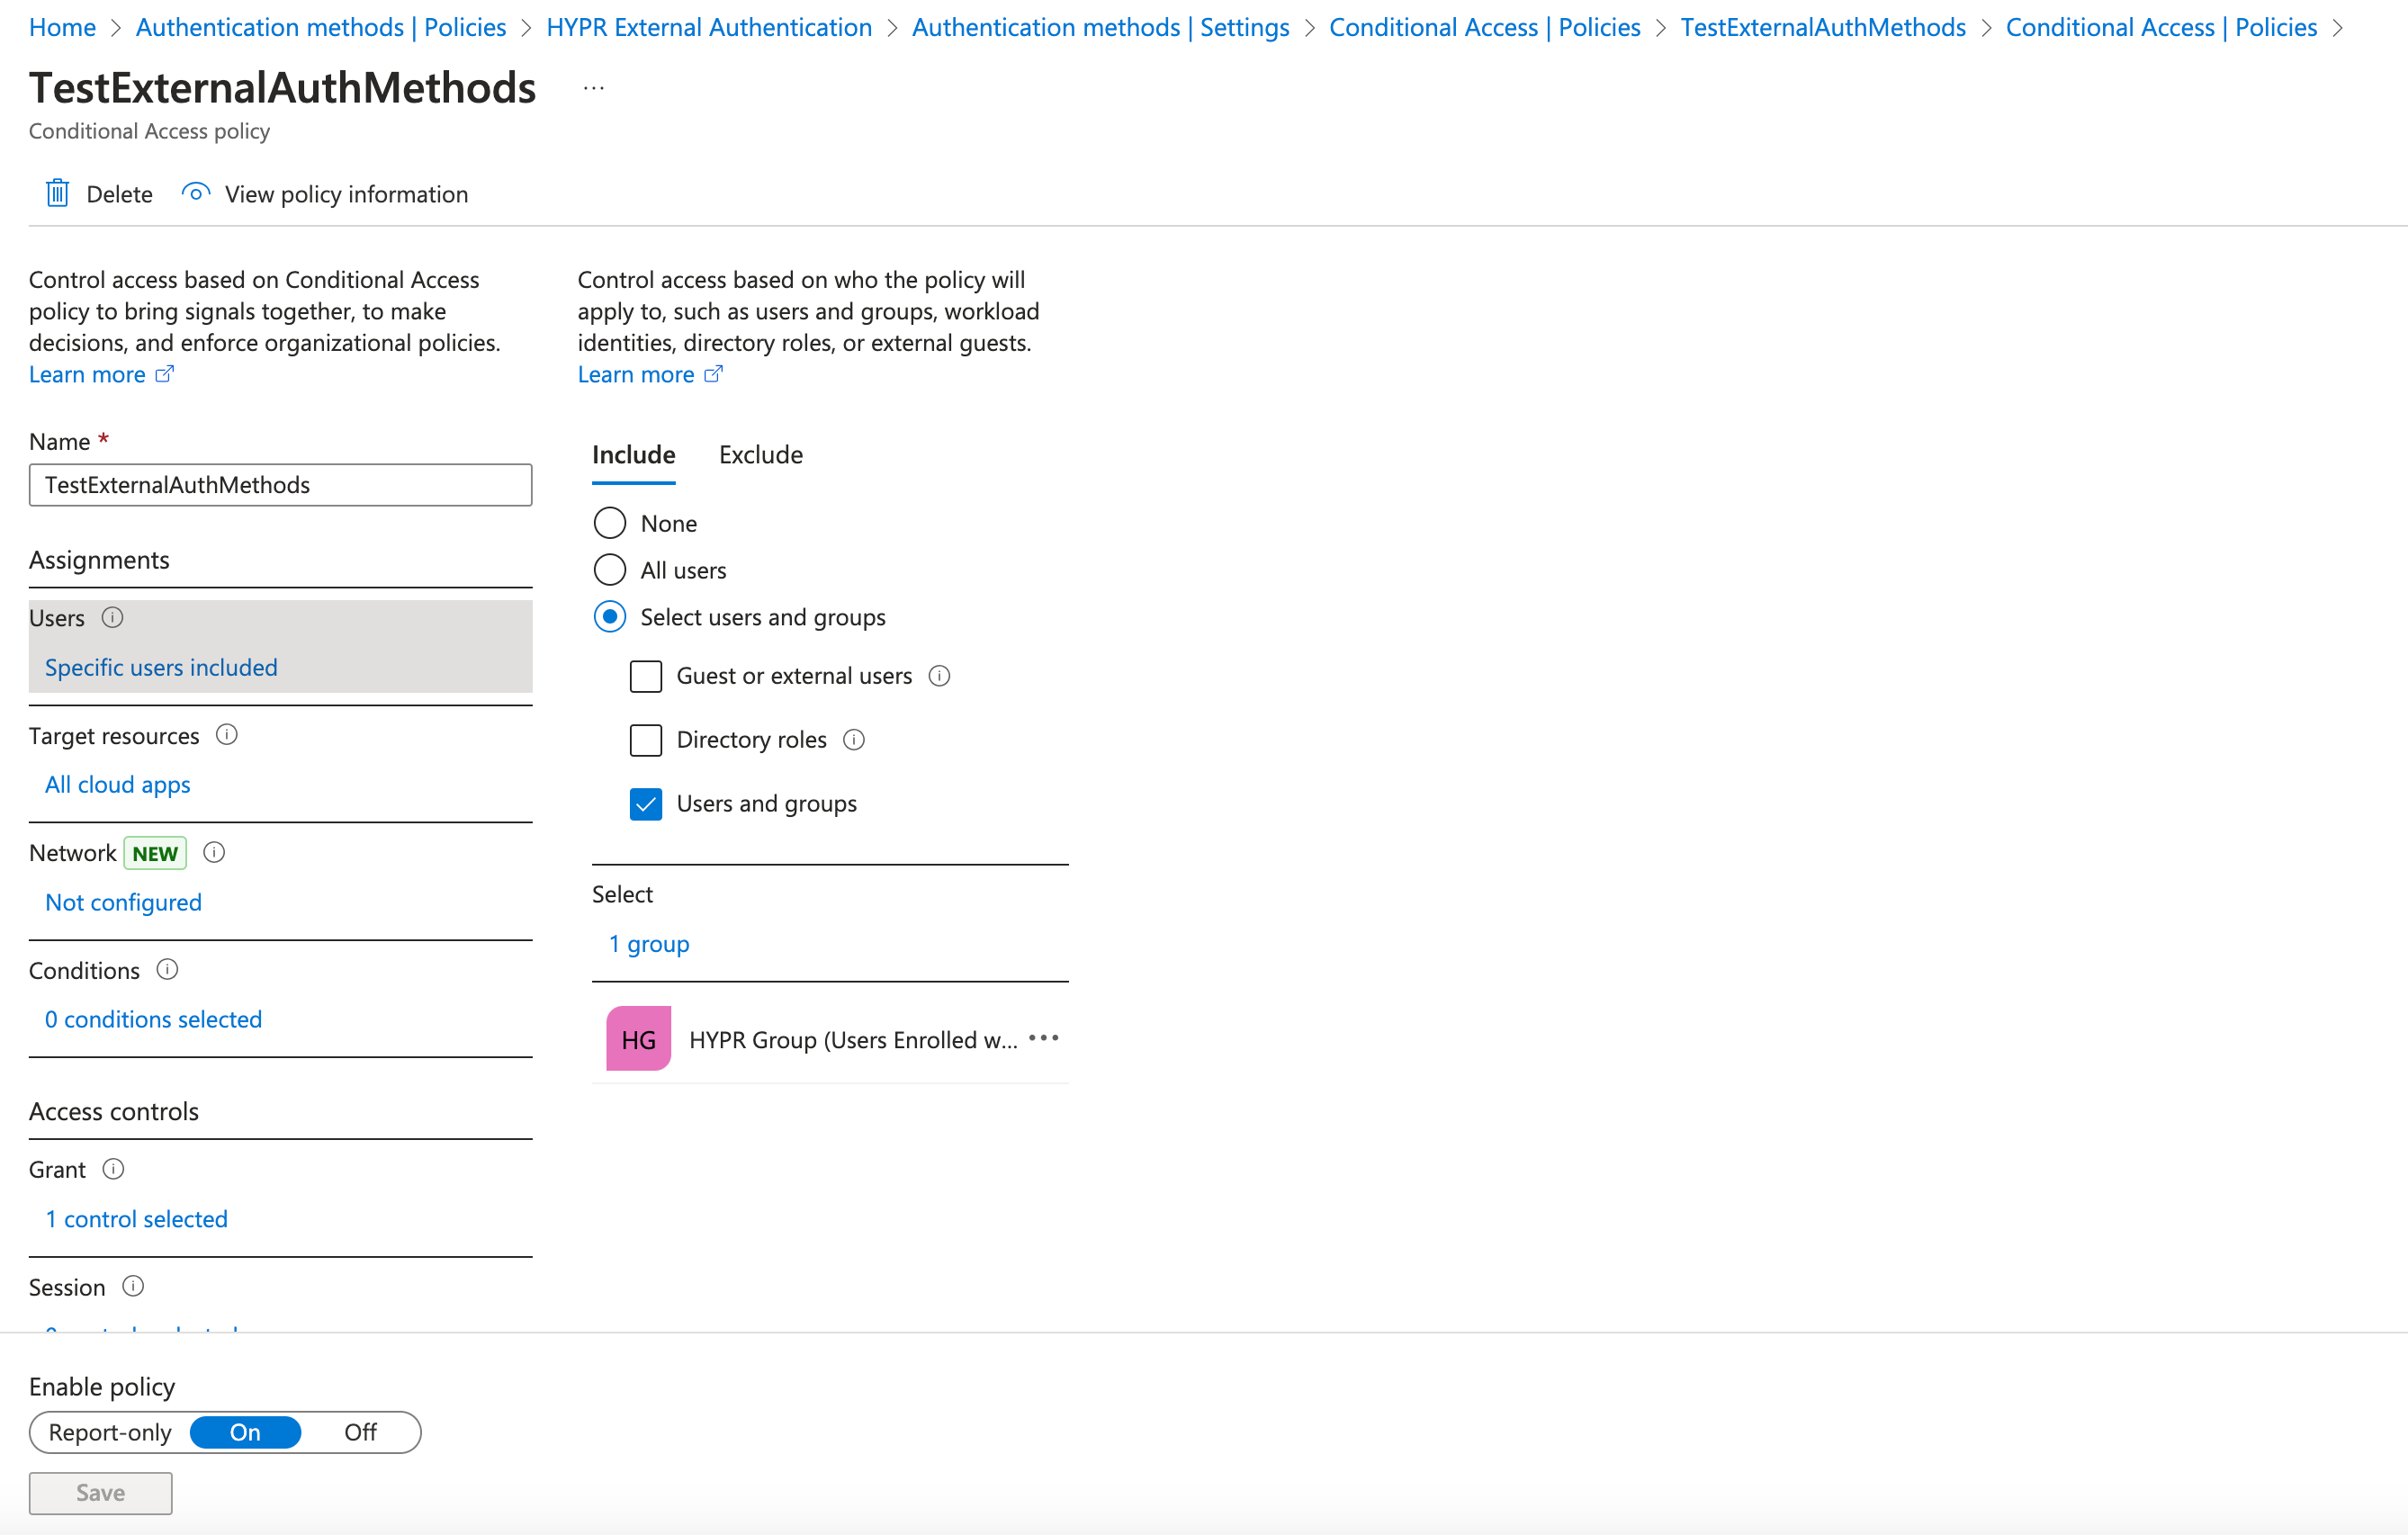
Under Assignments > Users > Include, choose Select users and groups and check the box next to Users and groups. Locate HYPR Group (Users Enrolled with HYPR EAM), or the group you scoped the method to, and select it.
-
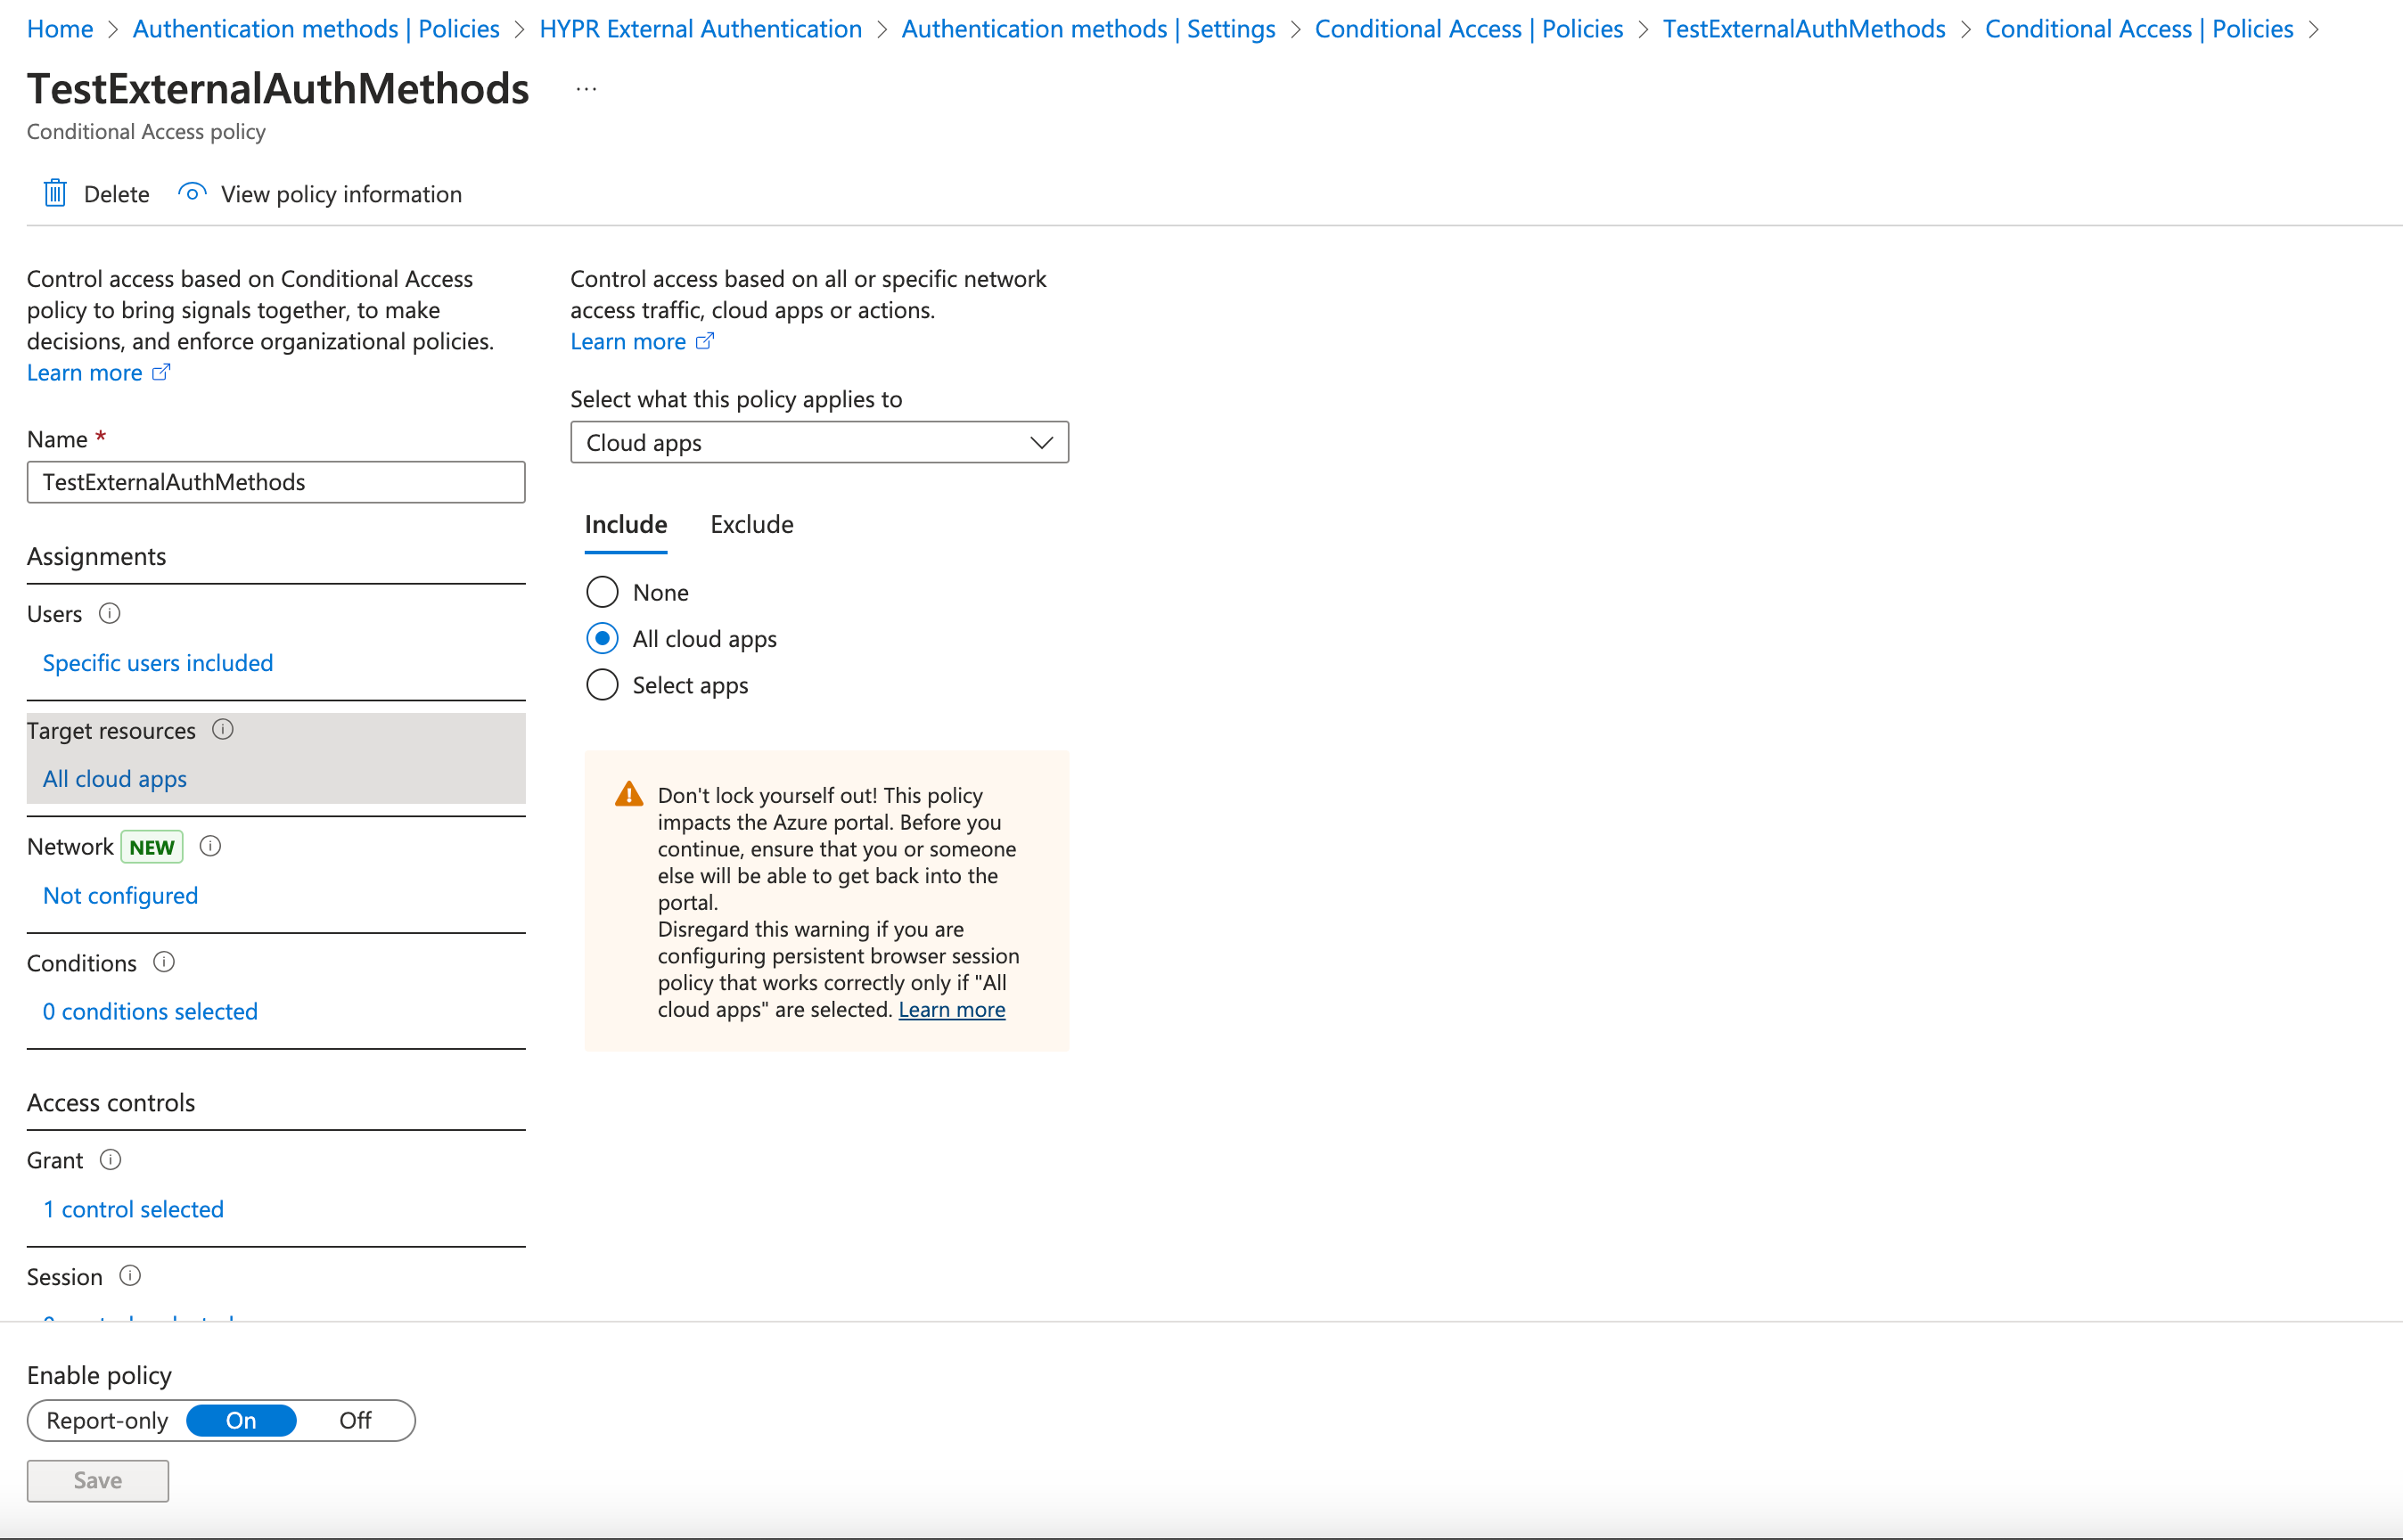
For Target resources, select All resources (formerly 'cloud apps') from the drop-down menu, then Include All resources (formerly 'All cloud apps').
-
Set Grant to Grant access and check the box next to Require multifactor authentication; click Select when you are finished
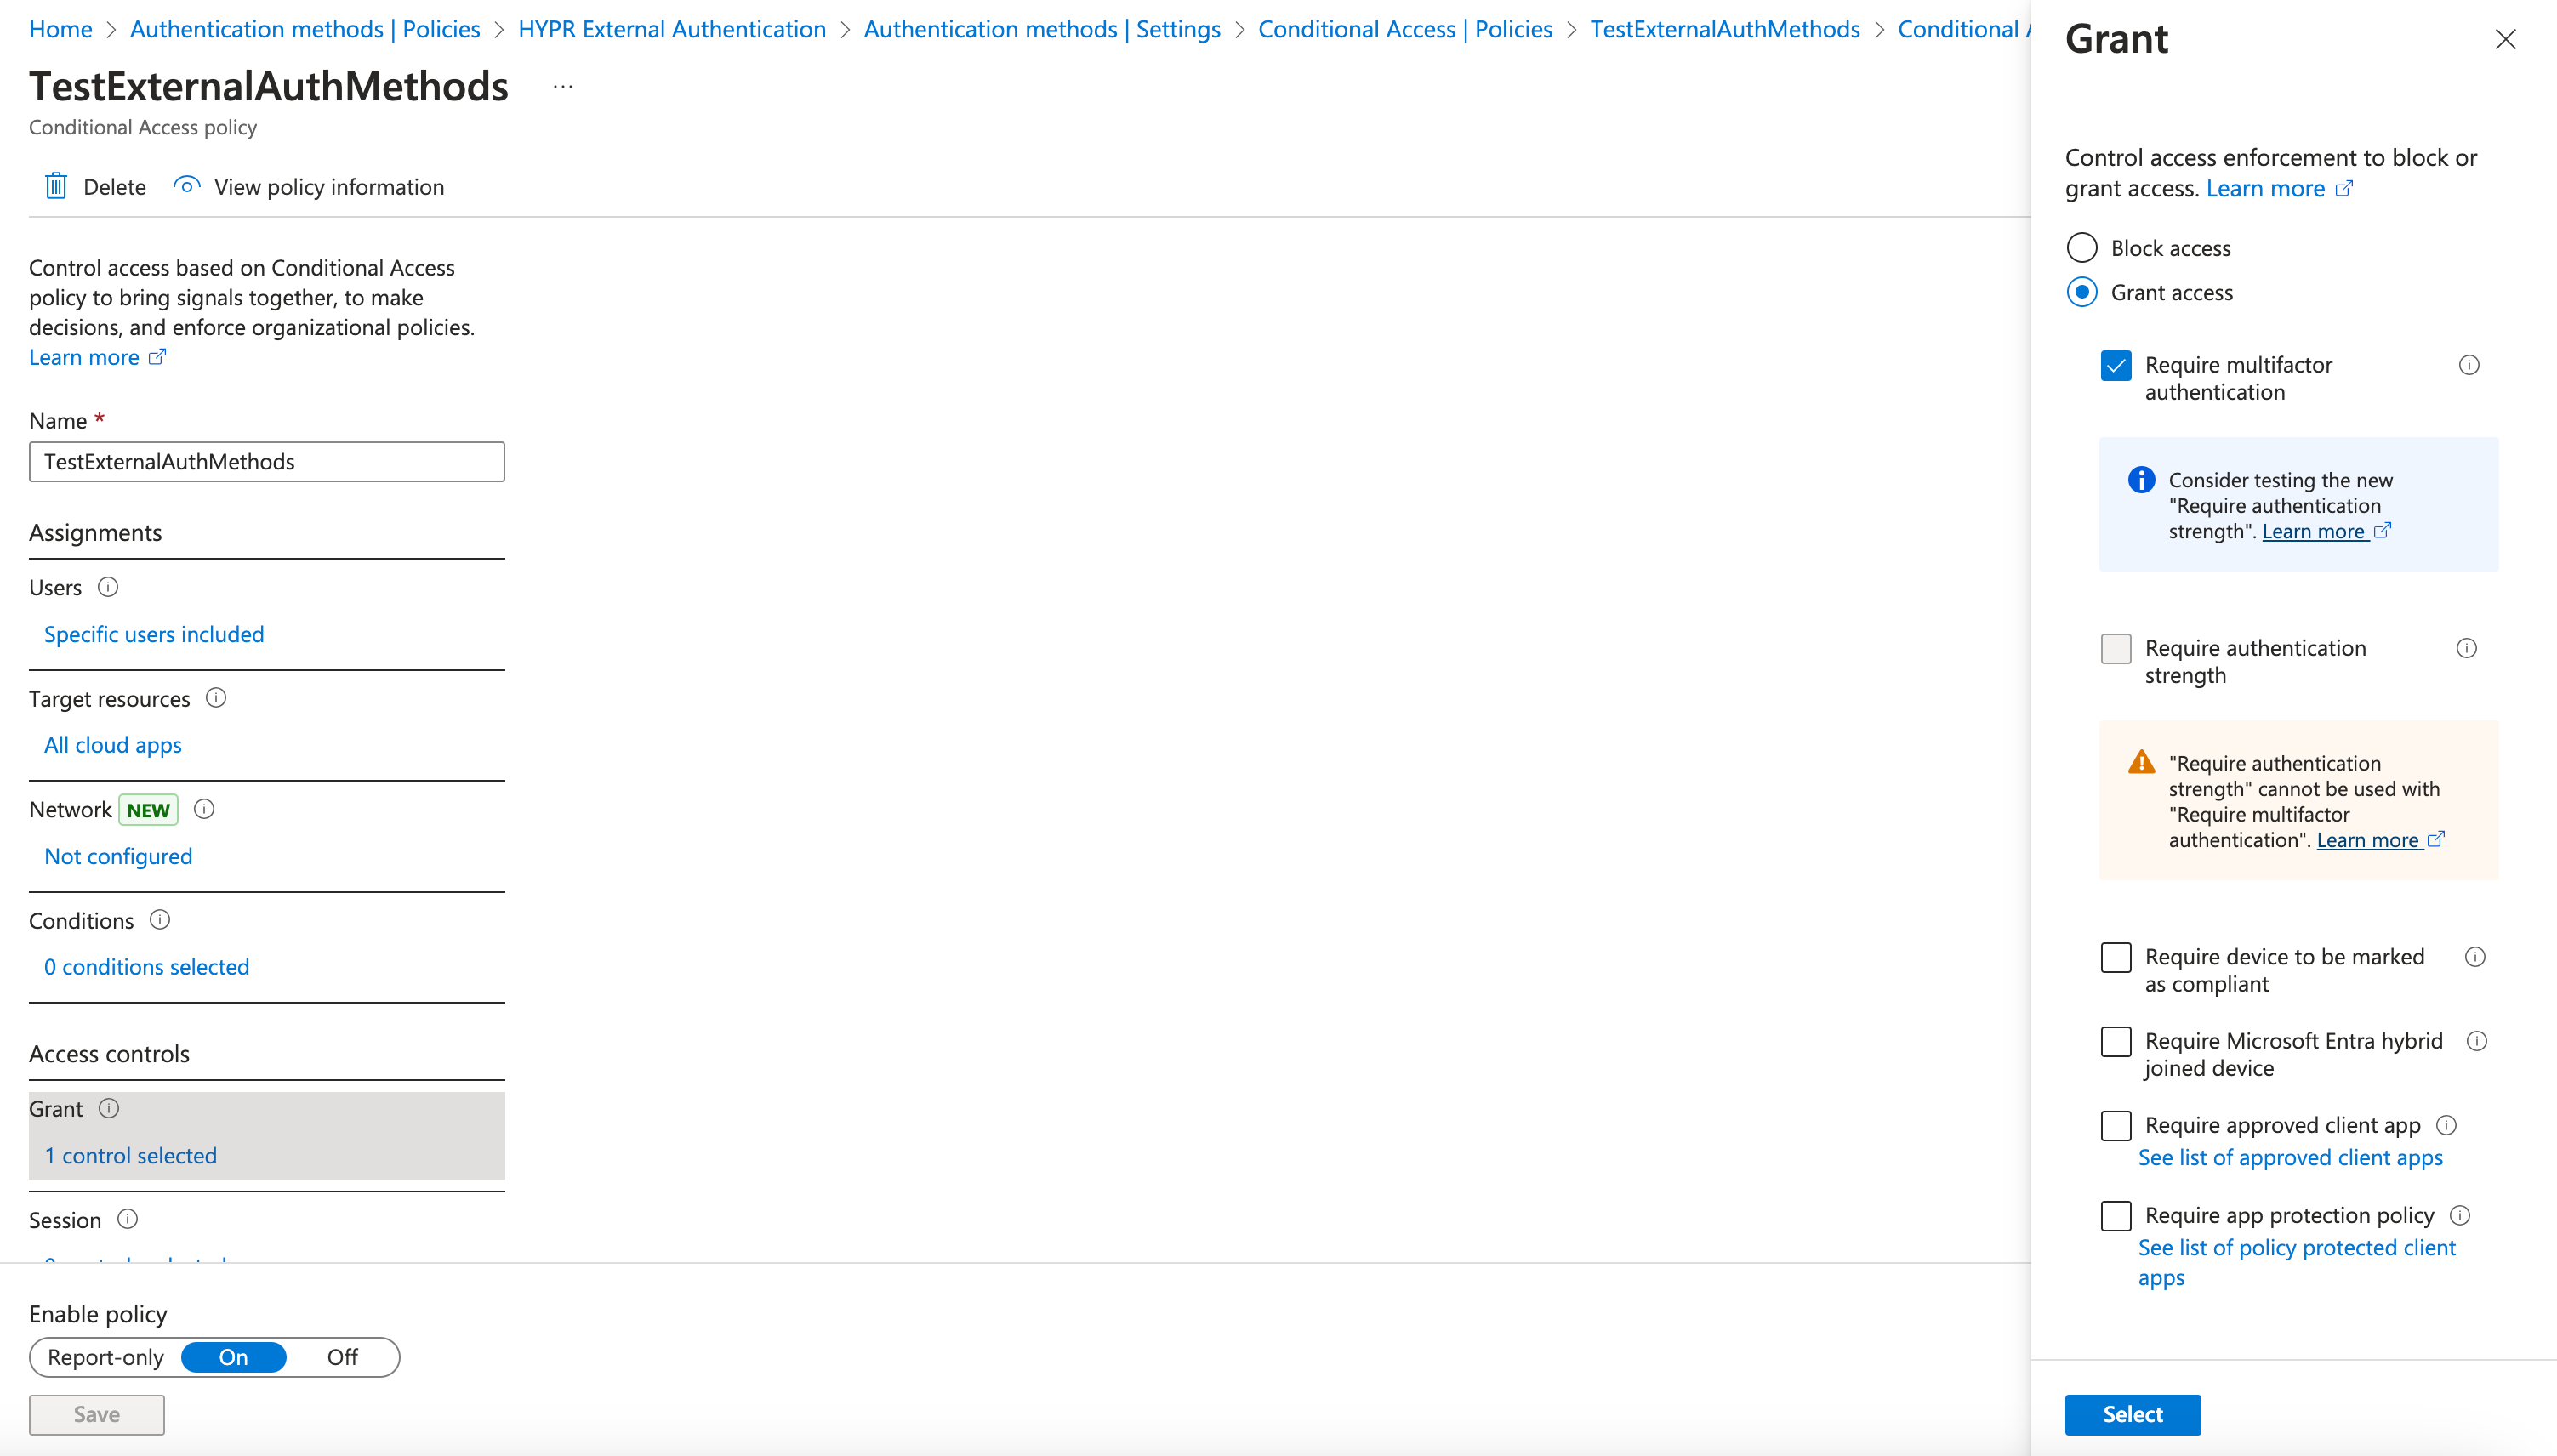
Use Require multifactor authentication, not an authentication strengthExternal MFA does not satisfy grant controls based on authentication strengths, including the built-in MFA strength. A policy built on an authentication strength will not be met by a HYPR sign-in, so configure the policy with Require multifactor authentication.
-
-
Ensure that Enable policy is On, then click Save at the bottom.
How Users Register the Method
Once the method is enabled and a user is in scope, the user registers HYPR as their external MFA method in Entra ID. Enrolling in HYPR through the Device Manager is what makes the user eligible; registering the method in Entra is a separate, user-facing step.
Users can register in either of these ways:
-
From Security info. Sign in to Security info, select + Add sign-in method, choose External Auth methods, select Next, then complete the challenge with HYPR. On success the method is listed among their sign-in methods.
-
Through the registration wizard. At sign-in, a wizard offers the methods the user is enabled for. If they are enabled for other methods too, they may need to choose I want to set up a different method and then External Auth methods. If the authentication fails, the wizard returns an error and the user can retry or pick another method.
An administrator can also register the method on a user's behalf, which means the user does not have to do either of the above. In the Microsoft Entra admin center, open Users > All users, select the user, then Authentication Methods > + Add Authentication Method > External authentication method, choose the method, and select Save. Administrators can also delete a registration, which causes the user's next sign-in to trigger a fresh registration — useful in recovery scenarios.
Users who satisfy MFA with an external method are not included in Entra ID's authentication method registration reports.
Known Limitations
-
Windows 10 device setup. External MFA is not supported during the Windows 10 out-of-box experience, so setting up a Windows 10 device with an external-MFA-only identity fails at sign-in. Microsoft has stated there are no plans to extend support to Windows 10; use Windows 11 for this scenario.
-
Authentication strengths. As noted above, external MFA does not satisfy authentication-strength grant controls.
Continue with the HYPR Integrations common UI experience in the Integrations main page to complete Enabling your integration, enrolling users, and monitoring activity with the integration's Audit Trail.