JWT Token Configuration
JWT Token Configuration appears on the Login Settings tab in both modes:
-
In Advanced Mode: Advanced Config for the Application selected under Choose an App
-
In Standard Mode: Integrations on the Login Settings tab for the selected integration
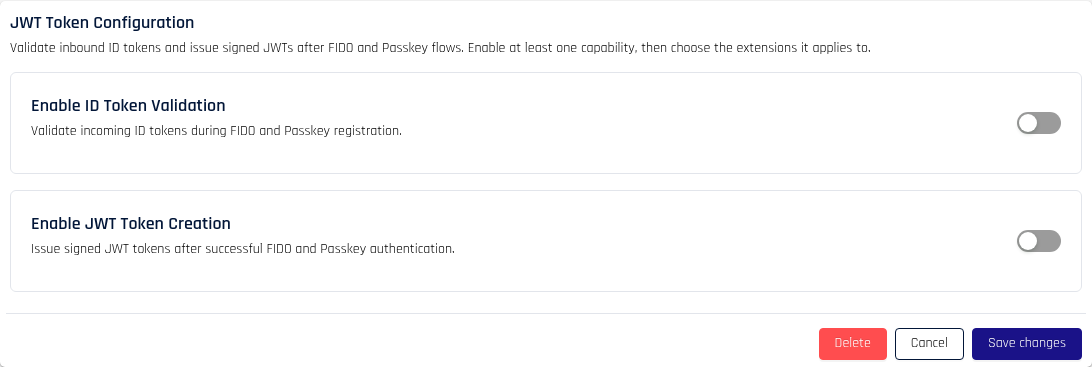
The JWT Token Configuration card lets you validate incoming ID tokens and issue signed JSON Web Tokens (JWTs) for an Application. Configuration is per Application — each Application keeps its own JWT settings.
Two independent capabilities are available, each with its own toggle:
- Enable ID Token Validation — validate incoming ID tokens during FIDO and Passkey registration
- Enable JWT Token Creation — issue a signed JWT after successful FIDO and Passkey authentication
Enable at least one capability, then choose the flows it applies to. The two capabilities are independent; you can enable either one or both.
Open JWT Token Configuration
Login to Control Center as an administrator, then open the Login Settings tab for your Application:
-
In Advanced Mode, choose the Application under Choose an App, then click Login Settings in the Advanced Config menu.
-
In Standard Mode, open Integrations, choose the integration, then open the Login Settings tab.
Scroll to the JWT Token Configuration card.
Enable ID Token Validation
Turn on Enable ID Token Validation to have HYPR validate an inbound ID token during registration. When the capability is on, the Applies to and Configuration sections appear.
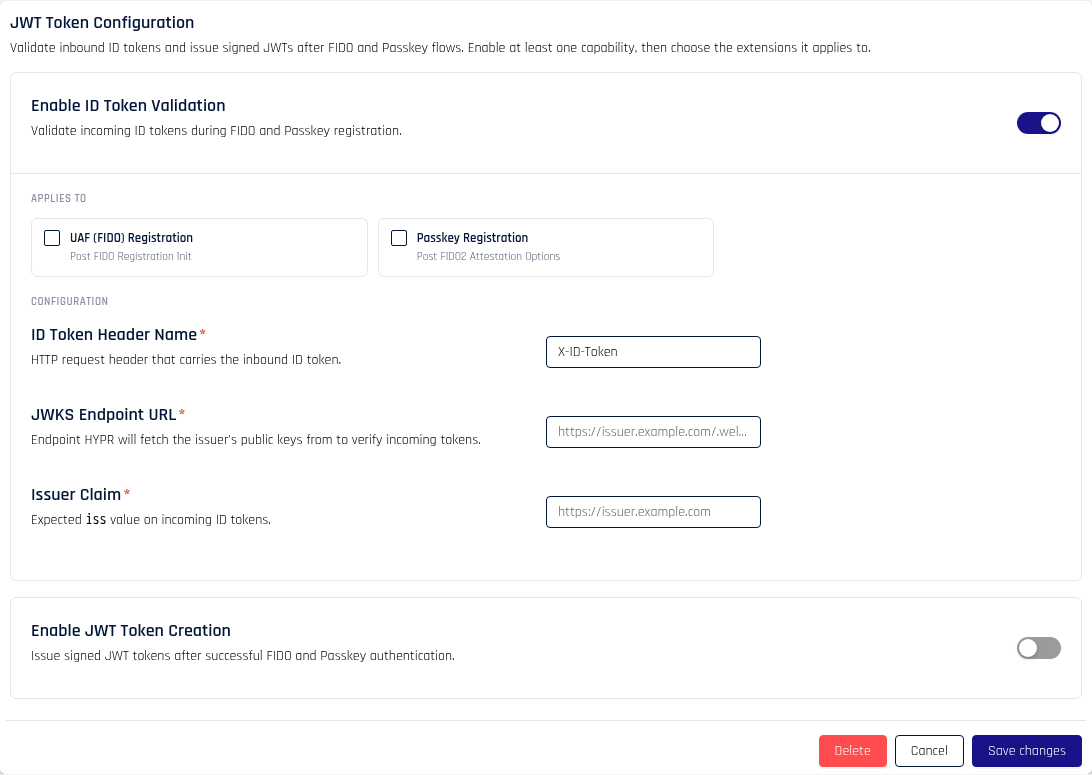
Applies to
Select the registration flows that validate an inbound ID token. Select at least one.
- UAF (FIDO) Registration — validates the token during Post FIDO Registration Init
- Passkey Registration — validates the token during Post FIDO2 Attestation Options
Configuration
Complete each field. All fields are required when ID Token Validation is enabled.
| Field | Description | Example |
|---|---|---|
| ID Token Header Name | HTTP request header that carries the inbound ID token. | X-ID-Token |
| JWKS Endpoint URL | Endpoint HYPR fetches the issuer's public keys from to verify incoming tokens. | https://issuer.example.com/.well-known/jwks.json |
| Issuer Claim | Expected iss value on incoming ID tokens. | https://issuer.example.com |
Enable JWT Token Creation
Turn on Enable JWT Token Creation to have HYPR issue a signed JWT after successful authentication. When the capability is on, the Applies to, Configuration, HYPR Claims and Custom Claims sections appear.

Applies to
Select the authentication flows that issue a JWT. Select at least one.
- Passkey Authentication — issues the JWT at Display Post FIDO2 Assertion Result
- UAF (FIDO) Authentication — issues the JWT at Post FIDO Auth Complete (UAF)
Configuration
Complete each field. Issuer, Audience, Timeout (seconds) and Response Header Name are required when JWT Token Creation is enabled.
| Field | Description | Default / Example |
|---|---|---|
| Issuer | Value placed in the JWT's iss claim. | https://auth.example.com |
| Audience | Value placed in the JWT's aud claim. | api.example.com |
| Timeout (seconds) | JWT expiration, in seconds from issuance. | 300 |
| Response Header Name | HTTP response header that carries the issued JWT. | HYPR-JWT |
The Issuer used for JWT creation is a separate value from the Issuer Claim used for ID token validation. Set each one independently.
Distributing the signing key
Relying parties that consume the issued JWT need the matching public key to verify the token's signature. The Host JWKS Endpoint toggle controls how that key is distributed.
Host JWKS Endpoint on
Turn on Host JWKS Endpoint to have HYPR publish the signing key at a hosted JWKS URL that your verifiers can fetch. After you click Save changes, two read-only fields appear:
- Hosted JWKS Endpoint — the URL HYPR publishes the signing key at. Point your verifier at this URL to fetch signing keys. Use the Copy button to copy it.
- Key ID (kid) — the key identifier HYPR assigns to the signing key. HYPR also sends this value as the
kidclaim in every issued JWT, so verifiers can match the token to the correct key in the JWKS response.
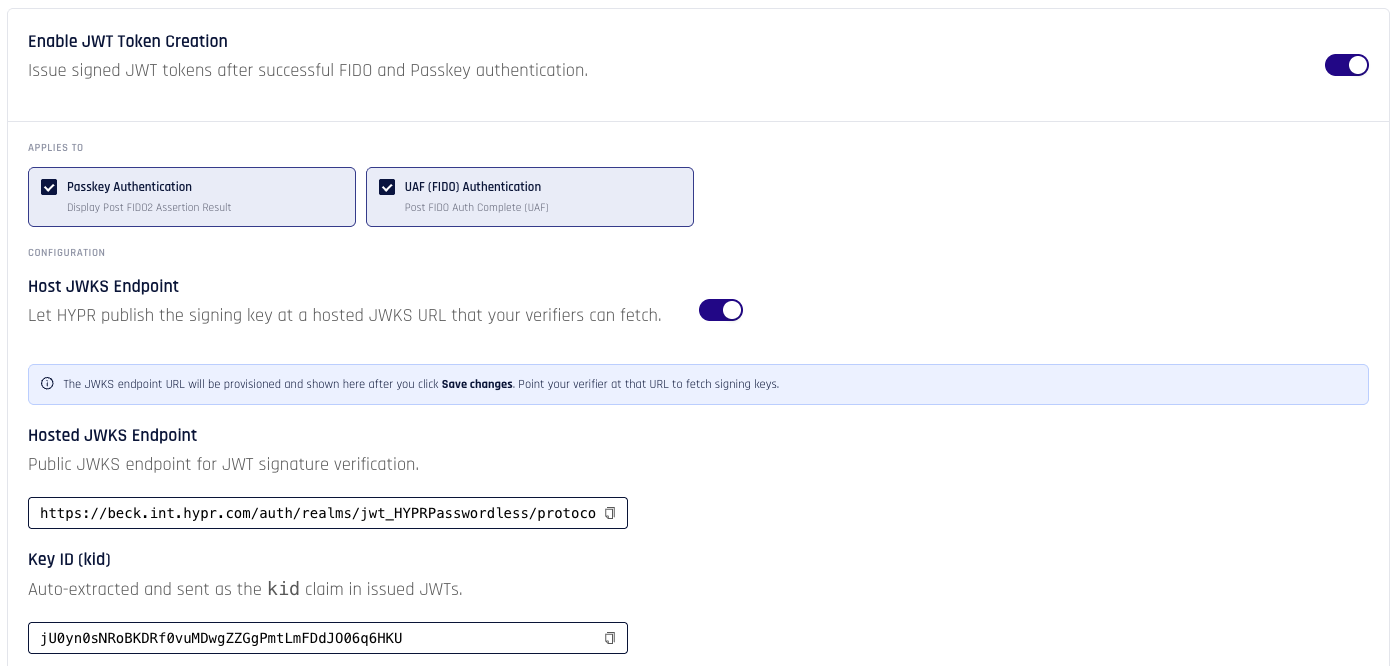
With Host JWKS Endpoint on, HYPR publishes and rotates the signing key for you. Verifiers always read the current key from the hosted JWKS URL.
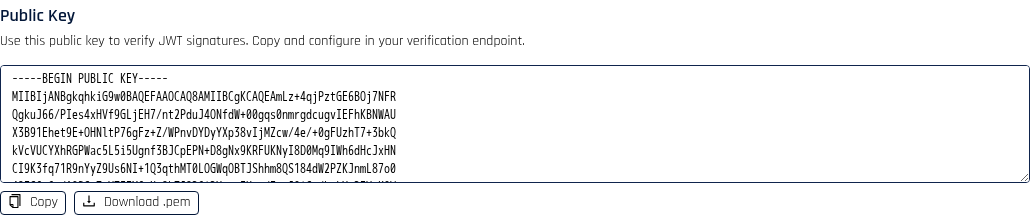
Host JWKS Endpoint off
Leave Host JWKS Endpoint off to distribute the public key yourself. After you click Save changes, the Public Key field appears with the generated X.509 PEM-encoded public key. Use Copy to copy the key or Download .pem to save it.
When Host JWKS Endpoint is off, HYPR does not expose a JWKS endpoint. Distribute the Public Key to every relying party that verifies these JWTs, and perform key rotation manually.
Advanced: use a custom signing key
By default, HYPR generates an RS256 signing key for you. To supply your own, expand Advanced: Use custom signing key and paste a PEM or base64-encoded PKCS#8 private key into the Signing Key (Private Key) field. Leave the field blank to keep the current key.
HYPR Claims
Use the HYPR Claims section to include facts HYPR knows about the authenticated user, device and session in the JWT payload. Each claim has its own toggle; the group headers show how many claims are selected and offer Select all and Clear all.
For UAF (FIDO) flows, the default sub is an opaque FIDO username (for example, fido-7c4a8d09…). Enable IDP Username to also include the user's real identifier from your identity provider, so recipients can map the token back to a real user.

Identity
| Claim | JWT key | Description |
|---|---|---|
| IDP Username | preferred_username | Real user identifier from the upstream identity provider. Recommended for UAF, where sub is otherwise the opaque FIDO username. |
| FIDO Username | fido_username | Opaque per-Application identifier HYPR uses internally. Included as sub by default; enable to also publish it under its own key. |
email, email_verified | Primary email on the user's HYPR record. | |
| Display Name | name | Full name as configured on the HYPR user record. |
Device and authenticators
| Claim | JWT key | Description |
|---|---|---|
| Authenticating Device | hypr.device | Device used for this authentication — platform, model, OS and app version. |
| Authenticator AAGUID | hypr.aaguid | FIDO2 AAGUID of the authenticator that signed the assertion. |
| Registered Devices | hypr.registered_devices | Summary of all authenticators currently bound to the user. |
| Authenticator Attachment | hypr.attachment | Whether the authenticator was platform (built-in) or cross-platform (roaming). |
Custom Claims
Use the Custom Claims section to merge additional key/value pairs into every JWT, in addition to the HYPR claims above. Click + Add claim to add a row, then complete it:
- Claim Name — the key to write into the JWT
- Source — choose Static Value to use a fixed value, or From Header to read the value from an HTTP request header
- Value — the static value, or the header name when the source is From Header
Click the delete icon on a row to remove a claim.

Save the configuration
Click Save changes to apply the configuration. HYPR validates the form before saving and shows a message at the top of the card if anything is missing — for example, when a capability is enabled but no flow is selected, or when a required Issuer field is empty. On success, a confirmation message appears.
Click Cancel to discard changes.
Delete the configuration
When a configuration already exists, a Delete button appears. Click Delete, then confirm to remove the JWT configuration for the Application. If Host JWKS Endpoint was on, deleting the configuration also removes the hosted JWKS endpoint.