Creating a Policy
Every HYPR AgentPass™ policy is created in the New policy wizard. The wizard walks through the same steps whichever way you start:
- Start from scratch, and write the condition yourself.
- Start from a common guardrail, a ready-made rule you can adjust.
- Describe it in your own words, and let AI write the condition. See Authoring a Policy with AI.
Each way ends with the same condition in the same editor, which you can read and change before you publish.
Before you start, read How Policies Are Evaluated once. Knowing what each setting does to a live request is what makes the rule right.
You need Policies: Add to create a policy, Policies: Edit to change one and Policies: Delete to delete one. Admin holds all three for every policy. Operator and Supervisor hold them for the policies they own. When your permission covers only your own policies, AgentPass makes you the owner when you save. What Your Role Lets You Do lists which permission each action needs.
Open the Wizard
Open the wizard in any of these ways:
- On Policies, click New policy.
- On a connector's detail page, open the Policies tab, and click New policy. The wizard starts with that connector already chosen.
- On the Suggested tab of Policies, click Create policy on a suggestion. See Suggested Policies.
- On Session watch, focus an entity in the findings graph, and click Draft a policy. The wizard opens on Describe it in your own words, with the connector and the goal filled in. See Drafting a Policy from an Entity.
The wizard's steps are Start, Details, Logic, Back test and Review & publish. A rail lists them, each with a short summary of what you chose. Click Continue to move on, or click a step you already reached to go back to it.
Cancel leaves the wizard. If you changed anything, the wizard first asks whether to discard it: click Yes, discard changes to leave, or No, keep editing to stay.
Choose a Starting Point
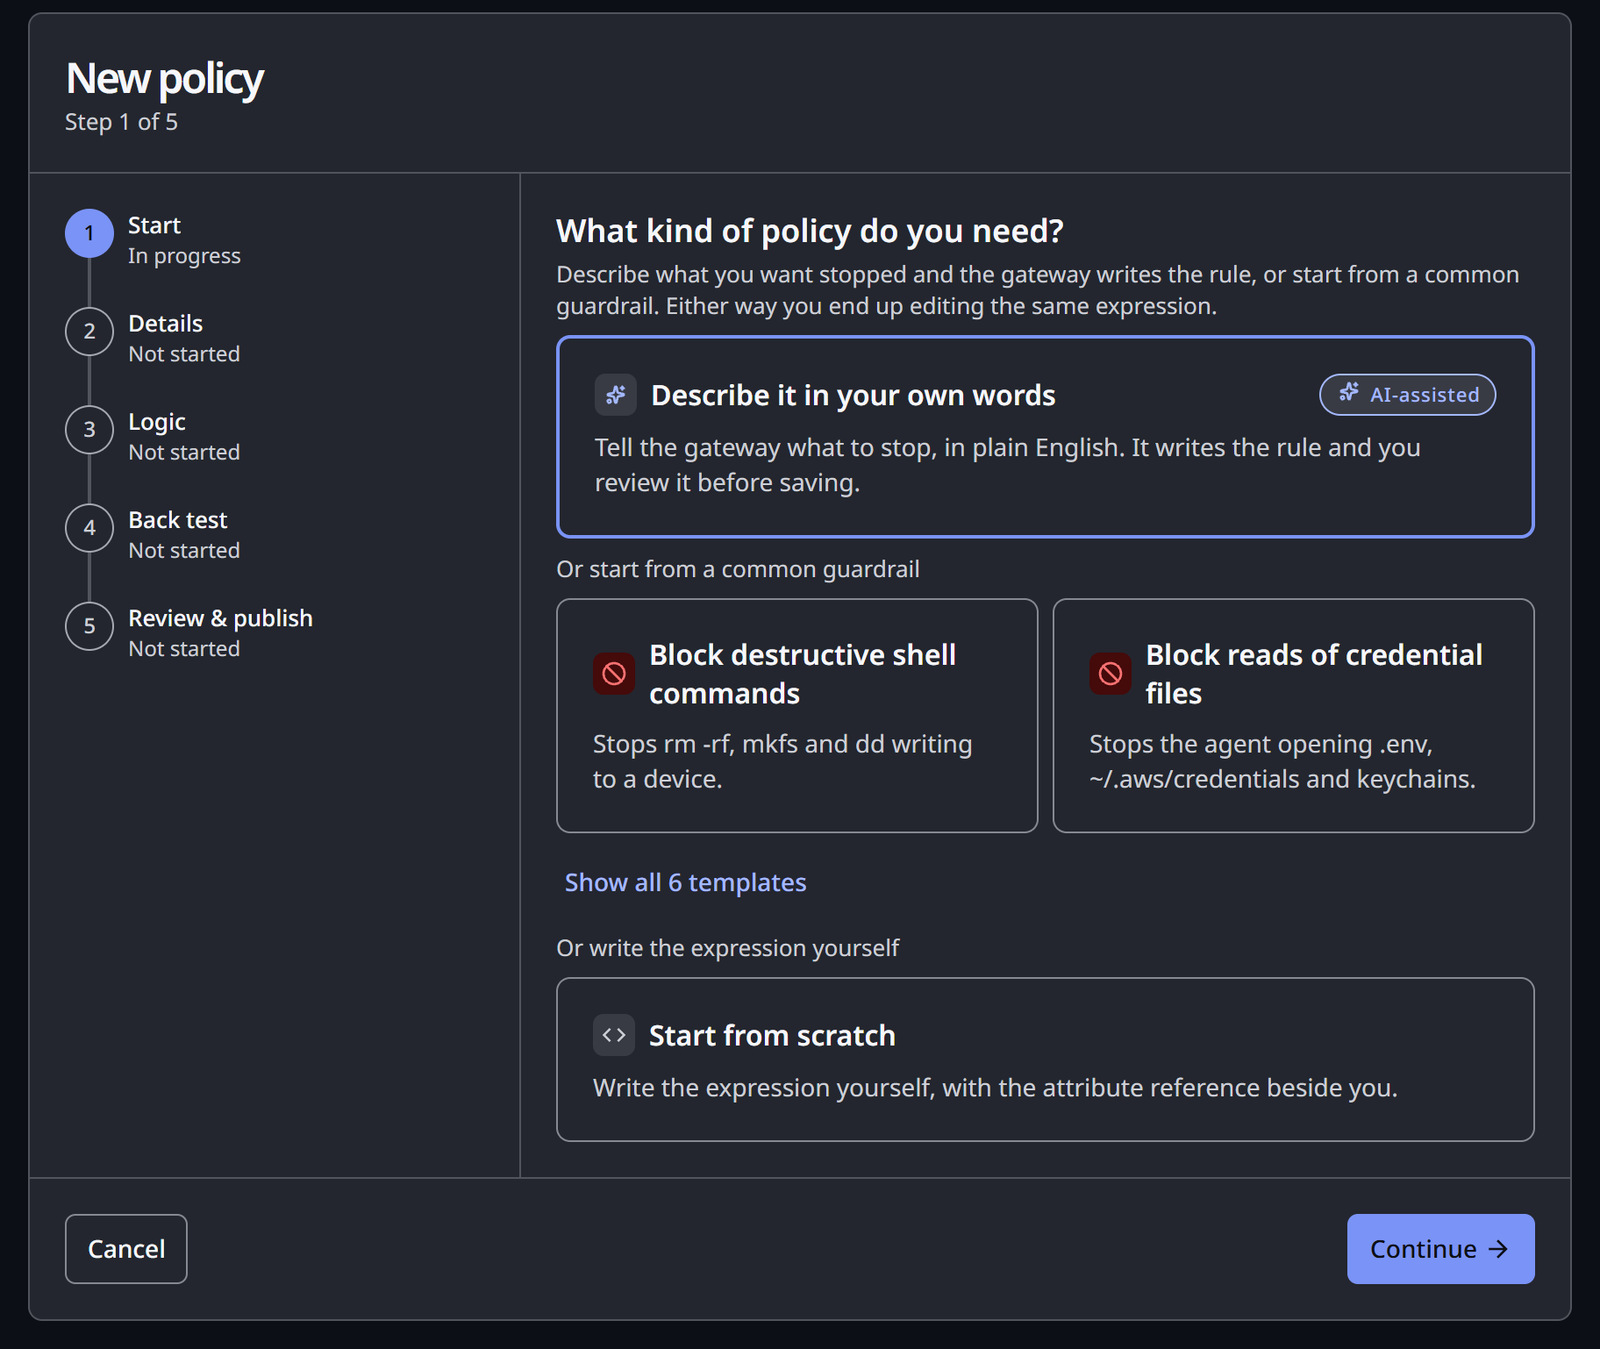
The Start step asks What kind of policy do you need?
- Describe it in your own words lets AI write the condition from a goal in plain English. The option is offered when AI drafting is set up. See Authoring a Policy with AI.
- Or start from a common guardrail offers ready-made rules. The first two are shown. Show all N templates lists the rest.
- Or write the expression yourself, with Start from scratch, opens an empty condition.
The Common Guardrails
A template fills in a complete policy: its name, description, what it checks, its action, its message and its condition. The condition is the template's own fixed rule. No AI is involved. You can change any of it in the following steps.
| Template | What it stops | Checks |
|---|---|---|
| Block destructive shell commands | rm -rf, mkfs and dd writing to a device | The reply |
| Block reads of credential files | Opening .env, ~/.aws/credentials, private keys and keychains | The reply |
| Block writes outside the project | Writes and edits under /etc, /usr or an .ssh directory | The reply |
| Block secrets pasted into a prompt | Private keys, AWS access keys and bearer tokens in the newest message | The request |
| Block personal data in prompts | National ID and payment card numbers in the newest message | The request |
| Block production system access | Connections to production hosts, databases or a production Kubernetes context | The reply |
Every template denies, and reads the conversation on an inference connector. Policy Examples gives each one's condition, and why a command is caught in the reply.
Set the Details
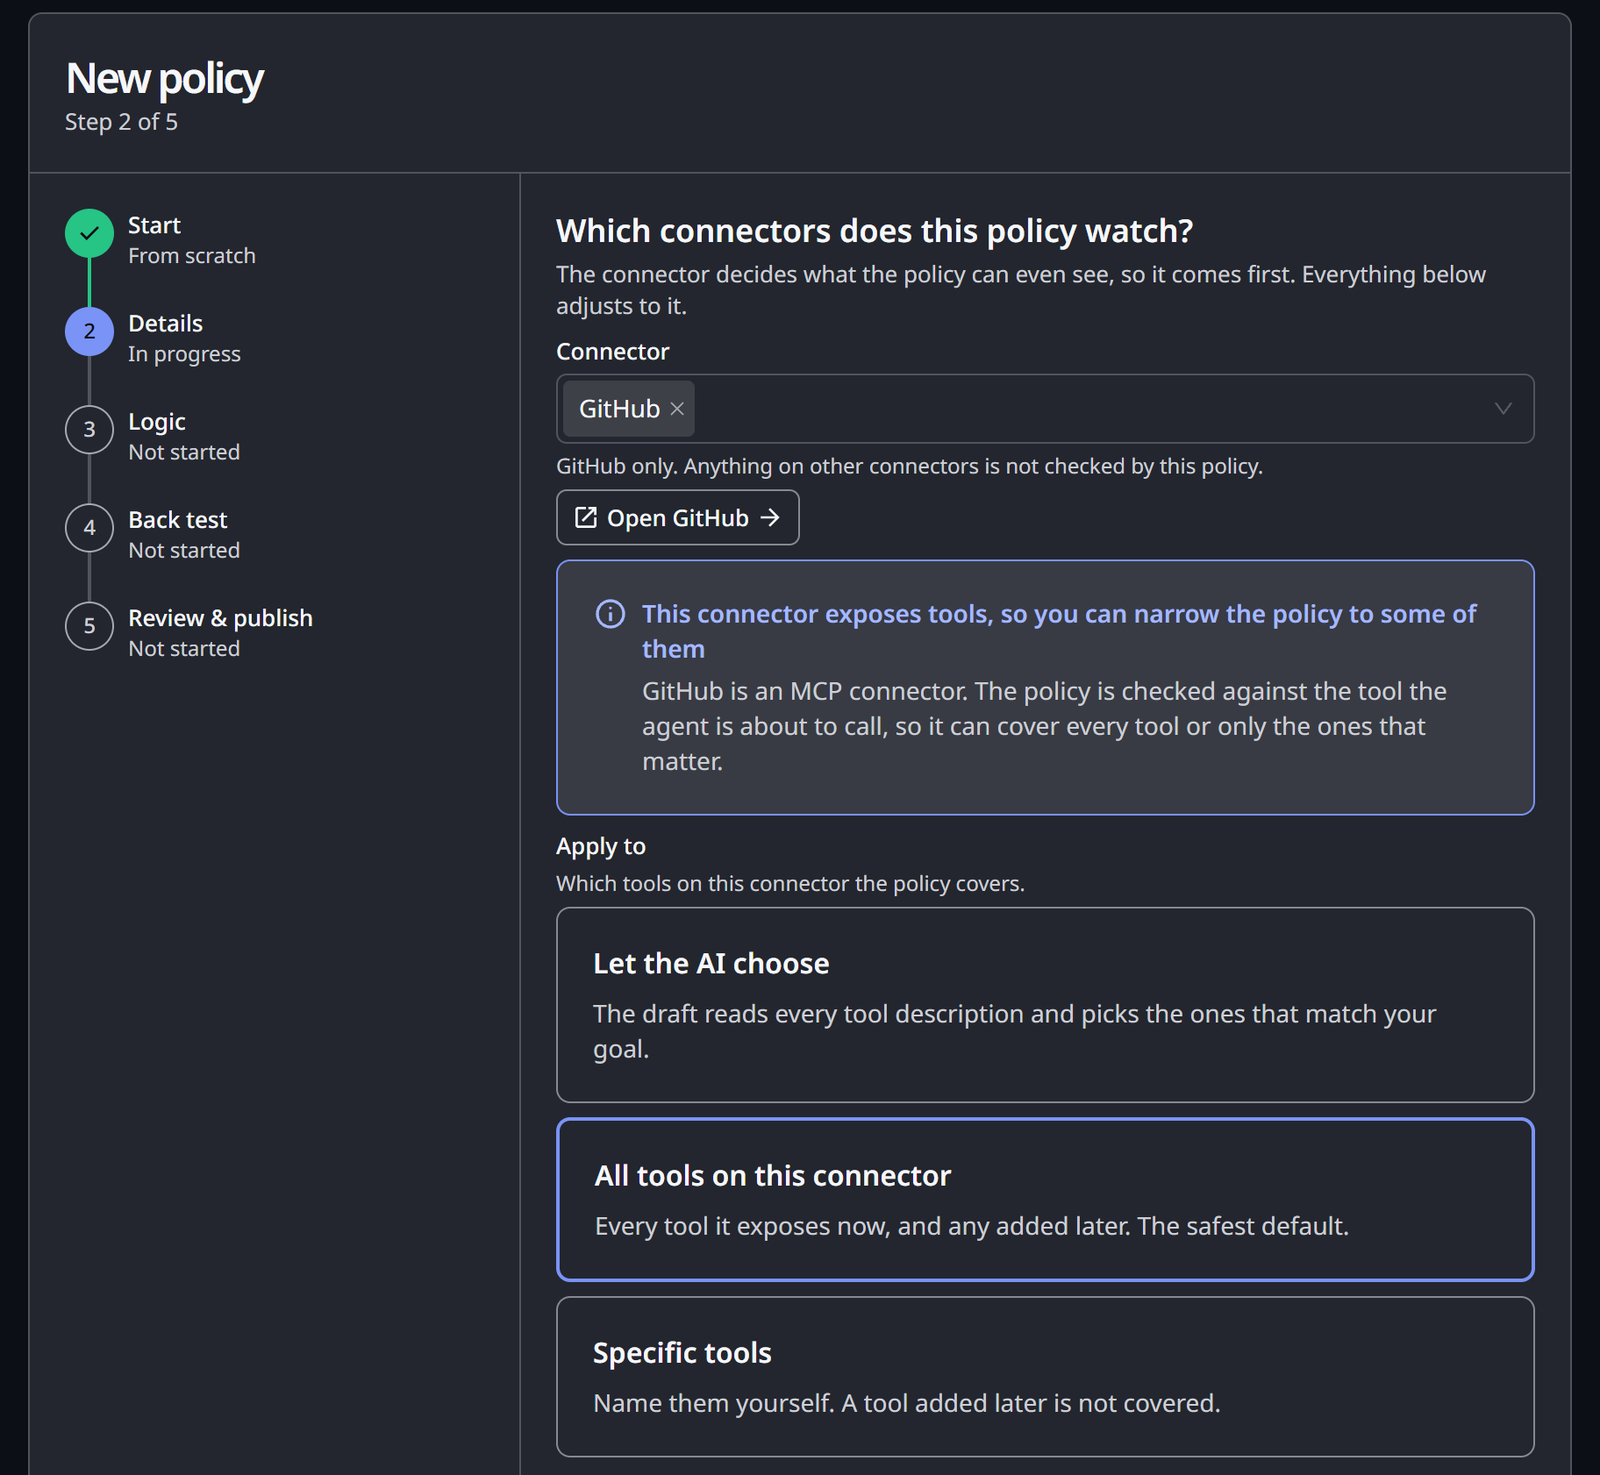
The Details step starts with the connector, because the connector decides what the policy can see. Then it holds every setting except the condition.
| Field | What it does |
|---|---|
| Connector | The connectors the policy watches. Left empty, the policy is evaluated on every connector, including any connected later |
| Apply to | Shown for a single MCP connector. Let the AI choose, offered when AI drafting is set up, has the AI author read every tool description and pick the tools that match your goal. All tools on this connector covers every tool, now and later. Specific tools covers the tools you name. A tool added later is not covered |
| Name | Shown wherever the policy is listed. It cannot be changed once the policy exists |
| Description | One sentence, shown under the name in the policy list |
| Owner | Who answers for the policy when it blocks something. It defaults to you. Where your permission is limited to your own records, it is always you |
| Checks | The reply — before it returns or The request — before it is sent. Decides which half of the exchange the condition looks at. The default is the reply |
| Priority | A whole number of 1 or more. Lower runs first. The default is 1000 |
| Action | Deny, Require approval or Allow. The default is Deny. When AI drafting is set up, a new policy also offers Let the AI choose from the goal: the author picks the action from what you describe, and you can change it on the Logic step. See Authoring a Policy with AI |
| Enforcement mode | Observe — evaluate and log, do not enforce, the default, or Enforce — apply the action to every match |
| Enabled | On by default. A disabled policy is skipped at evaluation: nothing is logged and nothing is enforced. Turn it off to park a policy without deleting it |
| Message to the agent | What the agent is told when the policy acts. Required for Deny and Require approval |
Under the connector, a note says what the policy can see:
- An inference connector carries a conversation, not a tool catalog. The policy reads what was sent and what the model replied.
- An MCP connector exposes tools, so the policy can cover every tool or only the ones that matter.
- No connector chosen means the policy is written against what every connector has. Only
request.*attributes exist on every connector.
Write the Condition
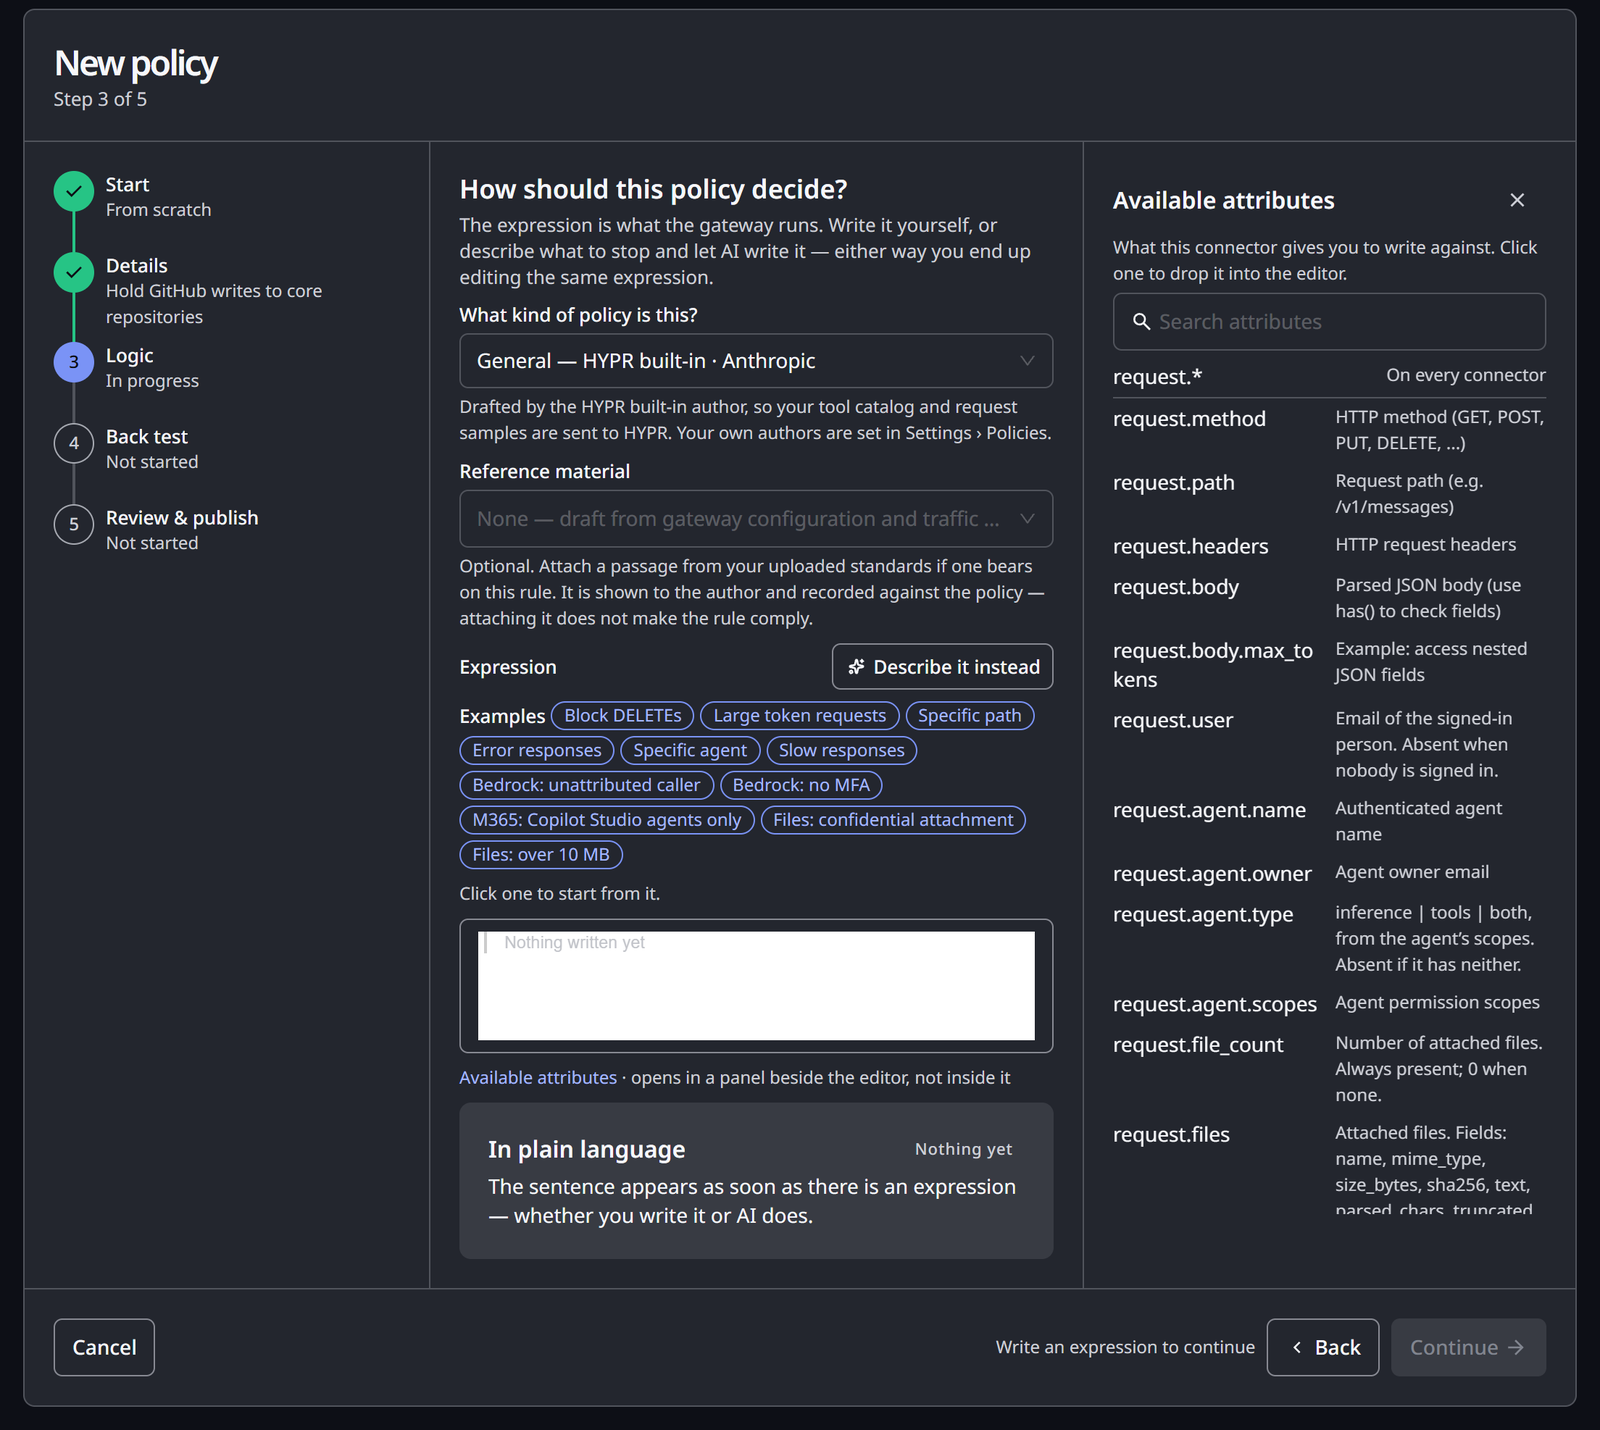
The Logic step asks How should this policy decide? Its expression editor holds the condition the gateway runs.
Conditions are written in Common Expression Language (CEL), a small expression language with syntax close to most programming languages. A condition is true or false for each request. When it is true, the policy applies. As you type, the editor suggests attribute names, operators and functions.
A condition can use these operators.
| Write | To mean |
|---|---|
request.method == "DELETE" | Equal to. != means not equal. >, >=, < and <= compare numbers |
a && b, a || b, !a | Both, either, not |
request.path.startsWith("/v1/admin") | Starts with. Also .endsWith(…), .contains(…), and .matches(…) for a regular expression |
has(request.body.max_tokens) | Whether a field is present in a parsed body. Test presence before comparing a value that might be missing |
"write" in request.agent.scopes | Whether a list contains a value |
request.files.exists(f, f.size_bytes > 10485760) | Whether any element of a list passes a test. .all(f, …) tests every element |
Everything a condition can refer to is listed in the Attribute Reference.
Check the Condition as You Write
The wizard checks the condition while you type, and reports the result in the In plain language card:
| Badge | Meaning |
|---|---|
| Valid expression | The condition compiles. The card reads it back to you in plain English |
| Cannot be read | The condition does not compile. The error is shown under the editor |
| Never matches | The condition compiles, but can never be true |
| Nothing yet | The editor is empty |
Continue is available once the condition is valid and the policy has an action.
When the condition reads an attribute that some of the chosen connectors never have, a warning says so, such as This policy cannot match on 2 of 3 connectors. For example, inference.* exists only on inference connectors. Remove those connectors under Connector in Details, or change the condition.
Start From an Example
Under Examples, the step offers eleven example conditions:
- Block DELETEs, Large token requests, Specific path, Error responses, Specific agent and Slow responses
- Bedrock: unattributed caller and Bedrock: no MFA
- M365: Copilot Studio agents only
- Files: confidential attachment and Files: over 10 MB
Click one to replace the expression in the editor with it, then adjust it. Policy Examples explains each one.
Starting from an example and changing one thing at a time is the fastest way to a correct condition. The examples also show the habit worth copying: a rule that says which traffic it is about, such as connector.template == "AWS_BEDROCK" && ….
Look Up an Attribute
Click Available attributes to open the attribute panel beside the editor. It lists what the chosen connectors give you to write against, by group, with each attribute's type and meaning. Search it by name, and click an attribute to insert it into the editor.
| Group | Where it exists |
|---|---|
request.* | On every connector |
response.* | On every connector, once the reply exists |
tool.*, data.* | MCP connectors only |
inference.* | Inference connectors only |
connector.* | On every connector. Some fields exist only on their own kind of connector |
The panel carries the same warnings as the Attribute Reference about attributes that are present only when resolved.
Say Which Traffic the Rule Is About
Lead the condition with an attribute that is always present on the traffic you mean:
connector.templateorconnector.name, on any connectorconnector.aws.bedrock.identity_source, on Bedrockconnector.m365.copilot.surface, on Copilotrequest.file_count, for files
A condition on a missing attribute is never true. See How Policies Are Evaluated.
A Reply-Side Rule on a Model Connector
A condition can read the model's reply, through inference.tool_uses or inference.completion.*, when the policy checks the reply. Enforcing such a rule stops the model's reply at the tool call. Write its message for the person waiting on that reply, and keep it in Observe first. Governing Inference Traffic describes the behavior.
Back-Test It
The Back test step asks What would this have caught? It replays the policy against the requests the connectors in scope carried over the last 7 days. It runs as the step opens. Nothing is blocked or held. It only shows what would have been.
The result shows:
- Examined: how many requests were replayed
- Matched: how many the policy would have caught
- To review: how many matches you marked as looking wrong
Under What it matched, mark each sample Correct or Looks wrong. Your marks count toward To review while you are in the wizard. They are not saved with the policy. Click Run again after you change the condition.
Read the result as evidence, not a verdict:
- No matches can mean the rule is too narrow, or that nothing in the period did what the rule is about. Spot-check a few recent requests before you decide.
- Some recorded requests carry only a summary, not the full body. The step says what share of the replay used a summary, so matches that depend on argument detail may be missing.
- The back test reads the request examples the gateway retains. Once those examples age past the Activity retention window set in Data Management, nothing is left to replay.
With no traffic in the period, the step reads No traffic to test against. You can still publish. The policy then starts in Observe, and you review it once traffic arrives.
Every back test is kept on the policy's History tab. See Understanding Your Policies.
Review and Publish
The Review & publish step reads Ready to publish. It states what the policy does in plain language, then lists every setting. Click Change beside a setting to go back to its step.
The step warns you when:
- The policy was not tested on real traffic. Leave it in Observe, and look at its matches before you enforce it.
- The policy looks like one you already have. The warning names the existing policy, and Open it opens that policy in a new tab. You can still create yours. Whichever has the lower priority number runs first.
Click Create policy. The policy is published in the enforcement mode you chose in Details.
When you chose Enforce and the policy was not back-tested on any traffic, the wizard asks Turn on enforcement without testing it? Click Publish in Observe to publish it observing, or Publish in Enforce to enforce it straight away.
The wizard returns you to where you started, with a Policy created banner. View policy opens the new policy's page.
When the gateway refuses the policy, the reason is shown on the Review & publish step. A name already in use reads A policy named “…” already exists. Change the name in Details.
The gateway refuses to enforce REQUIRE_APPROVAL on a condition that reads inference.*. You can publish such a rule in Observe, to record where approval would have been required, but not in Enforce. See Where Require Approval Applies.
Watch, Then Promote
A new policy is evaluated from the next request. In Observe, it changes nothing:
- Watch. Send the traffic you mean to govern. Each match is recorded as a Would deny or Would wait decision. Read them on the policy's Decisions tab, or on Activity → Policy decisions. See Policy Decisions.
- Promote. On the policy list, click the policy's State badge, and choose Enforcing. See Promoting a Policy to Enforce.
- Adjust. Edit any setting except the name. See Edit a Policy.
A rule that matches nothing in Observe mode does nothing in Enforce mode either. Check that the attribute you tested is actually present on that traffic. The Request log detail panel shows what the gateway resolved for a request. Also check that the connector is in the policy's scope.
Edit a Policy
On Policies, open the policy's row menu, and click Edit. On the policy's own page, click Edit.
The wizard opens on Details, titled Edit policy. Every step is open from the rail, and Save changes is available from any of them. The name cannot be changed.
Editing an enforcing policy takes effect on the next request. If you change its condition, its connectors, its tools or what it checks, the back test must run again before you can click Save changes. Until it has, Save as observing saves your changes with the policy observing.
Every change is recorded on the policy's History tab, with who made it and what changed.
Delete a Policy
- On Policies, open the policy's row menu, and click Delete policy.
- Read the Delete …? confirmation. When the policy matched requests in the last 7 days, it says how many, and that they would then fall through to the next policy in priority order.
- Click Yes, delete policy. To keep it, click No, keep policy.
Deleting cannot be undone. A policy can be deleted only from Policies, not from a connector's Policies tab.
The Connector's Policies Tab
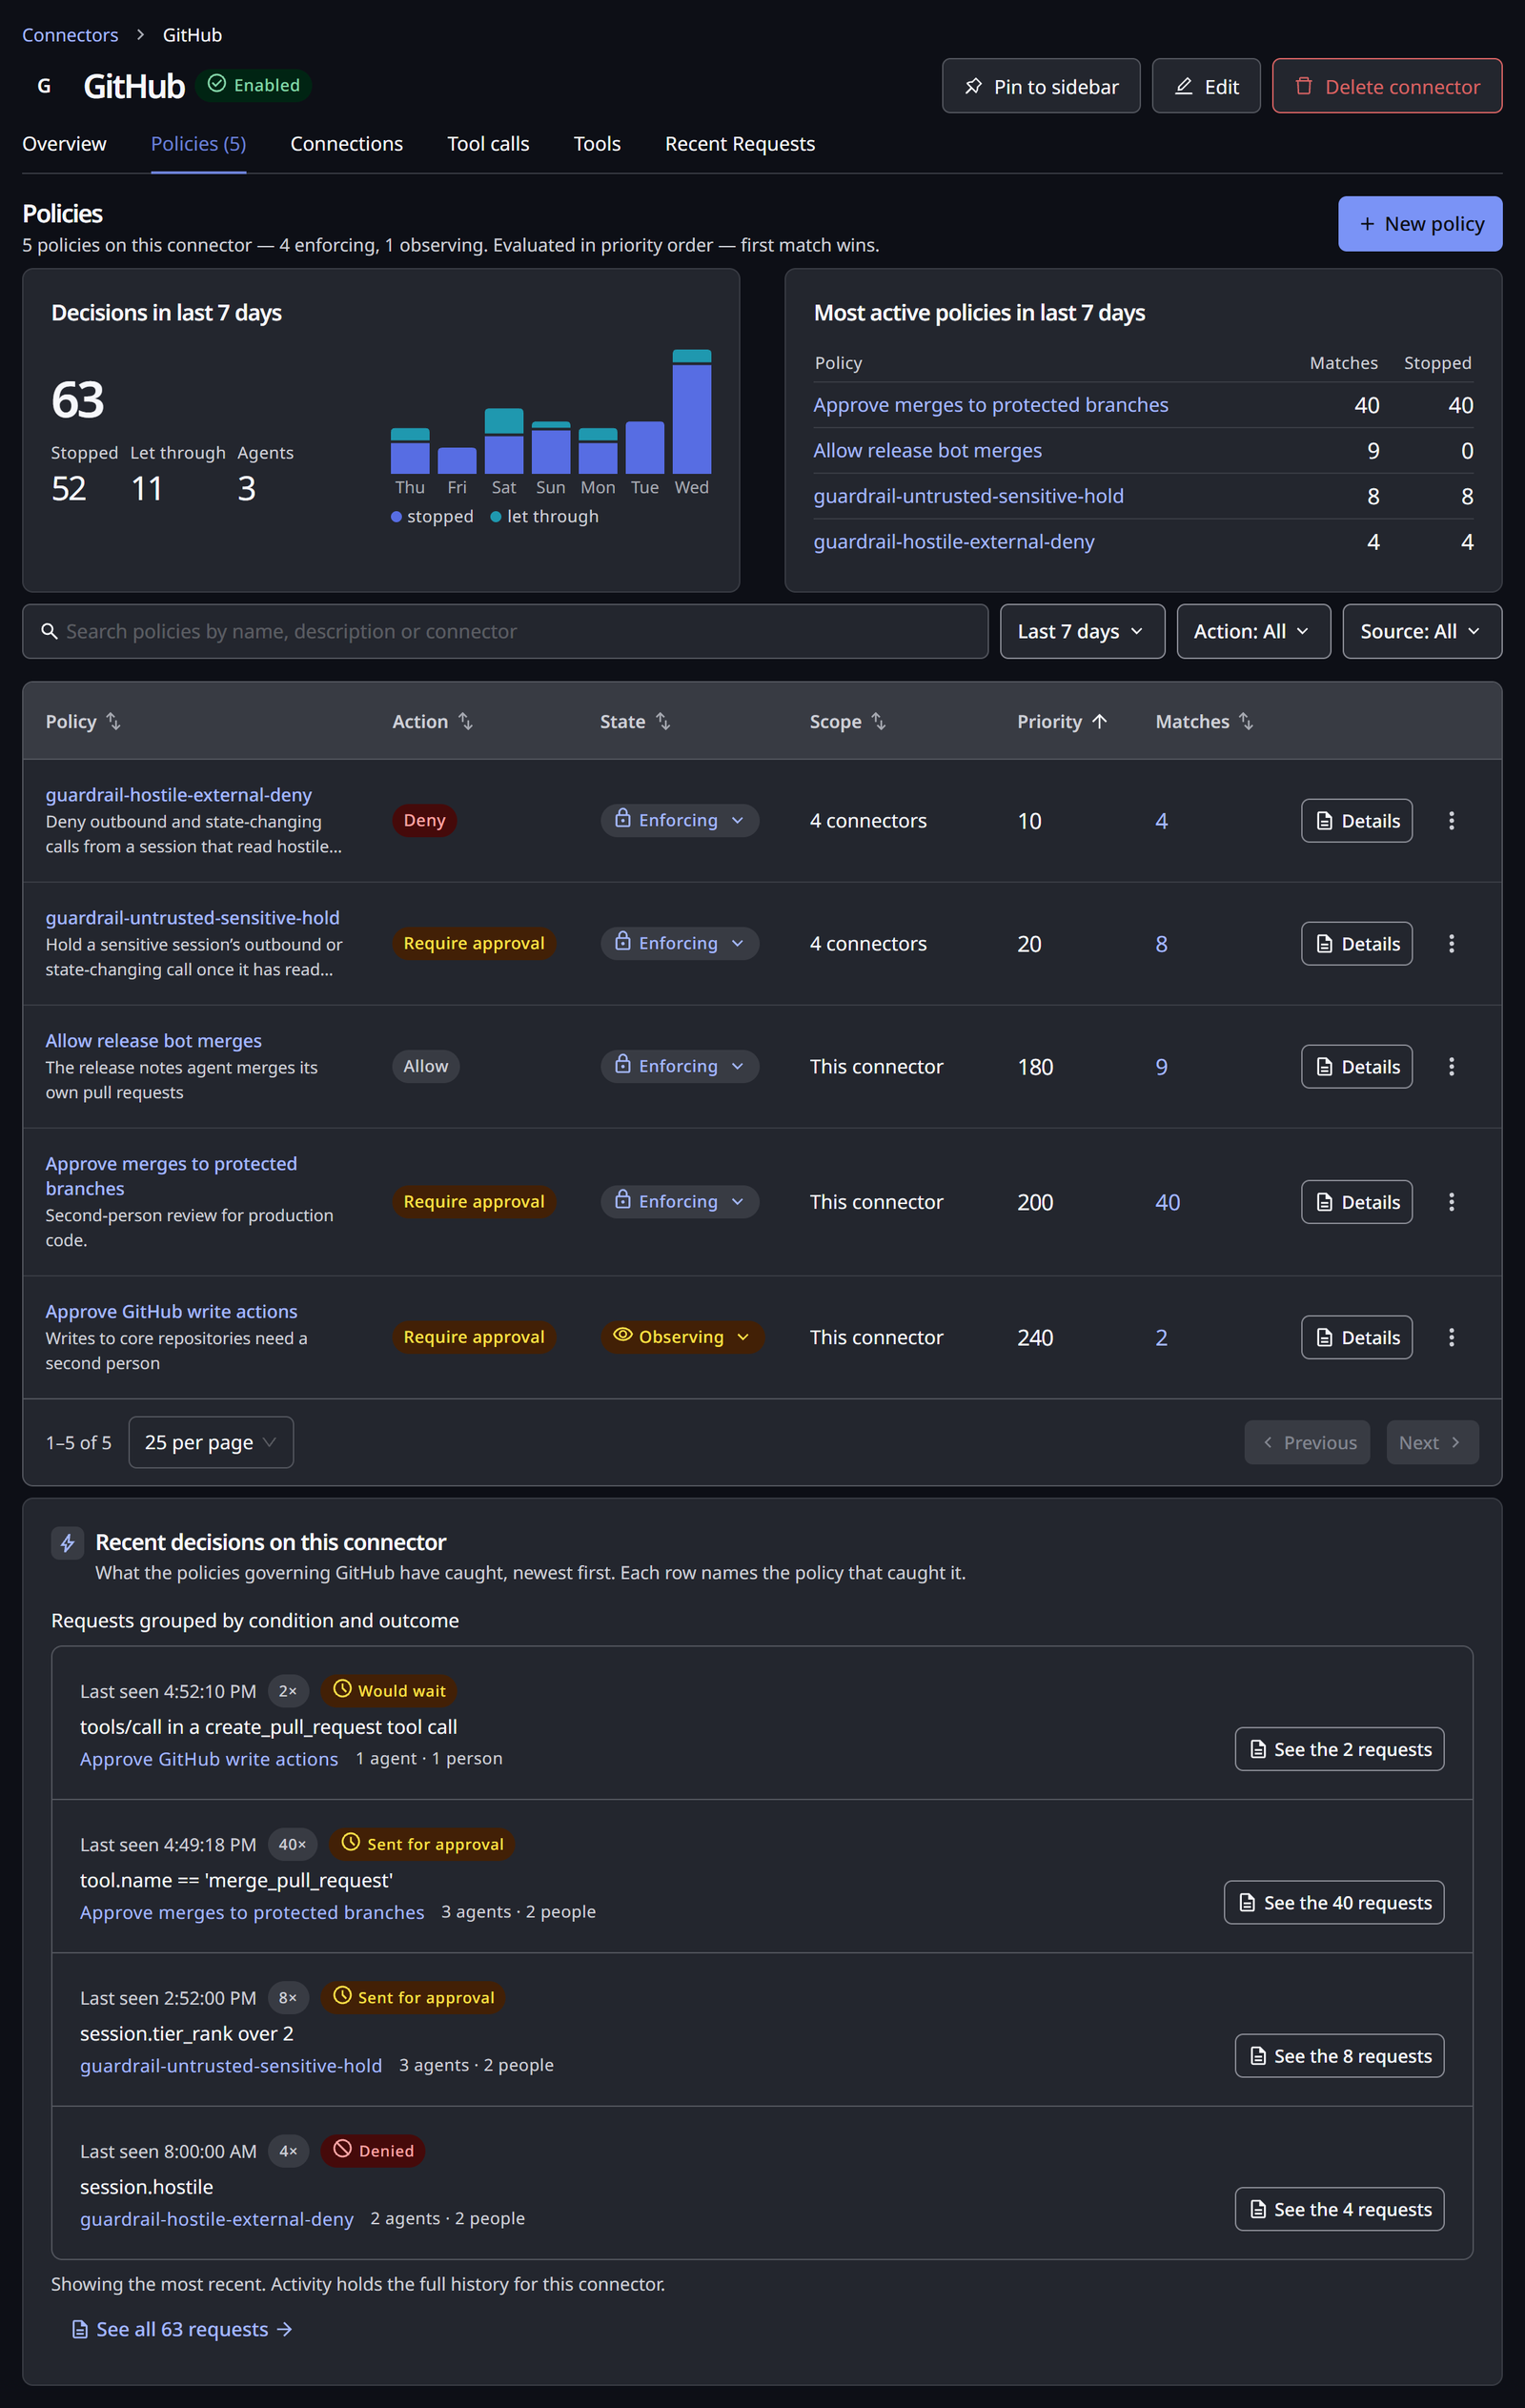
Every connector's detail page has a Policies tab listing every policy that governs it, with the count in the tab's name. Use it when your question is about one connector: what governs this provider's traffic, and what has it caught?
- New policy opens the wizard with this connector already chosen.
- The Scope column shows whether each policy covers This connector, several connectors, or All connectors.
- Each row has the same State badge as the main list, and a row menu with Edit and All decisions.
Under the list, Recent decisions on this connector shows what those policies most recently caught, grouped by condition and outcome. Each row names the policy that caught it. See Policy Decisions.
Related
- How Policies Are Evaluated — what each setting does to a live request
- Attribute Reference — every attribute a condition can test
- Policy Examples — the example conditions, the templates and more, each with its expression
- Policy Decisions — what your policies decided, and why