Requester Screen Text by Step
This page lists every screen a person being verified (the requester) can meet in a HYPR Affirm verification flow. For each screen it gives the default text, which parts your administrator can change and what information the screen collects. For the guided walkthrough with screenshots, see What the Requester Sees.
A flow shows only the steps an administrator enabled for it, in this order:
- Instructions and consent
- Login identifier
- Additional information (only when the flow needs a detail your directory record lacks)
- Phone number or email verification, then the one-time passcode
- Location
- Verified credential
- Document and biometric verification, then the optional results report
- Photo ID and liveness capture
- Chat and video with an approver
- Outcome
An administrator can also add custom steps after most of these steps.
How to Read This Page
Most text on these screens is admin-customizable. An administrator changes it per verification flow with an Affirm Studio kit or the Affirm Content Customization API. Any text left unchanged shows the HYPR default quoted here. Text marked fixed can't be changed.
Every screen also shows:
- Your organization's logo and background from Custom Branding, when Custom Branding is turned on for Affirm
- The browser tab title "HYPR Affirm" (fixed)
- Two optional footer captions, empty by default unless listed on this page
Where a default contains a line break or bold text, this page shows it as plain text.
Instructions
The first screen lists the steps ahead. The requester clicks Continue.
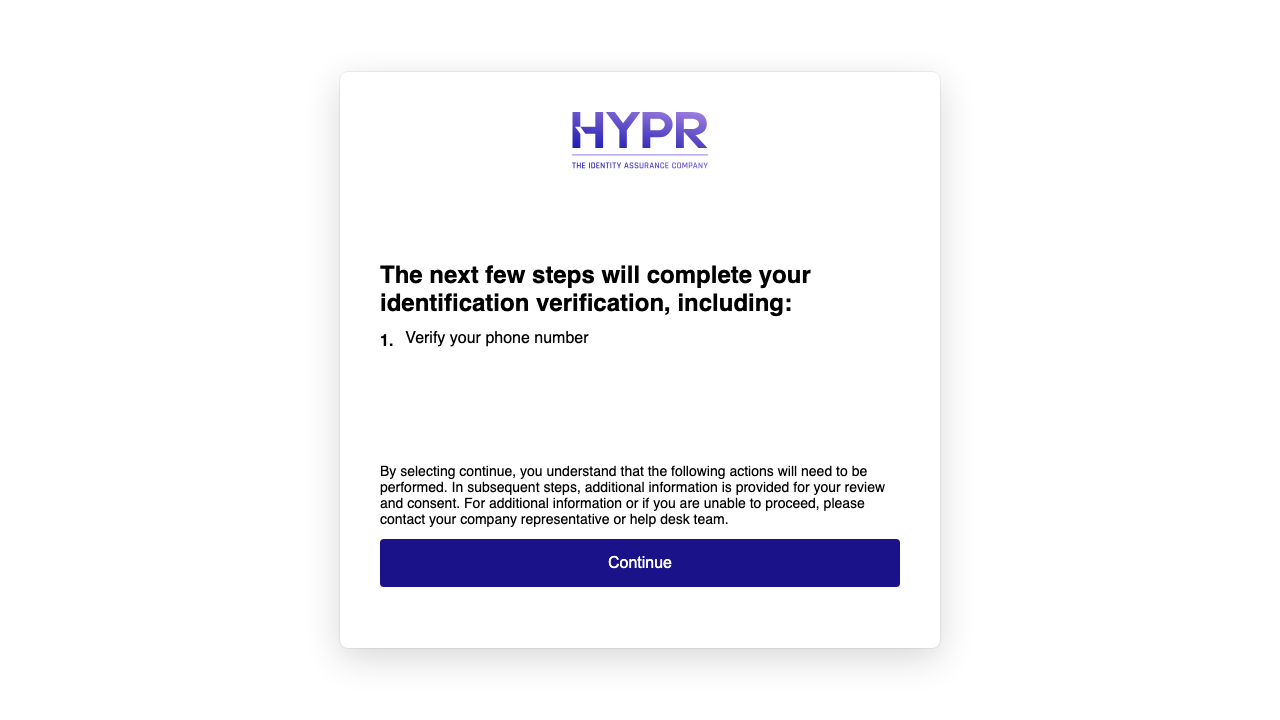
The following table lists the instructions screen text.
| Element | Default text | Customizable |
|---|---|---|
| Title | "The next few steps will complete your identification verification, including:" | Yes |
| Footer caption | "By selecting continue, you understand that the following actions will need to be performed. In subsequent steps, additional information is provided for your review and consent. For additional information or if you are unable to proceed, please contact your company representative or help desk team." | Yes |
| Button | "Continue" | Yes |
The numbered list shows one line for each enabled step. The following table gives each line's default text.
| Enabled step | Default line |
|---|---|
| Phone verification | "Verify your phone number" |
| Email verification | "Verify your email" |
| Phone or email verification | "Verify your phone number or email" |
| Location | "Verify your location" |
| Verified credential | "Verify your credential" |
| Document and biometric verification | "Verify your ID documentation" |
| Document and biometric verification with two documents | "Verify 2 of your ID documents" |
| Photo ID and liveness capture | "Verify your biometrics" |
| Chat and video | "Final video/chat" |
All the lines are customizable. Custom steps and the outcome aren't listed.
Information collected: none.
Consent
The consent screen shows the terms the requester must accept before any information is collected. The requester scrolls to the end of the text, then clicks Accept. The button stays disabled until the requester scrolls to the bottom. When the text fits without scrolling, the button is available at once. The screen has no decline button. A requester who doesn't agree closes the page.
The consent text combines any consent language your organization added, HYPR's consent notice and, for flows with Document and Biometric Verification, the document verification provider's terms. For how the screen is assembled and what an administrator can add, see Customizable Consent Screen. For which HYPR notice appears in which flow, see Biometric Data and the Privacy Notice.
The following table lists the consent screen text.
| Element | Default text | Customizable |
|---|---|---|
| Title and description | Empty | Yes |
| Organization consent text | None | Yes, per flow |
| HYPR and provider consent text | The published HYPR notice and, where it applies, the provider's terms | No |
| Button | "Accept" | Yes |
Information collected: Affirm records that the requester accepted the consent.
Login Identifier
The requester enters a username or email address and clicks Begin. Affirm looks the requester up in your organization's directory. When the requester opened a personal link, the field is already filled in. The administrator can lock it so it can't be edited, or skip the screen.
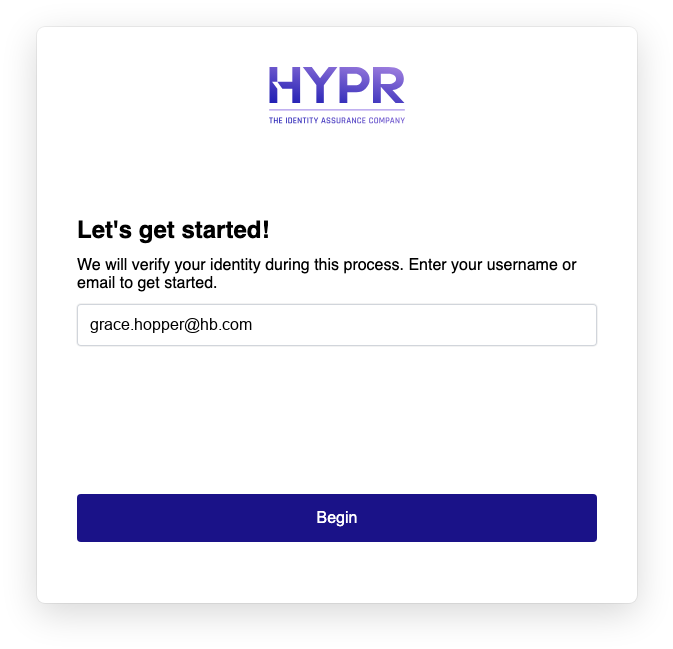
The following table lists the login identifier screen text.
| Element | Default text | Customizable |
|---|---|---|
| Title | "Let's get started!" | Yes |
| Description | "We will verify your identity during this process. Enter your username or email to get started." | Yes |
| Field placeholder | "Enter your username or email." | Yes |
| Button | "Begin" | Yes |
| Error when no matching user is found | "We could not find a user with the login identifier provided. Please contact your helpdesk for support" | Yes |
| Error when the identifier is changed after the flow started | "Login identifier cannot be changed once verification has started." | No |
The screen also shows an error when the directory record lacks something the flow needs, such as a phone number, an address, a first and last name or a manager. Administrators can set their own text for each of these cases.
Information collected: the username or email address.
Additional Information
This screen appears after the login identifier only when a document check needs a detail that isn't in the requester's directory record, such as the date of birth. The requester fills in the missing details and clicks Continue.
Information collected: the date of birth and address details the requester types.
Phone Number or Email Verification
This step confirms that the requester controls the phone number or email address in their directory record. The administrator chooses phone, email or a choice of either.
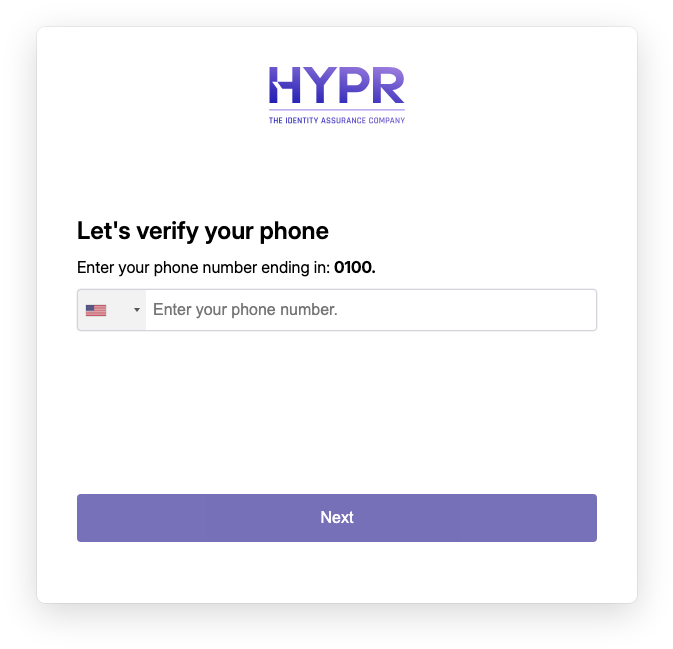
What the requester does depends on the option:
- Phone: The screen shows the last digits of the phone number on file. The requester picks a country code and types the full number. The number must match the record.
- Email: The requester clicks Next. The code goes to the email address on file, so nothing is typed.
- Phone or email: The requester selects Verify by phone or Verify by email first.
The following table lists the phone or email screen text.
| Element | Default text | Customizable |
|---|---|---|
| Title, phone | "Let's verify your phone" | Yes |
| Title, email | "Let's verify your email" | Yes |
| Title, phone or email | "Let's verify your phone or email" | Yes |
| Description, phone or email | "Please select your preferred method of contact for verification." | Yes |
| Phone hint | "Enter your phone number ending in:" followed by the last digits on file | Yes |
| Field placeholder | "Enter your phone number." | Yes |
| Choices | "Verify by phone" and "Verify by email" | Yes |
| Button | "Next" | Yes |
| Invalid number | "Please enter a valid phone number." | Yes |
| Number doesn't match the record | "The phone number provided did not match the one on file." | No |
Before Affirm sends a passcode, a notice appears above the field. The following table gives the default notice text.
| Channel | Default notice |
|---|---|
| Phone | "By entering your phone number and clicking Next you consent to receive a one-time verification code from HYPR. Message and data rates may apply. You can reply HELP or contact [support email]. For more information see Terms and Conditions and Privacy Policy." |
| "By clicking Next you consent to receive a one-time verification code via Email from HYPR. For more information see Terms and Conditions and Privacy Policy." |
Both notices are customizable. Terms and Conditions and Privacy Policy link to HYPR's published terms and privacy policy. The support email comes from Custom Branding.
Information collected: the phone number and country code the requester types, when phone is used.
One-Time Passcode
Affirm sends a six-digit code by text message or email. The requester types it into six boxes. The code submits automatically after the sixth digit, or when the requester clicks Verify. On success, the requester clicks Next.
The following table lists the passcode screen text.
| Element | Default text | Customizable |
|---|---|---|
| Title, text message | "Check your text messages" | Yes |
| Title, email | "Check your email" | Yes |
| Instructions, text message | "Enter the code sent to your phone number ending in:" followed by the masked number | Yes |
| Instructions, email | "Enter the code sent to your email address:" followed by the masked address | Yes |
| Buttons | "Verify", then "Next" | Yes |
| Invalid entry | "Please enter a valid 6-digit verification code." | Yes |
| Wrong code, title | "Code mismatch" | Yes |
| Wrong code, description | "The code you entered does not match the one sent to you." | Yes |
| Wrong code, button | "Resend" | Yes |
| Code not sent, title | "Send issue" | Yes |
| Code not sent, text message | "Could not send an sms message to your phone number." followed by the masked number | Yes |
| Code not sent, email | "Could not send an email to your email address." followed by the masked address | Yes |
| Success title | "Phone verified" or "Email verified" | Yes |
| Success description | "Your phone has been verified. Please proceed with your verification process by clicking Next." (or "Your email has been verified…") | Yes |
For the text of the passcode message itself, see SMS Notification Branding and Email Notification Customization.
Information collected: the code the requester types.
Location
Affirm asks the browser for the device's location and checks it against the flow's location rules. The browser shows its own permission prompt. When the check passes, the requester clicks Next.
If the requester blocks location access, or the check fails, two buttons appear:
- Proceed with IP location continues using only the location of the requester's internet connection.
- Retry check asks the browser again. It stays disabled while the browser blocks location access, until the requester allows access in the browser settings.
The following table lists the location screen text.
| Element | Default text | Customizable |
|---|---|---|
| Checking, title | "Checking your location" | Yes |
| Checking, description | "Please accept sharing your location, so we can verify you are coming from a trusted area." | Yes |
| Submitting, title | "Verifying your location" | Yes |
| Submitting, description | "Please wait while we verify your location." | Yes |
| Success, title | "Location verified" | Yes |
| Success, description | "Your location has been verified. Please proceed with your verification process by clicking Next." | Yes |
| Access blocked, title | "Unable to access your location" | Yes |
| Access blocked, description | "You may proceed without granting location access but it may impact our ability to successfully verify your identity." | Yes |
| Check failed, title | "Unable to verify your location" | Yes |
| Check failed, description | "You can re-attempt verification or skip this check. Skipping the location check may impact our ability to successfully verify your identity." | Yes |
| Caption when access is blocked | "Location access is required. Enable it in your browser settings to continue with verification." | Yes |
| Caption when the request times out | "Location request timed out. Please try again." | Yes |
| Buttons | "Next", "Proceed with IP location" and "Retry check" | Yes |
The success screen also shows the location Affirm determined.
Information collected: the device's latitude and longitude when the requester allows access, and the internet (IP) address of the connection. Affirm compares them with the address in the directory record and the flow's allowed countries and networks. See Location.
Verified Credential
The requester proves an existing digital credential with the Microsoft Authenticator app. The screen shows a QR code while it waits. On a phone, a link to open the wallet directly also appears. When the credential is accepted, the requester clicks Continue.
The following table lists the verified credential screen text.
| Element | Default text | Customizable |
|---|---|---|
| Title | "Verify your identity" | Yes |
| Description | "Use your Microsoft Authenticator app to scan the QR code and verify your credential." | Yes |
| Instructions | "1. Open the Microsoft Authenticator on your phone and tap "Verified IDs"." / "2. Scan the QR code above." / "3. Follow the prompts to verify your credential." | Yes |
| Phone link | "or use" "this link" | Yes |
| While the code loads | "Generating QR code..." | No |
| Success | "Verification successful" / "Your credential has been successfully verified." | Yes |
| Presentation error | "Verification error" / "An error occurred during the verification process. Please try again." | Yes |
| Setup error | "Verification failed" / "We encountered an issue while setting up your verified credential verification. Please review the error details below and try again." | Yes |
| Timeout after five minutes | "Verification timeout" / "The verification process has timed out. Please try again." | Yes |
| Retry button | "Try Again" | No |
| Continue button | "Continue" | Yes |
Information collected: the credential the requester chooses to present from their wallet.
Document and Biometric Verification
The requester photographs a government-issued ID and takes a selfie. The capture screens are provided by HYPR's document verification provider and appear inside the Affirm page. Their wording comes from the provider. An administrator can change their fonts and colors with an Affirm Studio kit but not their text.
The provider's screens ask the requester to:
- Choose the issuing country and document type. A document type restriction skips the country choice and narrows or fixes the document type.
- Capture the front of the document, and the back when the document type needs it.
- Take a selfie, if the flow compares a live photo with the document. When Motion Detection is enabled, the requester records a short video while moving their head as instructed.
When the flow checks two documents, the requester captures both documents first and takes one selfie at the end. The requester can finish the capture on a phone by scanning a QR code or using a link from the provider's screens.
After the capture, Affirm shows a waiting screen until the results arrive. If the check fails, a notice appears and the flow moves on after a few seconds.
The following table lists the Affirm text around the provider's screens.
| Element | Default text | Customizable |
|---|---|---|
| Waiting, title | "Checking your details" | Yes |
| Waiting, description | "Please wait while we review your information. You'll continue with the next steps shortly." | Yes |
| Waiting, unsuccessful notice | "Please wait while we determine the next step. You may be prompted to try again!" | Yes |
| Error if the capture can't be submitted | "An error has occurred. Please contact your helpdesk for further support." | Yes |
Information collected: images of the ID document (front and, where needed, back), a selfie photo or short selfie video and the details read from the document. The provider checks the document's authenticity and compares the selfie with the document photo. Affirm compares the name on the document with the directory record. When the administrator enabled them, the details are also screened against sanctions and watchlists and checked with the document issuer. See KYC Compliance Checks.
Identity Verification Results
When the administrator turned on report visibility for the requester, a results screen follows the document check. It shows the date, the requester's name and a pass or fail line for each check that ran. The requester clicks Next.
The following table lists the main results screen text.
| Element | Default text | Customizable |
|---|---|---|
| Title | "Identity verification results" | Yes |
| Labels | "Date:", "Requester:", then one section per step, such as "Phone number & OTP verification", "Location" and "Document and biometric verification" | Yes |
| Button | "Next" | Yes |
Each check line reads, for example, "Document authenticity: Verified" or "Face match confidence: High". All labels and values are customizable.
Photo ID and Liveness Capture
The requester provides a photo of an ID with their face on it, then takes a live selfie. Affirm compares the two faces. This step runs on Affirm's own screens.
Information collected: an image of the ID and a still selfie photo from the camera. Affirm extracts the face from the ID and compares it with the selfie. The two face images are shown to the approver. With Directory Image Writeback turned on, the images are also written to the directory.
Photo of the ID
On a computer, the requester clicks Upload and picks an image file. On a phone, the requester clicks Capture and photographs the ID with the camera, guided by hints on the screen. The requester checks the image, then clicks Upload to submit it or Redo to start again. Files larger than 10MB are rejected.
The following table lists the ID photo screen text.
| Element | Default text | Customizable |
|---|---|---|
| Title, computer | "Upload photo document" | Yes |
| Description, computer | "Upload a photo of your government-issued ID with your face clearly visible. After we verify your document and extract your face, you can continue." | Yes |
| Tips, computer | "Document upload tips:" "Ensure your document photo is well lit and is perpendicular or parallel to the bottom of your phone." | Yes |
| Title, phone | "Capture your ID" | Yes |
| Description, phone | "Take a clear photo of your ID with your face visible. Hold your phone steady, avoid glare, and keep the full document in the frame." | Yes |
| Review, title | "Check your image" | Yes |
| Review, description | "Make sure your document is visible and unobstructed." | Yes |
| Accepted, title | "Take a selfie" | Yes |
| Accepted, description | "We will compare this with your document." | Yes |
| Face not found, title | "There was an issue" | Yes |
| Face not found, description | "We couldn't extract your face from that photo." | Yes |
| File too large | "File too large" / "The file you want to upload is too large." | Yes |
| Buttons | "Upload", "Capture", "Redo" and "Next" | Yes |
Live Selfie
The requester clicks Enable camera and allows camera access in the browser. The requester centers their face in the outline and presses the shutter. Affirm checks in the browser that a face is in view before it takes the photo. It then compares the selfie with the face from the ID.
The following table lists the selfie screen text.
| Element | Default text | Customizable |
|---|---|---|
| Camera, title | "Allow camera access" | Yes |
| Camera, description | "Please enable camera access to continue. The selfie upload is mandatory to complete this process." | Yes |
| Positioning hint | "Position your face in the outline. Move closer or adjust lighting if needed." | Yes |
| Other positioning hints | "No face detected yet. Look at the camera and check your lighting.", "Center your full face in the outline.", "Move a little closer so your face fills the outline.", "Center your face within the outline." and "Move further away so your face fits within the outline." | No |
| No face after about 10 seconds | "Unable to detect face" / "Please make sure your face is properly positioned and the area is well lit." | Yes |
| Comparing | "Verifying your selfie" / "Your photo was captured. Please wait while we compare it to your document." | Yes |
| Match | "Thank you!" / "That is all we need to verify your document photo." | Yes |
| No match | "These faces do not match." / "The recorded face does not match the uploaded document." | Yes |
| Error | "There was an error." / "An error occurred." | Yes |
| Buttons | "Enable camera", "Retry" and "Next" | Yes |
On the last allowed attempt, the Retry button reads Next and the flow moves on.
Liveness-Only With an Anchor Image
When the flow uses an anchor image from the directory, the ID photo screen is skipped. The requester goes straight to the live selfie, which is compared with the stored image. See Liveness-Only (Anchor Image).
Custom Step
A custom step is a screen your organization builds and HYPR runs inside the Affirm page. Its text, buttons and the information it collects are defined by your organization. The Affirm header and footer captions still apply. See Custom Verification Step.
Chat and Video With an Approver
The requester joins a text chat with an approver. The same screen appears when a flow escalates the requester to live chat. See Escalate to Live Chat.
The chat screen works as follows:
- The requester types messages in the Type your message here field and sends them with the send button.
- Either person can start video with the camera button. The other person sees "has entered the video chat. Click here to join" and chooses whether to join.
- The Continue button appears once the approver finishes the chat.
The following table lists the chat screen text. None of it is customizable.
| Element | Text |
|---|---|
| Heading | "You are now in a chat with the approver." |
| While connecting | "Waiting to join conversation..." |
| First automated message | "Getting there" and the requester's name with a rocket emoji, then "We have contacted the listed approver via SMS and email to join the chat and complete the verification process." "The approver's email is:" followed by the approver's email address, then "Please wait for them to join..." |
| Second automated message | "After the verification process is complete the continue button will become active." |
| Approver joins | The approver's login identifier followed by "(A) has joined the chat" and an exclamation emoji |
| Approver leaves | The approver's login identifier followed by "has left the chat for further approval process, the continue button will appear once the approval process has been completed" and an exclamation emoji |
| Video invitation | The other person's name followed by "has entered the video chat. Click here to join" |
| Button | "Continue" |
| No approver joined in time | "The maximum amount of time has passed and an approver has not joined." "Please contact Support." |
Information collected: the chat messages and, when the requester turns the camera on, live video and audio from the requester's camera and microphone. The automated messages show the requester the approver's email address, and show both people the approver's login identifier.
Waiting for a Decision
After the last step, the requester waits while Affirm and any approver finish. The requester should keep the page open.
The following table lists the waiting screen text.
| Element | Default text | Customizable |
|---|---|---|
| Title | "Almost done!" | Yes |
| Description | "Verifying your information takes a few minutes. Avoid closing or refreshing your browser. We will notify you as soon as the process is complete. Thank you for your patience." | Yes |
| Approver didn't act in time | "Your assigned approver did not take action within the required time. Please restart the flow." | Yes |
Outcome Screens
The outcome depends on what the administrator configured. See Verified Outcome and Unverified Outcome.
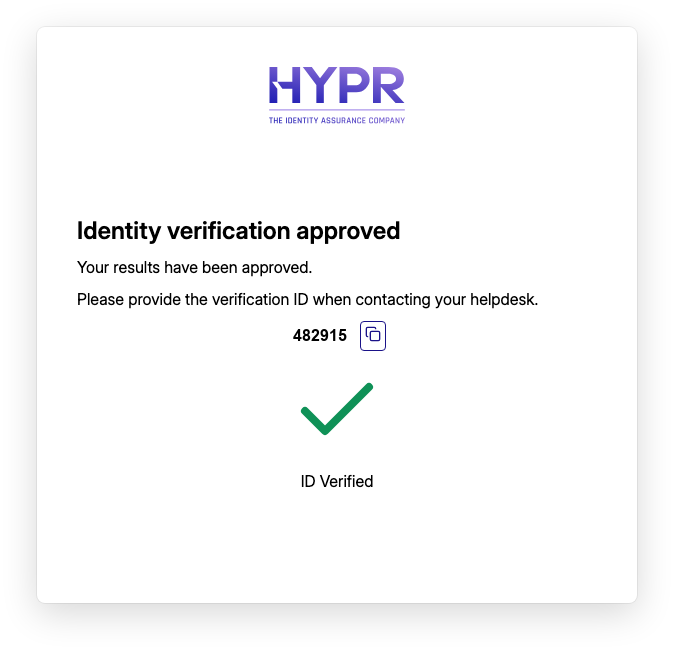
Outcomes are of two kinds:
- Redirect outcomes send the requester straight on, for example to Device Manager, an Okta password reset page or your own URL.
- Message outcomes show one of the screens in the following table.
The following table lists the outcome screen text.
| Outcome | Default text | Customizable |
|---|---|---|
| Approved | "Identity verification approved" / "Your results have been approved." with a check mark and "ID Verified" | Yes |
| Denied | "Identity verification denied" / "Your results have been denied." | Yes |
| Verification ID shown | "Please provide the verification ID when contacting your helpdesk." with the ID and a copy button | Yes |
| Verification ID copied | "The verification ID was copied to the clipboard." | Yes |
| Microsoft Entra ID Temporary Access Pass | "Your Entra ID TAP (Temporary Access Pass) is:" followed by the pass | Yes |
| Microsoft Entra Verified ID issued | "Your results have been approved. Please scan the QR code below to continue issuing your Verifiable Credential." then "You have successfully added the Verifiable Credential to your wallet!" | Yes |
| Custom message | The text your organization set | Yes |
When a verification from a shared flow link is denied and no verification ID is shown, the page returns to the start of the flow after about 10 seconds.
The following table lists the outcome error text.
| Situation | Default text | Customizable |
|---|---|---|
| General error | "An error has occurred. Please contact your helpdesk for further support." | Yes |
| Temporary Access Pass not created | "We could not generate your Entra ID TAP (Temporary Access Pass). Please contact your helpdesk for further support." | Yes |
| Okta reset link not created | "We could not generate your Okta password reset url. Please contact your helpdesk for further support." | Yes |
| Custom outcome failed | "Your outcome could not be generated due to an error. Please contact your helpdesk for further support." | Yes |
When a Step Fails
Each step has a retry limit and a failure outcome set by the administrator. See Injectable Outcomes and Retry Limits. Once the retries are used up, one of the following screens appears. None of their text is customizable.
The following table lists the step failure screens.
| Failure outcome | Title | Description |
|---|---|---|
| Continue to the next step | "Verification Unsuccessful" | "We are unable to verify your" followed by the step, such as "phone number", "location", "ID documentation" or "biometrics", then "You will be taken to the next step momentarily." |
| Deny | "Identity Verification Denied" | None |
| Workflow attempt limit reached | "Identity Verification Denied" | "You have reached the maximum number of attempts to complete this workflow. Please try again later." |
| Redirect | "Identity Verification Denied" | "You will now be taken to an external site for further verification" with a Redirect Now button |
The continue screen moves on after about five seconds and shows a Continue button if it doesn't. The redirect screen moves on after about five seconds.
Errors and Invalid Links
The following table lists the error screens a requester can meet. None of their text is customizable.
| Situation | Title | Message |
|---|---|---|
| Link expired or incorrect | "Invalid Link" | "The link is expired or otherwise incorrect." |
| Too many requests | "Too Many Requests" | "The service is at capacity. Please try again in 30 minutes." |
| Temporary server problem | "Something went wrong" | "Please try again in a few minutes." |
| Other error | "Error" | "We encountered an unexpected error while processing your request. Please try again, or contact support if the problem persists." |
| Flow not enabled | "Invalid configuration" | "The Affirm workflow has not been enabled for your account." "To use Affirm identity verification services, the associated workflow must be properly configured and activated by your system administrator." |
Some error screens include a Go Home button that returns to the start of the flow.
Leaving the Flow
If the requester closes the tab or window before the end, Affirm records the verification as abandoned.