Configuring Injectable Outcomes & Retry Limits
Each HYPR Affirm verification step that supports these settings has a retry limit and a failure outcome: how many attempts the requester gets, and what happens when the requester reaches the limit without passing the step. This page shows administrators how to set both in the flow editor, how they work with the flow-level retry limit and block duration, and which screens the requester sees. It is the reference for retry and failure-outcome behavior; each step's page lists that step's defaults and links here.
When your tenant uses the Affirm Risk Policy Builder, the assigned Policy Evaluation Kit sets this behavior instead. The step cards then show Retry limits and failure outcomes are configured through risk policies when the Policy Engine is enabled.
Overview
A step that passes moves the requester to the next step. A step that fails returns the requester to the same step while attempts remain. When the requester reaches the step's retry limit without passing, the step's failure outcome applies: Deny Verification, Redirect to URL or Continue Workflow, optionally with Escalate to Live Chat.
The failure outcome is the only step-level outcome. What happens at the end of the flow, after the approver or HYPR (automated approval) decides, is set by the flow's Verified Outcome and Unverified Outcome.
Before HYPR 10.3.0, Affirm workflows defined outcomes only at the workflow level. Injectable Outcomes adds a failure outcome to each step, so the response can depend on which step failed.
Key Benefits
Step-level failure outcomes offer the following benefits:
- Step-level failure handling: Choose what happens when each step fails: Deny Verification, Redirect to URL or Continue Workflow, with optional Escalate to Live Chat
- Retry limits per step: Set the number of attempts and the retry window for each step
- Targeted responses: Respond to the step that failed rather than applying one workflow-wide response
Supported Verification Steps
Retry limits and failure outcomes are available for the verification steps in the following table.
| Step | Covers |
|---|---|
| Phone Number / Email Verification | Phone number check and the optional one-time code sent by SMS or email |
| Location | IP-based location checks and geographic location validation |
| Verified Credential | Verified ID credential presentation from Microsoft Authenticator |
| Document and Biometric Verification | Document verification and identity document validation |
| Photo ID and Liveness Capture | Photo ID capture, selfie liveness detection and comparison of the selfie with the photo ID or anchor image |
| Custom steps | Organization-specific verification steps registered through the Code Customization API |
Prerequisites
Before you configure these settings, make sure you have the following:
- HYPR Control Center access with Affirm administration permissions
- HYPR 10.3.0 or later
- Understanding of Affirm workflow configuration
- Knowledge of your organization's security policies and retry requirements
Configuration Process
Access the Workflow Configuration
-
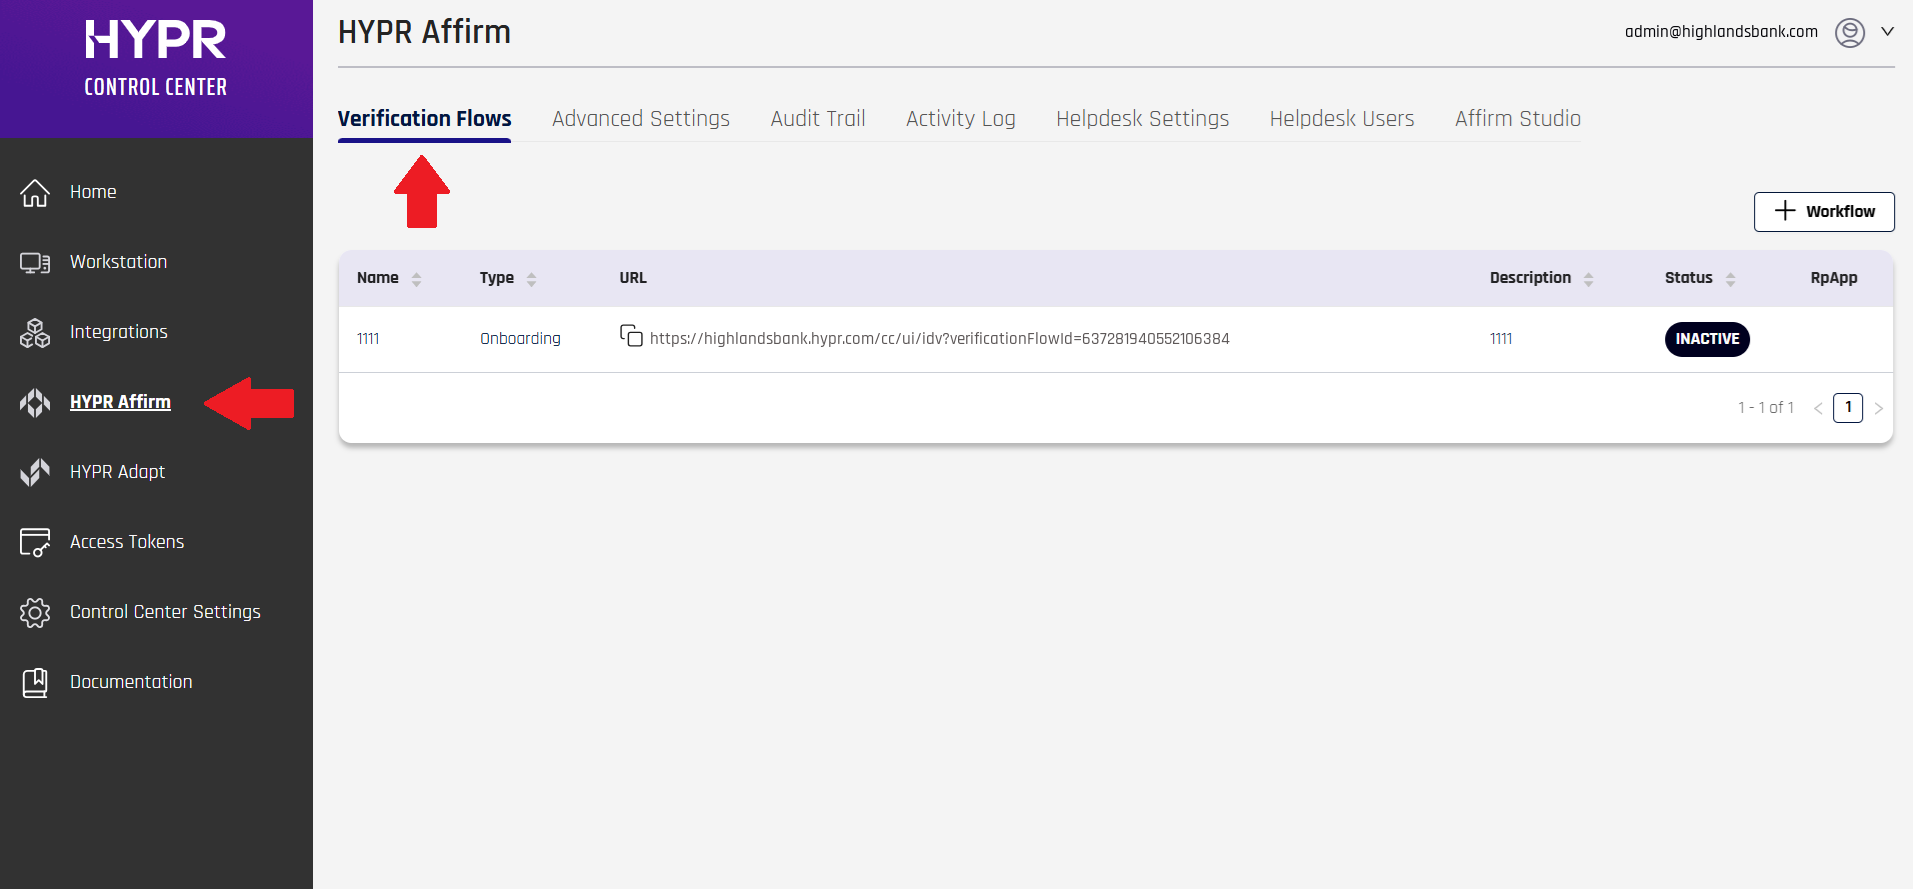
Go to HYPR Affirm > Verification Flows.
-
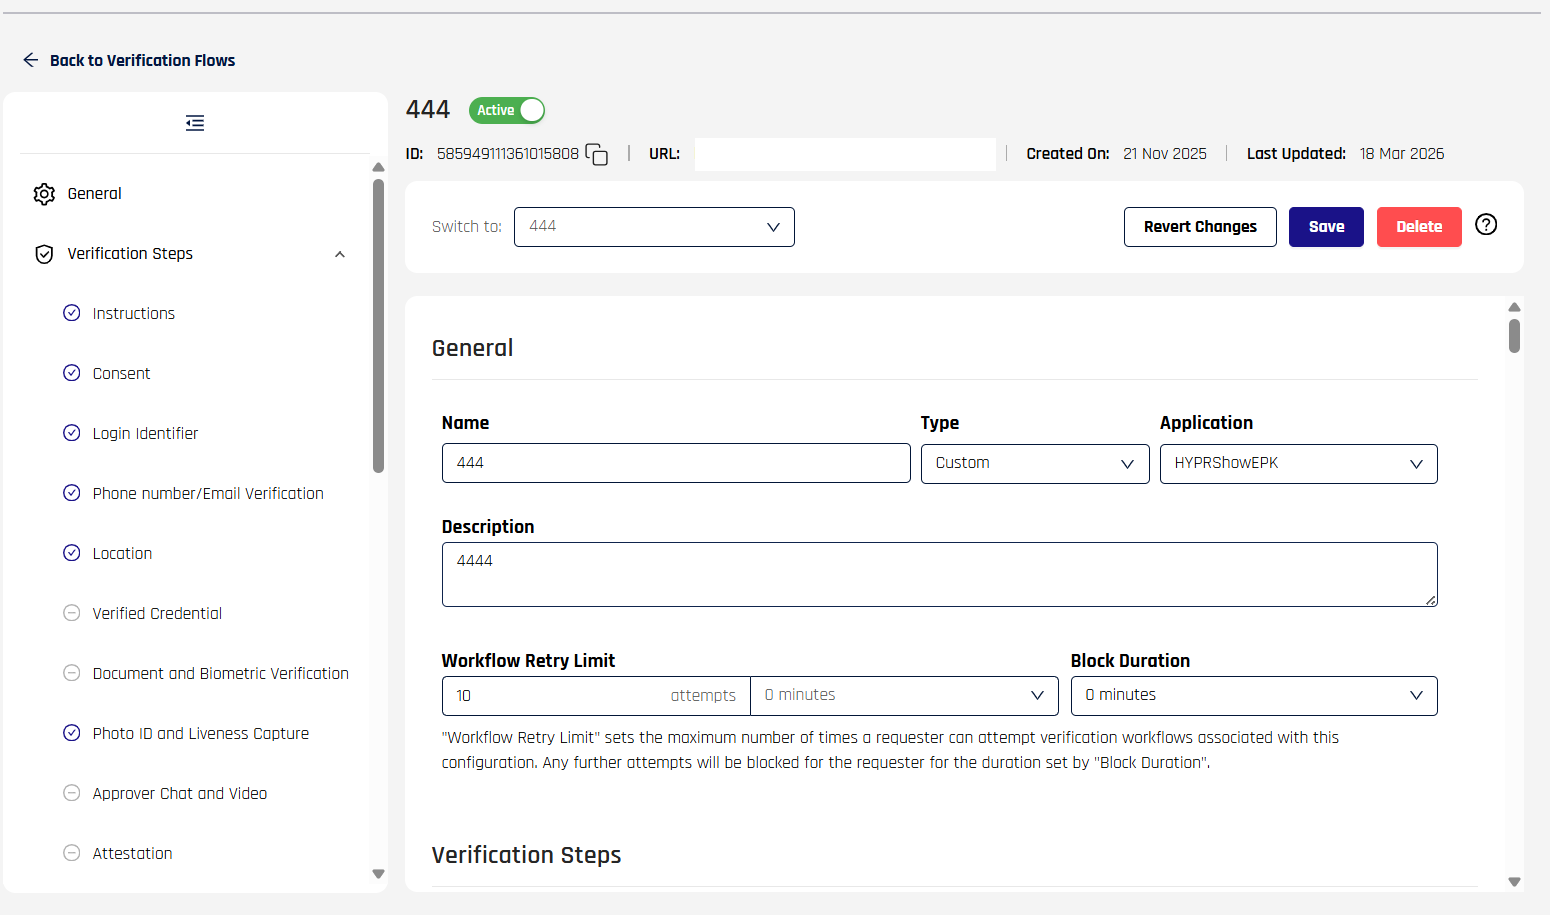
Click the row of the workflow you want to configure. The workflow editor opens with the General tab in view and a left sidebar listing every configurable section.
-
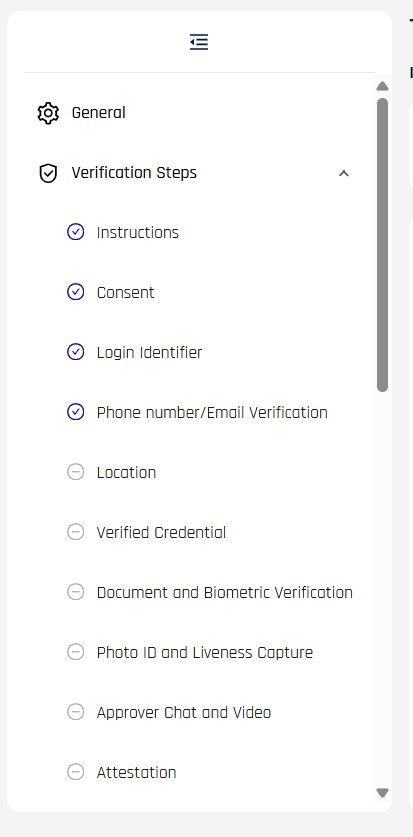
In the left sidebar, click Verification Steps to jump to that section.
-
Find the card of the step you want to configure. If the step is off, turn it on with the switch at the upper right of the card. The step's settings, including Retry Limit and Failure Outcome, appear on the card.
-
Set the retry and failure-outcome settings described in the following sections.
-
Click Save at the top right of the flow editor.
Configure Step-Level Outcomes
For each supported verification step, you can configure the following settings.
Retry Settings
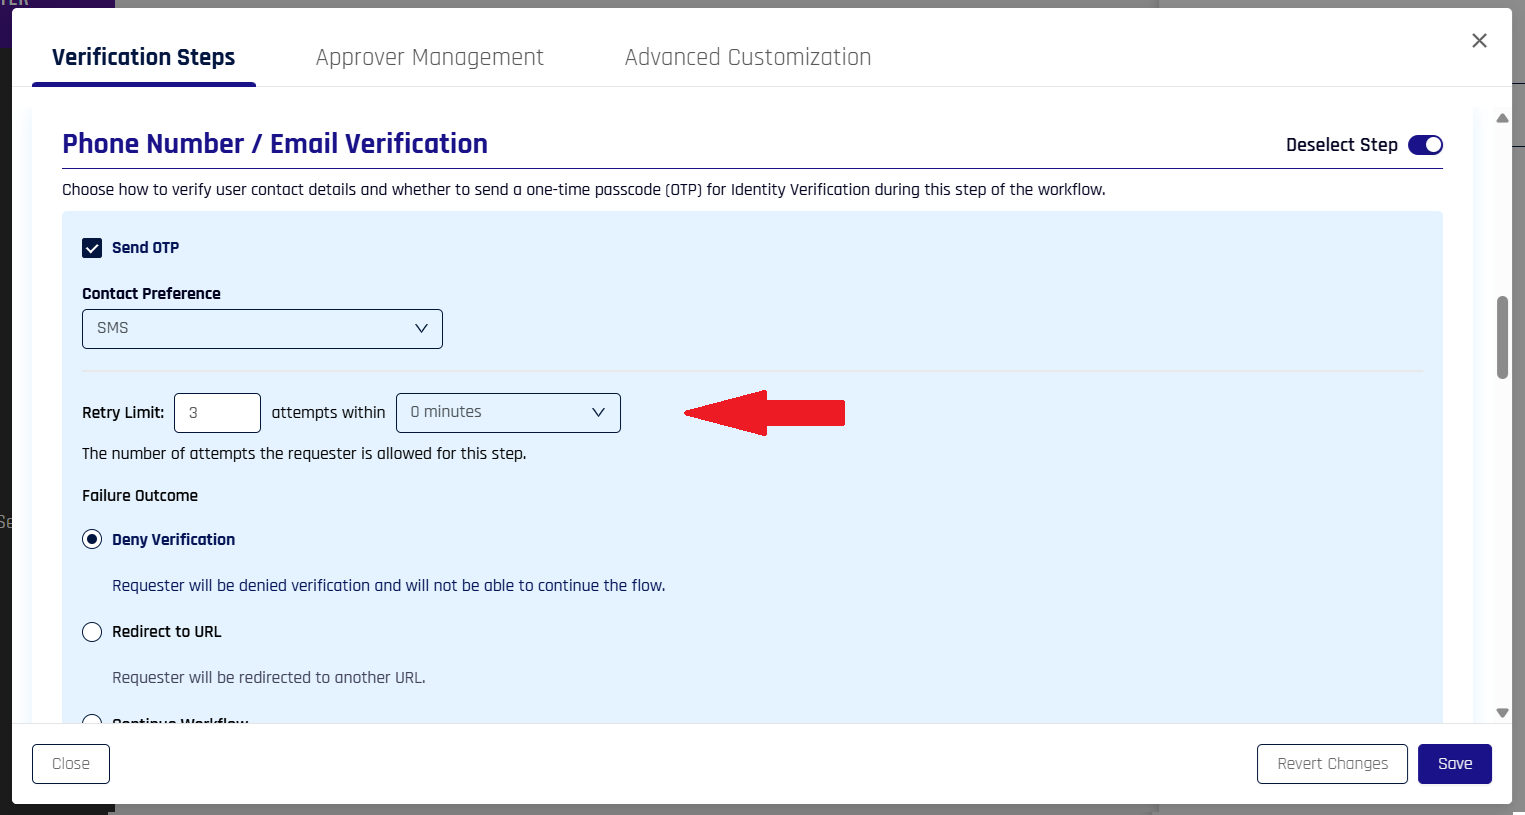
Each step has two retry settings:
- Retry Limit: Set the number of attempts, from 1 to 10. The default is 3, and 1 for Document and Biometric Verification.
- Retry Window: Set the time window for retries, from 0 to 60 minutes in 5-minute intervals. The default is 0 minutes.
The card reads Retry Limit: [n] attempts within [window] and The number of attempts the requester is allowed for this step. While attempts remain, a failed attempt returns the requester to the same step to try again.
Failure Outcome Types
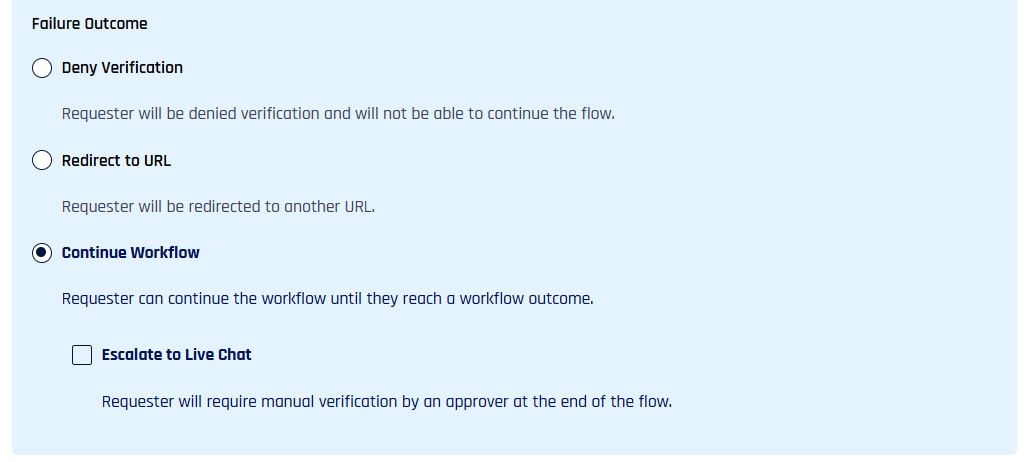
Choose one of the following outcomes for when a step reaches the retry limit. The default is Deny Verification for Phone Number / Email Verification and Continue Workflow for the other steps.
Deny Verification
- Use Case: High-security scenarios
- Behavior: The requester cannot continue the workflow. The card reads Requester will be denied verification and will not be able to continue the flow.
Redirect to URL
- Use Case: Alternative verification methods
- Behavior: The requester is redirected to the URL you enter in the field that appears when you select Redirect to URL (Requester will be redirected to another URL.)
- Configuration: Set a static URL, or use a dynamic URL supplied at runtime. For a dynamic URL, enter
DYNAMICas the Redirect URL; see Dynamic Redirect URLs.
Continue Workflow (No Escalation)
- Use Case: Low-risk scenarios
- Behavior: The requester can continue despite the step failure (Requester can continue the workflow until they reach a workflow outcome.). Select Continue Workflow and leave Escalate to Live Chat cleared.
- Result: The step is recorded as failed. HYPR (automated approval) approves only when every step passed, so with automated approval the flow ends in the Unverified Outcome. A human approver sees the result and decides.
Continue Workflow (Escalate to Live Chat)
- Use Case: Scenarios requiring human oversight
- Behavior: The requester can continue but needs manual verification. Select Continue Workflow, then select Escalate to Live Chat (Requester will require manual verification by an approver at the end of the flow.). The flow-level Escalate to Live Chat step must also be on.
- Result: Live chat escalation at the end of the flow
Configure Global Settings
Workflow Retry Limit and Block Duration
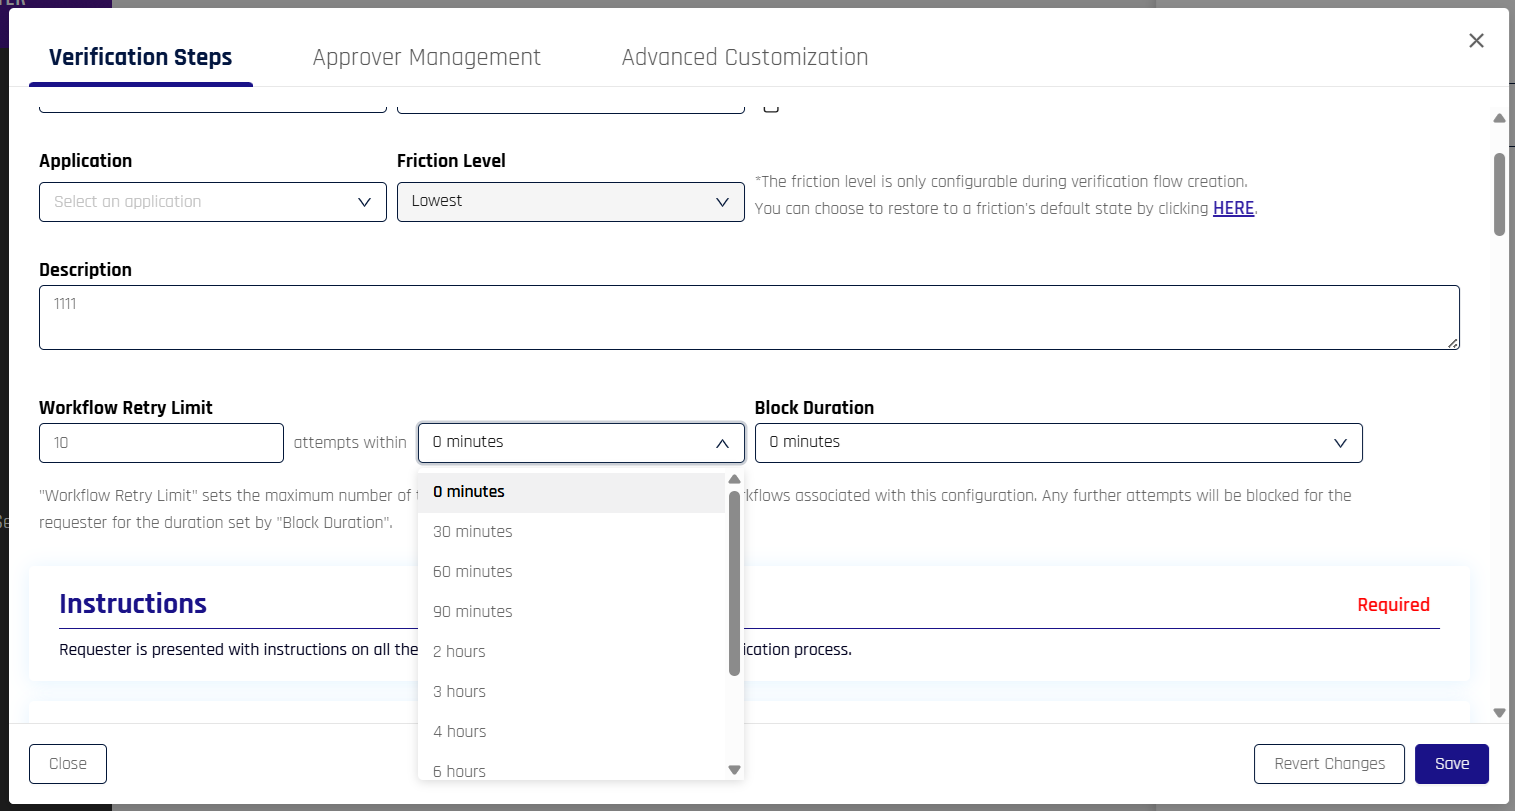
On the General tab of the flow editor, Workflow Retry Limit caps how many times a requester can attempt the whole flow within a time window, and Block Duration sets how long Affirm then blocks the requester. For the field values and defaults, see Workflow Retry Limits.
Every verification that ends without a successful result counts as an attempt, and a successful verification resets the count. Affirm counts attempts per requester and flow. When a requester starts the flow again after reaching the limit within the window, Affirm shows Identity Verification Denied with "You have reached the maximum number of attempts to complete this workflow. Please try again later." The requester stays blocked for the block duration. An administrator can lift the block early through the Affirm API unblock request, which takes the requester's login identifier and the verification flow ID.
The block duration options are 0, 30, 60 and 90 minutes and 2, 3, 4, 6, 12, 18 and 24 hours. For example:
- 0 minutes: no blocks for users
- 30 minutes: short-term blocks for minor issues
- 60 minutes or 90 minutes: longer blocks for failed attempts
- 24 hours: extended blocks for repeated failures of high-security workflows
Live Chat Escalation (Optional)
To enable escalation, turn on the Escalate to Live Chat step, then select Escalate to Live Chat under Continue Workflow on each step that should escalate. See Escalate to Live Chat.

Configuration Examples
The following examples show step settings together with the flow-level retry limit and block duration, which apply to the whole flow rather than to one step.
High-Security Workflow
On the General tab, set Workflow Retry Limit to 3 attempts within 24 hours and Block Duration to 24 hours.
| Step | Retry Limit | Retry Window | Failure Outcome |
|---|---|---|---|
| Phone Number / Email Verification | 2 | 15 minutes | Deny Verification |
| Location | 1 | 5 minutes | Deny Verification |
| Document and Biometric Verification | 3 | 30 minutes | Continue Workflow with Escalate to Live Chat |
User-Friendly Workflow
| Step | Retry Limit | Retry Window | Failure Outcome |
|---|---|---|---|
| Phone Number / Email Verification | 5 | 30 minutes | Continue Workflow, no escalation |
| Location | 3 | 15 minutes | Redirect to URL, with the Redirect URL https://www.example.com/alternative-verification |
| Document and Biometric Verification | 4 | 45 minutes | Continue Workflow with Escalate to Live Chat |
Balanced Security Workflow
On the General tab, set Block Duration to 2 hours.
| Step | Retry Limit | Retry Window | Failure Outcome |
|---|---|---|---|
| Phone Number / Email Verification | 3 | 20 minutes | Continue Workflow with Escalate to Live Chat |
| Location | 2 | 10 minutes | Deny Verification |
| Document and Biometric Verification | 3 | 30 minutes | Continue Workflow with Escalate to Live Chat |
Each example that escalates also needs the flow-level Escalate to Live Chat step on.
What the Requester Sees
The screens in this section have fixed text. Affirm Studio and the Content Customization API do not change them. To give requesters your own instructions after a failed step, use Redirect to URL and send them to a page you control.
Denied Screen
When a step failure denies the requester, Affirm redirects them to the Identity Verification Denied screen. When the requester has also reached the workflow retry limit, the screen adds "You have reached the maximum number of attempts to complete this workflow. Please try again later." The flow ends on this screen.
Redirect Screen
When a step's failure outcome is Redirect to URL, the requester sees Identity Verification Denied with "You will now be taken to an external site for further verification" and a Redirect Now button. After 5 seconds, Affirm redirects the requester to the configured URL.
Verification Unsuccessful Screen
When the requester can continue the workflow despite a step failure, they see the Verification Unsuccessful page. It reads "We are unable to verify your" followed by "location", "ID documentation" or "biometrics" for the Location, Document and Biometric Verification and Photo ID and Liveness Capture steps, or "information" for the other steps. It then reads "You will be taken to the next step momentarily."
The screen has no button at first. After 5 seconds, Affirm takes the requester to the next step. If the requester is still on the screen after 8 seconds, a Continue button appears so that they can move on themselves.
Use Cases
The following scenarios show how step-level outcomes and retry limits apply.
Employee Onboarding
- For access to high-risk systems, set Photo ID and Liveness Capture to Deny Verification, so a requester who reaches its retry limit cannot continue
- Set Document and Biometric Verification to Continue Workflow with Escalate to Live Chat, so an escalation approver reviews remote employees before access is granted
- Set Location to Continue Workflow with Escalate to Live Chat rather than Deny Verification
Help Desk Identity Verification Support
- Raise the Retry Limit on Document and Biometric Verification or Photo ID and Liveness Capture, so requesters can try again after an unreadable image
- Configure step-specific outcomes to reduce support burden
- Enable escalation to human approvers for complex verification scenarios
IT Admin Customization
- Set different retry limits for different verification steps to reduce user frustration while preventing brute-force attacks
- Set Location to Redirect to URL with an alternative verification page instead of blocking access
- Base outcomes on risk signals by assigning a Policy Evaluation Kit; see Conditional Outcomes
Best Practices
Apply the following practices when you choose outcomes and limits.
Security Considerations
- Use Deny Verification for high-risk scenarios and sensitive systems
- Configure appropriate retry limits to prevent brute-force attacks
- Set reasonable block durations to balance security and user experience
User Experience
- Use Continue Workflow for low-risk scenarios to reduce user friction
- Configure appropriate retry limits to give users reasonable attempts
- Because the failure screens have fixed text, use Redirect to URL when requesters need your own explanation of next steps
Operational Efficiency
- Use Redirect to URL to guide users to alternative verification methods
- Configure live chat escalation for scenarios requiring human oversight
- Monitor step failure rates to identify potential issues
Photo and Liveness Detection Integration
Photo ID and Liveness Capture uses the same Retry Limit and Failure Outcome settings as the other steps. Each retry captures both the photo ID and the selfie again. For the step's capture screens and positioning hints, see Photo ID and Liveness Capture.
Advanced Configuration
The following options extend the step-level settings.
Dynamic Redirect URLs
For Redirect to URL outcomes, you can configure dynamic URLs that are provided at runtime. Enter DYNAMIC as the Redirect URL on the step or on the Unverified Outcome. When you create each verification request through the Affirm API, pass the destination in failureRedirectUrl:
- For the Unverified Outcome, at the top level of the request
- For a step, in the step's entry under
steps(phoneEmail,location,verifiedCredential,idvordocumentLiveness)
For a dynamic Verified Outcome, pass the destination in redirectUrl. Affirm rejects a request whose URL is not valid.
Conditional Outcomes
To apply different outcomes to different groups of requesters, create a verification flow for each group, each with its own step settings. To base the outcome on risk signals, assign a Policy Evaluation Kit from the Affirm Risk Policy Builder.
Retry Logic Customization
You can configure different retry logic for each step, as in the following example.
| Step | Retry Limit | Retry Window | Failure Outcome |
|---|---|---|---|
| Phone Number / Email Verification | 5 | 30 minutes | Continue Workflow, no escalation |
| Document and Biometric Verification | 2 | 15 minutes | Deny Verification |
Monitoring and Analytics
Step Failure Tracking
Monitor step failure rates and patterns:
- Failure Rate by Step: Track which steps fail most frequently
- Retry Success Rate: Monitor how often retries are successful
- Block Duration Impact: Analyze the effectiveness of different block durations
Operational UX Monitoring
To evaluate the impact after deployment, review completed, denied and escalated verifications in the Activity Log.
Security Metrics
Monitor security-related metrics:
- Brute Force Attempts: Track repeated failure attempts
- Blocked User Count: Monitor how many users are blocked
- Escalation Volume: Track live chat escalation volume
Troubleshooting
Common Issues
The following sections list remedies for common issues.
Users Getting Blocked Too Frequently
- Review retry limits and time windows
- Consider increasing retry limits for low-risk scenarios
- Adjust block durations based on user feedback
Live Chat Escalation Overload
- Review step-level escalation settings
- Consider using Continue Workflow with no escalation for low-risk steps
- Monitor escalation volume and adjust accordingly
Redirect URL Issues
- Verify that redirect URLs are accessible
- Test dynamic redirect URLs
- Make sure invalid URLs are handled properly