Version: 11.3.0

Login Identifier

The Login Identifier step is the first verification step in every HYPR Affirm verification flow. The requester reaches it after the Instructions and Consent screens. The step collects the requester's work login identifier so the rest of the flow can resolve their profile, contact information and any per-user policy.

This step is always present and always required. The step card shows Required and has no on/off switch.

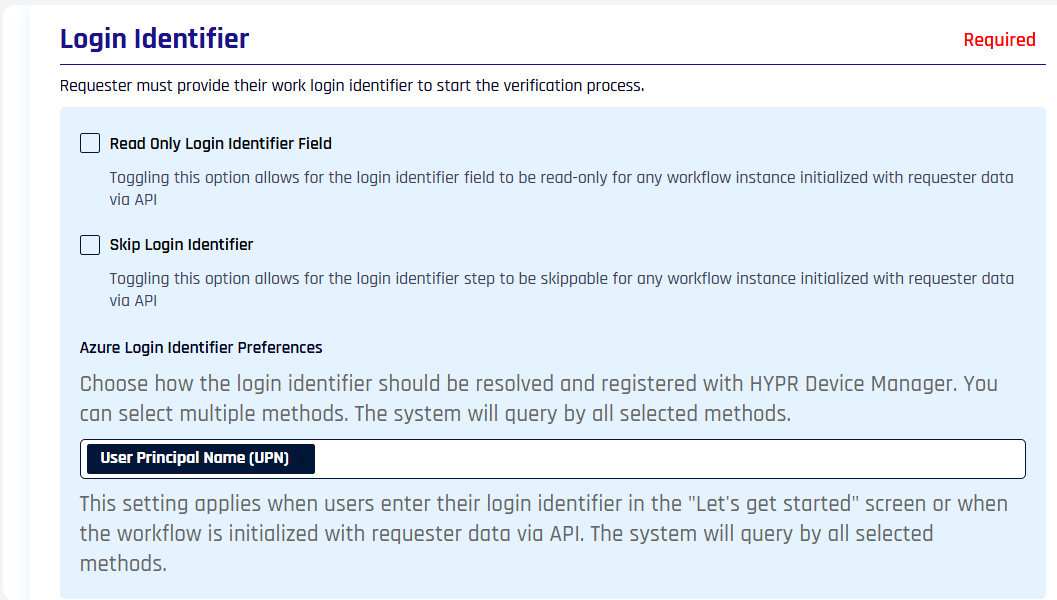
Login Identifier step card with the Read Only Login Identifier Field and Skip Login Identifier options

Prerequisites​

The verification flow needs a directory in which to look up the requester: a User Directory customization, or the Okta or Entra ID integration. The identifier the requester enters must resolve to a record in that directory. See Identity Provider Prerequisites.

Configure the Step​

The step card has two optional behaviors for flows started through the Affirm API, and an identifier preference list for Microsoft Entra ID applications.

Optional Behaviors​

When a verification flow is initialized with requester data through the Affirm API, two optional toggles change how the step renders for the requester. Both are cleared by default.

  • Read Only Login Identifier Field: The field shows the API-provided identifier as read-only for the workflow instance, and the requester cannot edit it.
  • Skip Login Identifier: Affirm skips the step for the workflow instance and uses the API-provided identifier without showing the screen.

Neither toggle applies when the requester enters the flow without API-provided context.

Azure Login Identifier Preferences​

For workflows whose application is a Microsoft Entra ID integration, the Azure Login Identifier Preferences list controls which directory attributes Affirm uses to look up the requester. Select one or more of the following options; with none selected, Affirm uses UPN.

  • User Principal Name (UPN)
  • Custom Attribute: also enter the attribute in Custom Attribute Name, for example onPremisesSamAccountName
  • Email Address

The card reads Azure AD attributes used to look up the requester when they sign in. Affirm tries each attribute you select.

What the Requester Sees​

The requester enters their username or email and clicks Begin. Begin stays disabled until the field has a value. The following table lists the default text; administrators can change it in Affirm Studio.

ElementDefault Text
Title"Let's get started!"
Description"We will verify your identity during this process. Enter your username or email to get started."
Field placeholder"Enter your username or email."
ButtonBegin
Login identifier screen: Let's get started, with the username or email field and the Begin button

After verification has started, the requester cannot change the identifier.

What Data Is Collected​

The step collects the identifier the requester types. Affirm trims it, converts it to lowercase and uses it to look up the requester's record in the directory configured for the flow: a User Directory customization, or the Okta or Entra ID integration. From that record, Affirm reads the attributes that the flow's steps need; see Profile Data Each Step Requires.

Results, Retries and Failure Outcomes​

This step has no Retry Limit or Failure Outcome controls. If Affirm cannot continue, the screen shows a message under the field. When the directory has no user for the identifier, the message reports that the user could not be found. Other messages report profile data that a later step needs and the directory record does not hold, such as a phone number, an address, a name or a manager.

If the requester has reached the workflow retry limit, or is still inside the block duration, Affirm shows Identity Verification Denied with "You have reached the maximum number of attempts to complete this workflow. Please try again later." See Workflow Retry Limits.