Affirm Risk Policy Builder
The Affirm Risk Policy Builder is the Control Center workspace where administrators define policy evaluation rules that drive verification outcomes. Rather than configuring escalation per workflow step inline, an administrator builds a Policy Evaluation Kit once and assigns it to one or more workflows. The kit decides pass/fail per verification action based on risk signals the platform emits as a verification runs.
The Affirm Risk Policy Builder is available in HYPR 11.3 and later.
Every screenshot on this page shows the default rule set the Risk Policy Builder ships with for the verification actions a representative tenant has enabled. Action names (Phone Number Or Email, Location, Verified Credential, Document and Biometric Verification Step, etc.) and the default rule names within each action (Phone/Email Pass, Location Pass, IDV Outcome Pass — Single Document, etc.) are consistent across tenants. The specific predicates, signals, and rule sets you see in your tenant depend on which steps and features your tenant has enabled in its verification flows — your defaults may include more or fewer actions than shown here.
Everything in the editor is editable. Each rule, condition, and group has a trash icon to delete it, and every group exposes + Condition, + AND group, and + OR group controls. + Add rule creates a new rule for an action.
For the conceptual model behind risk-signal escalation and how it differs from approver-chain escalation, see Escalation.
Where it lives
The Risk Policy Builder is a tab inside HYPR Affirm in Control Center. Click HYPR Affirm > Affirm Risk Policy Builder to open it.
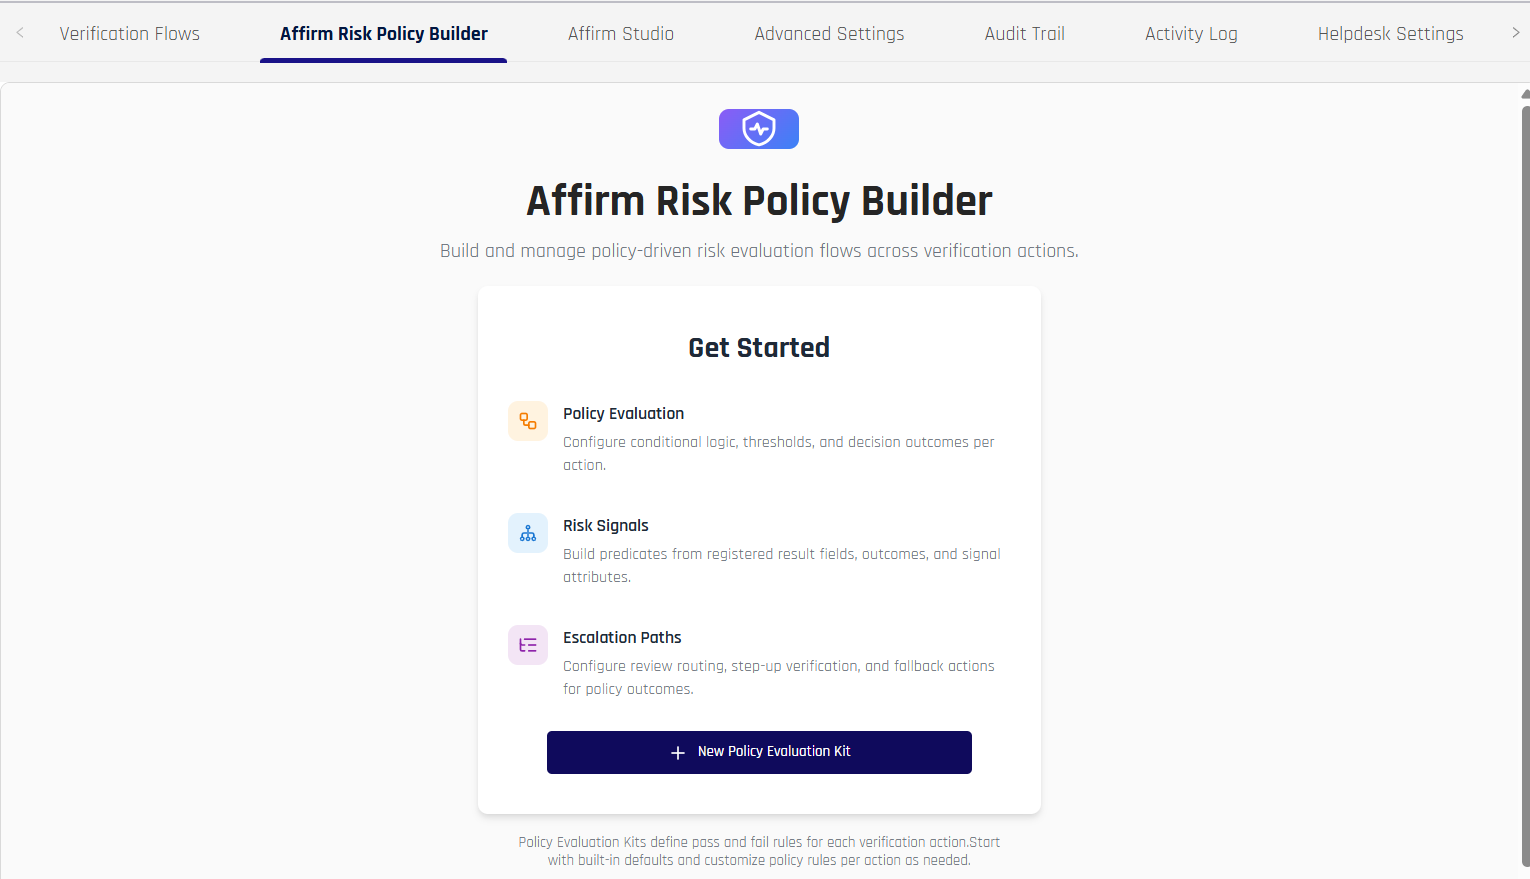
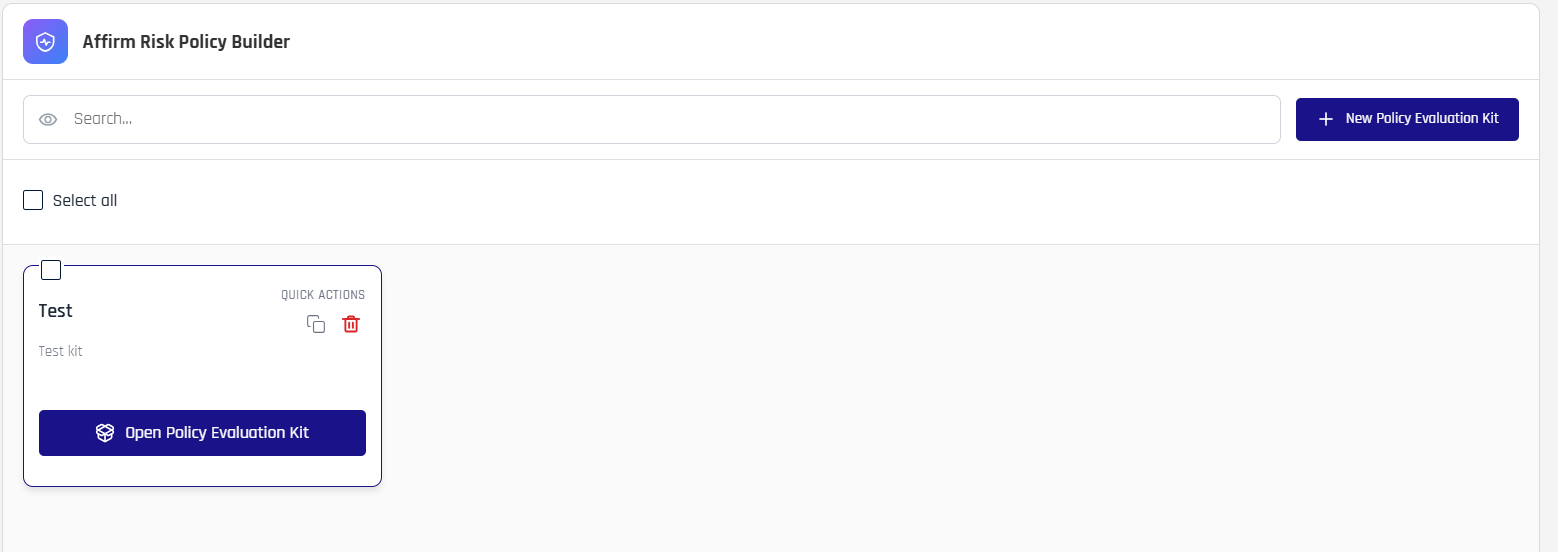
The landing area introduces the three pieces a kit composes — Policy Evaluation, Risk Signals, and Escalation Paths — and provides a + New Policy Evaluation Kit entry point. After at least one kit exists, the tab shows a kit list with search and per-kit quick actions:
How a kit is structured
A Policy Evaluation Kit is a per-tenant policy object that defines, for every verification action HYPR Affirm can run, three things:
- Risk Signals — the platform-emitted observations the kit can read for that action (for example,
Medium Verifiedfor the Phone/Email Verification action, orOverall ResultandFace Matchfor the Document and Biometric Verification IDV Outcome action). Signals are read-only and provided by the platform; the kit configures how to interpret them. - Action Retry Budget — the per-action retry envelope (Max attempts and time Window) within which the kit's evaluation applies.
- Evaluation Rules — ordered Pass/Fail rules. Each rule has a name, a predicate (built from Risk Signals using operators and AND/OR groups), a result (
PassorFail), and — forFailresults — an action (for example,Deny).
A kit ships with built-in defaults for every action. Administrators customize the defaults rather than starting from a blank slate.
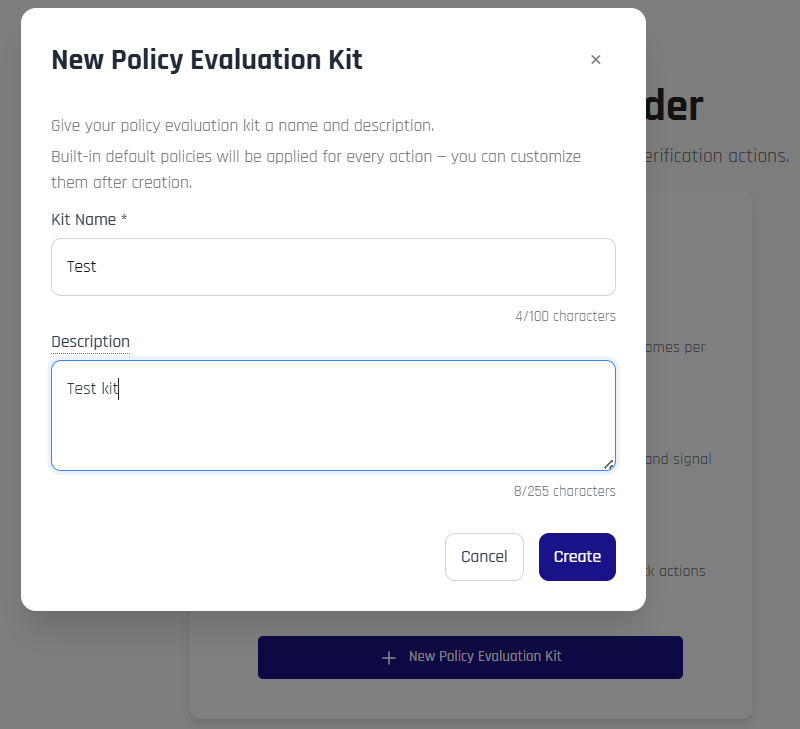
Creating a kit
Click + New Policy Evaluation Kit on the landing area. Provide a name and an optional description; built-in default policies are applied for every action automatically when the kit is created.
After creation the editor opens to the first action so the kit can be reviewed and customized. The built-in defaults are a starting point — every rule, predicate, and threshold can be edited, replaced, or removed.
The kit editor
The kit editor has two panes: an Action Navigator on the left listing every verification action grouped by step type, and a per-action detail pane on the right.
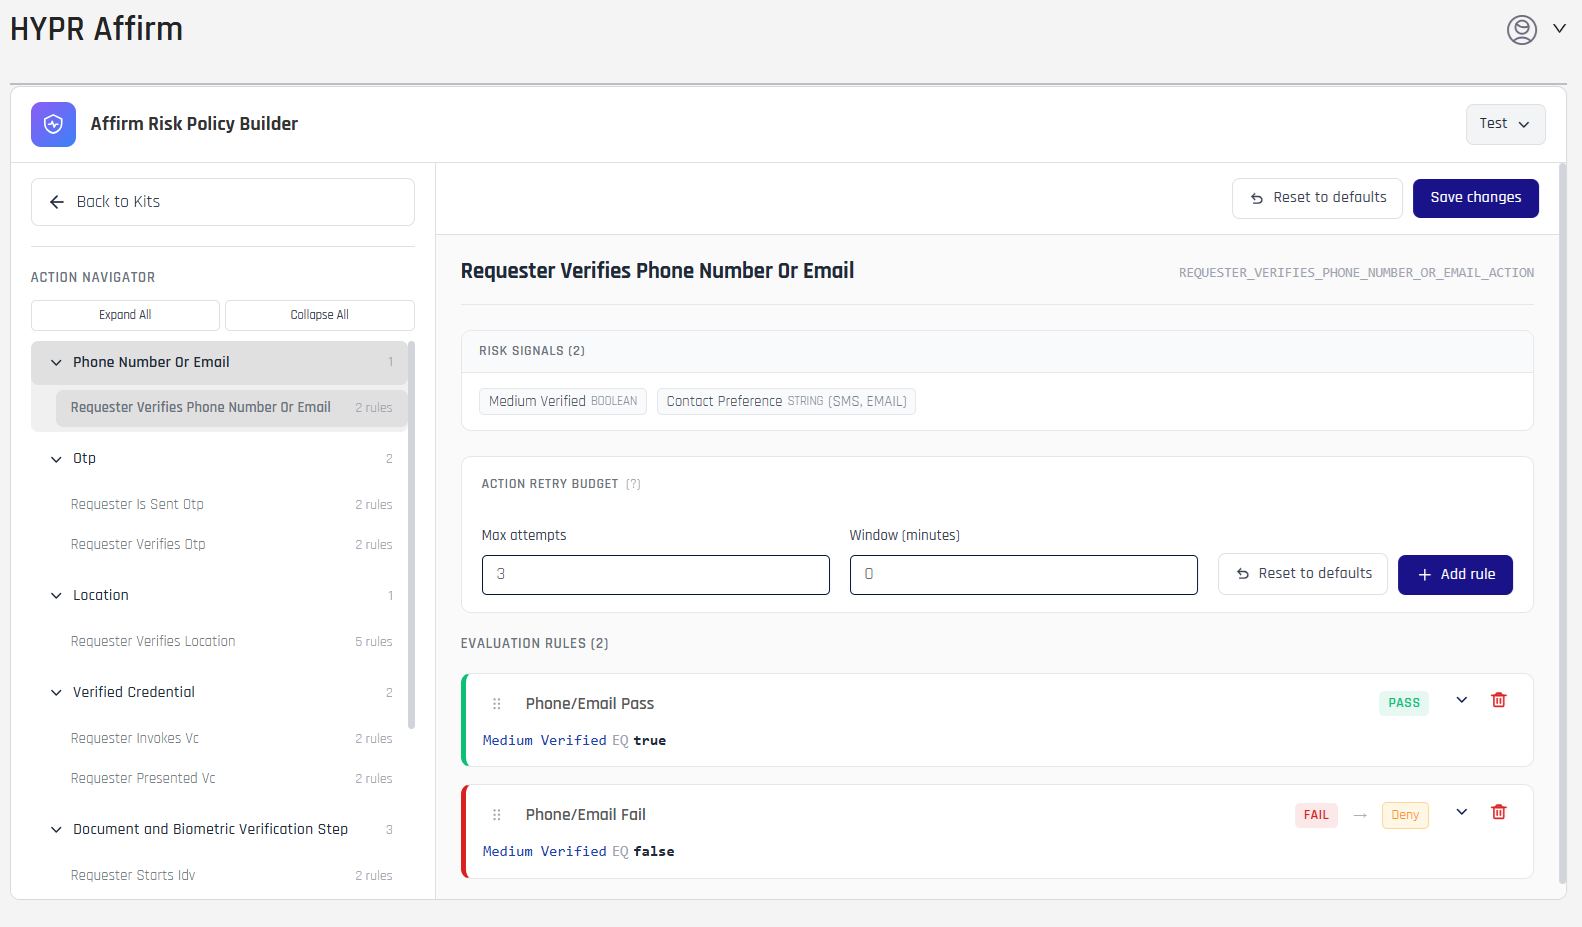
Use Expand All / Collapse All in the navigator to reveal or hide actions per step type. The badge next to each step type is the action count; the badge next to each action is the rule count.
The top-right of the editor shows the kit's name as a dropdown with three options:
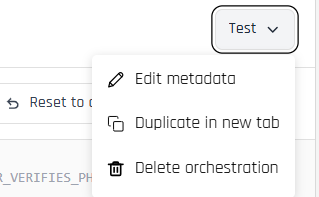
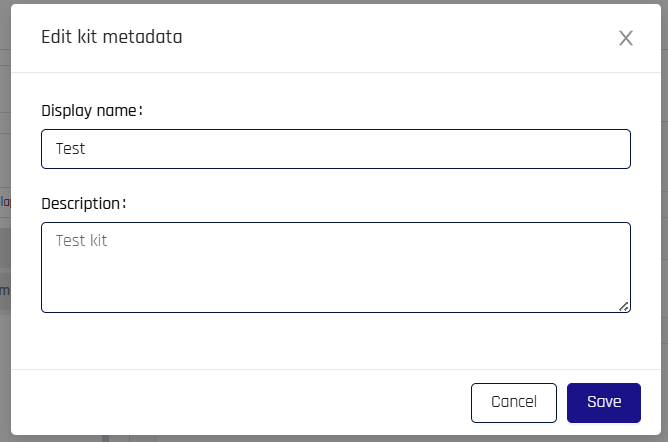
- Edit metadata — open a modal to update the kit's display name and description
- Duplicate in new tab — open a copy of the kit in a new browser tab for parallel editing
- Delete orchestration — delete the kit (with confirmation)
The Edit metadata modal:
The top-right of the editor also exposes Reset to defaults (per-action) and Save changes (kit-wide). Unsaved edits are preserved as you navigate between actions; pressing Save changes persists every action's edits at once.
Configuring an action
Selecting an action in the navigator opens the right-pane detail for that action. Three sections appear:
Risk Signals
A non-editable card listing every signal HYPR Affirm emits for that action. Each signal has a name and a type (BOOLEAN, STRING, etc.). Predicates inside Evaluation Rules can only reference signals that appear here.
Signal availability varies by action — a simple action like Phone Number / Email Verification exposes two signals; a complex action like the IDV Outcome exposes dozens across multiple groups. The exact set of signals depends on which features and steps your verification flow enables.
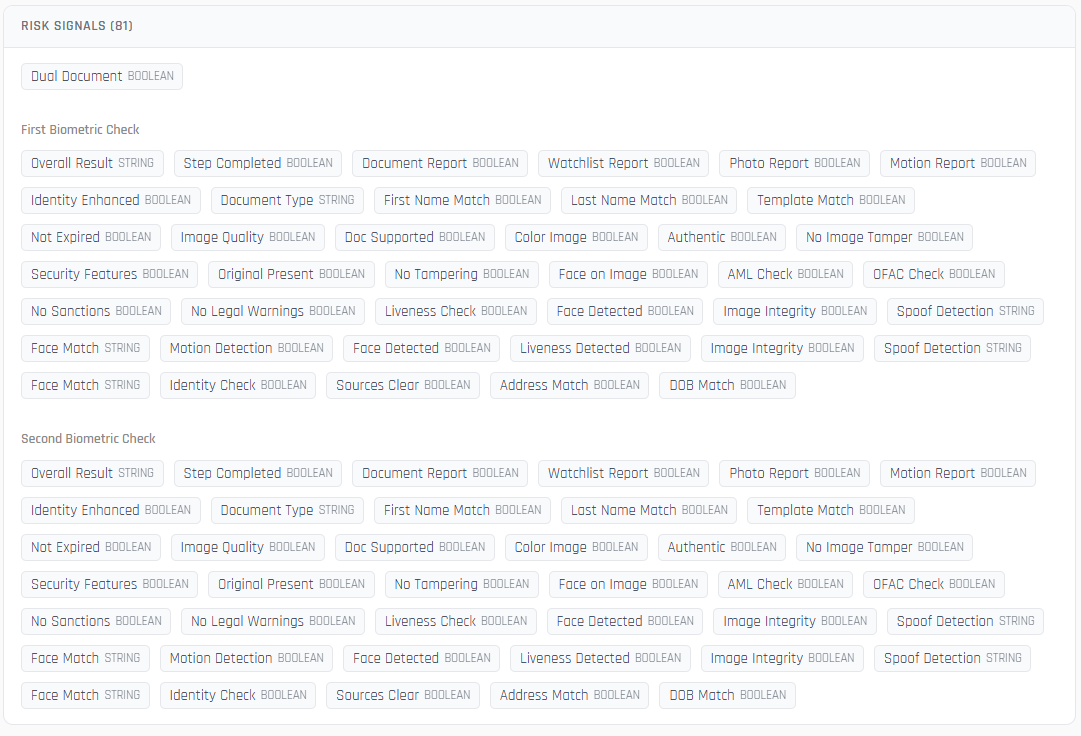
Sample: the IDV Outcome action's Risk Signals panel when Dual Document Verification is enabled — 81 signals across First and Second Biometric Check groups. Tenants without dual-document configured will see fewer signals.
Action Retry Budget
Two inputs:
- Max attempts — the maximum number of attempts allowed at this action within the time window
- Window (minutes) — the time window the Max attempts counter applies over
A Reset to defaults button restores the action's retry budget to the kit defaults; the + Add rule button next to it creates a new Evaluation Rule for the action.
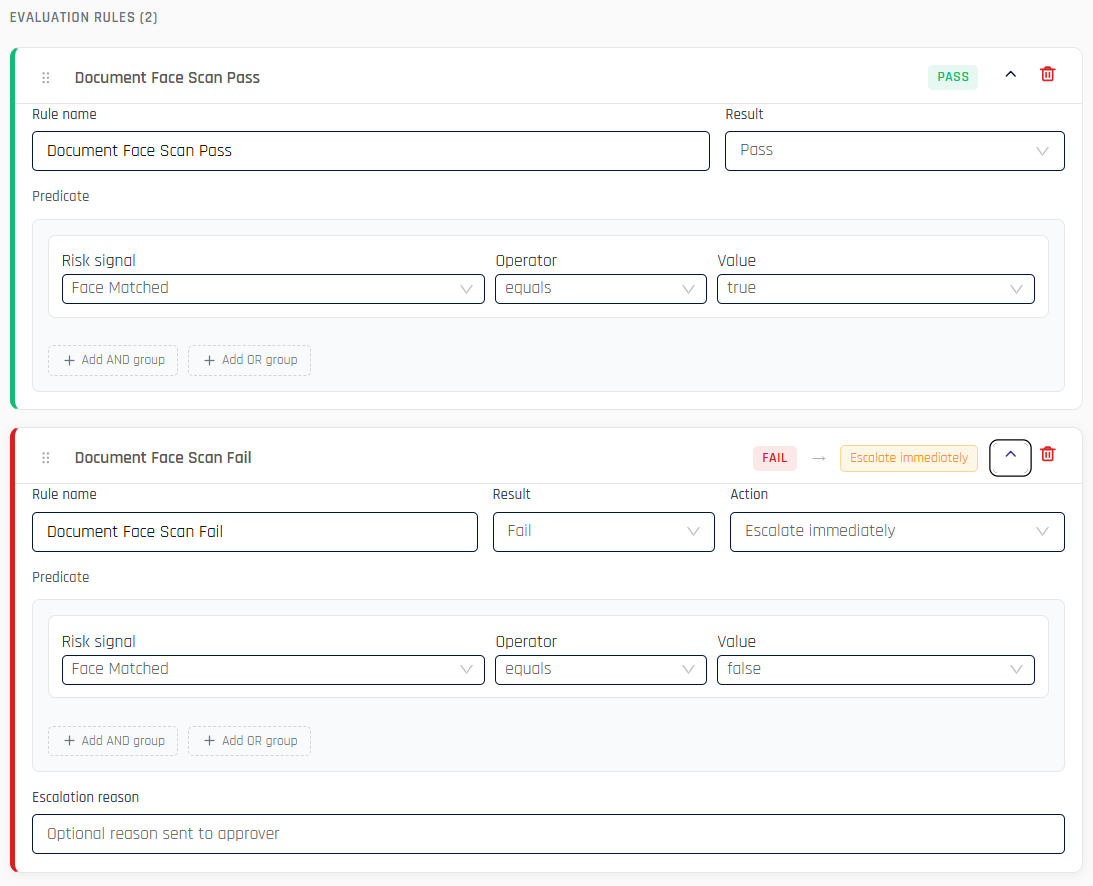
Evaluation Rules
The ordered list of rules the kit applies for this action. Each rule has a header showing the rule name, the result badge (PASS / FAIL), and — if FAIL — the action arrow plus action badge (for example, FAIL → Deny). Click the chevron to expand a rule for editing.
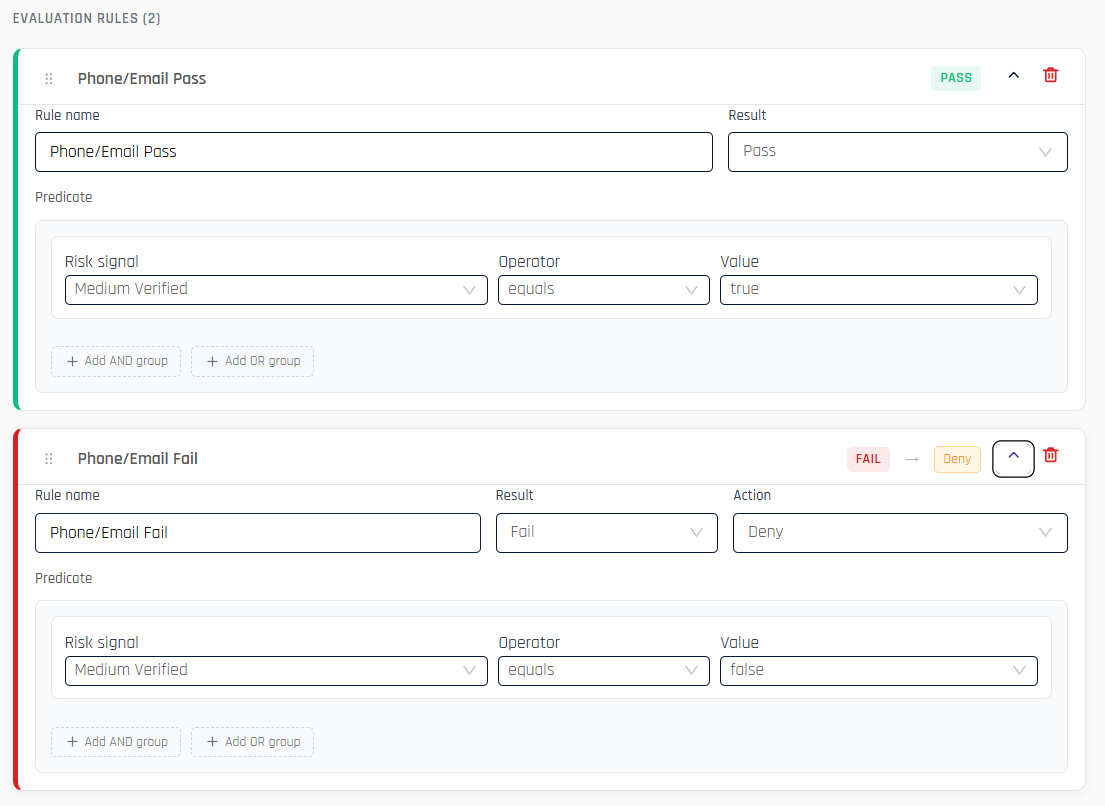
An expanded rule has these editable areas:
- Rule name — administrator-supplied label
- Result —
PassorFail - Action — only shown when Result is
Fail; the action to take on failure. The available actions are listed below. - Predicate — the condition tree (see Building predicates)
- Escalation reason — only shown when Result is
Failand Action is an escalation type; an optional free-text reason sent to the approver who picks up the escalation
Drag the handle on the left of a rule's header to reorder rules. Rules evaluate in display order; the first rule whose predicate matches determines the action's outcome.
Available actions on a Fail rule

- Deny — terminate the verification immediately with an Unverified outcome
- Escalate immediately — pause the flow and route the verification into the escalation approver chain
- Redirect immediately — terminate the verification and redirect the requester to the workflow's Unverified Outcome redirect URL
- Continue on failure (escalate) — let the verification continue through subsequent actions but flag it for escalation at the next attestation point
When the Action is an escalation type, the rule editor also exposes an Escalation reason field — an optional message attached to the verification so the escalation approver knows which rule fired:
Sample: a Fail rule with Action set to Escalate immediately, showing the Escalation reason field at the bottom for optional approver context.
Building predicates
A predicate is a tree of conditions combined with AND/OR group nodes. The leaf of the tree is a single condition of the form:
Risk signal Operator Value
-
Risk signal — picked from the action's available signals

-
Operator — one of
equals,not equals,greater than,less than,greater or equal,less or equal,in,contains -
Value — the literal to compare against. For
BOOLEANsignals, atrue/falsedropdown. ForSTRINGsignals, a free-text input (or, where the signal enumerates allowed values, a dropdown of those values).
To combine multiple conditions, wrap them in an AND group (all child conditions must be true) or an OR group (any child condition is true). Groups can nest — an AND group can contain OR groups and vice versa — so a kit can express complex policies like "the requester's IP must be allowed AND (the browser location must verify OR the IP-derived location must verify)".
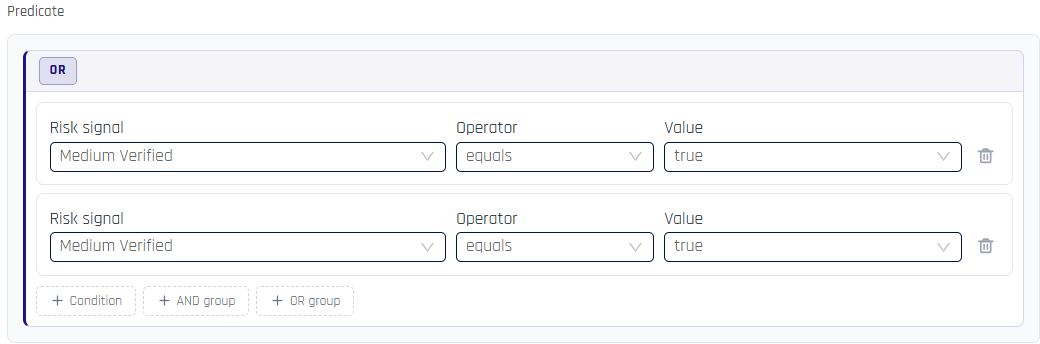
Inside any group, three buttons are available:
- + Condition — add another single condition at this level
- + AND group — nest an AND group at this level
- + OR group — nest an OR group at this level
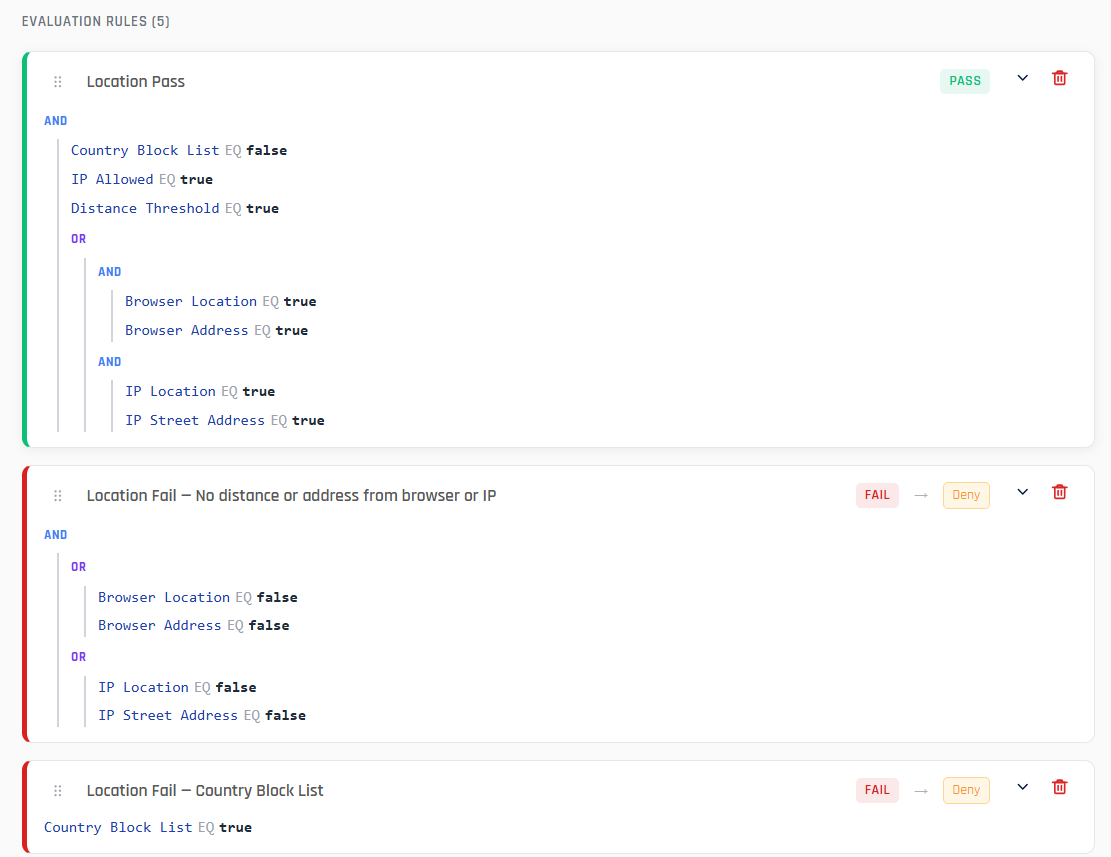
For example, the Location action's sample default Pass rule combines a top-level AND of three signals (Country Block List EQ false, IP Allowed EQ true, Distance Threshold EQ true) with an OR of two AND groups covering the browser-vs-IP location resolution paths:
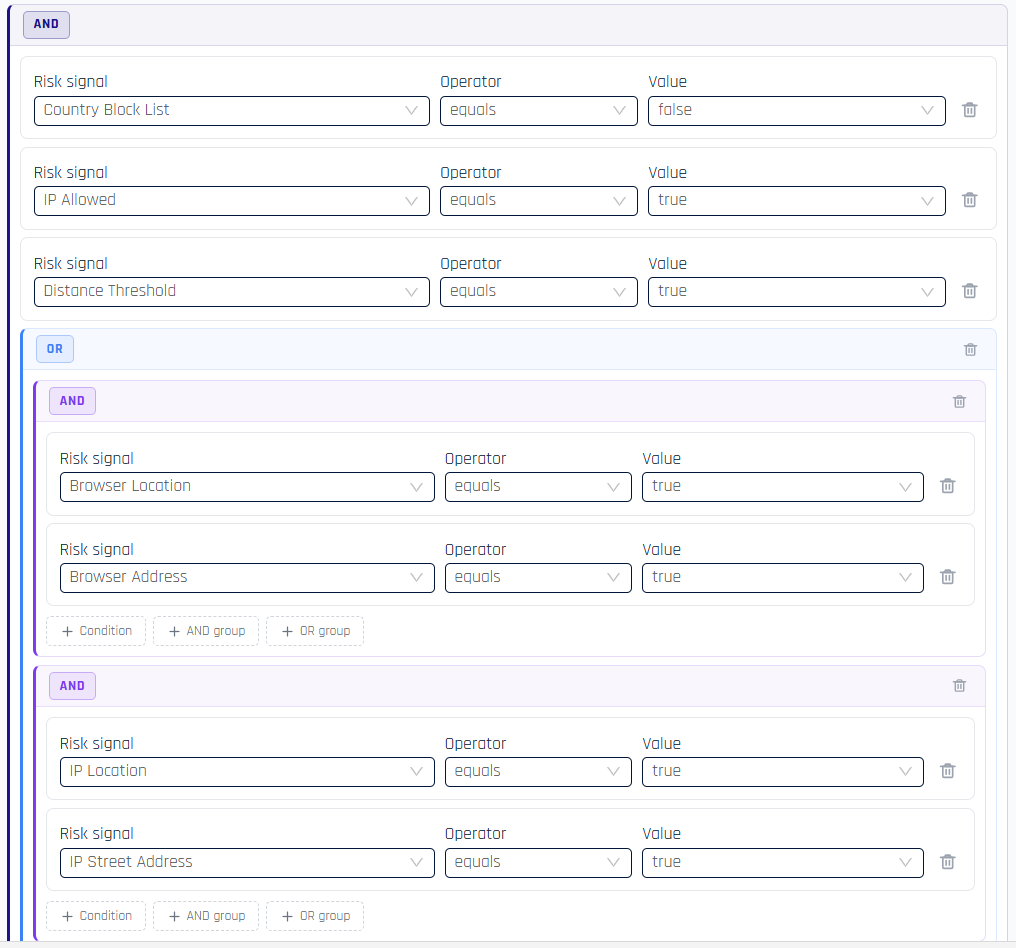
The same Location action also ships with several sample Fail rules — each matching a specific failure condition with the same Deny action by default:
Reading the IDV Outcome action
The IDV Outcome action (REQUESTER_REQUESTS_IDV_OUTCOME_ACTION) is the most expressive action a kit can configure. When Dual Document Verification is enabled, its sample default rules cover both single-document and dual-document flows — each Pass/Fail rule gated on the Dual Document signal plus per-document Overall Result signals:
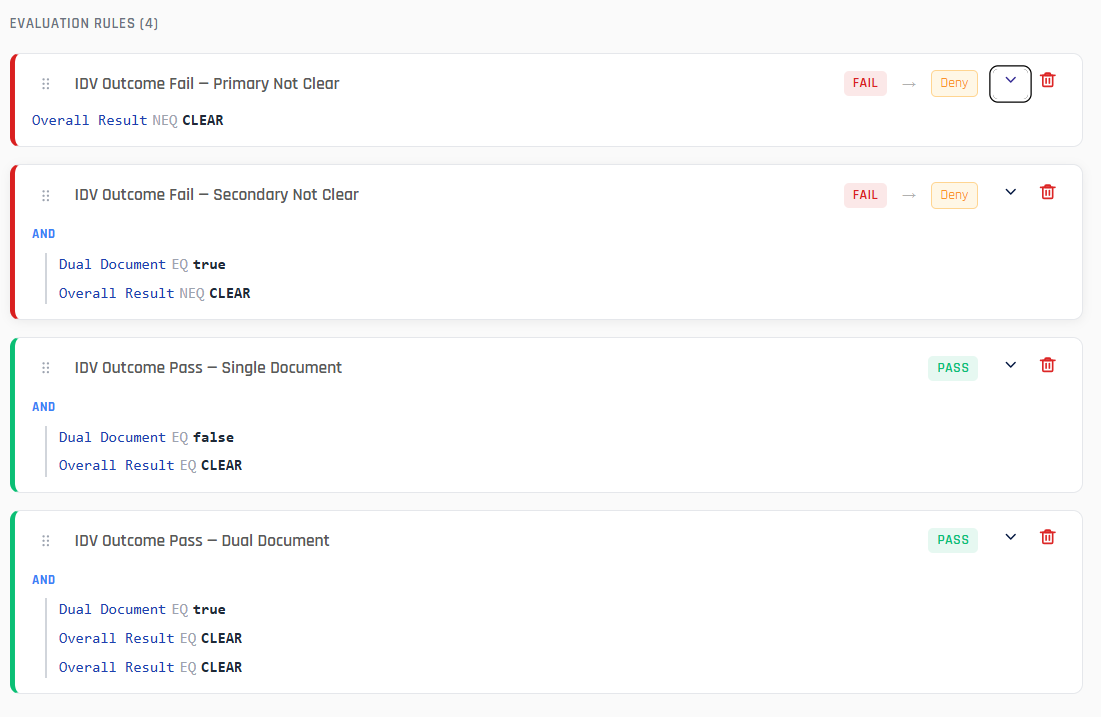
The Secondary Not Clear failure rule shows the typical pattern for dual-document failure detection — a Dual Document EQ true condition AND'd with an Overall Result NEQ CLEAR condition:
These rules are starting points. A high-security tenant might tighten the predicate (additional checks on Watchlist Report, Spoof Detection, etc.); a lower-friction tenant might soften the FAIL action from Deny to Escalate immediately so a human reviews before denying.
Saving and resetting
- Save changes (top right of the editor) persists every edit across every action in the kit
- Reset to defaults (top right) restores the current action's rules and retry budget to the built-in defaults; it does not affect other actions
Unsaved edits are preserved as you navigate between actions, so you can review and tune multiple actions before committing. The kit dropdown's Duplicate in new tab action is useful when iterating — keep the original open in one tab and experiment in the duplicate.
Assigning a kit to a verification flow
A kit is inert until it is assigned to a verification flow. Open the verification flow's editor, navigate to Advanced Customization → Risk Policy, and pick the kit from the Policy Evaluation Kit dropdown. See Creating and Managing Verification Flows → Advanced Customization.
A workflow uses one kit at a time. Workflows without a kit fall back to platform default behavior.
Policy ledger and observability
Every verification flow that runs against a kit produces a policy ledger record — a per-flow audit of which rules fired, which signals matched, and what action was taken. The ledger is appended to the Activity Log for the verification flow and is also retrievable via the Affirm API. For how the policy ledger correlates with the rest of Affirm observability, see Observability and Verification Flow ID.
Related
- Escalation (concept) — risk-signal escalation vs approver-chain escalation
- Escalation Policy — risk-signal policy outcomes as they appear in the Activity Log and Audit Trail
- Network and Location Policy — the Location action's policy controls covered from the network/location perspective
- Creating and Managing Verification Flows — assigning a Policy Evaluation Kit to a workflow
- Activity Log — per-verification record where the policy ledger is appended
- Verification Outcome Status Enum — the canonical outcome values rules drive toward