Writing Affirm Code Customizations
Overview
A code customization is a JavaScript program you register with HYPR Affirm and attach to a verification flow. Affirm runs it at a defined point in the flow: before the flow starts, when a notification is sent or after the verification decision is made. Use it to integrate an external system of record or to define your own post-verification behavior.
Customizations execute in an ES2022 runtime inside Affirm. Browser APIs and Node.js APIs are not available.
This page covers how to write a customization. For the input and output contract of each customization type, see Code Customizations.
Choose a Customization Type
Use a customization when a standard integration cannot supply what your verification flow needs:
- The user profile lives outside your IdP. A User Directory customization applies when an Okta or Entra ID integration is unavailable, or when it does not hold every profile field the flow requires: email, phone number, postal address or a manager identifier. It also applies when your system of record keys users on an identifier such as an employee ID, which needs custom mapping to the value the requester types on the first screen.
- The verification decision must drive an external action. An Outcome API Call customization runs after the decision, so you can write the result back to an external system, trigger a password reset, or return your own content to the requester.
- Notifications must leave through your own gateway. SMS Sending, SMS Verifying and Email customizations route the message through your REST gateway instead of HYPR's delivery services.
- The flow needs a verification step HYPR does not provide. A Custom Verification Step registers your own single-page application as a step in the flow.
User Directory Compared With Outcome
User Directory and Outcome customizations differ in when they run and what they are responsible for. The following table compares them.
| User Directory | Outcome API Call | |
|---|---|---|
| When it runs | At the start of the flow, when the requester submits the first screen. Runs a second time for the manager's profile when the flow requires an approver. | Once, at the end of the flow, after the verification decision is determined. |
| What it returns | The requester's (or manager's) profile fields, mapped to Affirm's parameter names. | Whether the external call succeeded, and optionally content to display to the requester. |
| Purpose | Supplies the profile data the verification steps compare against. | Acts on the decision that has already been made. |
Because a User Directory customization runs twice, branch on the isApprover input to return the right profile.
Inputs and Attributes
A customization reads two kinds of values:
- Inputs are supplied by the runtime for each execution, as a JSON string passed to the entry point. Each customization type has its own input contract. A User Directory customization receives
loginIdentifierandisApprover; an Outcome customization receivesloginIdentifier,email,isApprovedandworkflowId. - Attributes are static key-value pairs an administrator configures alongside the script in the Control Center. Use them for values that belong to the environment rather than the code, such as API base URLs, tenant identifiers and client credentials. Attribute values are stored encrypted.
Keeping credentials and URLs in attributes rather than in the script means the same customization can be promoted between environments without editing code.
The Entry Point
Every customization defines a handle function and ends by calling it with the input JSON for that execution. Affirm runs the script and uses the value of that final call as the customization's result:
function handle(inputJson) {
}

handle(ctx.getInputAsJson());
Parse the input and read the attributes you need. ctx.log writes to the customization's log output, and ctx.getAttribute reads a configured attribute by name:
function handle(inputJson) {
    const input = JSON.parse(inputJson);
    ctx.log("FINE", "Custom handler input=" + JSON.stringify(input));

    const tokenUrl     = ctx.getAttribute("DIRECTORY_TOKEN_URL");
    const clientId     = ctx.getAttribute("DIRECTORY_CLIENT_ID");
    const clientSecret = ctx.getAttribute("DIRECTORY_CLIENT_SECRET");
}
The ctx Object
Because there are no browser or Node.js APIs in the runtime, everything a customization needs to reach the outside world comes from ctx. Type ctx in the code editor to list the available methods and their exact signatures.
| Method | Purpose |
|---|---|
ctx.getInputAsJson() | Returns this execution's input JSON. Pass it to handle in the script's last statement. |
ctx.getAttribute(name) | Reads a configured attribute by name. |
ctx.log(level, message) | Writes to the customization's log output. Levels follow the standard names, such as FINE, INFO and SEVERE. |
ctx.httpGet(url, headers) | Performs an HTTP GET and returns the response body. |
ctx.httpPost(url, headers, requestBody) | Performs an HTTP POST. |
ctx.httpPut(url, headers, requestBody, timeoutSeconds) | Performs an HTTP PUT. The timeout is optional. |
ctx.httpPatch(url, headers, requestBody, timeoutSeconds) | Performs an HTTP PATCH. The timeout is optional. |
ctx.jwtCreateSignedJwt(…) | Creates a signed JWT. |
ctx.jwtDecodeJwt(jwt) | Decodes a JWT without verifying its signature. |
ctx.jwtVerify(jwt, publicKey) | Verifies a JWT signature. |
ctx.jwtDecodeVerify(…) | Decodes and verifies a JWT. |
ctx.uuid() | Returns a random UUID. |
ctx.sha256(value) | Returns the SHA-256 digest of a string. |
ctx.getHmacSHA256Signature(key, message) | Returns an HMAC-SHA256 signature. |
ctx.base64EncodeToString(value) | Base64-encodes a string or byte array. |
ctx.generateRandomPassword(minimumLength, minimumSpecialCharacters, requireMixedCaseAlphas, minimumNumbers, specialCharactersLimitList) | Generates a password meeting a complexity policy. Useful in an Outcome customization that resets a credential. |
ctx.get(key) and ctx.put(key, value, ttlInMillis) | A short-lived key-value store scoped to code customizations, for carrying a value such as a cached access token between executions. |
Design Patterns
The following patterns outline the structure of a User Directory customization and an Outcome customization.
User Directory Customization
A User Directory customization follows these steps:
- Parse the inputs and assign them to local variables.
- Read the attributes you need, such as API URLs and credentials.
- Obtain a bearer token with
ctx.httpPost, if your directory requires OAuth2. - Call the directory API with
ctx.httpGetto fetch the profile. - Branch on
isApproverso the requester lookup and the manager lookup each return the appropriate profile. - Map the external fields onto Affirm's parameter names and return them.
Outcome Customization
An Outcome customization runs once per requester, when the outcome is triggered. It is not re-run per attempt, so a single execution has to complete the outcome. It follows these steps:
- Parse the inputs and assign them to local variables.
- Read the attributes you need.
- Obtain a bearer token with
ctx.httpPost, if the target system requires OAuth2. - Call the target API with the matching
ctx.http*method to carry out the outcome. - Return the result, and the text or HTML to display to the requester if the flow displays outcome content.
Worked Example: A User Directory Customization
This example fetches a user profile from Microsoft Entra ID through the Graph API. It obtains its own access token with the OAuth 2.0 client-credentials grant, rather than signing in as a service account.
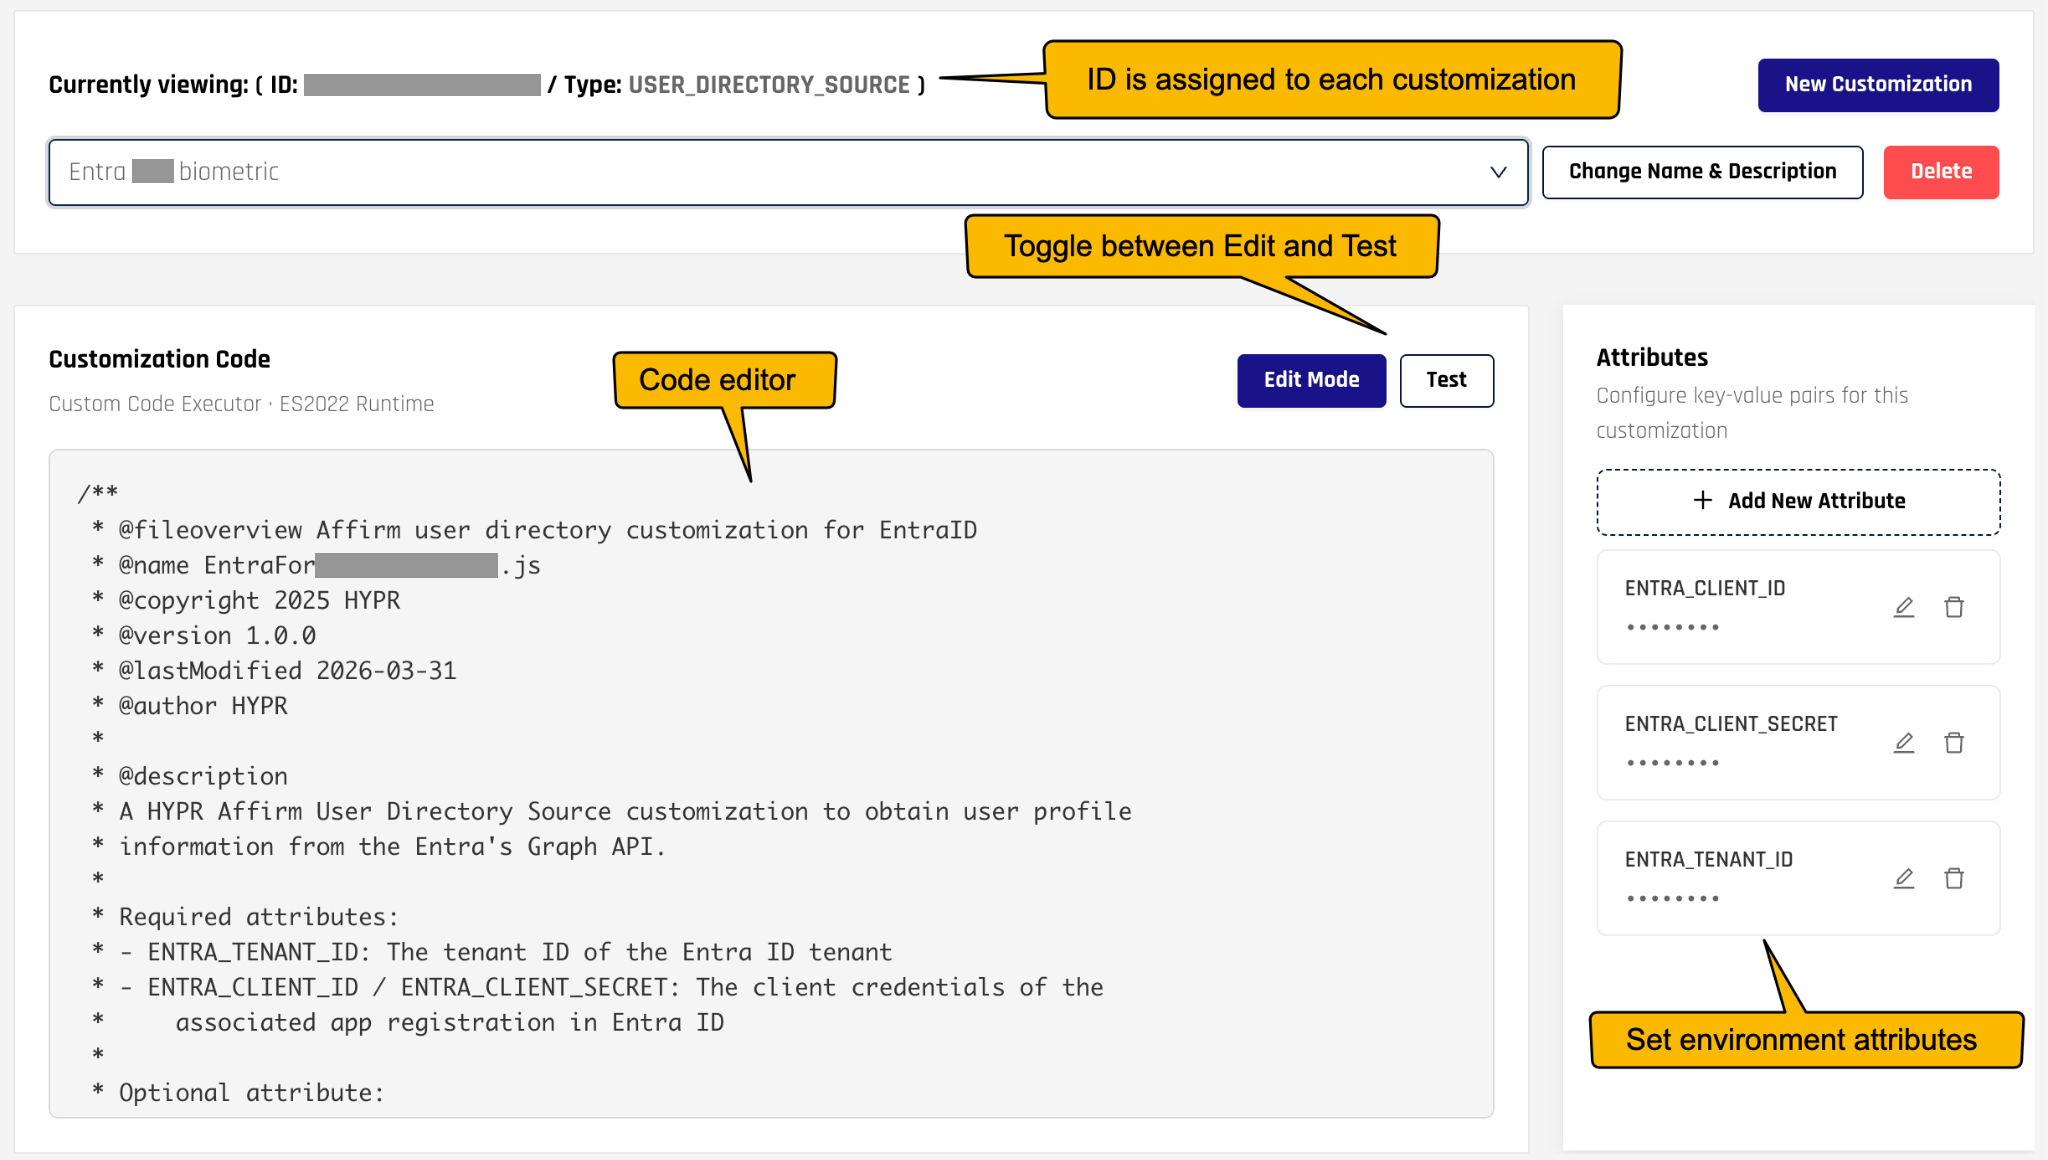
Configure the following attributes in the customization's Attributes panel.
| Attribute | Value |
|---|---|
ENTRA_TENANT_ID | The Entra tenant ID |
ENTRA_CLIENT_ID | The application ID of the Entra app registration |
ENTRA_CLIENT_SECRET | The client secret of that app registration |
The app registration needs the Microsoft Graph application permission User.Read.All, with admin consent granted.
Start with the token exchange. The function redacts the token before it logs the response. Attribute values are stored encrypted, and a bearer token should not be written to the log in clear text:
function getAccessToken() {
    const tenantId = ctx.getAttribute("ENTRA_TENANT_ID");
    const clientId = ctx.getAttribute("ENTRA_CLIENT_ID");
    const clientSecret = ctx.getAttribute("ENTRA_CLIENT_SECRET");

    const requestBody = {
        grant_type: "client_credentials",
        scope: "https://graph.microsoft.com/.default",
        client_id: clientId,
        client_secret: clientSecret,
    };
    const requestBodyRaw = Object.keys(requestBody)
        .map((k) => encodeURIComponent(k) + "=" + encodeURIComponent(requestBody[k]))
        .join("&");

    const responseRaw = ctx.httpPost(
        `https://login.microsoftonline.com/${tenantId}/oauth2/v2.0/token`,
        {
            Accept: "application/json",
            "Cache-Control": "no-cache",
            "Content-Type": "application/x-www-form-urlencoded",
        },
        requestBodyRaw
    );

    const { statusCode, body: bodyRaw } = JSON.parse(responseRaw);
    if (statusCode != 200) {
        throw new Error(`Could not fetch the Entra access token: statusCode=${statusCode}`);
    }

    const responseBody = JSON.parse(bodyRaw);
    ctx.log("FINE", "OAuth token response body=" +
        JSON.stringify({ ...responseBody, access_token: "(redacted)" }));

    return responseBody.access_token;
}
Next, add the profile lookup. The same function serves both the user and their manager by varying the profile path. It returns null on a 404, so the caller can tell "not found" apart from a failure:
function getUserProfile(userPrincipalName, options) {
    const { accessToken, attributes, profilePath = "/" } = options;

    const responseRaw = ctx.httpGet(
        `https://graph.microsoft.com/v1.0/users/${userPrincipalName}${profilePath}` +
            `?$select=${attributes.join(",")}`,
        {
            Accept: "application/json",
            "Cache-Control": "no-cache",
            "Content-Type": "application/json",
            Authorization: `Bearer ${accessToken}`,
        }
    );

    const { statusCode, body: bodyRaw } = JSON.parse(responseRaw);
    if (statusCode == 404) {
        return null;
    }
    if (statusCode != 200) {
        throw new Error(`Could not fetch the user profile: statusCode=${statusCode}`);
    }

    return JSON.parse(bodyRaw);
}
Finally, add the entry point. Map the directory's field names onto Affirm's parameter names. Affirm reads the profile from these keys, so they must match the User Directory output contract exactly:
function handle(inputJson) {
    const input = JSON.parse(inputJson);
    const { loginIdentifier } = input;

    const accessToken = getAccessToken();

    const userProfile = getUserProfile(loginIdentifier, {
        accessToken,
        attributes: [
            "userPrincipalName", "mail", "givenName", "surname", "mobilePhone",
            "streetAddress", "city", "state", "postalCode", "country", "accountEnabled",
        ],
    });
    if (!userProfile) {
        return {};
    }

    const managerProfile = getUserProfile(loginIdentifier, {
        accessToken,
        attributes: ["userPrincipalName"],
        profilePath: "/manager",
    });

    return {
        loginIdentifier,
        email:          userProfile.mail,
        firstName:      userProfile.givenName,
        lastName:       userProfile.surname,
        mobilePhone:    userProfile.mobilePhone,
        streetAddress:  userProfile.streetAddress,
        city:           userProfile.city,
        state:          userProfile.state,
        postalCode:     userProfile.postalCode,
        countryCode:    userProfile.country,
        status:         userProfile.accountEnabled ? "ACTIVE_FOR_AFFIRM" : "INACTIVE_FOR_AFFIRM",
        managerLoginId: managerProfile?.userPrincipalName,
    };
}

handle(ctx.getInputAsJson());
The example shows two practices worth copying:
- It returns
managerLoginIdrather than branching onisApprover. The lookup is the same for any user, so Affirm's second execution for the approver passes the manager's identifier asloginIdentifier. Branch onisApproveronly when your directory needs to treat the two lookups differently. - It maps
statusfrom the directory's own state. ReturningINACTIVE_FOR_AFFIRMfor a disabled account stops a deprovisioned user from being verified.
Return only the fields your verification flow needs. You can omit fields the flow does not use or return them as null. To find which fields apply, see Profile data each step requires.
If the same access token can serve several executions, cache it with ctx.put and read it back with ctx.get rather than exchanging credentials every time.
Handling Errors
Report a condition through the value you return. A customization always returns a JavaScript object:
- Return an empty object (
{}) when the record cannot be found in the directory. - Return an error message (
{ error: "My error message" }) to surface your own condition.
If the script throws during a live verification, the runtime logs the error and reports an execution error to Affirm. An Outcome API Call is then treated as isSuccess false, and an Image Writeback attempt is recorded as a failure and retried. Handle your own error conditions and return an explicit result; do not rely on throwing to steer the flow.
In Test mode, an exception does not stop the test. The error appears in the test logs and the result is empty, so you can see what went wrong before you use the customization in a live flow.
Returning null, or anything that is not an object, is treated as an error.
Per-step retry counts and failure outcomes are configured on the flow, independently of the customization; see Injectable Outcomes & Retry Limits. When your tenant uses the Affirm Risk Policy Builder, the Policy Evaluation Kit assigned to the flow sets them instead.
Edit and Test a Customization
You manage customizations in HYPR Affirm > Advanced Settings > Code Customizations. To work on a customization, choose it from the drop-down.
- Edit Mode: The code editor and the attribute list are read-only until you turn on Edit Mode. Turn it on to change the script or update attributes, then click Save, or click Discard to drop your changes.
- Test: Switch to Test to run the customization against values you supply, before you attach it to a live flow. Click Execute Test to run it and Exit Test to return.
When you test a customization, confirm the following:
- Each verification outcome your flow can produce is exercised, both approved and denied
- Any redirect URL the customization returns resolves as intended
- Every attribute your code reads with
ctx.getAttributeis configured, and its name matches the code exactly
Observability
Customization results are recorded alongside the rest of the verification flow:
- The Activity Log records the customization's result as a step result in the flow, like any other step.
- The Affirm Helpdesk presents the same verification history to help desk operators, without the rest of the Control Center interface.
- The Audit Trail records verification flow configuration changes, including assigning a customization to a flow. Edits to the customization code itself are not recorded.
Related
- Code Customizations — input and output contract for every customization type
- Profile data each step requires — which profile fields each verification step compares against
- Custom Verification Step — registering a single-page application as a verification step
- OIDC Settings — OIDC client behavior for flows that hand off through OIDC
- Identity Verification and Assurance Strategies — planning a verification flow end to end