Writing a Policy by Hand
The policy form gives you every setting a HYPR AgentPass™ policy has, and every attribute a condition can test. Use it when:
- You know what you want the rule to say.
- The rule needs an attribute the AI wizard does not write, such as the connector, the signed-in person or attached files.
- You want to adjust a policy the AI drafted.
Before you start, read How Policies Are Evaluated once. The form is short. Knowing what each field does to a live request is what makes the rule right.
Adding, editing and deleting policies are administrator tasks. Each has its own permission under Policies in Roles and Permissions. The Policies Page lists which permission each action needs.
The Policies Page
Open Oversight → Policies. The Rules tab lists every policy on your gateway. Each row shows the policy's phase, action and current mode, whether it was authored by hand or with AI, the connectors it is scoped to, its priority, and whether it is enabled.
Click a row to edit the policy. Click + at the start of a row to expand its details. See What an Expanded Row Shows. The trash icon at the end of the row deletes the policy. The Delete policy? confirmation warns that the action cannot be undone. Click Yes to delete it.
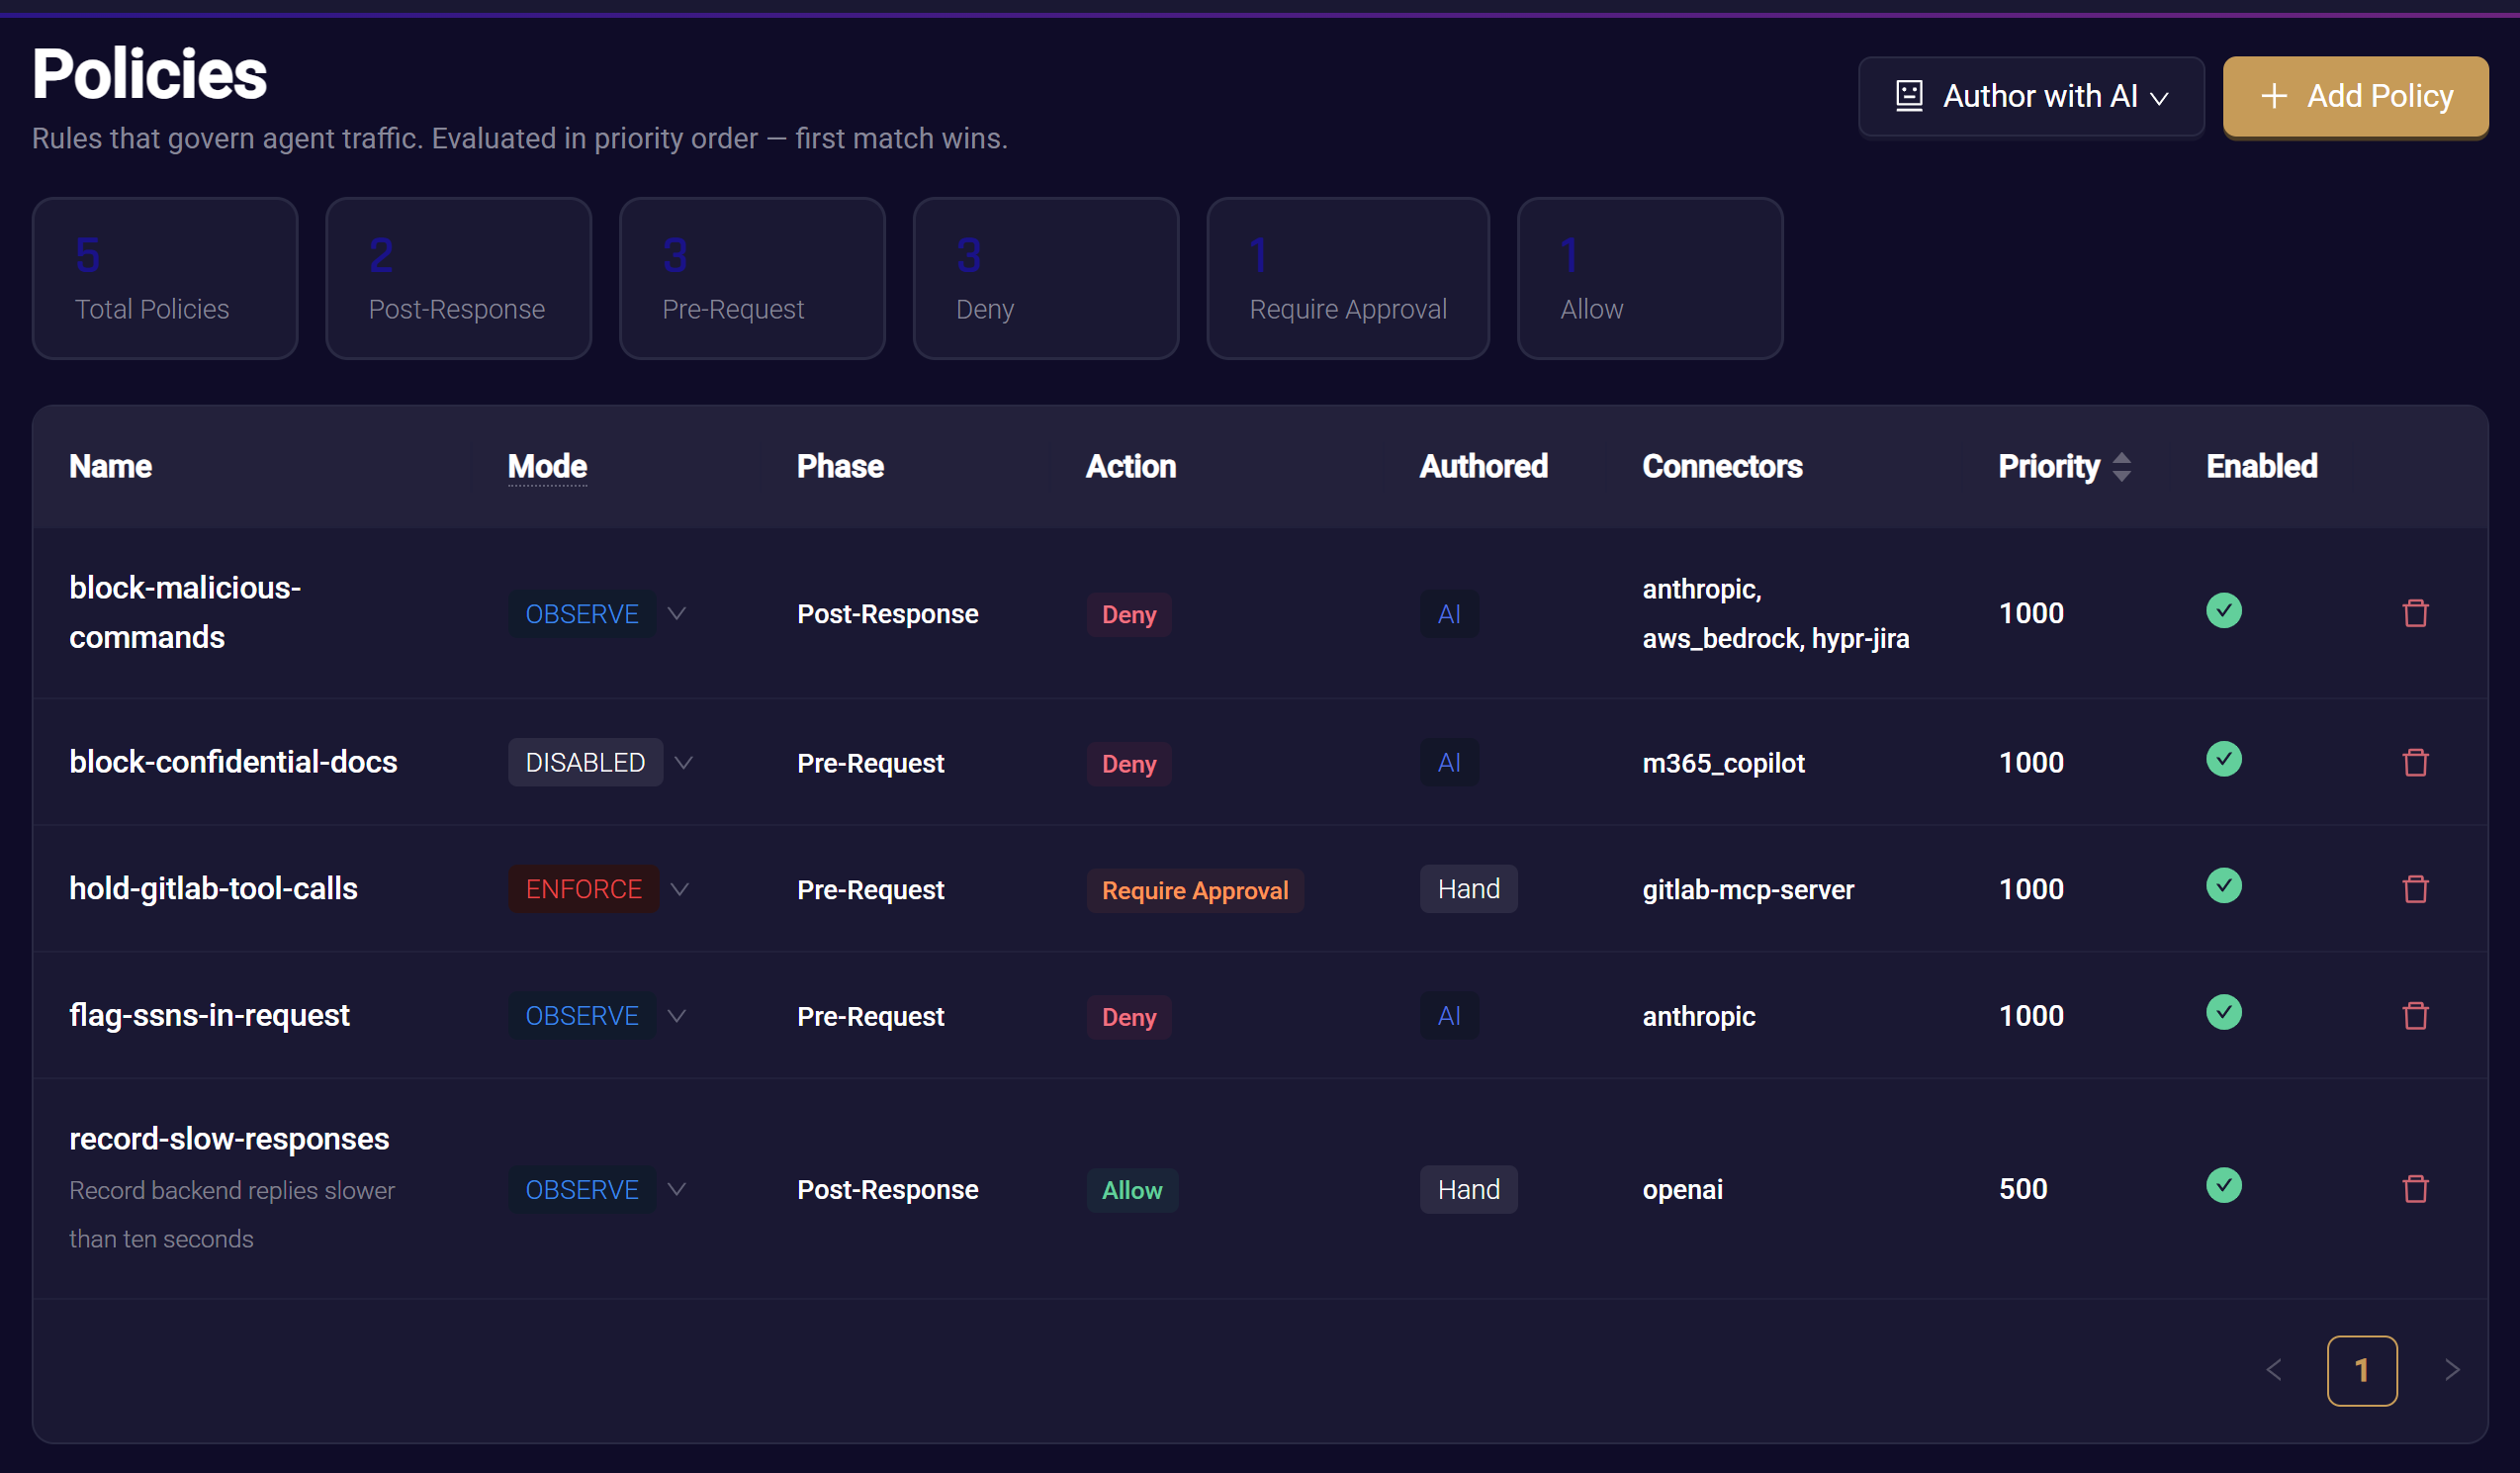
Two buttons sit at the top of the page:
- Author with AI opens the drafting wizard for a connector you pick.
- Add Policy opens the form described on this page.
Fill In the Form
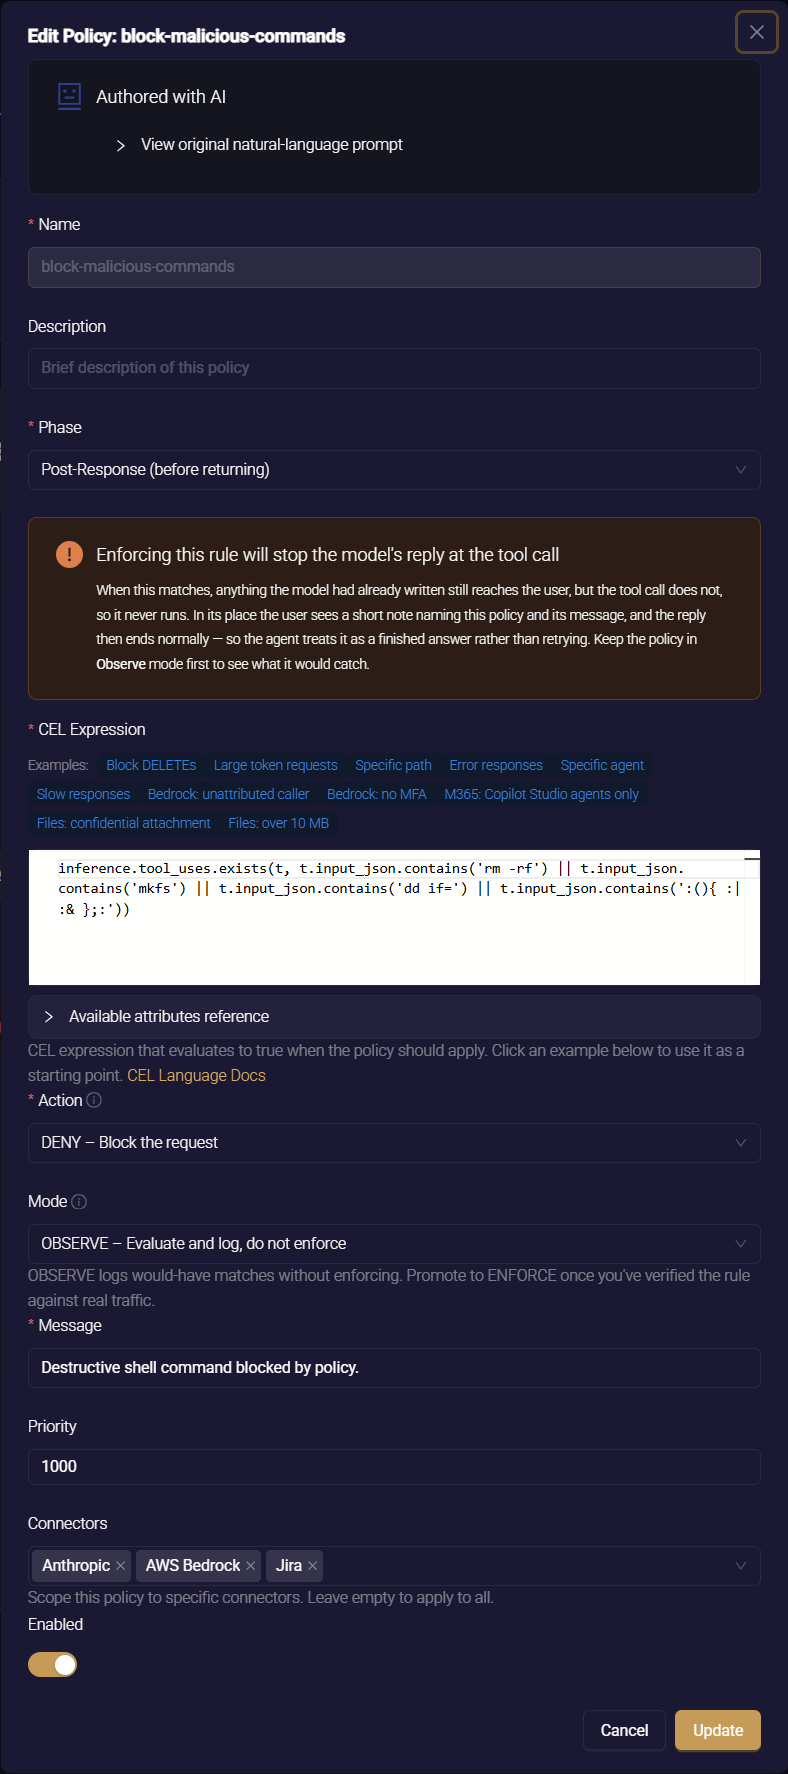
- On the Policies page, click Add Policy.
- Complete the fields described in the following table.
- Write the condition. See Write the Condition.
- Click Create. The policy is saved in the mode you chose. See Save, Watch, Promote.
The form shows its fields in this order.
| Field | What it does |
|---|---|
| Name | A short, stable identifier of lowercase letters, numbers and dashes, such as block-deletes. It cannot change after the policy is saved |
| Description | What the policy is for, in plain language. It is shown in the list, so write it for whoever reads the list next |
| Phase | Pre-Request (before forwarding) or Post-Response (before returning). Decides which half of the exchange the condition looks at |
| CEL Expression | The condition. When it evaluates to true, the policy applies |
| Action | What happens on a match once the policy is enforced: ALLOW – Let traffic through, DENY – Block the request or REQUIRE_APPROVAL – Require human approval |
| Mode | DISABLED – Skip evaluation entirely, OBSERVE – Evaluate and log, do not enforce or ENFORCE – Apply the action above on every match. The form preselects OBSERVE for a new policy |
| Message | Shown for DENY and REQUIRE_APPROVAL, and required for both. It is the reason the agent, or the person waiting on a reply, receives when the policy acts |
| Supervisor Email | Shown for REQUIRE_APPROVAL. The person to notify when the policy holds a request that carries no agent identity, so there is nobody else to route the approval to. The same address records who owns the policy. Where your role is limited to your own records, it is set to you when you save |
| Priority | A whole number of 1 or more. Lower is evaluated first. The default is 1000, and a cleared field is saved as 1000 |
| Connectors | The connectors the policy applies to. Leave it empty to apply the policy to all connectors |
| Enabled | Whether the policy takes part in evaluation at all |
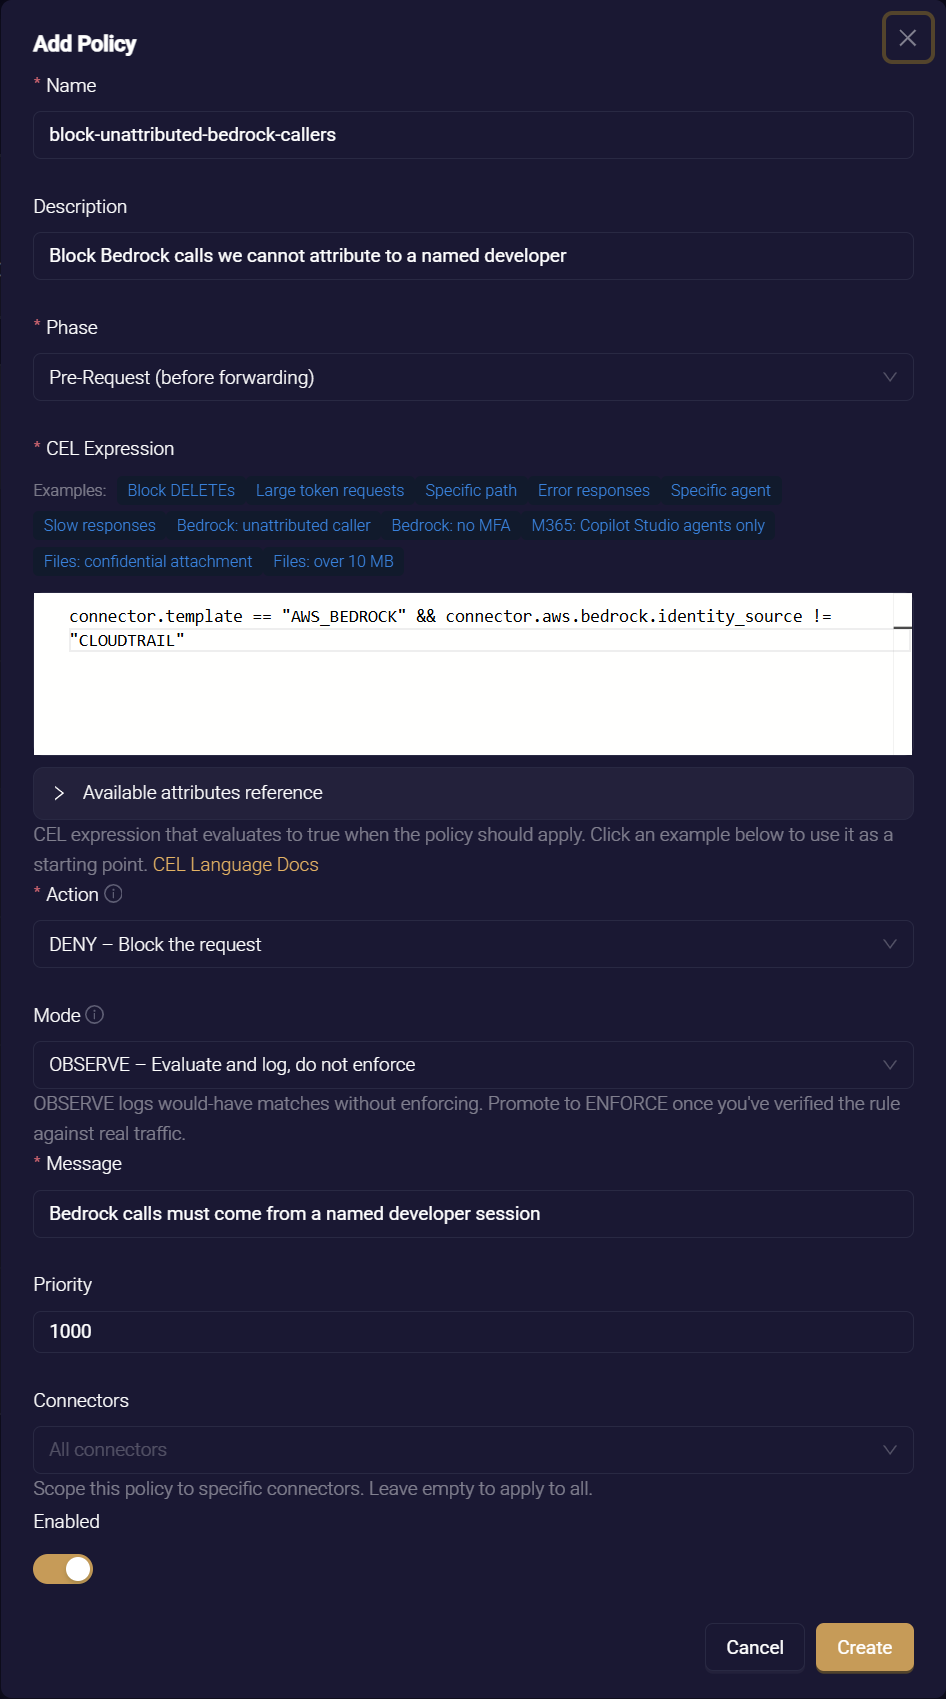
When you edit a policy authored with AI, the form opens with an Authored with AI notice and a View original natural-language prompt link, showing the goal the rule was drafted from. If that policy carries a tool scope, the form shows the tools it applies to. To change them, use Author with AI on the connector's Policies tab.
When the Form Refuses to Save
The form checks its fields when you click Create, or Update on an existing policy. It shows these messages.
| Message | What to change |
|---|---|
| Please enter policy name | Enter a name |
| Name must be lowercase alphanumeric with dashes | Use only lowercase letters, numbers and dashes. Shown for a new policy only |
| Message is required for DENY and REQUIRE_APPROVAL actions | Enter the message the agent or person receives |
| Policy already exists: … | Choose a name no other policy uses |
| CEL expression compilation failed: … | Correct the condition. The message names the error |
The form title reads Add Policy for a new policy, and Edit Policy: … with the policy's name when you edit one.
Write the Condition
Conditions are written in Common Expression Language (CEL), a small expression language with syntax close to most programming languages. A condition is true or false for each request. When it is true, the policy applies.
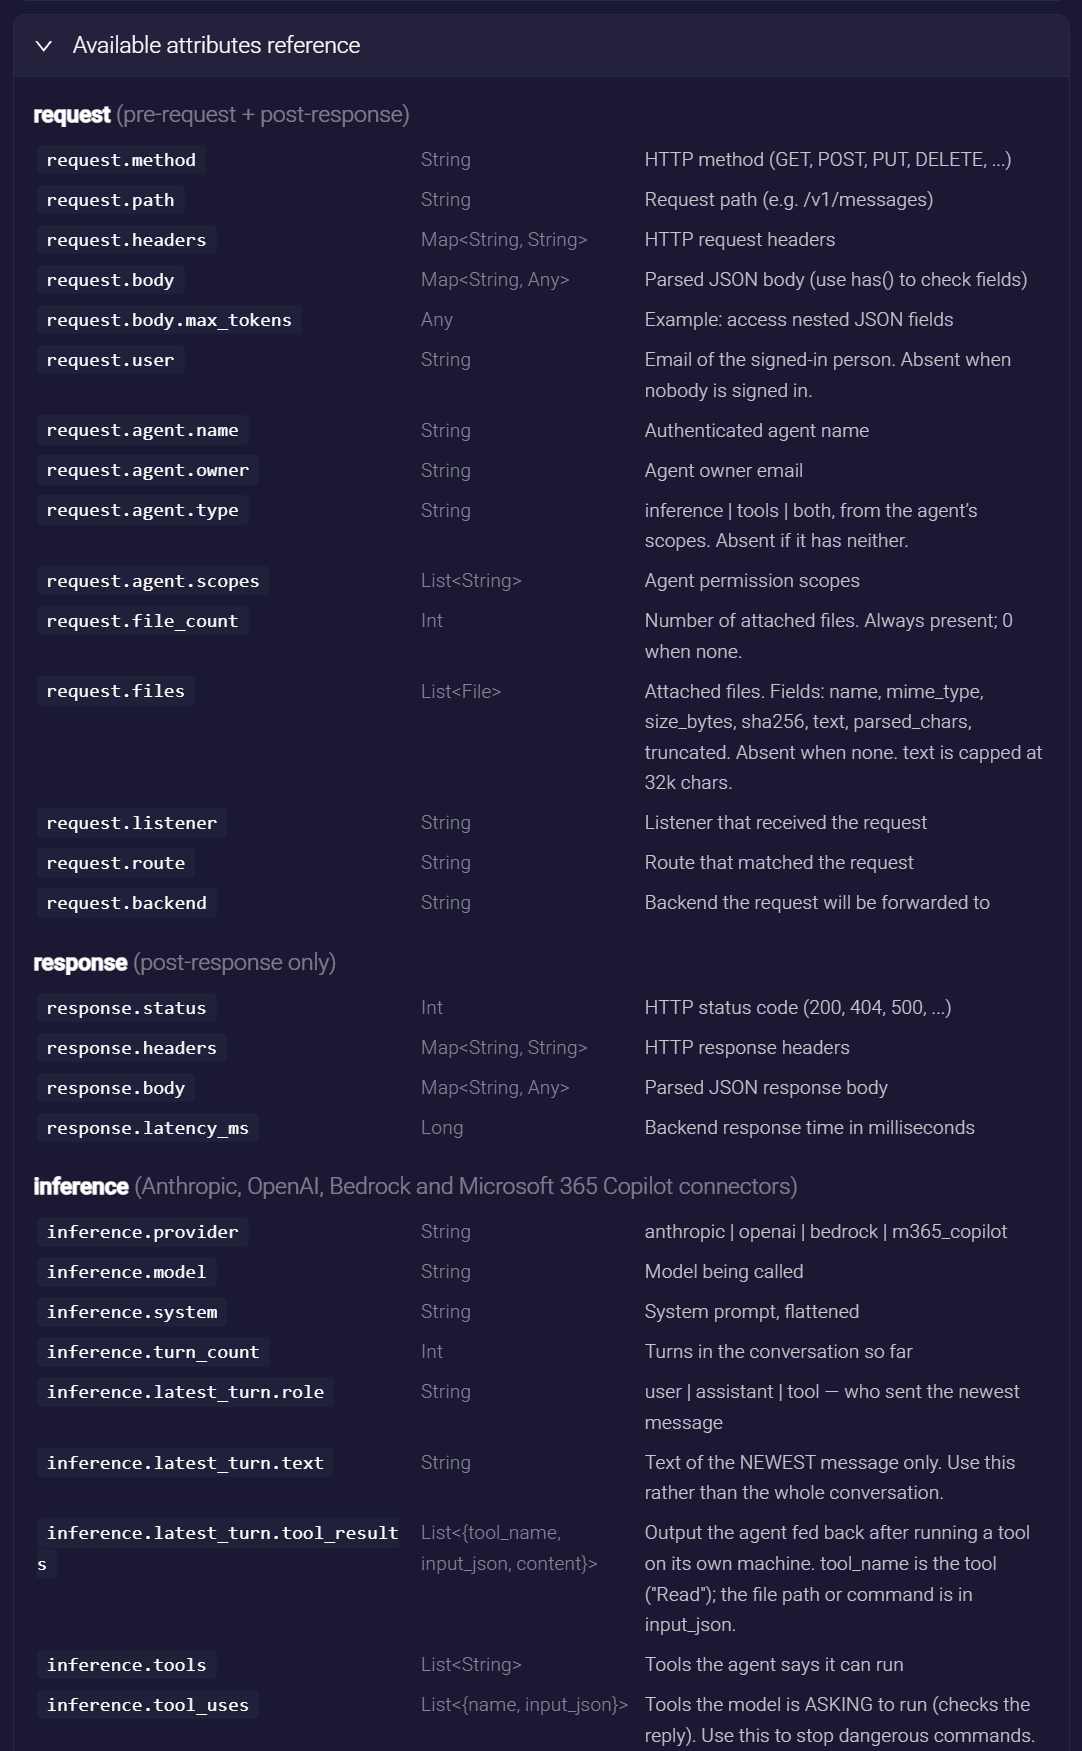
Everything a condition can refer to is listed in the Attribute Reference. The form also links to the CEL language documentation. As you type, the editor suggests attribute names, operators and functions.
A condition can use these operators.
| Write | To mean |
|---|---|
request.method == "DELETE" | Equal to. != means not equal. >, >=, < and <= compare numbers |
a && b, a || b, !a | Both, either, not |
request.path.startsWith("/v1/admin") | Starts with. Also .endsWith(…), .contains(…), and .matches(…) for a regular expression |
has(request.body.max_tokens) | Whether a field is present in a parsed body. Test presence before comparing a value that might be missing |
"write" in request.agent.scopes | Whether a list contains a value |
request.files.exists(f, f.size_bytes > 10485760) | Whether any element of a list passes a test. .all(f, …) tests every element |
Start From an Example
Above the editor, the form offers eleven example conditions as clickable chips:
- Block DELETEs, Large token requests, Specific path, Error responses, Specific agent and Slow responses
- Bedrock: unattributed caller and Bedrock: no MFA
- M365: Copilot Studio agents only
- Files: confidential attachment and Files: over 10 MB
Click one to load it into the editor, then adjust it. Policy Examples explains each one, with its expression.
Starting from an example and changing one thing at a time is the fastest way to a correct condition. The examples also show the habit worth copying: a rule that says which traffic it is about, such as connector.template == "AWS_BEDROCK" && ….
Look Up an Attribute
Below the editor, expand Available attributes reference. It lists every attribute by group, with its type and a one-line meaning. The groups, in order, are request, response, inference for the conversation on inference connectors, connector, tool / data for data classification, connector.aws.bedrock for the AWS caller on Bedrock connectors, and connector.m365.copilot for the Copilot details on Microsoft 365 connectors. It carries the same warnings as the Attribute Reference about attributes that are present only when resolved.
Say Which Traffic the Rule Is About
Lead the condition with an attribute that is always present on the traffic you mean:
connector.templateorconnector.name, on any connectorconnector.aws.bedrock.identity_source, on Bedrockconnector.m365.copilot.surface, on Copilotrequest.file_count, for files
A condition on a missing attribute is never true. See How Policies Are Evaluated.
A Reply-Side Rule on a Model Connector
A condition can read the model's reply, through inference.tool_uses or inference.completion.*, in a Post-Response policy. The form then shows the warning Enforcing this rule will stop the model's reply at the tool call, and explains what the user will see. Keep such a policy in Observe first. Governing Inference Traffic describes the behavior.
Save, Watch, Promote
When you save, the form checks that the condition compiles. The gateway refuses to enforce REQUIRE_APPROVAL on a condition that reads inference.*. You can save such a rule in OBSERVE, to record where approval would have been required, but not in ENFORCE. The form preselects Observe mode, and you promote the policy to Enforce when its matches look right. See Observe First, Then Enforce.
- Watch. Send the traffic you mean to govern. Each Observe match is recorded as a Would block decision on the connector's Policies tab, so you see exactly which requests the rule caught and which it did not. Open a decision to see the value each part of the condition resolved to. See Investigating a Policy Decision.
- Promote. In the policy list, open the Mode dropdown on the row, and pick
ENFORCE. The gateway asks you to confirm, with Change mode of policy "…"?, and reminds you to check the Observe events first. The same dropdown returns a policy toOBSERVEorDISABLEDat any time. Promoting a Policy to Enforce lists what to check first. - Adjust. Click the row to edit any field except the name. When you change the condition of any policy, the gateway keeps the previous expression. On the connector's Policies tab, the row gains a Restore button that swaps the two back, so you can undo a change in one click.
A rule that matches nothing in Observe mode does nothing in Enforce mode either. Check that the attribute you tested is actually present on that traffic. The Request Log detail panel shows what the gateway resolved for a request. Also check that the connector is in the policy's scope.
The Connector's Policies Tab
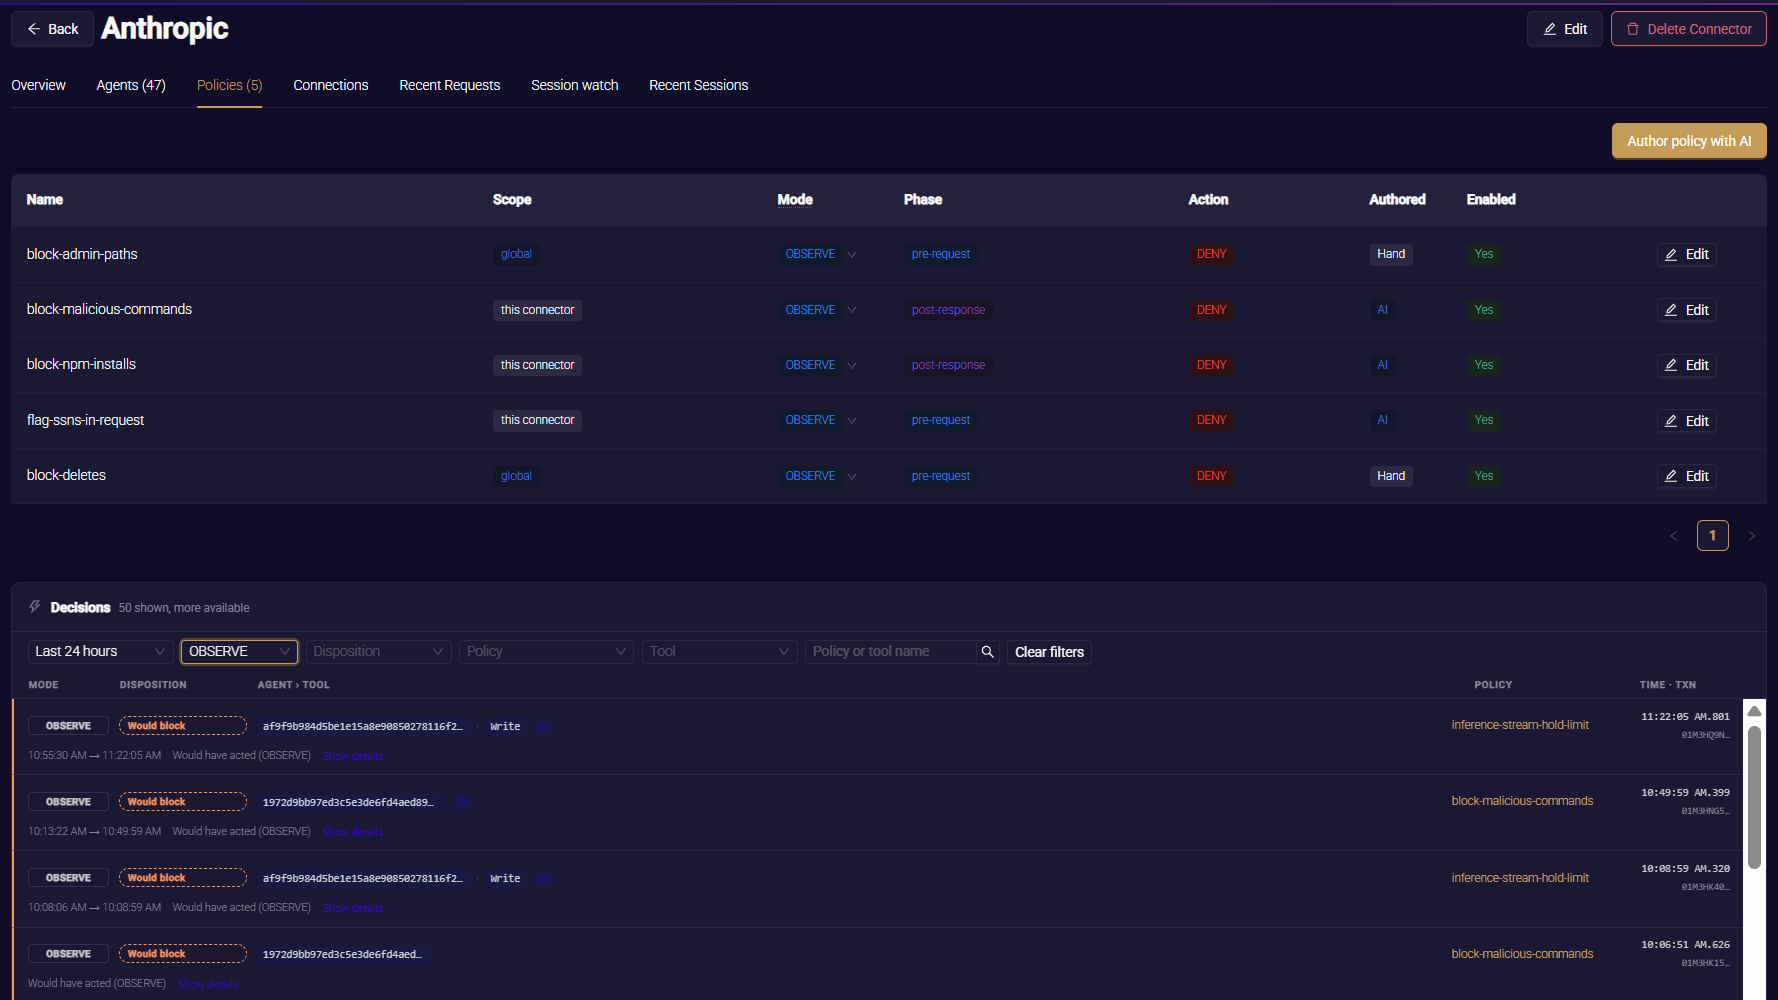
Every connector's detail page has a Policies tab listing every policy that governs it, with the count in the tab's name. Use it when your question is about one connector: what governs this provider's traffic, and what has it caught?
- The Scope column shows whether each policy is scoped to this connector, or is global: an unscoped policy that applies to every connector.
- Each row has the same Mode dropdown as the main list, an Edit button, and Restore where a previous expression exists.
- Author policy with AI at the top opens the wizard, already pointed at this connector.
Beneath the list, the Decisions card shows what those policies did to this connector's traffic: the blocks, holds and Observe matches. You can filter them, page through them, and open them one at a time. Investigating a Policy Decision walks through it.
Related
- How Policies Are Evaluated — what each field does to a live request
- Attribute Reference — every attribute a condition can test
- Policy Examples — the example chips and more, each with its expression
- Investigating a Policy Decision — what a policy did, to which request, and why it matched